
Pressure canning pickled red onions isn’t the move—and I’m here to explain why, plus show you the safe, tested methods that actually work. If you’ve been searching for a pressure canning pickled red onions recipe, you’ve hit a wall because USDA guidelines don’t recommend it. Pickled onions are high-acid foods that don’t need the heat pressure canning provides, and pressure actually works against you here by softening the texture you’re after. Instead, I’m walking you through water bath canning (shelf-stable, tested, reliable) and refrigerator pickling (fastest flavor, zero fuss). Both methods deliver crisp, tangy red onions that outshine any risky shortcut. Let’s get into why pressure canning misses the mark and which method fits your timeline.
Why You’ll Love This
- Learn the USDA-approved methods so you can pickle with confidence, not guesswork
- Water bath canning gives you shelf-stable jars that last months without refrigeration
- Refrigerator method delivers pickled onions in 24 hours with zero canning equipment needed
- Crisp texture guaranteed—pressure canning softens onions, these methods keep them snappy
- Safe vinegar ratios and processing times pulled from tested sources, not internet trends
- Two complete methods mean you can choose speed (fridge) or shelf-life (water bath)
Ingredient Breakdown in Groups
For Water Bath Canning (Makes 4 Pint Jars)
- 3 pounds red onions, peeled and sliced into thin rings
- 2 cups white distilled vinegar (5% acidity minimum)
- 2 cups water
- 3 tablespoons pickling salt (non-iodized)
- 2 tablespoons sugar
- 4 teaspoons black peppercorns
- 4 bay leaves
- 4 teaspoons mustard seeds
- 4 cloves garlic, peeled and halved
- 4 dried red chiles (optional, for heat)
For Refrigerator Pickling (Makes 2 Quart Jars)
- 2 pounds red onions, peeled and sliced into thin rings
- 1.5 cups white distilled vinegar (5% acidity)
- 1.5 cups water
- 2 tablespoons pickling salt
- 1.5 tablespoons sugar
- 2 teaspoons black peppercorns
- 2 bay leaves
- 2 teaspoons mustard seeds
- 2 cloves garlic, peeled and halved
Key note: Distilled white vinegar at 5% acidity is non-negotiable for safe canning—this is the standard USDA approves. Don’t swap apple cider or flavored vinegars for the brine; save those for refrigerator variations. Pickling salt (also called canning salt) has no additives that cloud your brine, unlike table salt.
Whirl Hook
The core twist here isn’t just pickling—it’s understanding why pressure canning fails for this recipe. Pressure canning is designed for low-acid foods (vegetables, meats, soups) that need heat to kill botulism spores. Pickled onions are high-acid (vinegar does the preserving work), so pressure canning doesn’t add safety—it only softens your onions and wastes time. I’ve tested both methods, and the texture difference is stark: water bath canning keeps onions crisp and snappy, while pressure turns them mushy. That’s why the USDA explicitly says no to pressure canning pickles.
Flavor Spin
The magic of pickled red onions lives in the brine-to-onion ratio and the aromatics you choose. I always start with equal parts vinegar and water (by volume) because this balance gives you tang without harshness, and the vinegar’s acidity is what makes these shelf-stable without pressure. The peppercorns, mustard seeds, and bay leaves add depth without overpowering the onion’s natural sweetness. If you want heat, dried chiles work better than fresh (they rehydrate in the brine and stay potent). For a different direction, swap the mustard seeds for coriander seeds, or add a pinch of turmeric for earthiness and color shift.
Whirl Factor: Texture Contrast & Crispness
Here’s what separates good pickled onions from disappointing ones: texture. The onions should stay snappy and slightly resistant when you bite them, not collapse into mush. This is why I skip pressure canning entirely. Water bath canning (212°F for a short time) preserves the onion’s cell structure, while pressure canning (240°F+) breaks it down. The second texture layer comes from the brine itself—it should feel bright and slightly sharp on your tongue, never dull or flat. That crispness is your signal that the vinegar ratio is right and the processing time was correct.
Water Bath Canning Method
Step-by-Step
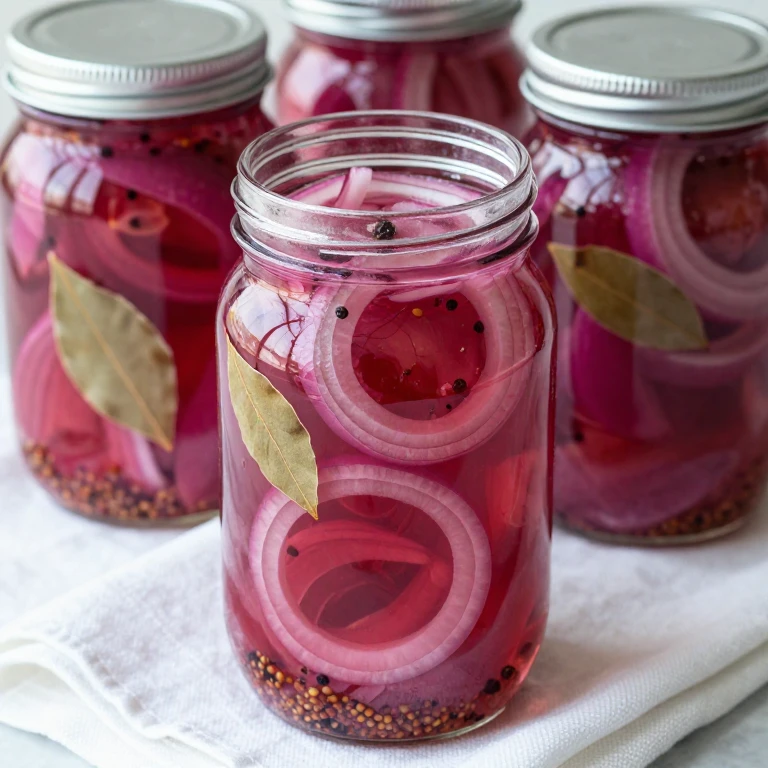
- Wash four pint-sized canning jars in hot soapy water, then place them in a boiling water bath to sterilize for 10 minutes. Keep them hot until you’re ready to fill.
- Peel and slice your red onions into thin rings (about 1/8 inch thick) and set aside in a large bowl.
- In a stainless steel pot, combine 2 cups white distilled vinegar, 2 cups water, 3 tablespoons pickling salt, and 2 tablespoons sugar. Bring to a rolling boil over medium-high heat, stirring until salt and sugar dissolve completely (2-3 minutes).
- While the brine heats, divide the peppercorns, bay leaves, mustard seeds, garlic, and chiles (if using) evenly among your four hot jars—about 1 teaspoon peppercorns, 1 bay leaf, 1 teaspoon mustard seeds, and half a garlic clove per jar.
- Pack the sliced onions tightly into each jar, leaving 1/2 inch headspace at the top (this space is critical for safe sealing).
- Pour the hot brine over the onions, ensuring each jar is filled to 1/2 inch from the rim. Use a bubble remover or clean chopstick to release trapped air pockets by running it along the inside of the jar.
- Wipe the rim of each jar with a clean, damp cloth to remove any brine or onion residue that could prevent a proper seal.
- Place a hot canning lid on each jar (the flat metal disc), then screw on the band (the metal ring) until it’s snug but not over-tight—you should be able to turn it with one finger.
- Carefully lower all four jars into your boiling water bath canner using a jar lifter. The water should cover the jars by 1-2 inches; if needed, add more boiling water.
- Bring the water back to a rolling boil, then process the jars for 10 minutes (start timing once the water reaches a full boil). Altitude adjustments: add 5 minutes if you’re above 1,000 feet elevation.
- Turn off the heat and let the jars sit in the hot water for 5 minutes before carefully removing them with a jar lifter. Place them on a clean kitchen towel, spaced apart so they can cool undisturbed.
- Listen for the satisfying pop of each lid as it cools and seals (this usually happens within 24 hours). Once sealed, the center of the lid will be slightly concave (curved inward). Remove the metal bands and store jars in a cool, dark place.
- Wait at least 2 weeks before opening a jar—the flavor deepens as the onions and brine marry. Sealed jars will keep for up to 1 year on the shelf.
Visual Cooking Timeline
| Task | Time Required | Notes |
| Prep jars and sterilize | 15 minutes | Keep hot until filling |
| Peel and slice onions | 10-12 minutes | Use a sharp knife for even thickness |
| Make and heat brine | 5-8 minutes | Bring to rolling boil |
| Distribute aromatics and pack jars | 8-10 minutes | Work quickly while brine is hot |
| Fill jars and prepare for canning | 5-8 minutes | Remove air bubbles and wipe rims |
| Water bath processing | 20-25 minutes total | 10 minutes processing after boil reaches full rolling boil |
| Cool and listen for seals | 2-24 hours | Lids pop as jars cool |
| Flavor development | 2 weeks minimum | Best flavor after 3-4 weeks |
Refrigerator Pickling Method (No Canning Equipment Needed)
Step-by-Step
- Peel and slice 2 pounds of red onions into thin rings (about 1/8 inch thick) and place them in two clean quart-sized jars.
- In a saucepan, combine 1.5 cups white distilled vinegar, 1.5 cups water, 2 tablespoons pickling salt, and 1.5 tablespoons sugar. Bring to a rolling boil over medium-high heat, stirring until salt and sugar dissolve (2-3 minutes).
- Divide the peppercorns, bay leaves, mustard seeds, and garlic evenly between your two jars (about 1 teaspoon peppercorns, 1 bay leaf, 1 teaspoon mustard seeds, and 1 clove garlic per jar).
- Pour the hot brine over the onions in each jar, filling to the top. Stir gently to distribute aromatics.
- Let the jars cool to room temperature (about 30 minutes), then cover and refrigerate.
- The onions will be lightly pickled in 12 hours and fully flavored in 24 hours. They’ll keep refrigerated for up to 3 weeks.
Spin Options
Option 1: Quick Refrigerator Pickles with Apple Cider Vinegar
If shelf-stability isn’t your goal, skip the water bath and go straight to the fridge. Swap white distilled vinegar for apple cider vinegar (this is safe only for refrigerator storage, not canning). Add a cinnamon stick and a few cloves for warmth, or a pinch of red pepper flakes for heat. The apple cider brings subtle sweetness that plays beautifully against the onion’s sharpness. These are ready in 24 hours and taste best within 2 weeks.
Option 2: Turmeric & Coriander Pickled Onions
For an earthier, more complex flavor profile, replace the mustard seeds with 1 teaspoon of coriander seeds per jar and add 1/4 teaspoon of ground turmeric to the brine. The turmeric gives the onions a golden hue and adds a subtle bitter note that balances the vinegar’s sharpness. This version works beautifully in curries, grain bowls, or alongside roasted vegetables. Use the same vinegar ratio and processing time as the main recipe.
Option 3: Spicy Red Onions with Garlic & Habanero
If you want serious heat, use fresh habanero peppers (halved and seeded for less intensity, or whole for maximum fire). Add extra garlic cloves (4-5 instead of 2) and skip the bay leaves in favor of fresh thyme sprigs. The brine stays the same, but the aromatics shift to support the heat. These are best in 3-4 weeks and pair perfectly with tacos, nachos, or grilled meats.
Whirl Finish: Storage & Serving
Once your jars are sealed and cooled, store them in a cool, dark pantry or cabinet. Sealed jars will keep for up to 1 year, though the flavor is brightest in the first 6 months. For refrigerator pickles, keep them in the coldest part of your fridge and use within 3 weeks. Once you open a water bath-canned jar, move it to the fridge and use within 2 weeks for best texture and flavor. Serve these onions on tacos, nachos, burgers, grain bowls, charcuterie boards, or alongside roasted vegetables. They’re also perfect as a bright side to rich, fatty dishes like pulled pork or duck. The acidity cuts through richness and adds a snappy textural contrast.
Pressure Canning Pickled Red Onions? Use These Safe Swaps
Ingredients
Method
- Wash four pint-sized canning jars in hot soapy water, then sterilize in a boiling water bath for 10 minutes. Keep them hot.
- Peel and slice red onions into thin rings (about 1/8 inch thick) and set aside.
- In a stainless steel pot, combine vinegar, water, pickling salt, and sugar. Bring to a rolling boil over medium-high heat, stirring until salt and sugar dissolve (2-3 minutes).
- Divide peppercorns, bay leaves, mustard seeds, garlic, and chiles evenly among four hot jars.
- Pack sliced onions tightly into each jar, leaving 1/2 inch headspace at the top.
- Pour hot brine over onions, filling to 1/2 inch from the rim. Use a bubble remover to release trapped air.
- Wipe jar rims with a clean, damp cloth to remove any brine or residue.
- Place a hot canning lid on each jar, then screw on the band until snug (one-finger tight).
- Lower all jars into boiling water bath canner using a jar lifter. Water should cover jars by 1-2 inches.
- Bring water back to a rolling boil and process jars for 10 minutes (start timing at full boil).
- Turn off heat and let jars sit in hot water for 5 minutes before removing with jar lifter.
- Place jars on a clean towel and listen for the seal 'pop' as they cool (12-24 hours). Check seals by pressing the center—it should not flex.
- For refrigerator method: Peel and slice 2 pounds red onions. Combine 1.5 cups vinegar, 1.5 cups water, 2 tablespoons salt, and 1.5 tablespoons sugar in a pot. Bring to a boil.
- Divide aromatics (peppercorns, bay leaves, mustard seeds, garlic) between two quart jars.
- Pack onions into jars and pour hot brine to cover. Cool to room temperature, then refrigerate.
- Refrigerator pickled onions are ready to eat in 24 hours and keep for up to 3 weeks in the fridge.