
Canned pickled red onions are a game-changer for any kitchen—tangy, crisp, shelf-stable jars of pure flavor that transform tacos, grain bowls, and charcuterie boards in seconds. I’ve tested vinegar ratios, spice combinations, and water bath processing to give you a method that delivers restaurant-quality results without the guesswork. This isn’t a quick refrigerator pickle; it’s a proper canned preserve that sits pretty on your pantry shelf for months, ready to brighten any plate. The Whirl Factor here is the texture contrast—you get that snappy crunch against the soft, tangy bite of the onion, all locked in by a foolproof water bath seal.
Why You’ll Love This
- Shelf-stable for up to 1 year when processed correctly—no fridge real estate needed
- Crisp, snappy texture that stays intact through proper cooling and storage
- Tested vinegar ratios prevent mushiness and ensure food safety
- One batch fills 4-5 jars, perfect for gifts or stocking your pantry
- Customizable spice options let you build flavor without changing the brine safety
- Ready to use straight from the jar as a condiment, salad topper, or taco finish
Ingredient Breakdown
For the Brine
- 2 cups white vinegar (5% acidity—check the label)
- 1 cup water
- 2 tablespoons pickling salt (or kosher salt, not table salt)
- 2 tablespoons sugar
- 1 teaspoon black peppercorns
- 2 bay leaves
- 1 teaspoon mustard seeds
- 2-3 garlic cloves, peeled and halved
For the Jars
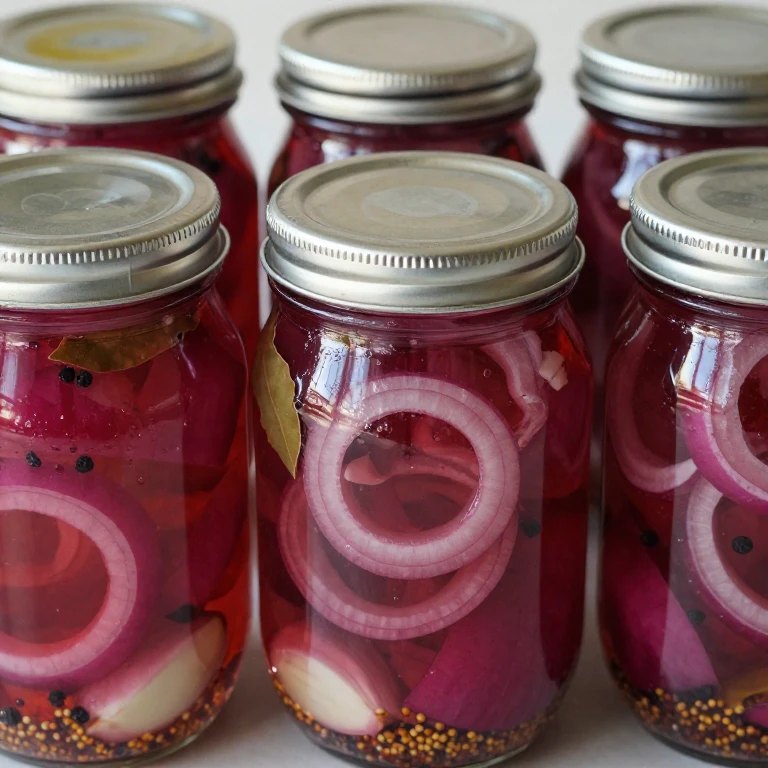
- 3 pounds red onions, peeled and sliced into thin rings (about 1/8-inch)
- 4-5 clean, hot half-pint canning jars (8 oz each)
- 4-5 new, unused canning lids and bands
The vinegar ratio is critical here—5% acidity is the standard for safe water bath canning. I always verify the label on my vinegar bottle before starting. The salt keeps the onions crisp, while the spices are flexible; swap mustard seeds for coriander, or add a pinch of red pepper flakes if you want heat.
Flavor Spin
The core twist in this recipe is the dual-texture contrast: crisp, snappy onion rings suspended in a bright, tangy brine that stays perfectly balanced. I’ve dialed in the vinegar-to-water ratio to prevent the onions from softening while keeping the brine safe for water bath processing. The mustard seeds and bay leaves add subtle depth without overpowering the clean, sharp finish. This is pickled onion done right—no mushiness, no off-flavors, just reliable, delicious results every time you open a jar.
Whirl Factor
What makes this stand out: the snap-and-tang contrast. You bite into a crisp onion ring and hit that bright vinegar brine immediately, with just enough sweetness to balance the acid. That texture holds because the brine ratio and processing time are dialed in. The spice notes—bay, mustard seed, peppercorn—sit quietly in the background, letting the onion shine. It’s the difference between a jar that tastes like an afterthought and one that feels intentional and professional.
Step-by-Step
- Fill a large pot with water and bring to a boil. Place clean canning jars on a rack in the pot, or in a separate pot of simmering water, to keep them hot while you prep. This prevents thermal shock when you fill them.
- Peel the red onions and slice them into thin rings, about 1/8-inch thick. You should have roughly 8-9 cups of sliced onions. Set aside in a large bowl.
- In a medium saucepan, combine the white vinegar, water, pickling salt, and sugar. Bring to a rolling boil over medium-high heat, stirring occasionally until the salt and sugar dissolve completely, about 3-4 minutes.
- Add the peppercorns, bay leaves, mustard seeds, and garlic to the brine. Simmer for 1-2 minutes to bloom the spices, then remove from heat.
- Carefully remove one hot jar from the water using tongs or a jar lifter. Place it on a clean, heat-safe surface. Pack the jar with sliced red onions, leaving about 1/2-inch of headspace at the top.
- Pour the hot brine over the onions, filling to 1/2-inch from the rim. Use a bubble remover tool or a thin knife to release any trapped air bubbles by gently sliding it along the inside of the jar. Wipe the rim clean with a damp cloth.
- Place a hot canning lid on the jar and screw the band on firmly but not too tight—you should be able to turn it with one finger. Repeat with remaining jars until all brine is used.
- Return the filled jars to the hot water bath, ensuring they are covered by at least 1 inch of water. Bring the water back to a rolling boil and process for 10 minutes (adjust for altitude if you’re above 1,000 feet—add 1 minute per 1,000 feet).
- Turn off the heat and let the jars sit in the hot water for 5 minutes before removing them with a jar lifter. Place them on a clean towel, spacing them 2-3 inches apart, and let them cool completely at room temperature for 12-24 hours.
- Check the seals: the center of each lid should be flat or slightly concave and should not pop when pressed. If a jar didn’t seal, refrigerate it and use within 2-3 weeks. Sealed jars keep for up to 1 year in a cool, dark pantry.
Visual Cooking Timeline
- 0:00 — Fill water bath pot, bring to boil, place clean jars in hot water to keep them hot
- 0:10 — Peel and slice red onions into thin rings, set aside
- 0:15 — Combine vinegar, water, salt, and sugar in saucepan, bring to rolling boil
- 0:18 — Stir until salt and sugar dissolve, then add spices and simmer 1-2 minutes
- 0:20 — Remove hot jars one at a time, pack with onions, fill with hot brine
- 0:30 — All jars filled and sealed with lids and bands, return to boiling water bath
- 0:40 — Process for 10 minutes at rolling boil, then turn off heat
- 0:45 — Remove jars and place on clean towel to cool completely (12-24 hours)
Spin Options
Spice Variation 1: Warm & Aromatic — Replace mustard seeds with 1 teaspoon coriander seeds and add 2-3 whole cloves. This builds a warmer, slightly sweet spice profile that pairs beautifully with roasted vegetables and grain bowls.
Spice Variation 2: Bright & Hot — Keep the base brine but add 1/4 to 1/2 teaspoon red pepper flakes (adjust to your heat preference) and 2-3 thin slices of fresh ginger. This version brings heat and a subtle ginger note that’s perfect for tacos and Asian-inspired dishes.
Spice Variation 3: Classic & Herbal — Add 1 teaspoon fresh thyme (or 1/2 teaspoon dried) and 1 teaspoon fresh rosemary (or 1/2 teaspoon dried) to the brine. This creates a more herbaceous finish that works especially well with charcuterie boards and roasted meats.
Quick Tips
- Always check your vinegar label for 5% acidity—this is non-negotiable for safe water bath canning. White vinegar, apple cider vinegar, and distilled vinegar all work; flavored vinegars may affect safety.
- Slice your onions as uniformly as possible so they pickle at the same rate and finish with consistent texture.
- Don’t skip the hot water bath for jars—it prevents thermal shock and helps create a proper seal.
- If a lid doesn’t seal after cooling, don’t reprocess; simply refrigerate that jar and use within 2-3 weeks.
- The onions taste good immediately but develop deeper flavor over 1-2 weeks of sitting, as the brine infuses the rings.
- Store sealed jars in a cool, dark place away from direct sunlight to preserve color and flavor for the full year.
Substitution Ideas
Red onions → Yellow or white onions — Yellow onions are milder and slightly sweeter; white onions are sharper. Texture and cook time stay the same, but flavor profile shifts.
White vinegar → Apple cider vinegar — Use 5% acidity apple cider vinegar for a slightly warmer, fruitier note. Processing time and safety remain unchanged.
Pickling salt → Kosher salt — Use the same weight (or measure by weight, not volume, since salt densities vary). Avoid table salt, which contains anti-caking agents that cloud the brine.
Sugar → Honey — Use 1.5 tablespoons honey in place of 2 tablespoons sugar for a subtle honey note. The sweetness balances similarly, though honey adds slight body to the brine.
Whirl Finish
These jars are ready to use straight from the pantry—no cooking, no fussing. I reach for them as a condiment for tacos, a bright topper for grain bowls, a sharp accent on charcuterie boards, and a quick pickle for nachos. They also make excellent gifts if you label them with the processing date and spice variation. Store sealed jars in a cool, dark pantry for up to 1 year; once opened, keep refrigerated and use within 1 month.
Make-Ahead Options
Day Before: Peel and slice your red onions, store them in an airtight container in the fridge. Prepare your canning jars, lids, and bands, and set them on the counter. Measure out your dry spices into a small bowl so they’re ready to go. This cuts active cooking time in half on canning day.
2 Hours Before: Prepare the brine by combining vinegar, water, salt, and sugar in the saucepan. Let it sit at room temperature; you’ll reheat it just before filling jars. This is a good time to fill your water bath pot and get it heating.
Morning Of: If you’re canning in the afternoon, fill your water bath pot in the morning and let it sit. This gives you a head start on heating and means less wait time when you’re ready to process. Do not make the brine ahead and let it cool—you need it hot when you fill the jars.
FAQ
Can I use a pressure canner instead of a water bath?
No—pressure canning isn’t necessary for pickled onions and can actually soften the texture. Water bath canning is the correct, tested method for this recipe. Pressure canning is used for low-acid foods like vegetables without vinegar; pickled vegetables are acidified and safe for water bath processing.
What if my jars didn’t seal?
Don’t reprocess them. Instead, refrigerate any unsealed jars and use them within 2-3 weeks, treating them as refrigerator pickles. Reprocessing can damage the texture and isn’t reliable. For future batches, ensure your jars and lids are clean and hot, and that you’re wiping rims before sealing.
How long do these last once opened?
Once you open a jar, keep it refrigerated and use the onions within 1 month. The brine stays safe longer, but the onion texture and flavor are best within that window.
Can I adjust the spices without affecting safety?
Yes—you can swap and adjust spices freely. The safety of this recipe comes from the vinegar ratio and processing time, not the spices. Just avoid adding fresh herbs or garlic in large amounts, as these can introduce bacteria. Small amounts of dried spices, seeds, and bay leaves are safe.
Do I need special canning equipment?
You need a large pot (for the water bath), a jar lifter, a bubble remover tool, and new canning lids. A canning rack is helpful but not essential—you can use a folded towel at the bottom of the pot. Most hardware stores and online retailers carry affordable canning kits.
What altitude adjustments do I need?
If you live above 1,000 feet elevation, add 1 minute to the processing time for every 1,000 feet. For example, at 3,000 feet, process for 12 minutes instead of 10. Check your local USDA or National Center for Home Food Preservation guidelines for your exact elevation.
Can I make a smaller batch?
Yes—scale the recipe down proportionally. The brine ratio (2 parts vinegar to 1 part water, plus salt and sugar) stays the same. Process time remains 10 minutes regardless of batch size, as long as your water bath covers the jars by at least 1 inch.
Canned Pickled Red Onions: Safe Water Bath Method
Ingredients
Method
- Fill a large pot with water and bring to a boil. Place clean canning jars on a rack in the pot, or in a separate pot of simmering water, to keep them hot while you prep. This prevents thermal shock when you fill them.
- Peel the red onions and slice them into thin rings, about 1/8-inch thick. You should have roughly 8-9 cups of sliced onions. Set aside in a large bowl.
- In a medium saucepan, combine the white vinegar, water, pickling salt, and sugar. Bring to a rolling boil over medium-high heat, stirring occasionally until the salt and sugar dissolve completely, about 3-4 minutes.
- Add the peppercorns, bay leaves, mustard seeds, and garlic to the brine. Simmer for 1-2 minutes to bloom the spices, then remove from heat.
- Carefully remove one hot jar from the water using tongs or a jar lifter. Place it on a clean, heat-safe surface. Pack the jar with sliced red onions, leaving about 1/2-inch of headspace at the top.
- Pour the hot brine over the onions, filling to 1/2-inch from the rim. Use a bubble remover tool or a thin knife to release any trapped air bubbles by gently sliding it along the inside of the jar. Wipe the rim clean with a damp cloth.
- Place a hot canning lid on the jar and screw the band on firmly but not too tight—you should be able to turn it with one finger. Repeat with remaining jars until all brine is used.
- Return the filled jars to the hot water bath, ensuring they are covered by at least 1 inch of water. Bring the water back to a rolling boil and process for 10 minutes (adjust for altitude if you're above 1,000 feet—add 1 minute per 1,000 feet).
- Turn off the heat and let the jars sit in the hot water for 5 minutes before removing them with a jar lifter. Place them on a clean towel, spacing them 2-3 inches apart, and let them cool completely at room temperature for 12-24 hours.
- Check the seals: the center of each lid should be flat or slightly concave and should not pop when pressed. If a jar didn't seal, refrigerate it and use within 2-3 weeks. Sealed jars keep for up to 1 year in a cool, dark pantry.