
Keto pickled onions are my secret weapon for adding brightness and crunch to low-carb meals without derailing macros. These tangy, crisp onions transform a simple salad into something with real presence, and they’re built on a zero-sugar brine that doesn’t compromise on flavor. I’ve found that the apple cider vinegar base paired with erythritol gives you that sharp, slightly sweet bite you’d expect from traditional pickled onions—but without the sugar crash.
What makes this version work is the method itself. Instead of cooking the brine and waiting days for flavor to develop, I use a quick refrigerator approach that delivers crisp-tender onions in hours. The erythritol dissolves cleanly into the vinegar without leaving that artificial aftertaste you sometimes get with sweeteners, and the result tastes like something you’d find at a high-end taco bar, not a diet hack.
Let me walk you through the process, show you why each component matters, and give you the flexibility to customize based on what you’re serving these with. Whether you’re topping lettuce-wrap burgers, loading up taco bowls, or brightening a grain-free Buddha bowl, these pickled onions deliver the textural contrast that makes keto food feel less like restriction and more like choice.
Quick Snapshot
- Prep Time: 10 minutes
- Cook Time: 0 minutes (no cooking required)
- Total Time: 10 minutes active + 2-4 hours chilling
- Yield: About 2 cups
- Texture: Crisp-tender with bright, tangy bite
- Flavor Profile: Sharp vinegar, subtle sweetness, aromatic spice notes
- Skill Level: Beginner—no special technique required
Why This Recipe Works
The foundation here is ratio. Apple cider vinegar at one cup to one and a half cups water creates enough liquid to fully submerge the onions while keeping the vinegar flavor punchy without being harsh. I use one-third cup erythritol because it dissolves completely into the brine without crystallizing, and it balances the vinegar’s sharpness just enough to make the onions crave-worthy rather than medicinal.
Temperature matters more than you’d think. By keeping everything at room temperature during the initial pickling phase, the onions stay crisp instead of softening. The brine penetrates the layers quickly because the onions are sliced thin—roughly quarter-inch—which gives you maximum surface area for flavor absorption without turning them mushy.
Sea salt at one teaspoon per cup of brine draws out the onions’ natural moisture while seasoning the brine itself. This osmotic exchange is what gives you that firm bite even after hours of sitting in liquid. The optional additions—dill, peppercorns, red pepper flakes—aren’t garnish; they infuse into the brine and create flavor layers that deepen over the first day.
Ingredient Overview
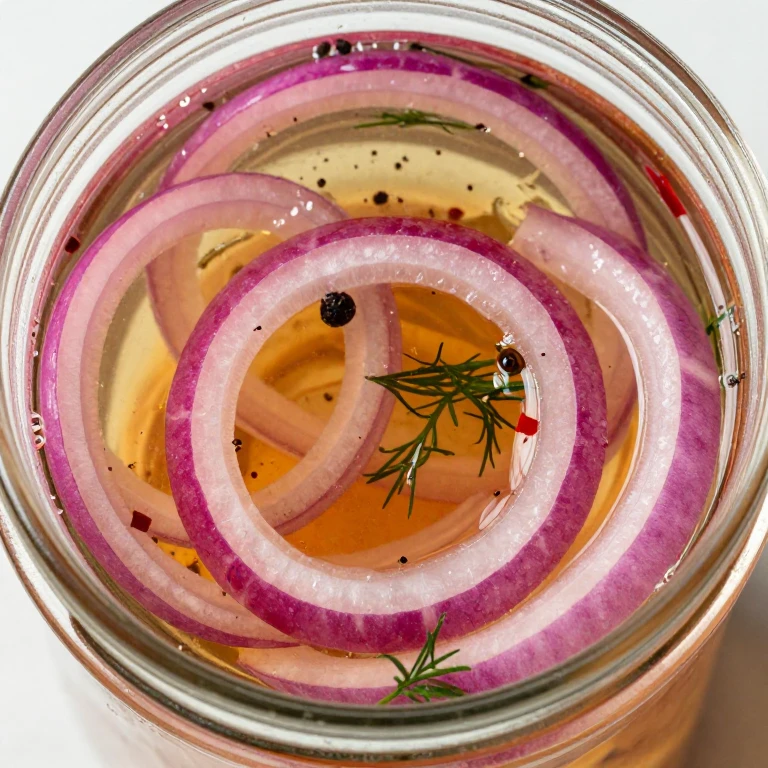
- Onions: 1 pound red or yellow onions (about 3 medium), sliced into quarter-inch rings
- Brine Base:
- 1 cup apple cider vinegar (with the mother, or filtered)
- 1.5 cups water
- 1 teaspoon sea salt
- 1/3 cup erythritol or monk fruit sweetener
- Optional Aromatics:
- 1 teaspoon black peppercorns
- 1/2 teaspoon red pepper flakes
- 3-4 fresh dill sprigs (or 1 teaspoon dried dill)
- 2 bay leaves
Red onions give you the most visual pop and tend to hold their crispness better than yellow varieties, but either works. The key is slicing them consistently so they pickle at the same rate. I use a mandoline for this, but a sharp knife and steady hand work just fine.
Apple cider vinegar with the mother—that cloudy sediment—adds complexity to the brine. If you only have filtered ACV, that’s perfectly fine; the pickling will work identically, just with a cleaner appearance. Erythritol is my choice here because it has minimal cooling effect compared to monk fruit, which can leave a slight menthol note. If you prefer monk fruit, use the same amount and expect a marginally sweeter profile.
The aromatics are flexible. Dill adds herbal brightness, peppercorns bring heat, and red pepper flakes create a subtle kick. You can use all of them, none of them, or any combination depending on what you’re serving these with. I typically add dill and peppercorns for general use, then make a second batch with red pepper flakes for spicy applications like taco bowls.
Whirl Hook
Here’s the twist: traditional pickled onions rely on sugar to balance vinegar’s harshness. I’m using erythritol to hit that sweet-tart note while keeping carbs at zero. The result tastes like the real thing—bright, complex, crave-worthy—without the blood sugar impact. This is what makes keto pickled onions feel like an upgrade instead of a compromise.
Flavor Spin
The core flavor dynamic here is vinegar-forward with a subtle sweetness that arrives at the end of each bite. Apple cider vinegar brings earthiness and complexity that white vinegar can’t match. The erythritol dissolves completely into the brine, so you get sweetness as a flavor note, not a texture element. This combination creates balance: the vinegar’s sharpness pulls your taste buds forward, and the sweetness keeps them engaged without overwhelming the savory elements.
Whirl Factor
The texture contrast is what makes these special. You get crisp, snappy onion layers that resist the brine instead of absorbing it completely. The brine itself stays clean and bright, never turning syrupy or heavy. When you bite into a pickled onion, you get that immediate crunch followed by the tangy, slightly sweet flavor blooming across your palate. This textural snap is what transforms a salad from functional to memorable, and it’s what keeps people reaching for seconds.
Step-by-Step Instructions
- Prepare the onions. Slice your onions into quarter-inch rings, working from root to tip so the layers stay intact. You want pieces that are thin enough to absorb flavor quickly but sturdy enough to hold their crunch. This should take about 5 minutes. Place the sliced onions in a clean glass jar or bowl.
- Combine the brine. In a separate container, whisk together apple cider vinegar, water, sea salt, and erythritol. Stir until the erythritol dissolves completely—this takes about 1 minute of steady whisking. You shouldn’t see any sweetener crystals remaining. If you’re using aromatics, add them now: peppercorns, red pepper flakes, dill, and bay leaves all go into the brine.
- Pour the brine over the onions. Pour the mixture over your sliced onions, making sure every piece is submerged. If some onions float to the surface, place a small glass or ramekin on top to keep them under the liquid. Submerged onions pickle evenly; exposed pieces will oxidize and turn brown.
- Chill and taste. Cover the jar and refrigerate for at least 2 hours. At the 2-hour mark, taste a piece. The flavor will be bright and vinegary with a subtle sweetness. If you prefer more developed flavor, let them sit for 4 hours or overnight. The longer they sit, the more the aromatics infuse and the more the onions soften slightly (still crisp, just less snappy).
- Transfer to storage. Once they’ve reached your preferred flavor intensity, transfer the pickled onions and brine to an airtight container. They’ll keep refrigerated for up to 2 weeks, though the crispness gradually softens after about 10 days.
Pro Tips for Best Results
- Slice consistency matters. Uneven thickness means uneven pickling. Some pieces will be mushy while others stay crunchy. I use a mandoline set to quarter-inch, but if you’re using a knife, aim for pieces that are roughly the same width. This takes an extra 2 minutes but pays off in texture.
- Don’t skip the erythritol dissolution step. If sweetener crystals remain in the brine, they’ll create a gritty mouthfeel and won’t distribute evenly. Whisk for a full minute, then look at the liquid against the light. You should see nothing but clear brine.
- Keep the onions submerged. Exposed onions oxidize and turn brown or develop an off flavor. Use a small weight—a glass, ramekin, or even a small plate—to keep everything under the liquid. This is especially important in the first few hours.
- Taste at 2 hours, not before. The brine needs time to penetrate the onion layers. At 1 hour, they’ll taste mostly like raw onions with vinegar on the outside. By 2 hours, the flavor has moved inside.
- Make a double batch and freeze the extras. Pickled onions freeze beautifully for up to 3 months. Thaw them in the refrigerator, and they’ll have the same crispness as fresh. This is a massive time-saver for meal prep.
- Adjust sweetness to your preference. Some people prefer their pickled onions more tart, others more balanced. Start with one-third cup erythritol, taste at 2 hours, and add a teaspoon more if you want additional sweetness. You can’t remove sweetness once it’s in, so go conservative on the first batch.
Spin Options
Spicy Sriracha Version
Add 1 tablespoon sriracha and 1/2 teaspoon red pepper flakes to the brine. The sriracha adds garlic and chili complexity while the red pepper flakes create a building heat. This version is excellent on spicy taco bowls, over grain-free nachos, or alongside grilled chicken. The flavor develops more aggressively, so taste at 1.5 hours instead of 2.
Herb-Forward Dill and Tarragon
Use 4 fresh dill sprigs and 2 fresh tarragon sprigs instead of the basic aromatics. Tarragon brings an anise-like sweetness that pairs beautifully with lighter proteins like fish or chicken. This version works particularly well in grain-free Buddha bowls or alongside cured salmon. The herbal notes are more delicate, so let these sit for at least 3 hours before tasting.
Mustard Seed and Turmeric
Add 1 tablespoon yellow mustard seeds, 1/2 teaspoon turmeric, and 1/4 teaspoon cumin to the brine. This creates a more complex, spiced-forward profile that works beautifully on pulled pork, over roasted vegetables, or in grain-free grain bowls. The mustard seeds add a subtle pop, and the turmeric creates an earthy undertone. This version benefits from 4 hours of chilling to let the spices fully integrate.
Whirl Finish
These pickled onions are at their crispest in the first 2-3 days, so I use them immediately on salads, taco bowls, and burgers. After about a week, they soften slightly but the flavor deepens, making them perfect for chopping and mixing into grain-free grain bowls or using as a topping for roasted vegetables. The brine itself becomes liquid gold—use it as a salad dressing base, add it to marinades, or sip a tablespoon for digestive support.
Serving Suggestions
Layer these on top of lettuce-wrap burgers alongside avocado and a fried egg for crisp, tangy contrast that cuts through the richness. The sharp flavor and snappy texture make the entire burger feel more substantial and intentional.
Scatter them over a grain-free Buddha bowl with roasted cauliflower, shredded chicken, avocado, and a tahini dressing. The pickled onions add brightness and crunch that prevents the bowl from feeling heavy or monotonous.
For an elevated option, use them as a topping for smoked salmon and cream cheese on cucumber rounds or keto crackers. The vinegar cuts through the richness of the salmon and cream cheese, creating a bite that feels restaurant-quality and completely keto-friendly.
Storage & Reheating
Pickled onions don’t require reheating—they’re best served cold or at room temperature. Store them in an airtight glass container in the refrigerator for up to 2 weeks. The first 3 days are when they’re crispest; after that, they gradually soften but remain flavorful for the full 2 weeks.
For freezing, transfer the onions and brine to a freezer-safe container and freeze for up to 3 months. Thaw in the refrigerator overnight. The texture will be slightly softer than fresh, but the flavor remains intact and they work beautifully in cooked applications like grain-free grain bowls or as a burger topping.
The brine itself keeps indefinitely in the refrigerator. Once you’ve used up the onions, use the brine to pickle a new batch of onions (they’ll be ready in about 1.5 hours since the brine is already seasoned), or use it as a salad dressing base, marinade ingredient, or digestive aid.
FAQ
Can I use white vinegar instead of apple cider vinegar?
You can, but the flavor will be harsher and less complex. Apple cider vinegar brings earthiness and subtle sweetness that white vinegar lacks. If you only have white vinegar on hand, reduce the amount to three-quarters cup and increase the water to two cups to mellow the sharpness. The result will be more one-dimensional but still functional for taco bowls and burgers.
What if I don’t have erythritol? Can I use monk fruit or stevia?
Monk fruit works beautifully and uses the same one-third cup measurement. Stevia is much more concentrated, so use only one-quarter teaspoon and taste at 1 hour to avoid over-sweetening. Both will create the same sweet-tart balance; monk fruit brings slightly more sweetness while stevia creates a crisper finish. Avoid sugar alcohols like xylitol, which can cause digestive distress.
How thin should I slice the onions?
Aim for quarter-inch thickness. This is thin enough for the brine to penetrate quickly and evenly, but thick enough to maintain crispness even after sitting in liquid for several days. If you slice thinner than this, the onions will soften too quickly and lose their snap. If you slice thicker, they’ll take longer to pickle and won’t soften enough to bite through easily.
Can I make these without aromatics?
Absolutely. The base brine of vinegar, water, salt, and erythritol is complete on its own and delivers bright, tangy pickled onions. Aromatics like dill, peppercorns, and bay leaves add complexity and depth, but they’re entirely optional. If you prefer simplicity or want to make these ahead without committing to a specific flavor profile, the basic version works perfectly.
Do I need to sterilize the jar before using it?
For short-term storage (up to 2 weeks), a clean jar is sufficient. Wash it thoroughly with hot soapy water and rinse well. If you’re planning to store these for longer than 2 weeks or want to process them for shelf stability, sterilize the jar by running it through the dishwasher on the hot cycle or boiling it for 10 minutes.
Can I eat these immediately or do they need to sit?
You can technically eat them after 30 minutes, but they’ll taste mostly like raw onions with vinegar on the outside. The flavor really develops between 2-4 hours as the brine penetrates the onion layers. I recommend waiting at least 2 hours for the best balance of crispness and flavor absorption.
Why do my pickled onions turn brown?
This happens when onions are exposed to air during pickling. Make sure every piece is submerged under the brine, using a small weight if necessary. Browning doesn’t affect the taste, but it indicates oxidation, which can slightly compromise texture. Keep them fully submerged and this won’t happen.
Keto Pickled Onions Recipe With ACV and Erythritol
Ingredients
Method
- Slice your onions into quarter-inch rings, working from root to tip so the layers stay intact. You want pieces that are thin enough to absorb flavor quickly but sturdy enough to hold their crunch. This should take about 5 minutes. Place the sliced onions in a clean glass jar or bowl.
- In a separate container, whisk together apple cider vinegar, water, sea salt, and erythritol. Stir until the erythritol dissolves completely—this takes about 1 minute of steady whisking. You shouldn't see any sweetener crystals remaining. If you're using aromatics, add them now: peppercorns, red pepper flakes, dill, and bay leaves all go into the brine.
- Pour the mixture over your sliced onions, making sure every piece is submerged. If some onions float to the surface, place a small glass or ramekin on top to keep them under the liquid. Submerged onions pickle evenly; exposed pieces will oxidize and turn brown.
- Cover the jar and refrigerate for at least 2 hours. At the 2-hour mark, taste a piece. The flavor will be bright and vinegary with a subtle sweetness. If you prefer more developed flavor, let them sit for 4 hours or overnight. The longer they sit, the more the aromatics infuse and the more the onions soften slightly.
- Once they've reached your preferred flavor intensity, transfer the pickled onions and brine to an airtight container. They'll keep refrigerated for up to 2 weeks, though the crispness gradually softens after about 10 days.