
Strawberry mousse cakes sit at the intersection of elegance and technique—they demand precision with gelatin, layering discipline, and an understanding of how temperature shapes texture. I’ve found that the difference between a flat, rubbery mousse and one that holds its silky structure comes down to bloom time, whipping angle, and stabilization method. These twelve concepts push beyond basic mousse into territory where airy layers meet intentional shine, crunch, and flavor inserts that actually matter. I’ve organized them by texture approach: stabilized classics, mirror-glazed entremets, coulis-forward designs, and crunch-layered builds. Each one teaches you something about mousse behavior, ring assembly, or glaze timing.
Stabilized Mousse Foundations
These three anchor the collection. They show you how gelatin bloom, whipping technique, and fold-in order determine whether your mousse holds its shape through slicing or collapses. Each uses a different stabilization ratio and base—some cream-forward, some egg-white-forward—so you can pick the method that fits your kitchen confidence and equipment.
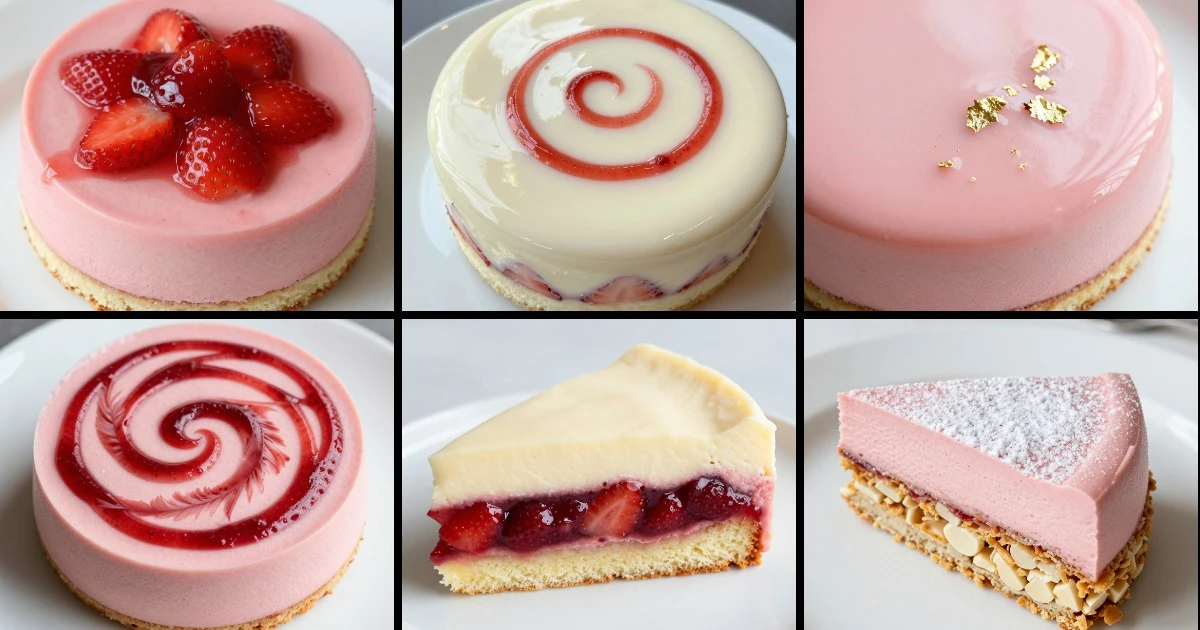
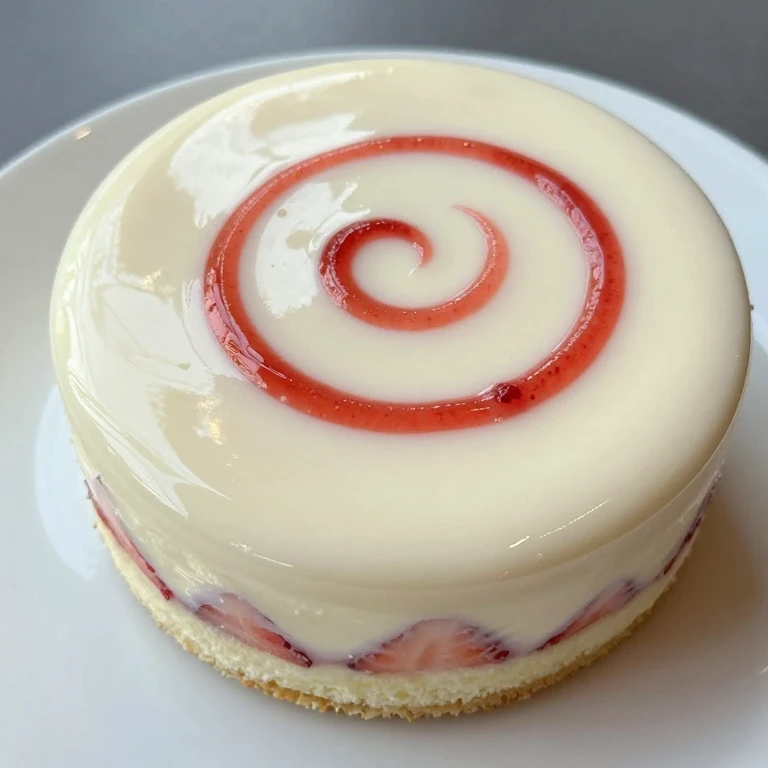
1. Classic Gelatin-Set Strawberry Mousse Cake
This is the blueprint. I start with a thin sponge base, layer a gelatin-stabilized strawberry mousse (bloomed, never boiled), and finish with a simple gloss. The mousse itself teaches you precision: bloom 2 teaspoons gelatin in cold water for exactly 5 minutes, warm it gently over a water bath until it dissolves, fold it into whipped cream and pureed strawberries in the right sequence, and chill until it sets to a soft-peak consistency before pouring onto the sponge. The result is a clean slice with no weeping.
Ingredients
- 1 sheet store-bought sponge cake (8-inch round, ¼-inch thick)
- 1 lb fresh strawberries, hulled and pureed
- 2 tsp gelatin powder
- 3 tbsp cold water (for blooming)
- 1 cup heavy cream, cold
- 3 tbsp granulated sugar
- ½ tsp vanilla extract
- 2 tbsp strawberry jam (for gloss)
- 1 tbsp water (for gloss)
Instructions
- Bloom gelatin in cold water for 5 minutes until spongy.
- Place bloomed gelatin in a small bowl over a water bath (not touching the water) and warm gently until fully dissolved, about 1 minute. Let cool to room temperature.
- Whip cold heavy cream with sugar and vanilla until stiff peaks form.
- Fold strawberry puree into whipped cream in two additions, then fold in cooled gelatin until no streaks remain.
- Pour mousse into a ring mold lined with parchment and fitted over the sponge base. Chill 4 hours or overnight.
- Heat jam and water together, strain, and brush over the top before serving.
Whirl Hook: Bloom your gelatin cold and dissolve it gently—boiling kills its setting power and creates a rubbery texture. I always let it cool before folding to prevent the cream from deflating.
Storage: Chill up to 3 days in an airtight container. Do not freeze; mousse will separate.
2. Cream Cheese Stabilized Strawberry Mousse (No Gelatin)
Some kitchens skip gelatin entirely. I use cream cheese as the stabilizer here—it adds tang, holds structure without gelatin, and creates a denser, more custard-like mousse. The fold sequence matters: softened cream cheese first, then whipped cream, then strawberry puree. The result is mousse that sets firm enough to slice cleanly without any wobble, and the tang brightens the strawberry flavor.
Ingredients
- 1 sheet sponge cake (8-inch round)
- 8 oz cream cheese, softened to 68°F
- ½ cup heavy cream, cold
- 3 tbsp powdered sugar
- ¾ cup fresh strawberry puree
- 1 tbsp lemon juice
- Pinch of salt
- 2 tbsp strawberry coulis (for topping)
Instructions
- Beat softened cream cheese until smooth, about 1 minute.
- Whip cold heavy cream with powdered sugar to stiff peaks.
- Fold whipped cream into cream cheese in two additions.
- Fold strawberry puree and lemon juice into the mixture until just combined.
- Pour into a ring mold over the sponge base and chill 3 hours.
- Drizzle coulis over each slice before serving.
Whirl Factor: Cream cheese gives you structure and tang without gelatin bloom timing. I find this approach faster and more forgiving if you’re new to mousse work.
Practical tip: Soften cream cheese to 68°F (cool room temperature) so it blends smoothly into whipped cream without lumps.
Storage: Chill up to 4 days. The acidity in cream cheese helps preserve freshness longer than gelatin-only versions.
3. Egg White Stabilized Strawberry Mousse (French Sabayon Method)
This is the classic French approach: whip egg whites with sugar over a water bath to create a stable foam base, then fold in strawberry puree and whipped cream. The mousse is airier than cream-cheese versions and has a silkier mouthfeel. The sabayon step takes practice—you’re whipping egg whites and sugar together over gentle heat until they reach 160°F for food safety, then cooling slightly before folding. It’s worth learning because the texture is incomparable.
Ingredients
- 1 sheet sponge cake (8-inch round)
- 3 large egg whites, room temperature
- 6 tbsp granulated sugar
- ¾ cup fresh strawberry puree
- ¾ cup heavy cream, cold
- ½ tsp vanilla extract
- Pinch of cream of tartar
- 1 tbsp water (for temperature check)
Instructions
- Combine egg whites, sugar, and cream of tartar in a heatproof bowl. Set over a water bath (bowl should not touch water) and whip constantly with a hand mixer until the mixture reaches 160°F and looks pale and thick, about 5–7 minutes.
- Remove from heat and continue whipping until cool to the touch, about 3 minutes.
- In a separate bowl, whip cold heavy cream and vanilla to stiff peaks.
- Fold strawberry puree into the cooled sabayon, then fold in whipped cream in two additions.
- Pour into a ring mold over sponge base and chill 4 hours.
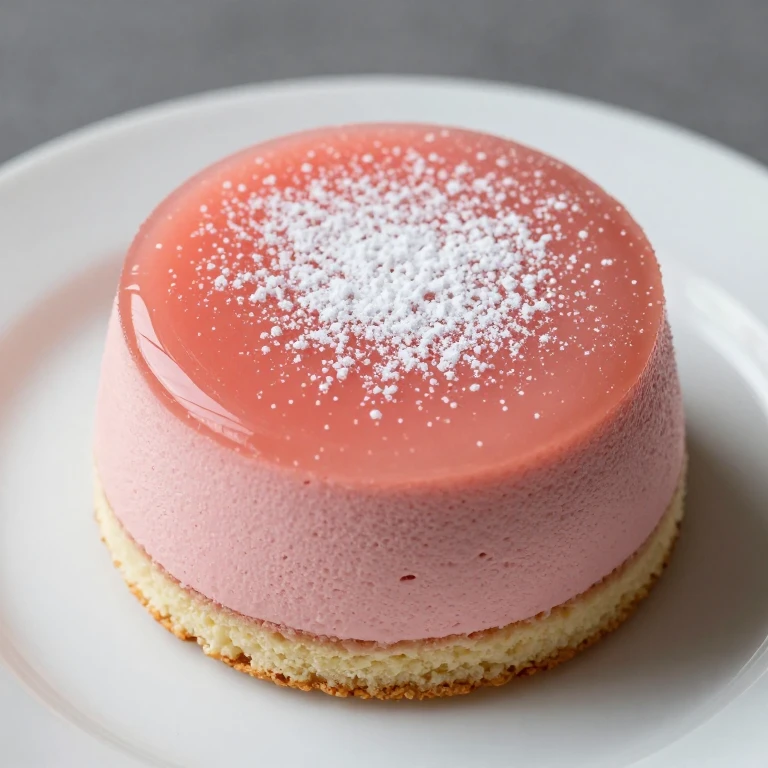
- Serve chilled with a light dusting of powdered sugar if desired.
Whirl Hook: The sabayon base creates an airy, silky mousse that slices cleanly without the density of cream cheese or the wobble risk of under-set gelatin. I use an instant-read thermometer to hit 160°F precisely.
Practical tip: Whip the cooled sabayon before folding in fruit—this step ensures the mousse stays light and fluffy.
Storage: Chill up to 2 days. Egg white mousse is more delicate than gelatin versions; consume within 48 hours for best texture.
Mirror-Glazed Entremets
These three use a poured mirror glaze over a set mousse layer. The glaze creates visual drama and a thin, shiny shell that breaks cleanly when you slice. The technique here is temperature control: glaze must be poured at 95–105°F onto a mousse that’s been chilled to 35–40°F. Too warm and it slides off; too cold and it cracks. Each of these variations plays with glaze color, opacity, and flavor to change the visual and taste impact.
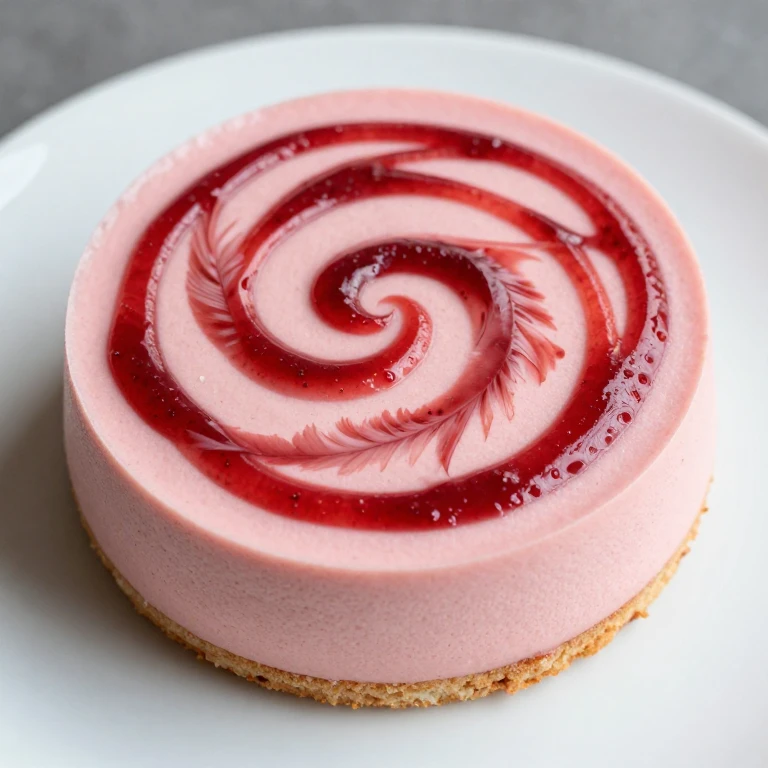
4. Strawberry Mirror Glaze with Raspberry Accent
I pour a strawberry-white chocolate glaze over the mousse base, then add a thin raspberry stripe before it sets. The white chocolate in the glaze adds sheen and body, while the raspberry accent adds a flavor layer and visual contrast. The glaze is made from white chocolate, sweetened condensed milk, and strawberry puree, tempered to the right temperature. When it sets, it creates that signature glossy finish that looks bakery-professional.
Ingredients
- 1 layer stabilized mousse (from Group 1, any method)
- 4 oz white chocolate, chopped
- ¼ cup sweetened condensed milk
- ¼ cup fresh strawberry puree
- 2 tbsp light corn syrup
- 2 tbsp raspberry puree (for stripe)
- Pinch of salt
- Food thermometer
Instructions
- Combine white chocolate, condensed milk, strawberry puree, and corn syrup in a heatproof bowl over a water bath (not touching water). Stir until smooth and fully melted, about 2 minutes.
- Remove from heat and let cool to 95–105°F, stirring occasionally. This takes about 5 minutes.
- Chill the mousse layer to 35–40°F (at least 2 hours).
- Pour glaze slowly over the chilled mousse in a thin, even layer. Work quickly but gently.
- Before the glaze sets (within 30 seconds), drizzle raspberry puree in thin lines across the top and drag a toothpick through to create a feathered pattern.
- Chill 1 hour until glaze is fully set.
Whirl Factor: White chocolate glaze gives you shimmer and sweetness, while the raspberry stripe adds tartness and a visual pop. The temperature control is the skill—nail it and you look like a pastry chef.
Practical tip: Use a food thermometer to track glaze temperature as it cools. If it dips below 95°F, gently warm it over a water bath for 10 seconds and recheck.
Storage: Chill up to 3 days. The glaze protects the mousse underneath, so these keep slightly longer than unglazed versions.
5. Dark Chocolate Mirror Glaze Over Strawberry Mousse
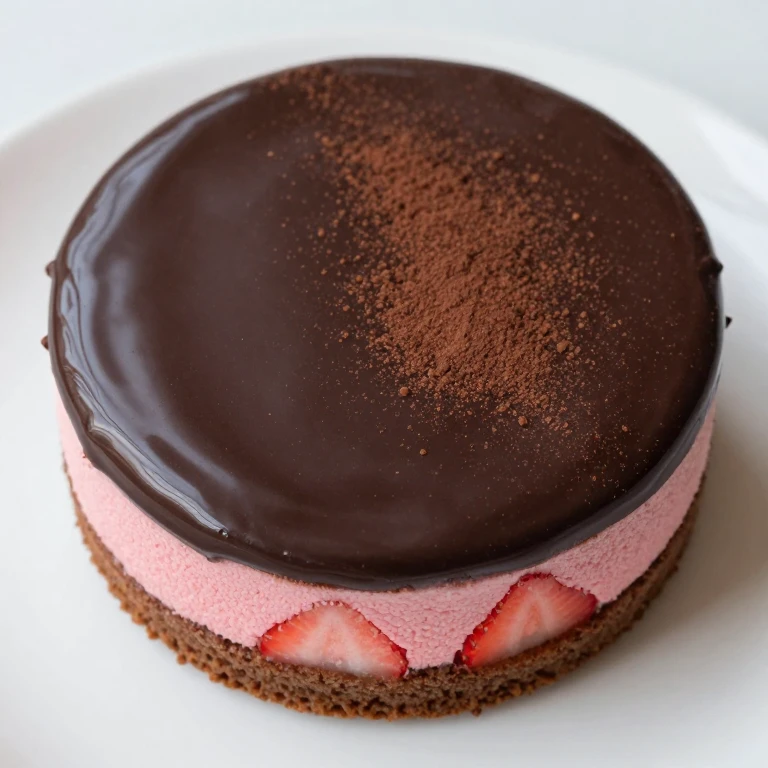
This is a bold contrast: dark chocolate glaze over bright strawberry mousse. The glaze is made from dark chocolate (70% cacao), sweetened condensed milk, and a touch of strawberry puree for color and flavor alignment. When you slice through the shiny dark shell, the pale pink mousse underneath creates striking visual contrast. The flavor pairing is classic—dark chocolate and strawberry—but the glaze method elevates it into something refined.
Ingredients
- 1 layer stabilized mousse (from Group 1)
- 5 oz dark chocolate (70% cacao), chopped
- ¼ cup sweetened condensed milk
- 2 tbsp strawberry puree
- 2 tbsp light corn syrup
- 1 tbsp cocoa powder (for dusting, optional)
- Food thermometer
Instructions
- Combine dark chocolate, condensed milk, and strawberry puree in a heatproof bowl over a water bath. Stir until fully melted and smooth, about 2–3 minutes.
- Remove from heat, stir in corn syrup, and let cool to 95–105°F, about 5–7 minutes.
- Chill the mousse layer to 35–40°F.
- Pour glaze over the chilled mousse in one smooth motion, working from the center outward.
- Chill 1 hour until glaze is fully set and matte.
- Dust lightly with cocoa powder before serving if desired.
Whirl Hook: Dark chocolate glaze creates visual drama and adds a sophisticated bitter note that balances the strawberry sweetness. The glaze also seals and protects the mousse, extending shelf life.
Practical tip: If your glaze thickens too quickly while pouring, place the bowl back over the water bath for 5 seconds to loosen it slightly.
Storage: Chill up to 4 days. The dark chocolate acts as a seal, protecting the mousse from oxidation and drying out.
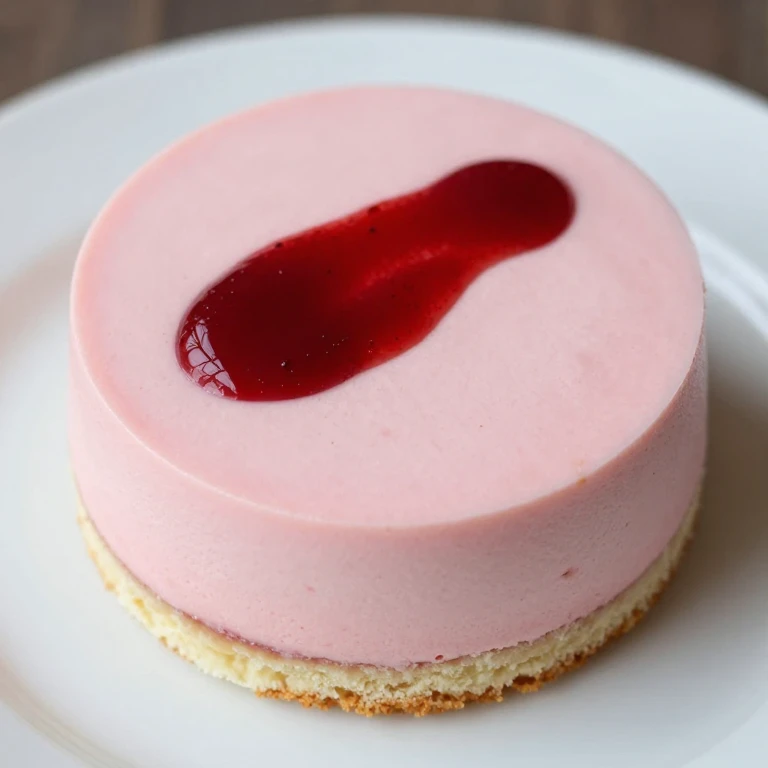
6. Pastel Pink Mirror Glaze with Edible Gold Leaf
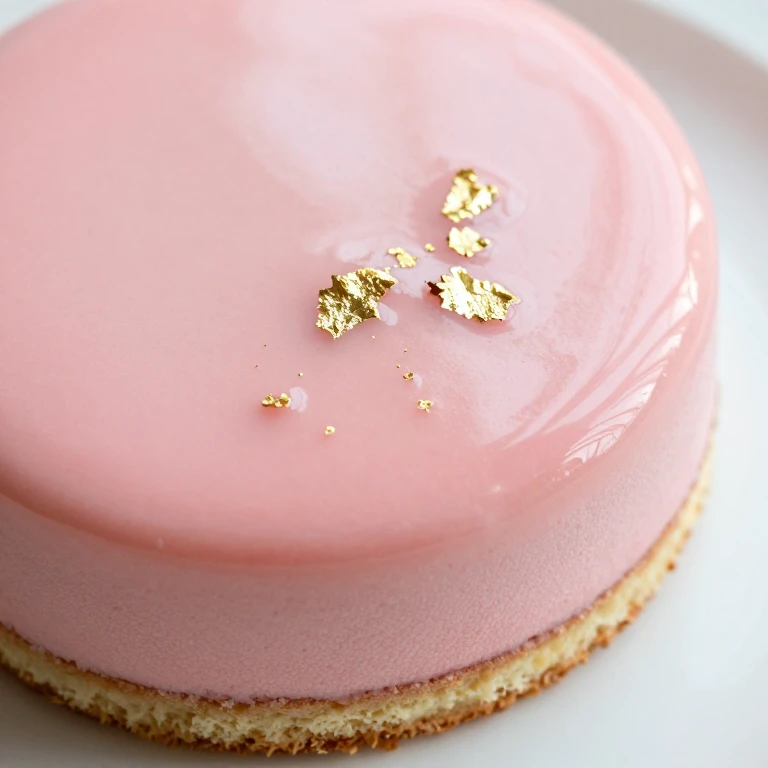
I use a lighter hand here: white chocolate glaze tinted pale pink with strawberry puree and a touch of food coloring, finished with edible gold leaf for a refined, modern look. The glaze is more delicate in color than the raspberry-accented version, and the gold adds luxury without changing the flavor profile. This one is all about visual impact and elegance.
Ingredients
- 1 layer stabilized mousse (from Group 1)
- 5 oz white chocolate, chopped
- ¼ cup sweetened condensed milk
- 3 tbsp strawberry puree
- 2 tbsp light corn syrup
- 1–2 drops rose food coloring (optional, for deeper pink)
- Edible gold leaf sheets
- Food thermometer
Instructions
- Melt white chocolate with condensed milk over a water bath until smooth, about 2 minutes.
- Remove from heat and stir in strawberry puree, corn syrup, and food coloring if using.
- Cool to 95–105°F, stirring occasionally, about 5 minutes.
- Chill mousse layer to 35–40°F.
- Pour glaze over the chilled mousse in a thin, even layer.
- While glaze is still slightly tacky (within 1 minute), carefully press small pieces of edible gold leaf onto the surface.
- Chill 1 hour until fully set.
Whirl Factor: Pastel glaze with gold leaf reads as refined and modern. The gold doesn’t change flavor—it’s pure visual drama. I use this approach when I’m plating for a dinner party or photo shoot.
Practical tip: Handle edible gold leaf with tweezers or a dry pastry brush; it tears easily and oils from your fingers will damage it.
Storage: Chill up to 3 days. Keep away from humidity; gold leaf can tarnish if exposed to moisture.
Coulis Inserts and Flavor Layers
These three build flavor depth by inserting a coulis or fruit puree layer between the mousse and the base, or by creating a two-tone mousse. The coulis adds tartness, visual interest, and a burst of concentrated fruit flavor when you slice. Some use a set coulis layer; others swirl it into the mousse before setting. Each approach teaches you how to layer flavors and textures intentionally.
7. Strawberry-Basil Coulis Insert with Lime Mousse
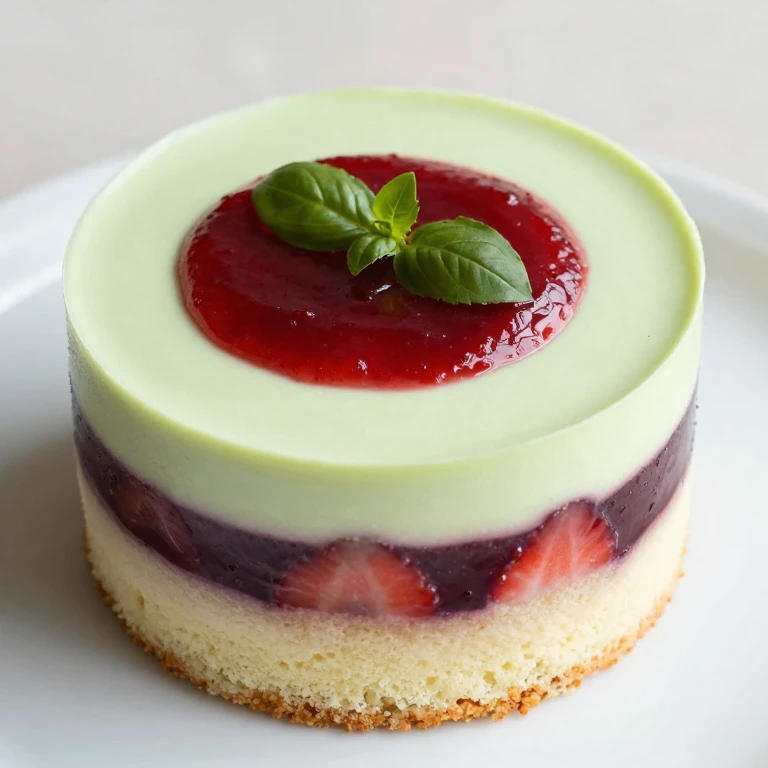
This is a flavor spin: I make a strawberry-basil coulis (strained, set with a tiny bit of gelatin), layer it on the sponge base, then pour a lime-infused mousse on top. The basil adds herbal complexity, the lime adds brightness, and the coulis layer adds tartness and visual definition. When you slice, you see three distinct layers: sponge, red coulis, pale green mousse. The flavor combination is unexpected but balanced—strawberry and basil are natural partners, and lime cuts through the richness.
Ingredients
- 1 sheet sponge cake (8-inch round)
- ¾ cup fresh strawberry puree
- 6 fresh basil leaves, torn
- 2 tbsp granulated sugar
- 1 tsp gelatin powder
- 2 tbsp cold water (for blooming)
- ¾ cup heavy cream, cold
- 3 tbsp powdered sugar
- Zest of 2 limes
- 2 tbsp fresh lime juice
- Pinch of salt
Instructions
- Heat strawberry puree with torn basil and granulated sugar over medium heat until it steams, about 2 minutes. Strain through a fine-mesh sieve, pressing gently on the basil. Let cool to room temperature.
- Bloom gelatin in cold water for 5 minutes, then warm gently over a water bath until dissolved. Cool slightly.
- Stir dissolved gelatin into the cooled coulis and pour into a ring mold over the sponge base. Chill 1 hour until set to a firm gel.
- Whip cold heavy cream with powdered sugar, lime zest, and lime juice until stiff peaks form.
- Fold in a small amount of the whipped cream to lighten it, then fold in the remaining cream until uniform.
- Pour lime mousse over the set coulis layer and chill 3 hours until firm.
Whirl Hook: Basil in the coulis layer adds herbal intrigue; lime in the mousse adds brightness. The coulis layer also creates visual separation and teaches you how to set a thin fruit layer with minimal gelatin.
Practical tip: Strain the basil coulis carefully to remove all herb pieces—they can cloud the glaze if left in.
Storage: Chill up to 3 days. The basil flavor mellows slightly over time, so eat within 24 hours for maximum herb impact.
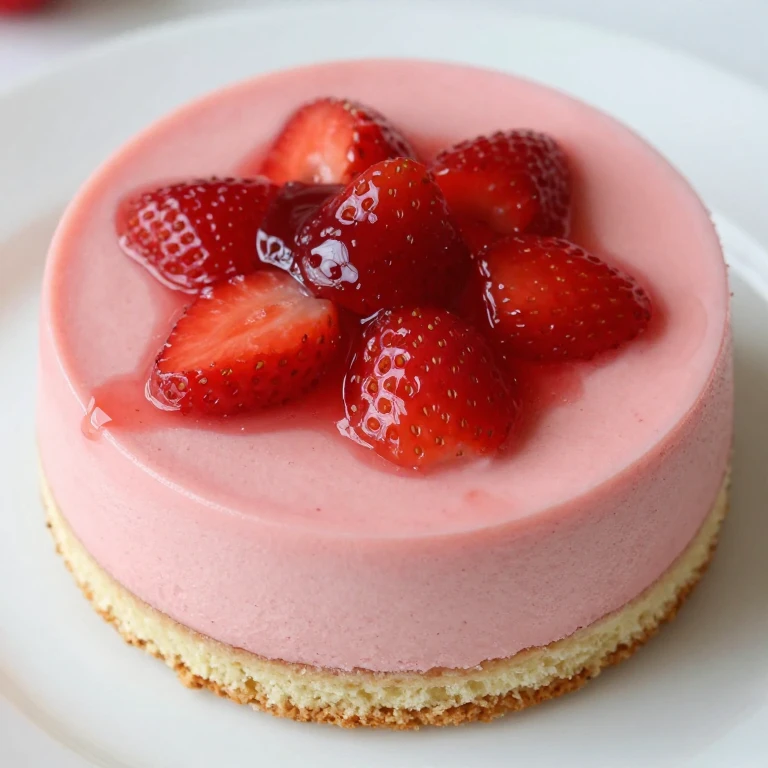
8. Raspberry Coulis Swirl Strawberry Mousse
Instead of a separate coulis layer, I swirl raspberry coulis directly into the strawberry mousse before it sets. The swirl creates a marbled effect and adds tartness throughout, not just at one point. The technique is simple: pour half the mousse into the ring, drizzle coulis in thin lines across the top, pour the remaining mousse, then drag a skewer through the coulis to create swirls. It sets into a two-tone mousse with flavor and visual interest throughout.
Ingredients
- 1 sheet sponge cake (8-inch round)
- 1 lb fresh strawberries, pureed and strained
- ½ cup fresh raspberry puree
- 2 tsp gelatin powder
- 3 tbsp cold water (for blooming)
- 1 cup heavy cream, cold
- 3 tbsp granulated sugar
- ½ tsp vanilla extract
- Pinch of salt
Instructions
- Bloom gelatin in cold water for 5 minutes, then warm gently over a water bath until dissolved. Cool slightly.
- Whip cold heavy cream with sugar, vanilla, and salt until stiff peaks form.
- Fold strawberry puree into whipped cream, then fold in cooled gelatin.
- Pour half the mousse into a ring mold over the sponge base.
- Drizzle raspberry coulis in thin lines across the mousse surface.
- Pour remaining mousse over the coulis, then drag a skewer or toothpick through the coulis lines to create swirls.
- Chill 4 hours until fully set.
Whirl Factor: The swirl creates visual drama without requiring a separate coulis layer to set. The raspberry tartness is distributed throughout, so every bite has balanced flavor.
Practical tip: Work quickly when swirling—the mousse begins to set as soon as it hits cold air, so your swirl window is about 1 minute.
Storage: Chill up to 3 days. The mousse holds its swirl pattern beautifully and doesn’t weep or separate.
9. Strawberry-Rhubarb Coulis Layer with Vanilla Mousse
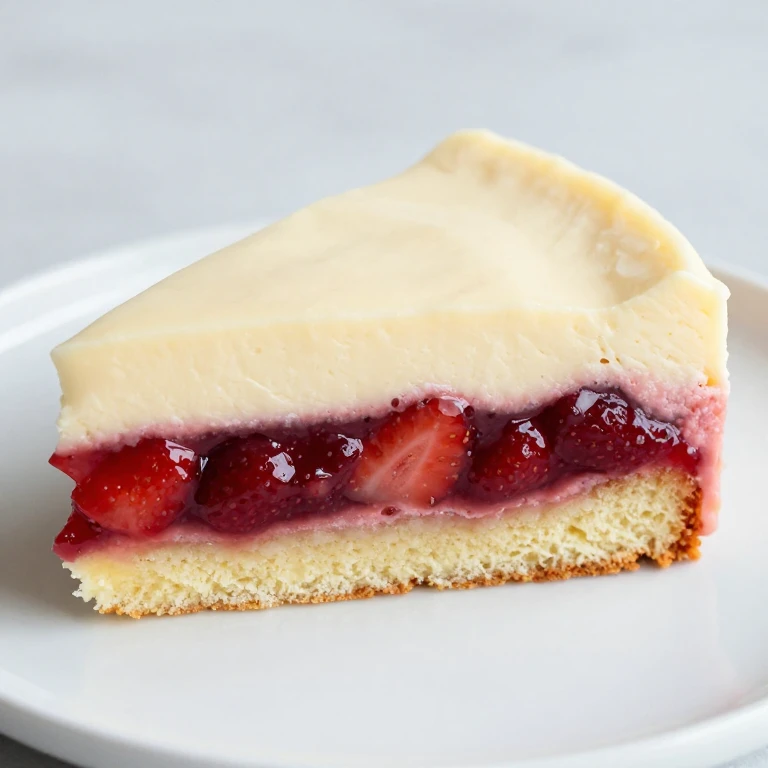
Rhubarb adds tartness and a subtle earthiness that strawberry alone can’t deliver. I make a strawberry-rhubarb coulis (cooked down to concentrate flavor, strained, and set with gelatin), layer it on the sponge, then top with a vanilla mousse. The vanilla is a neutral backdrop that lets the coulis flavor shine. When you slice, the bright pink coulis layer is visually striking, and the flavor is tart and complex.
Ingredients
- 1 sheet sponge cake (8-inch round)
- ½ cup fresh strawberry puree
- ½ cup fresh rhubarb puree (cooked down from 1 cup chopped rhubarb)
- 3 tbsp granulated sugar
- 1 tsp gelatin powder
- 2 tbsp cold water (for blooming)
- ¾ cup heavy cream, cold
- 3 tbsp powdered sugar
- 1 tsp vanilla extract
- Pinch of salt
Instructions
- Combine strawberry puree, rhubarb puree, and granulated sugar in a saucepan over medium heat. Simmer for 2 minutes to blend flavors. Strain through a fine-mesh sieve and let cool to room temperature.
- Bloom gelatin in cold water for 5 minutes, then warm gently over a water bath until dissolved. Cool slightly.
- Stir dissolved gelatin into the cooled coulis and pour into a ring mold over the sponge base. Chill 1 hour until set.
- Whip cold heavy cream with powdered sugar, vanilla, and salt until stiff peaks form.
- Pour vanilla mousse over the set coulis layer and chill 3 hours until firm.
Whirl Hook: Rhubarb coulis adds tartness and sophistication. The vanilla mousse is clean and neutral, letting the coulis be the star. This pairing works because rhubarb’s earthiness balances strawberry’s sweetness.
Practical tip: Cook rhubarb down before pureeing to concentrate its flavor and reduce moisture content, which helps the coulis set more firmly.
Storage: Chill up to 3 days. The rhubarb tartness preserves the coulis layer beautifully and prevents weeping.
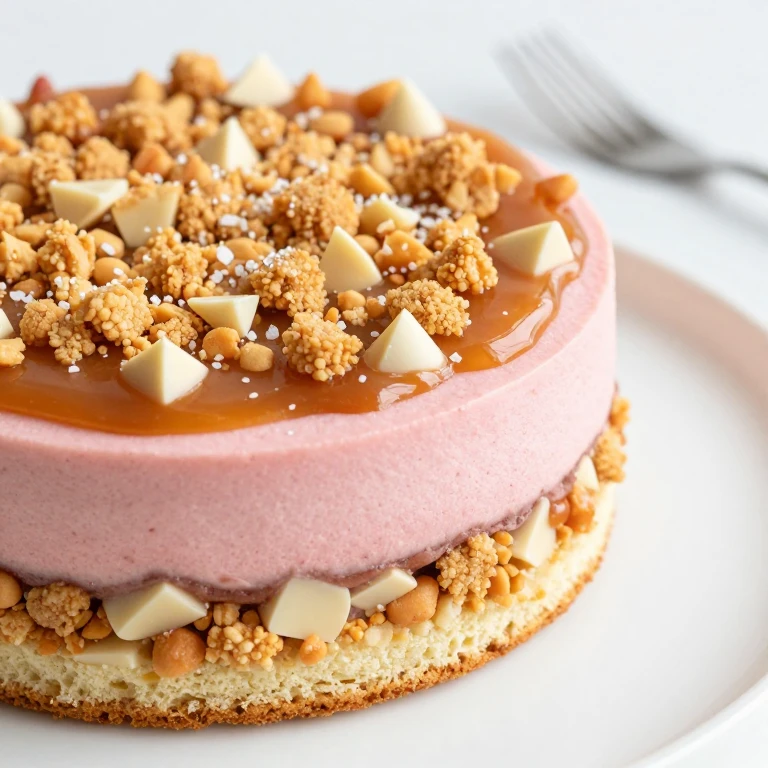
Crunch Layers and Textured Finishes
These three add crispy, crunchy, or textured elements to break up the mousse softness. Some use feuilletine (crispy wafer crumbs), some use a nut-based crunch layer, and some use a caramel or brittle topping. The crunch is essential to the eating experience—it creates contrast and makes every bite more interesting. Each of these approaches teaches you how to layer textures intentionally and when to add crunch (before setting vs. at service).
10. Feuilletine Crunch Layer with Strawberry Mousse
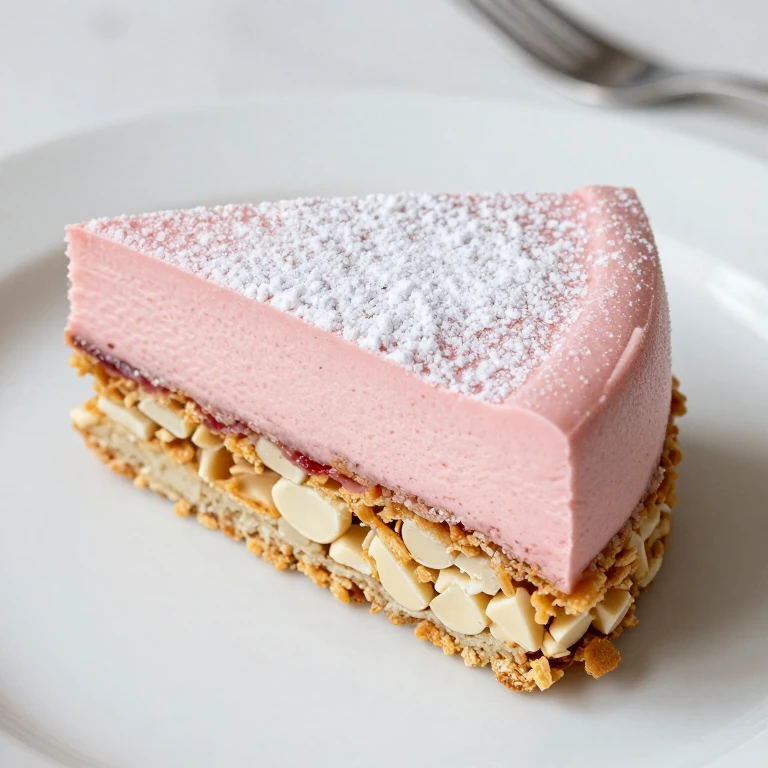
Feuilletine is crispy, delicate wafer crumbs that dissolve on your tongue. I mix it with melted white chocolate and butter to create a thin crunch layer between the sponge and mousse. The layer stays crispy because it’s sealed by the mousse above it, and when you slice, you get the soft mousse, then a snap of crunch, then the sponge. The technique is simple: spread the feuilletine mixture on the sponge, chill until set, then pour mousse on top.
Ingredients
- 1 sheet sponge cake (8-inch round)
- ½ cup feuilletine crumbs
- 2 oz white chocolate, melted
- 1 tbsp unsalted butter, melted
- Pinch of salt
- 1 batch stabilized mousse (from Group 1, any method)
- 2 tbsp powdered sugar (for dusting)
Instructions
- Combine feuilletine crumbs, melted white chocolate, melted butter, and salt in a small bowl. Mix until all crumbs are coated.
- Spread the feuilletine mixture in an even layer over the sponge cake base, pressing gently to compact it slightly.
- Chill the feuilletine layer for 15 minutes until the white chocolate is set.
- Pour mousse over the feuilletine layer and chill 4 hours until the mousse is fully set.
- Dust lightly with powdered sugar before serving.
Whirl Factor: Feuilletine adds a delicate crunch that contrasts beautifully with the soft mousse. The white chocolate coating keeps the crumbs crispy and adds subtle sweetness.
Practical tip: Chill the feuilletine layer before pouring mousse to prevent the warmth of the mousse from softening the crunch prematurely.
Storage: Chill up to 3 days. The feuilletine layer stays crispy because it’s sealed by the mousse, so these hold texture longer than exposed crunch layers.
11. Hazelnut Praline Crunch with Strawberry-Hazelnut Mousse
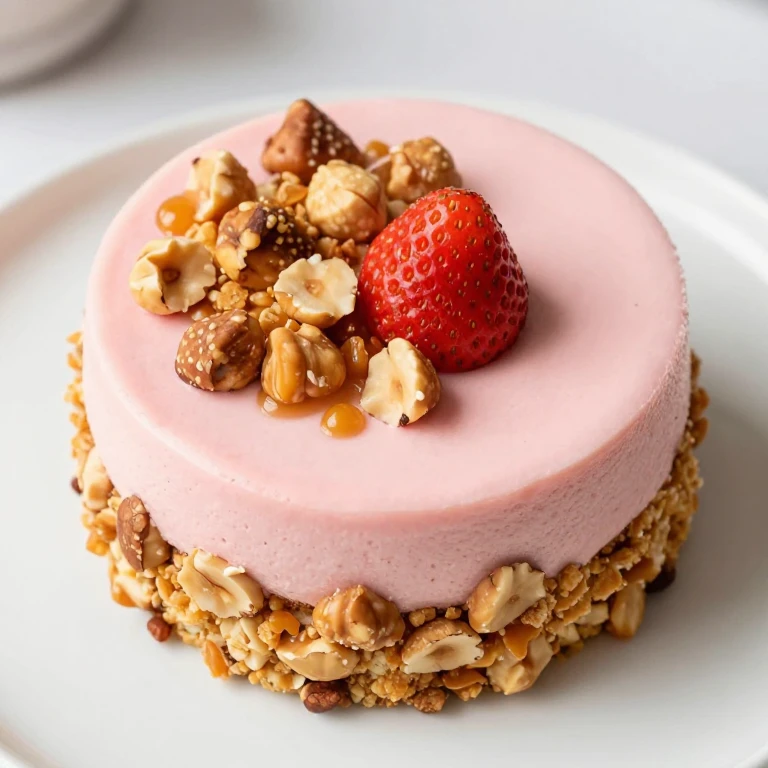
I make a simple praline (hazelnuts toasted and caramelized with sugar), crush it into coarse pieces, and layer it between the sponge and a hazelnut-infused mousse. The mousse itself is made with hazelnut paste folded into the whipped cream and strawberry puree, so the hazelnut flavor runs throughout, not just in the crunch layer. When you slice, you get layers of hazelnut flavor and texture: soft mousse, then a snap of praline, then the sponge. The pairing of strawberry and hazelnut is classic and refined.
Ingredients
- 1 sheet sponge cake (8-inch round)
- ¾ cup raw hazelnuts
- ½ cup granulated sugar
- 2 tbsp water
- Pinch of salt
- ¾ cup heavy cream, cold
- 3 tbsp powdered sugar
- 2 tbsp hazelnut paste (or finely ground roasted hazelnuts mixed with 1 tsp oil)
- ¾ cup fresh strawberry puree
- 1 tsp gelatin powder (optional, for extra stability)
- 1 tbsp cold water (for blooming, if using gelatin)
Instructions
- Toast hazelnuts in a 350°F oven for 12 minutes until fragrant. Let cool slightly, then rub off loose skins.
- Combine granulated sugar and water in a saucepan over medium heat. Stir until sugar dissolves, then stop stirring and let it cook until it reaches 350°F (hard-crack stage), about 5–7 minutes. Immediately add hazelnuts and stir to coat, then pour onto a parchment-lined baking sheet. Let cool completely, then crush into coarse pieces.
- Whip cold heavy cream with powdered sugar until stiff peaks form.
- Fold hazelnut paste into whipped cream, then fold in strawberry puree until combined.
- Spread praline crunch over the sponge base, then pour mousse on top. Chill 4 hours until set.
Whirl Hook: Hazelnut praline adds crunch and nutty depth. The hazelnut mousse carries the flavor throughout, so the nut element is present in every bite, not just where the crunch layer is.
Practical tip: Make praline in advance and store it in an airtight container; it stays crispy for up to 1 week and you can crush it fresh just before assembly.
Storage: Chill up to 3 days. The praline layer stays crispy because it’s sealed by the mousse above it.
12. Caramelized White Chocolate Crunch with Strawberry Mousse
I make a caramelized white chocolate crunch by spreading melted white chocolate on a baking sheet, letting it set, then breaking it into shards and mixing it with toasted breadcrumbs and melted butter. The result is a textured, crunchy layer that’s sweeter and more delicate than praline. I layer it on the sponge before pouring the mousse, and when you slice, the caramelized white chocolate shards catch the light and add visual interest alongside the crunch texture.
Ingredients
- 1 sheet sponge cake (8-inch round)
- 4 oz white chocolate, chopped
- ½ cup panko breadcrumbs
- 2 tbsp unsalted butter, melted
- 1 tbsp granulated sugar
- Pinch of fleur de sel
- 1 batch stabilized mousse (from Group 1, any method)
Instructions
- Spread white chocolate thinly on a parchment-lined baking sheet and let it set at room temperature for 30 minutes, or chill for 10 minutes. Break into rough shards.
- Toast panko breadcrumbs in a dry skillet over medium heat for 2 minutes until fragrant and lightly golden. Transfer to a bowl.
- Toss toasted breadcrumbs with melted butter, sugar, fleur de sel, and white chocolate shards.
- Spread the crunch mixture over the sponge base, pressing gently to compact.
- Pour mousse over the crunch layer and chill 4 hours until set.
Whirl Hook: Caramelized white chocolate shards add sweetness, visual shimmer, and a delicate crunch. The breadcrumb base keeps the shards from clumping and adds textural depth.
Practical tip: Toast the breadcrumbs just before mixing—this preserves their crispness and prevents them from absorbing moisture from the melted butter.
Storage: Chill up to 3 days. The crunch layer stays crispy because the mousse seals it from moisture.
When to Choose Each Style
- Stabilized Mousse Foundations (Group 1): Start here if you’re new to mousse work or want to focus on technique. These teach you bloom timing, fold sequences, and how different stabilizers affect texture. Pick gelatin if you want the silkiest result, cream cheese if you want tang and speed, or egg white if you want maximum airiness.
- Mirror-Glazed Entremets (Group 2): Choose these when you want visual drama and are comfortable with temperature control. The glaze is the star, so pick dark chocolate for bold contrast, white chocolate for shimmer, or pastel pink for modern elegance. These take longer to chill but photograph beautifully.
- Coulis Inserts and Flavor Layers (Group 3): Pick these when you want flavor complexity and don’t mind the extra layer-setting step. Coulis inserts teach you how to build flavor depth and create visual separation. Choose a swirl if you want speed, or a separate layer if you want distinct flavor zones.
- Crunch Layers and Textured Finishes (Group 4): Choose these when you want textural contrast and are ready to think about how different elements interact. Feuilletine is the fastest and most delicate; praline is the most impressive; caramelized white chocolate is the most modern. All three stay crispy when sealed by mousse.
FAQ
How do I know if my gelatin is bloomed correctly?
Bloomed gelatin should feel spongy when you press it with your finger—it will have absorbed all the cold water and expanded slightly. If it’s still granular or hasn’t absorbed the water, it needs more time. I always bloom for exactly 5 minutes, then check the texture before warming. Blooming correctly ensures the gelatin dissolves smoothly and sets your mousse to the right consistency.
Why does my mousse weep or separate after a day?
Weeping usually means one of three things: the gelatin was overheated (which damages its setting power), the mousse wasn’t chilled long enough before serving (so it’s still slightly soft), or the ratio of gelatin to liquid was too low. I always use 2 tsp gelatin per 3 cups mousse as my baseline, and I chill for at least 4 hours. If you’re using cream cheese or egg white stabilizers, weeping is less common because these methods create a more stable emulsion.
Can I make these cakes ahead and freeze them?
Gelatin-based mousse doesn’t freeze well—the structure breaks down and the mousse becomes grainy or weepy when thawed. Cream cheese mousse freezes slightly better but still loses some texture. I recommend making these cakes up to 4 days ahead and keeping them refrigerated, rather than freezing. If you must freeze, freeze the sponge base and components separately, then assemble after thawing.
What’s the difference between a mousse cake and an entremets?
Technically, an entremets is a multi-layered dessert with distinct layers (sponge, mousse, coulis, glaze), while a mousse cake can be simpler (just sponge and mousse). In practice, I use the terms interchangeably. The key difference is intention: entremets are built to showcase multiple textures and flavors in each slice, while mousse cakes can be simpler and more straightforward.
How do I get a clean slice without the mousse dragging?
A hot, wet knife is your best friend. I dip a long serrated knife in hot water, wipe it dry, and make one smooth downward cut without sawing. The heat helps the knife glide through the mousse without dragging. Between slices, I dip and wipe again. If the cake is too cold (below 32°F), the mousse will be too firm and the knife will drag; if it’s too warm (above 40°F), the mousse will be soft and may compress. Aim for 35–38°F.
Can I use frozen strawberries instead of fresh?
Frozen strawberries work, but thaw them completely and drain off excess liquid before pureeing. Frozen berries release more water than fresh, which can throw off your mousse ratios and make the final texture looser. If you use frozen berries, I recommend reducing the total liquid in the recipe slightly and adding ¼ tsp extra gelatin to compensate.
What’s the best way to unmold a mousse cake?
I use a removable-bottom tart pan or a ring mold, which makes unmolding simple: just push the bottom up or slide the ring away. If you used a regular ring mold, warm the outside of the ring slightly with a hot towel, then slide it off gently. If the mousse sticks, run a thin offset spatula around the inside edge first. Always chill the cake fully before unmolding—a warm mousse will collapse.
Conclusion
These twelve strawberry mousse cakes teach you the full range of technique: from stabilizer choice and fold sequences to glaze temperature and crunch layers. Pick one that matches your comfort level and the occasion, then master it. I’d love to hear which version you try—save this post and come back when you’re ready to build.