
Flowered sheet cakes are having a moment, and I’m here for it. Whether you’re decorating for a garden party, a spring celebration, or just because your kitchen needs more blooms, piped flowers transform a simple sheet cake into an edible work of art. The beauty is this: you don’t need advanced pastry skills or expensive tools to pull it off. I’ve built these 12 designs around buttercream consistency, petal shapes, and color layering—techniques that stick with you once you nail the fundamentals.
I’ve organized these by piping style and complexity so you can pick what matches your skill level and time. Some designs lean into classic rosettes and daisy shapes; others play with color gradients and leafy borders. Each one pairs beautifully with vanilla, lemon, almond, or strawberry cake, and I’ve included the consistency cues and storage moves that keep petals crisp and vibrant.
Classic Buttercream Blooms Flowered Sheet Cake Designs
These designs anchor on foundational piping techniques—rosettes, peonies, and simple petal work. I start here because mastering these shapes opens up dozens of remix options. They work for weeknight practice or confident-enough-for-a-crowd occasions.
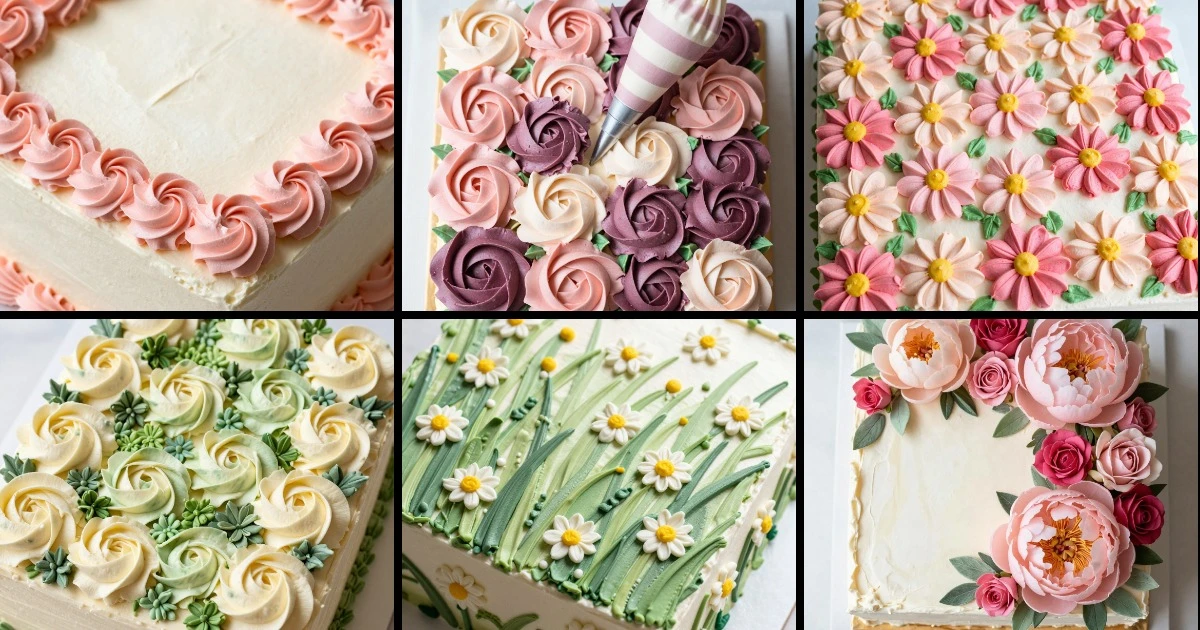
1. Buttercream Rosette Border
The rosette is the workhorse of cake piping. I build them in tight spirals, starting from the center and working outward. Stack three or four on a sheet cake edge, add greenery between, and you’ve got an instant garden look that reads polished without fuss.
Ingredients
- 2 cups unsalted butter, room temperature
- 4 cups powdered sugar
- 2 tablespoons heavy cream
- 1 teaspoon vanilla extract
- Food coloring (pink, coral, or blush)
- Wilton 1M piping tip
- Piping bag
- One 9×13 sheet cake, cooled
Instructions
- Beat butter and powdered sugar until pale and fluffy, about 3 minutes.
- Add cream and vanilla; mix until smooth and spreadable.
- Divide buttercream into bowls; tint each with food coloring for gradient effect.
- Load piping bag with 1M tip; pipe rosettes in tight spiral motion around cake perimeter.
- Pipe smaller rosettes in clusters across top surface, leaving space for greenery.
- Refrigerate 20 minutes to set piping before serving.
Consistency Cue: Your buttercream should hold peaks but still feel soft—if it’s too stiff, add cream 1 teaspoon at a time.
Storage: Cover loosely and refrigerate up to 3 days. Bring to room temperature 30 minutes before serving so flowers soften slightly and flavors come through.
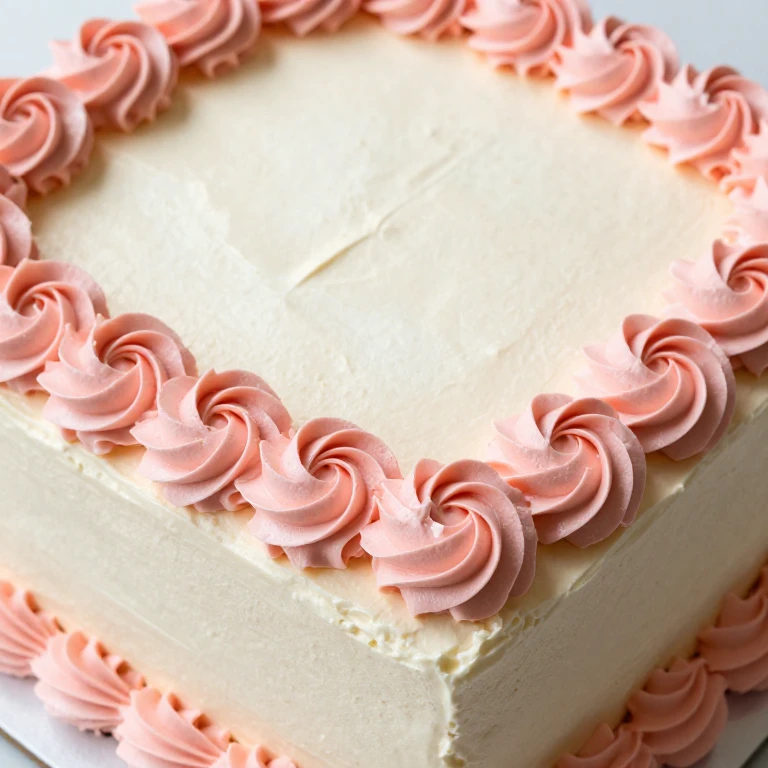
2. Peony Petal Cascade
Peonies are lush and romantic. I layer petals from outside in, using a petal tip to create that ruffled, full-bodied look. On a sheet cake, a cluster of three peonies becomes a focal point that anchors the whole design.
Ingredients
- 2 cups unsalted butter, room temperature
- 4 cups powdered sugar
- 2 tablespoons heavy cream
- 1 teaspoon vanilla extract
- Food coloring (blush pink, deeper pink)
- Wilton 104 petal piping tip
- Piping bag
- One 9×13 sheet cake, cooled
Instructions
- Prepare buttercream as in Rosette Border recipe; tint in two shades of pink.
- Fit piping bag with 104 tip; load with lighter pink.
- Pipe outer ring of petals in a circle, angling tip slightly outward.
- Rotate bag and pipe second ring, overlapping first layer.
- Switch to deeper pink; pipe inner petals tighter and smaller.
- Chill 30 minutes before adding leaves and final touches.
Practical Tip: Practice peonies on parchment first—once you feel the angle and pressure, they come together fast.
Storage: Keep refrigerated in an airtight container up to 4 days. The buttercream protects the cake and keeps petals defined.
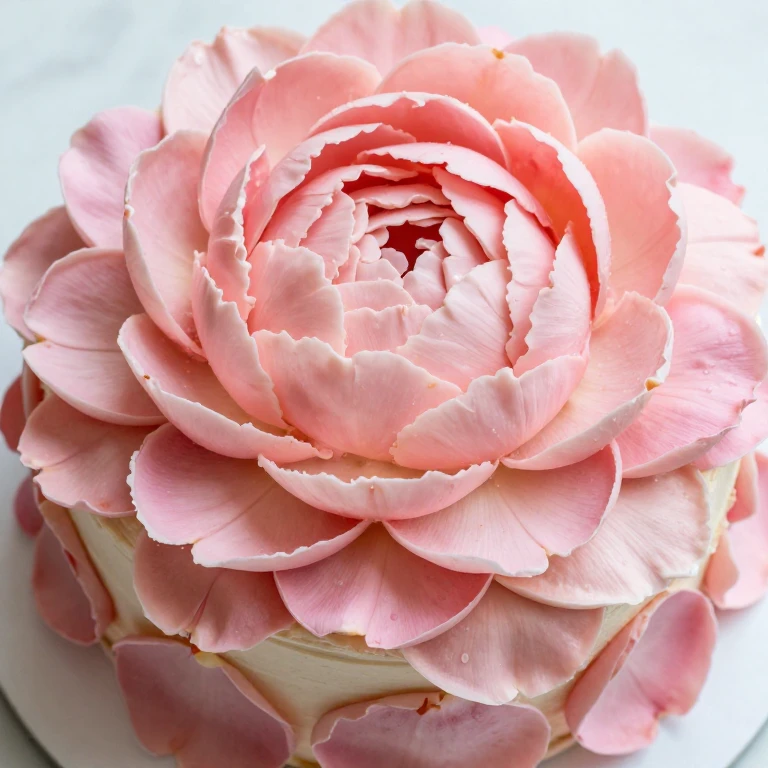
3. Daisy Cluster Field
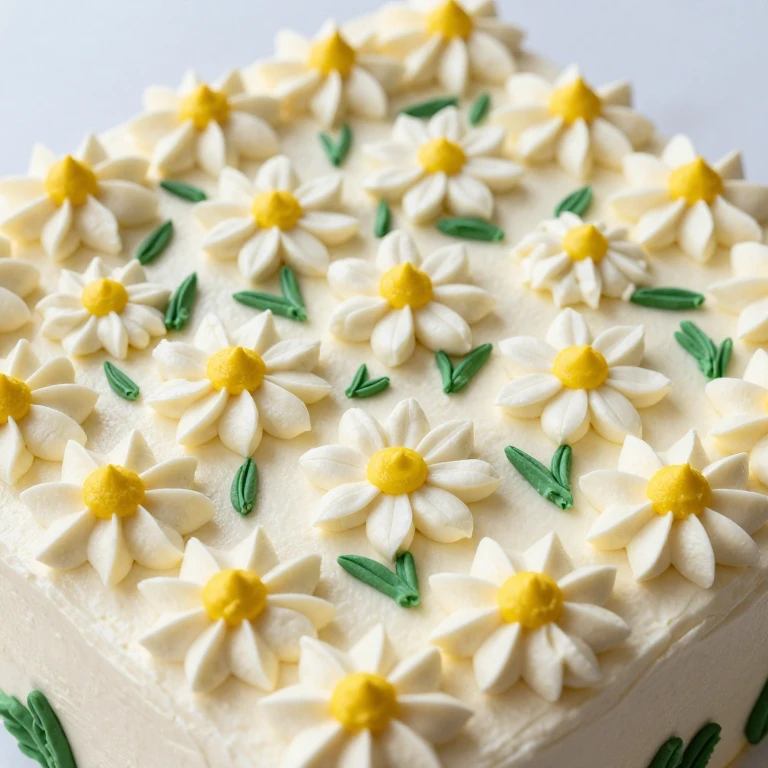
Daisies are simple and cheerful. I pipe five petals in a circle, add a dot center, and repeat across the cake. Layer them tight or spread them loose—both read as intentional garden abundance.
Ingredients
- 2 cups unsalted butter, room temperature
- 4 cups powdered sugar
- 2 tablespoons heavy cream
- 1 teaspoon vanilla extract
- Food coloring (white, yellow, green)
- Wilton 103 or 104 petal tip
- Wilton 2 round tip
- Piping bags
- One 9×13 sheet cake, cooled
Instructions
- Make buttercream and tint white for petals, yellow for centers, green for leaves.
- Load petal tip with white; pipe five short petals in a circle.
- Switch to round tip with yellow; pipe a small dot in the center.
- Repeat across cake top in loose clusters or tight rows.
- Pipe thin green leaves between and around daisies.
- Refrigerate 20 minutes to set.
Consistency Cue: For small petals, your buttercream should be slightly stiffer than rosette consistency—add less cream.
Storage: Covered and refrigerated, this cake holds beautifully for 3 days. The simple piping means petals stay crisp and don’t weep.
Color Gradient & Ombré Flowered Sheet Cake Designs
These designs layer color to create depth and visual impact. I blend shades—from pale to bold—across the same flower or in a sweep across the cake. This is where the magic of modern sheet cakes happens.
4. Ombré Rosette Sweep
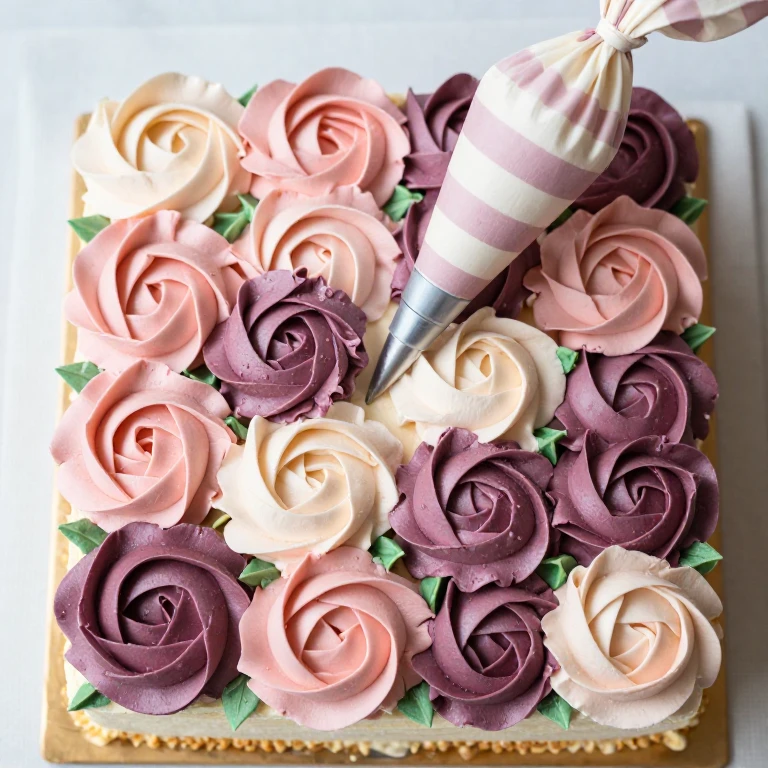
I blend three or four shades of the same color family in one piping bag, creating rosettes that shift from light to dark as I move across the cake. It’s a single technique with maximum visual payoff.
Ingredients
- 2.5 cups unsalted butter, room temperature
- 5 cups powdered sugar
- 3 tablespoons heavy cream
- 1 teaspoon vanilla extract
- Food coloring (blush, rose, deep mauve)
- Wilton 1M piping tip
- Piping bag
- One 9×13 sheet cake, cooled
Instructions
- Prepare buttercream; divide into three bowls and tint each shade darker.
- Load piping bag: stripe one side with blush, one with rose, one with deep mauve.
- Pipe rosettes across cake top, rotating bag slightly so color shifts within each flower.
- Refill and repeat until cake is covered in a gradient sweep.
- Add green leaves between rosettes.
- Chill 30 minutes before serving.
Practical Tip: Load your piping bag fresh every 3–4 rosettes so colors stay vibrant and don’t muddy together.
Storage: Refrigerate covered up to 4 days. The ombré effect stays striking because buttercream holds color well when chilled.
5. Sunset Peony Gradient
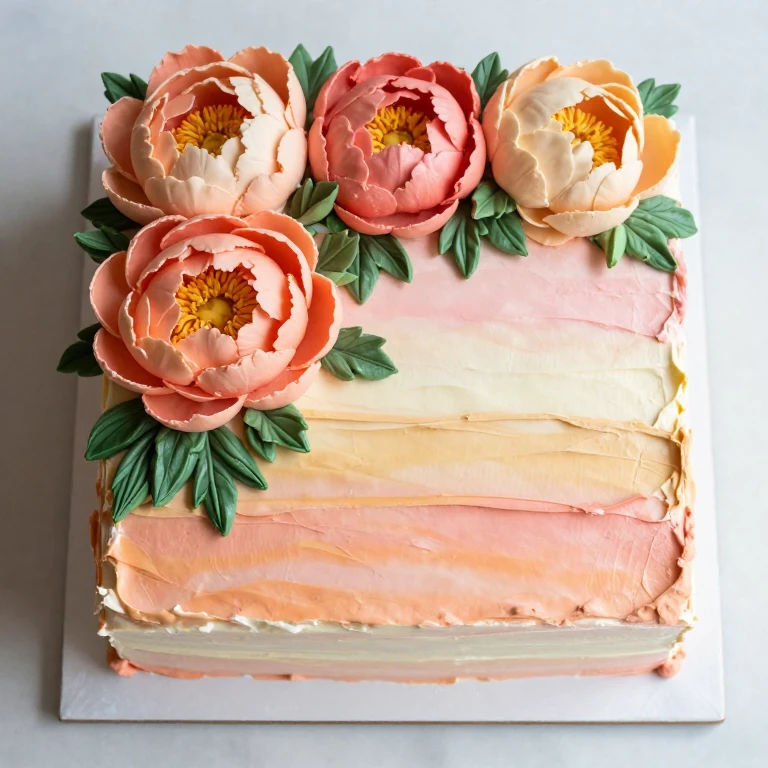
I build peonies that transition from coral to gold to blush within a single flower. It’s a showstopper technique that looks like you spent hours—but the method is straightforward once you load your bag right.
Ingredients
- 2.5 cups unsalted butter, room temperature
- 5 cups powdered sugar
- 3 tablespoons heavy cream
- 1 teaspoon vanilla extract
- Food coloring (coral, peach, gold, blush)
- Wilton 104 petal piping tip
- Piping bag
- One 9×13 sheet cake, cooled
Instructions
- Prepare buttercream and divide into four shades: coral, peach, gold, blush.
- Load piping bag with all four colors in vertical stripes.
- Pipe peony layers as in Peony Petal Cascade, rotating bag so colors blend naturally.
- Pipe 3–4 peonies across cake top, repositioning color stripes for variety.
- Fill negative space with greenery.
- Refrigerate 30 minutes.
Consistency Cue: Slightly stiffer buttercream helps colors stay defined; slightly softer lets them blend more. Choose based on the look you want.
Storage: Covered and refrigerated up to 4 days. Colors remain vibrant and petals hold shape beautifully.
6. Blush-to-Bold Daisy Bed

I pipe daisies across the cake in a color progression—starting pale on one edge and deepening toward the other. It’s directional, modern, and works on any cake shape.
Ingredients
- 2.5 cups unsalted butter, room temperature
- 5 cups powdered sugar
- 3 tablespoons heavy cream
- 1 teaspoon vanilla extract
- Food coloring (blush, rose, deep pink, yellow, green)
- Wilton 103 petal tip
- Wilton 2 round tip
- Piping bags
- One 9×13 sheet cake, cooled
Instructions
- Prepare buttercream; tint petal colors in blush, rose, and deep pink. Keep yellow and green separate.
- Pipe daisies across cake top, starting with blush petals on one edge.
- Shift to rose for the middle section.
- Finish with deep pink daisies on the far edge.
- Pipe yellow centers and green leaves throughout.
- Chill 20 minutes.
Practical Tip: Sketch your color zones lightly with a toothpick before piping so you stay on track.
Storage: Refrigerate covered up to 3 days. The gradient effect stays clean and bold when properly chilled.
Leafy Border & Mixed Greenery Flowered Sheet Cake Designs
These designs emphasize foliage and botanical structure. I use leaf tips and simple strokes to build depth and frame the cake. Greenery is the unsung hero of a polished flowered cake.
7. Leafy Peony Frame

I pipe a dense border of leaves around the cake perimeter, then anchor peonies at corners and center. The leaves create a garden bed effect that makes peonies pop.
Ingredients
- 2.5 cups unsalted butter, room temperature
- 5 cups powdered sugar
- 3 tablespoons heavy cream
- 1 teaspoon vanilla extract
- Food coloring (blush pink, deep green)
- Wilton 104 petal tip (for peonies)
- Wilton 352 leaf tip
- Piping bags
- One 9×13 sheet cake, cooled
Instructions
- Prepare buttercream; divide and tint pink for peonies and green for leaves.
- Load piping bag with leaf tip and green buttercream.
- Pipe a dense border of overlapping leaves around cake perimeter.
- Pipe leaf clusters along top edges as anchors.
- Switch to petal tip and pink buttercream; pipe peonies at four corners and cake center.
- Chill 30 minutes before serving.
Consistency Cue: Leaves need slightly stiffer buttercream so they hold pointed shape; peonies prefer softer consistency for ruffled petals.
Storage: Refrigerate covered up to 4 days. Leaves stay crisp and support the peonies beautifully.
8. Herb Garden Rosette Bed
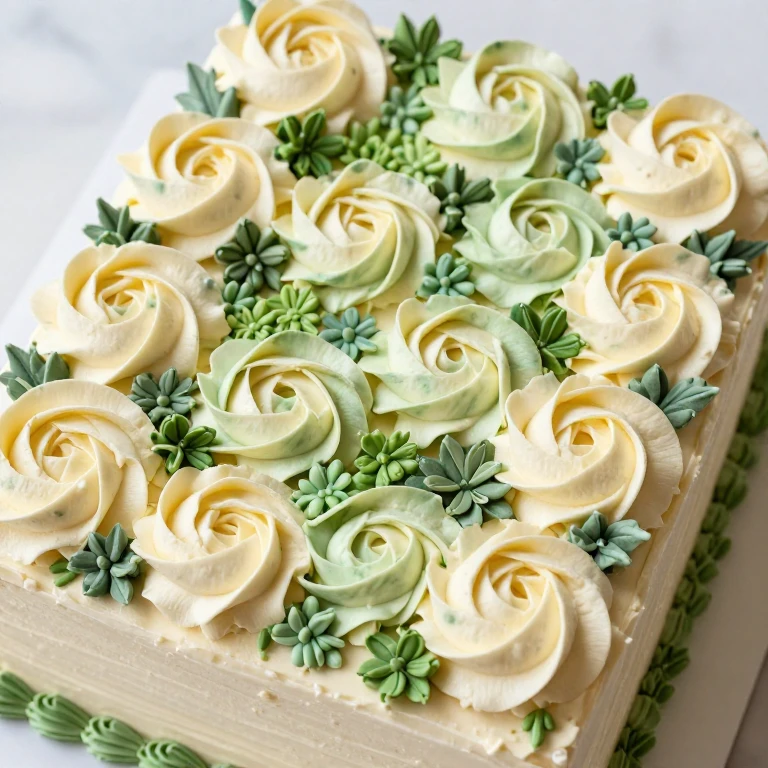
I combine rosettes with varied leaf work—some simple strokes, some piped as individual leaves. It reads botanical and intentional, perfect for garden-themed events.
Ingredients
- 2 cups unsalted butter, room temperature
- 4 cups powdered sugar
- 2 tablespoons heavy cream
- 1 teaspoon vanilla extract
- Food coloring (cream, soft green, sage green)
- Wilton 1M piping tip
- Wilton 352 leaf tip
- Piping bags
- One 9×13 sheet cake, cooled
Instructions
- Prepare buttercream; tint cream for rosettes and two shades of green for foliage.
- Load piping bag with 1M tip and cream buttercream; pipe rosettes across cake top in loose clusters.
- Switch to leaf tip with soft green; pipe simple leaf strokes between rosettes.
- Use sage green for deeper leaf shadows and detail work.
- Step back and fill gaps with additional leaves for a full garden effect.
- Refrigerate 20 minutes.
Practical Tip: Vary leaf direction and angle so the garden feels organic, not rigid.
Storage: Covered and refrigerated up to 3 days. The mix of rosettes and leaves stays fresh and holds texture beautifully.
9. Daisy Meadow with Tall Grasses
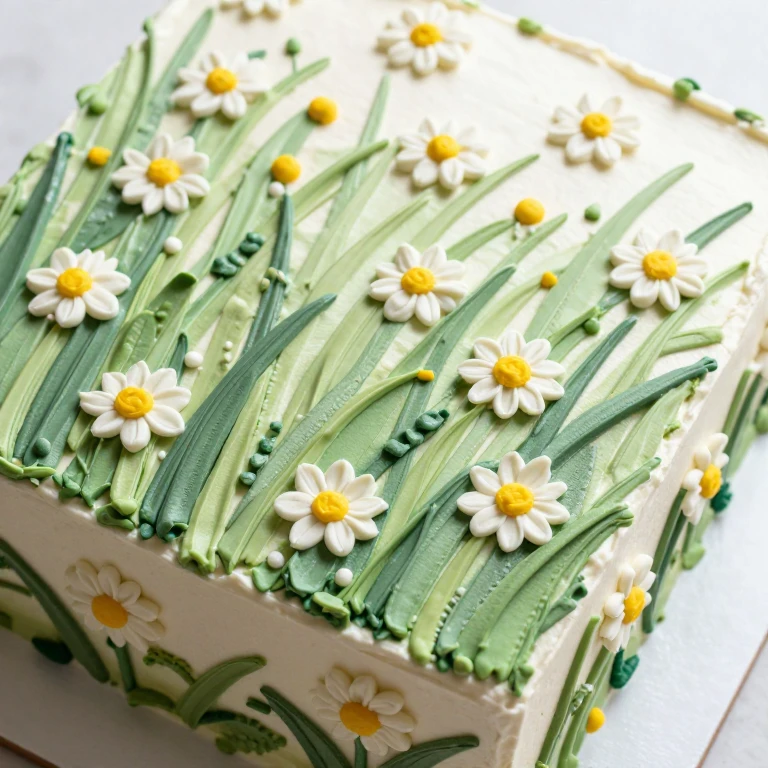
I pipe daisies scattered across the cake, then add tall grass strokes between them. It’s whimsical and modern at once—like a meadow in miniature.
Ingredients
- 2 cups unsalted butter, room temperature
- 4 cups powdered sugar
- 2 tablespoons heavy cream
- 1 teaspoon vanilla extract
- Food coloring (white, yellow, soft green, sage)
- Wilton 103 petal tip
- Wilton 2 round tip
- Wilton 352 leaf tip
- Piping bags
- One 9×13 sheet cake, cooled
Instructions
- Prepare buttercream; tint white for petals, yellow for centers, and two greens for foliage.
- Pipe daisies randomly across cake top with petal tip and white buttercream.
- Add yellow centers with round tip.
- Load leaf tip with soft green; pipe tall grass strokes between daisies, angling upward.
- Add sage green shadows for depth.
- Chill 20 minutes.
Consistency Cue: Grass strokes work best with slightly stiffer buttercream so they hold pointed tips.
Storage: Refrigerate covered up to 3 days. The meadow effect stays playful and intact.
Mixed Flower & Statement Designs Flowered Sheet Cake Designs
These designs combine multiple flower types or introduce bold focal points. I use these when I want the cake to be the centerpiece of the table—no other dessert needed.
10. Peony and Rose Duet
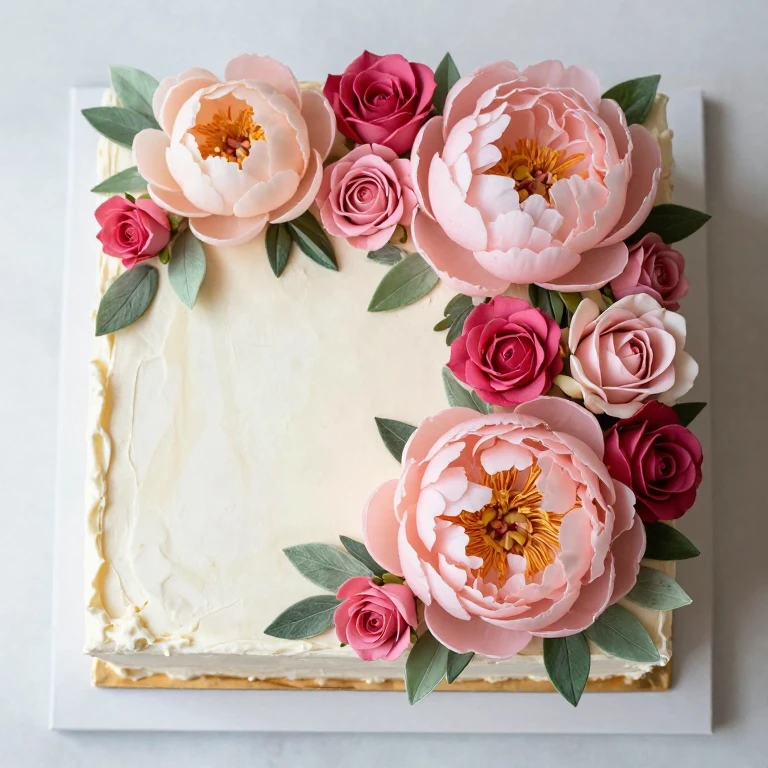
I pair full peonies with smaller roses, creating a high-impact combination. The size contrast and color interplay make this design feel sophisticated and intentional.
Ingredients
- 2.5 cups unsalted butter, room temperature
- 5 cups powdered sugar
- 3 tablespoons heavy cream
- 1 teaspoon vanilla extract
- Food coloring (blush pink, deep pink, sage green)
- Wilton 104 petal tip
- Wilton 103 petal tip
- Wilton 352 leaf tip
- Piping bags
- One 9×13 sheet cake, cooled
Instructions
- Prepare buttercream; tint blush and deep pink for flowers, sage for leaves.
- Load piping bag with 104 tip and blush buttercream; pipe 2–3 full peonies as focal points.
- Switch to 103 tip with deep pink; pipe smaller roses clustered between peonies.
- Fill with sage leaves and greenery to anchor the composition.
- Chill 30 minutes.
Practical Tip: Anchor peonies first, then build roses around them—this gives you a roadmap for the whole design.
Storage: Refrigerate covered up to 4 days. Both flower types hold shape and color beautifully when chilled properly.
11. Rainbow Rosette Explosion
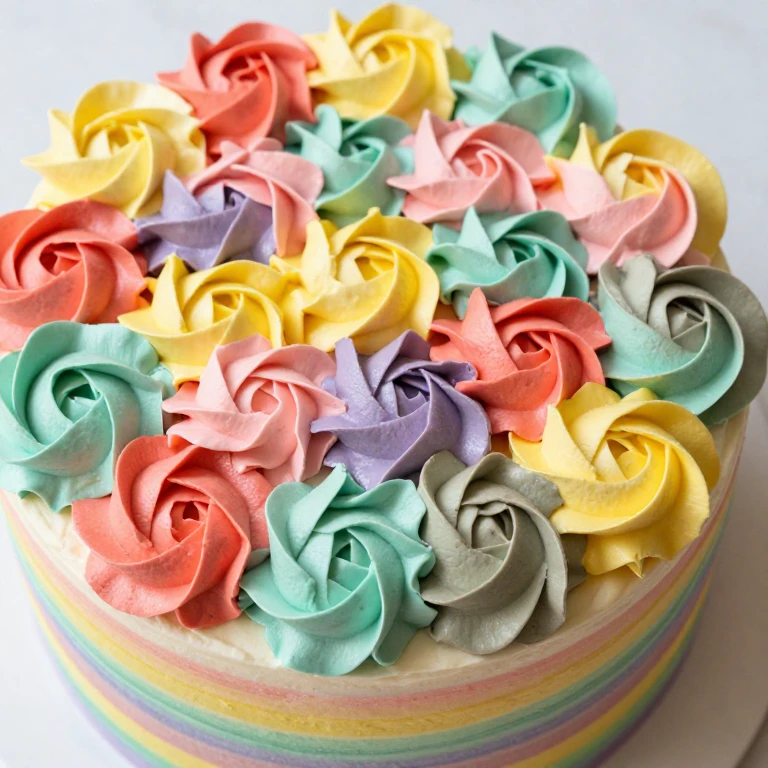
I load a piping bag with multiple colors and pipe rosettes across the entire cake in a riot of hues. It’s bold, modern, and demands attention. This design works for celebrations or anyone who loves color.
Ingredients
- 3 cups unsalted butter, room temperature
- 6 cups powdered sugar
- 3 tablespoons heavy cream
- 1 teaspoon vanilla extract
- Food coloring (coral, yellow, blush, lavender, mint, sage)
- Wilton 1M piping tip
- Piping bag
- One 9×13 sheet cake, cooled
Instructions
- Prepare buttercream and divide into six bowls; tint each a different color.
- Load piping bag by striping all six colors vertically inside the bag.
- Pipe rosettes across cake top, rotating bag so colors shift within each flower.
- Refill bag every 4–5 rosettes to keep colors vibrant.
- Cover entire top surface with overlapping rosettes.
- Chill 30 minutes.
Consistency Cue: For this design, slightly softer buttercream lets colors blend and swirl; slightly stiffer keeps them more distinct. Both work—choose your mood.
Storage: Refrigerate covered up to 4 days. Colors stay bold and vibrant; no fading or color bleed.
12. Statement Peony Focal Point
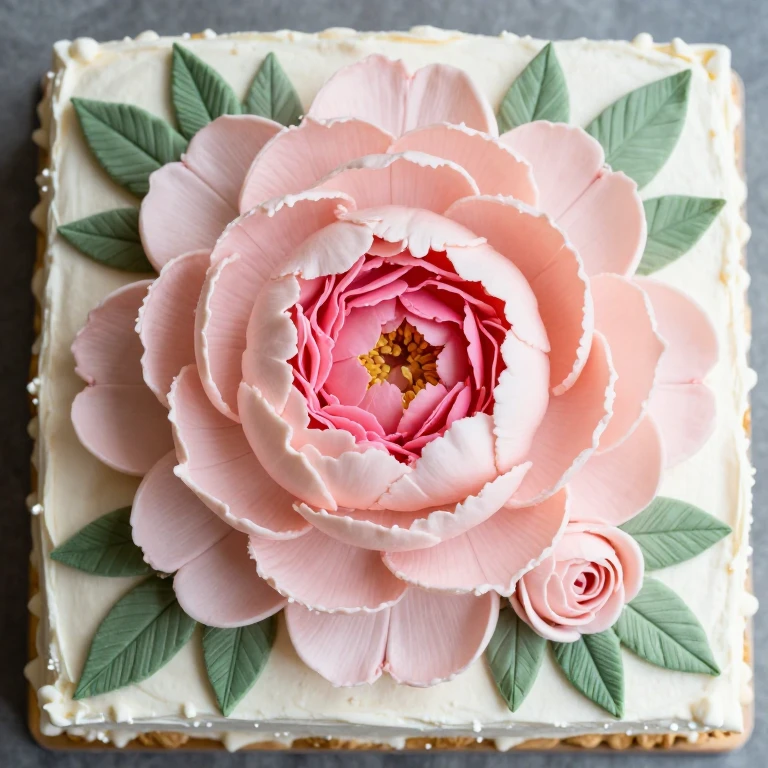
I pipe one massive peony dead center of the cake, then surround it with smaller flowers and leaves. It’s a single-flower statement that reads gallery-worthy. This is the design I pull out when I want to show off.
Ingredients
- 2.5 cups unsalted butter, room temperature
- 5 cups powdered sugar
- 3 tablespoons heavy cream
- 1 teaspoon vanilla extract
- Food coloring (blush pink, deep pink, sage green)
- Wilton 104 petal piping tip
- Wilton 103 petal tip
- Wilton 352 leaf tip
- Piping bags
- One 9×13 sheet cake, cooled
Instructions
- Prepare buttercream; tint blush and deep pink for flowers, sage for leaves.
- Load piping bag with 104 tip and blush buttercream; find cake center and pipe outer ring of large petals.
- Rotate bag and pipe second ring, overlapping and slightly smaller.
- Switch to deep pink and pipe inner petals tight and full.
- Pipe supporting flowers (smaller peonies or roses) around the focal point.
- Frame with leaves and greenery; chill 30 minutes before serving.
Practical Tip: Use a cake turntable for the focal peony—it lets you rotate and work at a consistent angle.
Storage: Refrigerate covered up to 4 days. The statement peony holds its ruffled structure beautifully when properly chilled.
When to Choose Each Style
- Classic Buttercream Blooms: You’re learning piping fundamentals or need a design that feels timeless and garden-fresh. Rosettes and daisies work for any occasion and any cake flavor.
- Color Gradient & Ombré: You want visual impact without added complexity. Gradients read modern and polished—perfect for celebrations or when you want the cake to be a focal point.
- Leafy Border & Mixed Greenery: You’re decorating a garden party or want the cake to feel botanical and structured. Leaves anchor the design and make flowers feel intentional.
- Mixed Flower & Statement Designs: You’re building a showstopper. These designs demand attention and work best when the cake is the main dessert, not one of many options.
FAQ
What buttercream consistency do I need for flowered sheet cakes?
Consistency is everything. For rosettes and large piped flowers, you want buttercream that holds peaks but still feels soft—it should spread smoothly on the cake but hold shape when piped. If it’s too soft, flowers collapse; too stiff, and piping becomes exhausting. I test by piping a rosette on a small plate first. If it holds shape with soft edges, you’re there. Add cream 1 teaspoon at a time if it’s too stiff, or refrigerate 10–15 minutes if it’s too soft.
Can I make flowered sheet cakes ahead of time?
Yes, and I do this often. Bake the cake 1–2 days ahead, wrap it undecorated, and refrigerate. Decorate it the morning of serving or up to 8 hours before. Piped flowers actually benefit from a few hours in the fridge—they set and hold shape better. Keep the finished cake covered loosely in the refrigerator until serving time. Bring it to room temperature 30 minutes before slicing so the cake is tender and flavors come through.
What’s the best way to pipe peonies without them looking flat?
Layer from outside in, and rotate the bag as you work. The outer petals should angle slightly outward; middle petals angle more inward; inner petals are tight and small. Think of it as building a 3D flower, not a flat circle. Also, slightly softer buttercream helps—it creates those ruffled, organic edges that make peonies look full and dimensional.
How do I keep piped flowers from wilting or losing color?
Refrigeration is your friend. Buttercream flowers hold their shape and color best when kept cool. I refrigerate the cake for at least 20 minutes after piping so flowers set. Keep the finished cake covered and refrigerated until serving. If you’re transporting the cake, use a cake box and keep it in a cool car or insulated carrier. Avoid direct sunlight, which can fade colors and soften buttercream.
Can I use gel food coloring instead of liquid?
Absolutely. Gel coloring is more concentrated, so you need less and it won’t thin your buttercream the way liquid coloring can. Start with a toothpick dab and build color gradually. Gel coloring also produces more vibrant, true hues—especially helpful for ombré and gradient designs. Mix thoroughly so color is even throughout.
What cake flavors pair best with flowered designs?
Any cake works, but I’ve found that lighter, more delicate flavors let the floral design shine. Vanilla, almond, lemon, and strawberry are my go-tos. They don’t compete with the visual impact of the piping. Chocolate and darker cakes are beautiful too—they create contrast with light buttercream flowers. The key is matching your cake flavor to your buttercream flavor so they feel intentional together.
How long does a flowered sheet cake last in the refrigerator?
Covered and refrigerated, a flowered sheet cake stays fresh and delicious for 3–4 days. The buttercream protects the cake and keeps it moist. After 4 days, the cake can dry out slightly and piped flowers may start to weep if humidity is high. If you’re making the cake more than 2 days ahead, I recommend decorating it closer to serving time—the flowers stay crisper and more vibrant.
Conclusion
Flowered sheet cakes are approachable once you understand the fundamentals: buttercream consistency, petal shapes, and color layering. Pick one design from this collection that speaks to you, practice on parchment if you need to, then commit. I promise the payoff—that moment when someone sees your cake and gasps—is worth the small learning curve. Start today.