
Lunch box rice bowls are my go-to move for weekday eating that actually tastes like I tried. The challenge isn’t the rice—it’s keeping everything tasting fresh, textured, and balanced eight hours later. I’ve organized these 12 recipes into four flavor-driven groups so you can pick your strategy: bold Asian-inspired bowls, bright Mediterranean styles, creamy comfort builds, and quick-prep protein-forward options. Each one nails the Whirl Factor—that signature twist and texture contrast that keeps lunch from tasting like, well, lunch.
Bold Asian-Inspired Lunch Box Rice Bowls
These bowls lean into umami, sesame, and bright acid. The Whirl Factor here is layering—sauces stay separate, crunchy elements stay crisp, and warm rice stays warm. Pack these with a tight-seal container and you’ve got depth of flavor that improves as it sits.
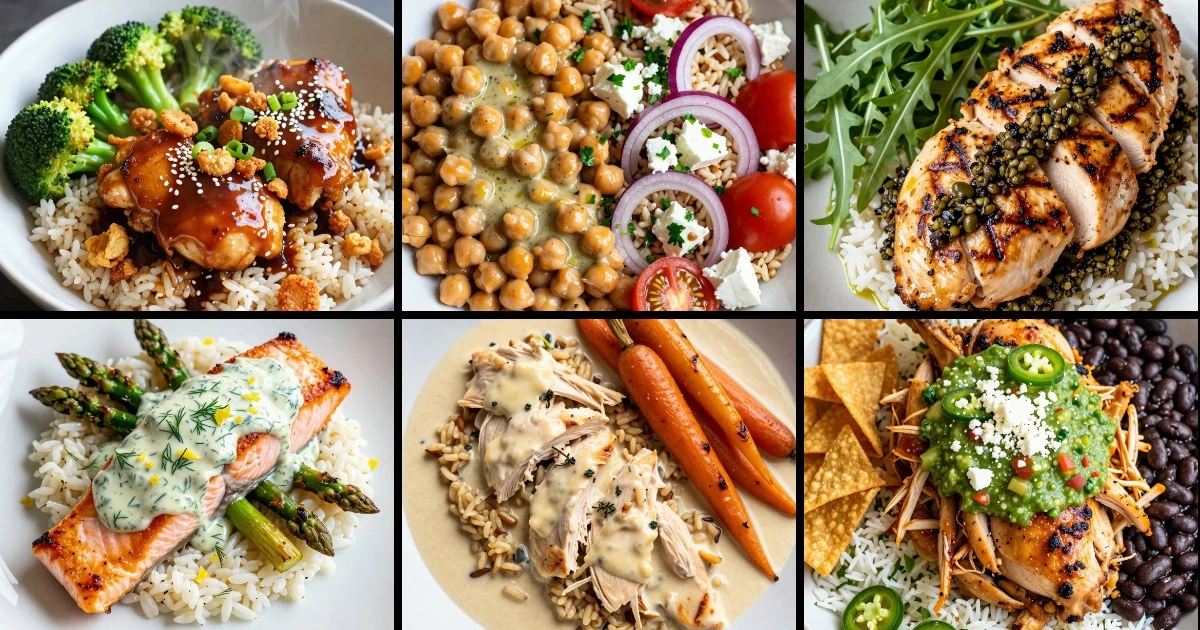
1. Teriyaki Chicken with Crispy Shallots
Glazed chicken thighs over brown rice with roasted broccoli and a shower of fried shallots. The contrast is hot-sweet glaze meeting cold, snappy shallot crunch. I pack the shallots on the side and dress the bowl just before eating so they stay crispy.
Ingredients
- 1.5 lbs boneless chicken thighs, cut into 1.5-inch pieces
- 1/2 cup soy sauce
- 3 tablespoons mirin
- 2 tablespoons honey
- 2 cloves garlic, minced
- 2 cups cooked brown rice
- 2 cups broccoli florets, roasted
- 1/3 cup crispy fried shallots
- 2 green onions, sliced
- 1 tablespoon sesame seeds
Instructions
- Whisk soy sauce, mirin, honey, and garlic in a bowl.
- Heat 2 tablespoons oil in a large skillet over medium-high heat. Add chicken and sear 4-5 minutes per side until golden.
- Pour teriyaki glaze over chicken, simmer 3-4 minutes until sauce thickens and coats each piece.
- Divide rice into containers, top with broccoli and glazed chicken.
- Pack fried shallots, green onions, and sesame seeds in a separate small container.
- Sprinkle toppings just before eating.
Whirl Finish: The shallot crunch is non-negotiable—keep it separate and add it in the last minute. The glaze actually deepens overnight, so this bowl tastes even better on day two.
Storage: Keeps 4 days refrigerated. Reheat rice and chicken gently (30 seconds in the microwave), add cold broccoli and fresh shallots.
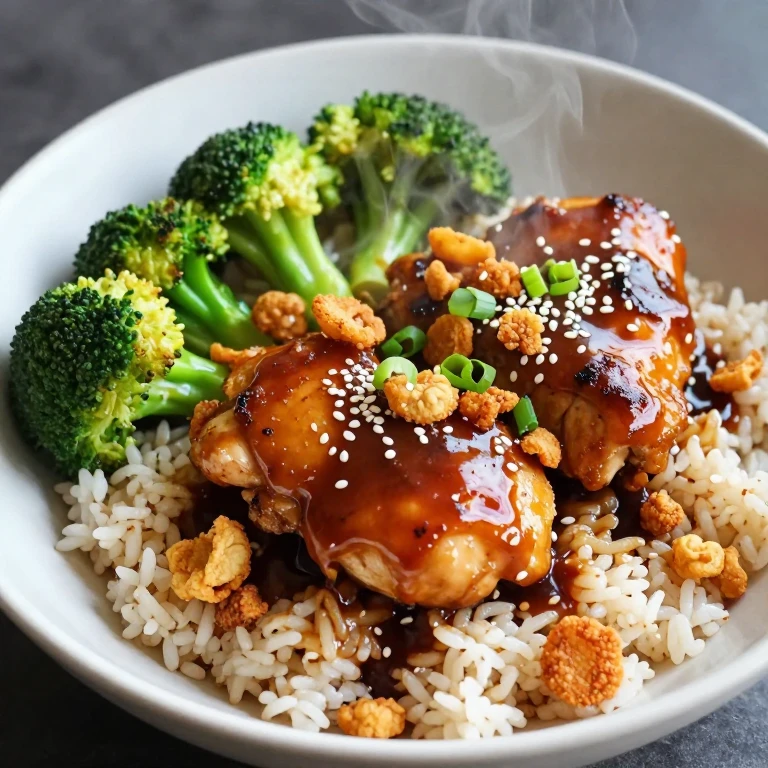
2. Sesame Tofu with Pickled Cucumber
Crispy pan-fried tofu tossed in sesame-ginger sauce, served over jasmine rice with quick-pickled cucumbers and edamame. The Whirl Factor is the contrast between hot tofu and cold, tangy pickles—it’s what keeps you coming back to the bowl.
Ingredients
- 14 oz extra-firm tofu, pressed and cubed
- 3 tablespoons sesame oil
- 2 tablespoons rice vinegar
- 1 tablespoon soy sauce
- 1 teaspoon grated ginger
- 1 clove garlic, minced
- 2 cups cooked jasmine rice
- 1 cup cucumber, thinly sliced
- 1 cup shelled edamame
- 2 tablespoons white sesame seeds
Instructions
- Quick-pickle cucumbers: toss sliced cucumber with 2 tablespoons rice vinegar, 1 tablespoon sugar, and a pinch of salt. Let sit 15 minutes.
- Heat 1.5 tablespoons oil in a skillet over medium-high heat. Pan-fry tofu cubes 3-4 minutes per side until golden and crispy.
- Whisk remaining sesame oil, rice vinegar, soy sauce, ginger, and garlic. Toss warm tofu in sauce.
- Layer rice, edamame, and sesame tofu in containers.
- Pack pickled cucumber in a separate compartment so liquid doesn’t soak the rice.
- Sprinkle sesame seeds just before eating.
Whirl Finish: The pickled cucumber brings acid and snap that cuts through the richness of sesame oil. This is the move that makes the whole bowl feel intentional.
Storage: Keeps 3 days. Pack pickles separately and add them fresh when you eat. The tofu actually gets firmer as it cools, which means better texture at lunch.
3. Citrus Shrimp with Charred Snap Peas
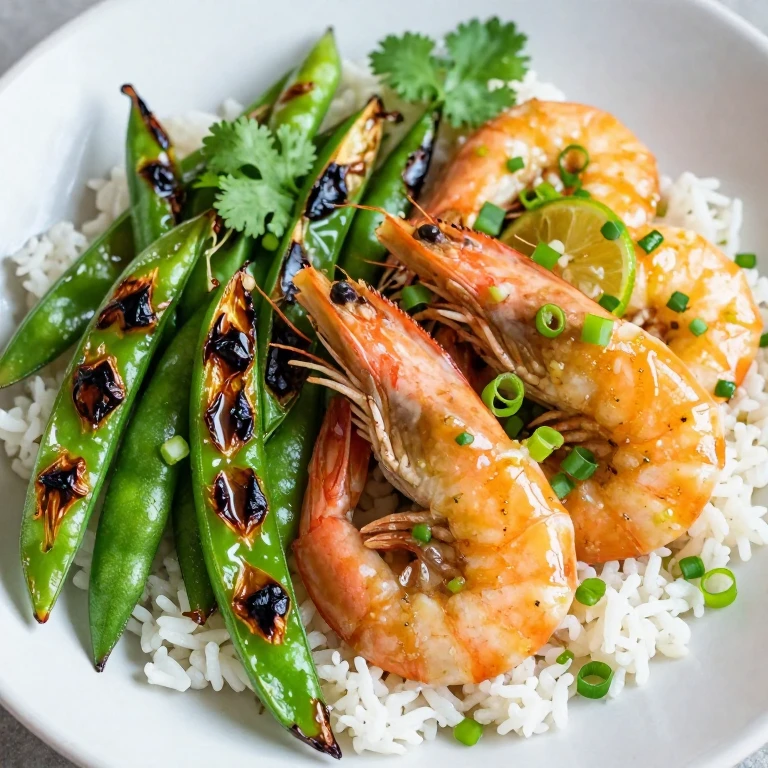
Quick-seared shrimp with lime-ginger dressing, charred snap peas, and jasmine rice. I love this one because it comes together in under 20 minutes and the citrus keeps everything bright even after a few hours in a lunch box.
Ingredients
- 1 lb large shrimp, peeled and deveined
- 2 tablespoons olive oil
- Zest and juice of 2 limes
- 1 tablespoon fish sauce
- 1 teaspoon grated ginger
- 2 cups cooked jasmine rice
- 2 cups snap peas, halved
- 1/4 cup fresh cilantro, chopped
- 2 green onions, sliced
- Fleur de sel and black pepper
Instructions
- Whisk lime zest, lime juice, fish sauce, and ginger in a small bowl. Set dressing aside.
- Heat 1 tablespoon oil in a large skillet over high heat. Sear shrimp 1.5-2 minutes per side until pink. Transfer to a plate.
- In the same skillet, char snap peas 2-3 minutes until blistered. Season with salt and pepper.
- Toss warm shrimp with citrus dressing.
- Layer rice, snap peas, and shrimp into containers.
- Pack cilantro and green onions separately; add fresh just before eating.
Whirl Finish: The char on the snap peas is the texture anchor here—it gives you something to bite into. The citrus dressing stays bright all day, which is the whole point.
Storage: Keeps 3 days. Pack fresh herbs separately so they don’t wilt. Shrimp is best eaten the same day or day two; the texture stays firm but the flavor deepens.
Bright Mediterranean Lunch Box Rice Bowls
These bowls build on olive oil, fresh herbs, and clean acid. The Whirl Factor is simplicity with intention—every element earns its place. Mediterranean bowls pack beautifully because the flavors actually improve as everything mingles overnight.
4. Chickpea and Herb Salad with Feta
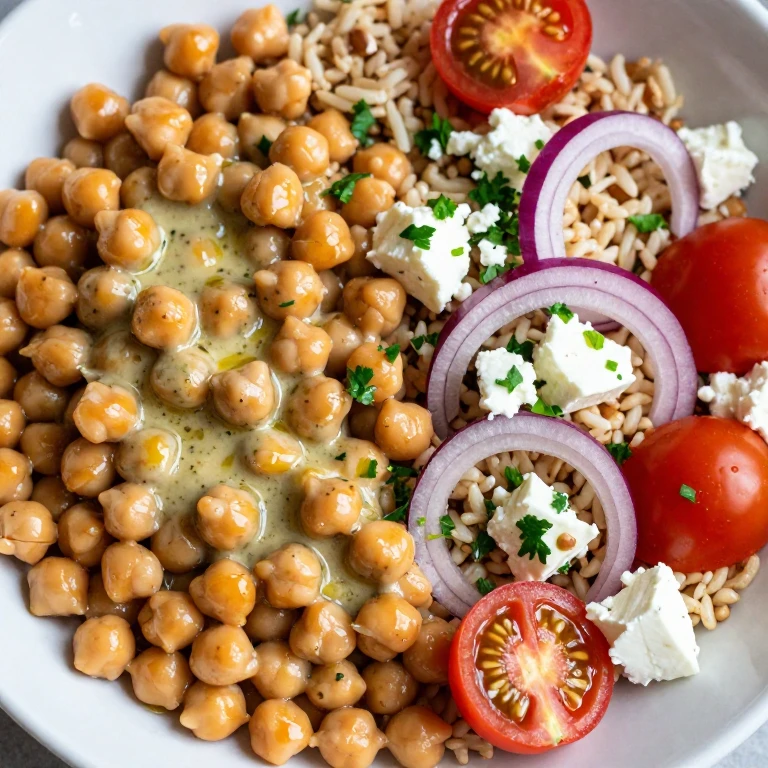
Warm chickpeas tossed in lemon-oregano dressing, cooled and layered with feta, tomatoes, and red onion over brown rice. This is my meatless power move—the chickpeas give you protein and substance, and the feta brings salt and richness that makes the whole bowl feel complete.
Ingredients
- 2 cans chickpeas, drained and rinsed
- 3 tablespoons olive oil
- Zest and juice of 2 lemons
- 2 teaspoons dried oregano
- 2 cloves garlic, minced
- 2 cups cooked brown rice
- 1 cup cherry tomatoes, halved
- 1/2 red onion, thinly sliced
- 1 cup crumbled feta
- 1/4 cup fresh parsley, chopped
Instructions
- Warm chickpeas in a pot over medium heat. Whisk olive oil, lemon zest, lemon juice, oregano, and garlic.
- Toss warm chickpeas in dressing and let cool to room temperature (about 10 minutes).
- Layer rice into containers, top with cooled chickpea mixture.
- Pack tomatoes, red onion, and feta in separate compartments or scatter over just before eating.
- Finish with fresh parsley.
- Drizzle any remaining dressing over the top.
Whirl Finish: The warm-then-cool technique lets the chickpeas soak up flavor while the feta stays creamy and cold. This is the bowl that tastes better on day two because the flavors have time to marry.
Storage: Keeps 4 days. The chickpeas actually improve overnight. Pack tomatoes and feta separately if you prefer them cold and crisp; otherwise, everything mingles beautifully.
5. Roasted Vegetable and Quinoa with Tahini Drizzle
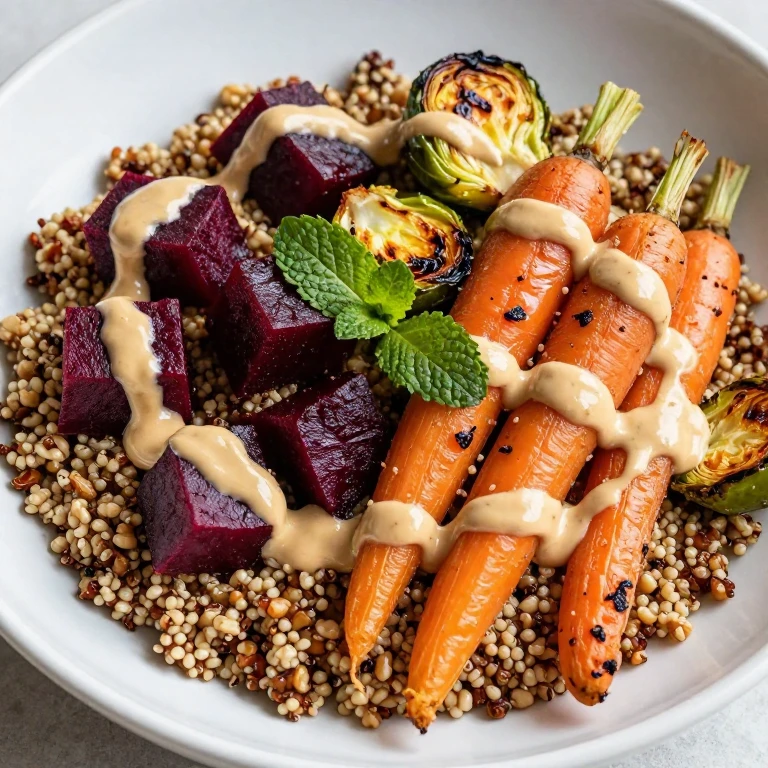
Roasted beets, carrots, and Brussels sprouts over fluffy quinoa, finished with creamy tahini-lemon sauce. The Whirl Factor is the earthy roasted vegetables meeting the nutty tahini—it’s warm, filling, and the colors stay vibrant all day.
Ingredients
- 1 medium beet, cubed
- 2 large carrots, cubed
- 1.5 cups Brussels sprouts, halved
- 3 tablespoons olive oil
- Salt and pepper
- 1.5 cups cooked quinoa
- 1/4 cup tahini
- Juice of 1 lemon
- 1 clove garlic, minced
- 1/4 cup fresh mint, chopped
Instructions
- Toss beet, carrots, and Brussels sprouts with 2 tablespoons oil, salt, and pepper. Roast at 425°F for 25 minutes, stirring halfway.
- Whisk tahini, lemon juice, garlic, and 3 tablespoons water until smooth and pourable.
- Layer quinoa into containers, top with roasted vegetables.
- Drizzle tahini sauce over each bowl.
- Pack fresh mint in a separate container and scatter over just before eating.
- Store tahini sauce in a small leakproof container on the side.
Whirl Finish: The tahini sauce is creamy enough to coat everything but light enough that it doesn’t make the grains soggy. The roasted vegetables stay firm and the beet color bleeds slightly into the quinoa—it’s actually gorgeous.
Storage: Keeps 4 days. Pack the tahini sauce separately and add it just before eating so the grains stay fluffy. The roasted vegetables taste even better cold.
6. Grilled Chicken with Olive Tapenade and Arugula

Grilled chicken breast marinated in lemon and thyme, topped with briny olive tapenade and peppery arugula over white rice. This is my go-to when I want something that feels restaurant-quality but packs like a dream.
Ingredients
- 1.5 lbs chicken breast
- 3 tablespoons olive oil
- Zest and juice of 1 lemon
- 2 teaspoons dried thyme
- 2 cloves garlic, minced
- 2 cups cooked white rice
- 3/4 cup kalamata olives, pitted and chopped
- 2 tablespoons capers
- 2 cups fresh arugula
- Fleur de sel and black pepper
Instructions
- Marinate chicken in 2 tablespoons oil, lemon zest, lemon juice, thyme, and garlic for at least 2 hours (or overnight).
- Grill chicken over medium-high heat 6-7 minutes per side until internal temperature reaches 165°F.
- Rest 5 minutes, then slice into strips.
- Chop olives and capers together to make a rough tapenade.
- Layer rice into containers, top with chicken slices and tapenade.
- Pack arugula separately and toss with 1 tablespoon olive oil just before eating.
Whirl Finish: The olive tapenade brings salt and brininess that keeps the chicken from feeling plain. The fresh arugula added at eating time gives you peppery snap—this is the texture contrast that makes it sing.
Storage: Keeps 4 days. Pack arugula in a separate container so it doesn’t wilt. The chicken actually gets more tender as it sits, and the tapenade flavors deepen.
Creamy Comfort Lunch Box Rice Bowls
These bowls build on richness—cream sauces, roasted proteins, and soft vegetables. The Whirl Factor is balancing creamy elements with something bright or crunchy so the bowl doesn’t feel heavy. These pack beautifully because the sauce coats the rice and keeps everything moist.
7. Creamy Mushroom and Thyme with Crispy Breadcrumbs

Sautéed mushrooms in a light cream sauce over brown rice, topped with crispy herb breadcrumbs and fresh thyme. The Whirl Factor is the creamy mushroom meeting the crunchy breadcrumb topping—it’s comfort food with texture intention.
Ingredients
- 1.5 lbs mixed mushrooms, sliced
- 2 tablespoons butter
- 1/2 cup heavy cream
- 1/4 cup dry white wine
- 2 cloves garlic, minced
- 2 teaspoons fresh thyme
- 2 cups cooked brown rice
- 1/2 cup panko breadcrumbs
- 1 tablespoon olive oil
- Fleur de sel and black pepper
Instructions
- Heat butter in a large skillet over medium-high heat. Sauté mushrooms 5-6 minutes until golden. Season with salt and pepper.
- Add garlic and thyme, cook 1 minute until fragrant.
- Deglaze with white wine, scraping up browned bits. Simmer 2 minutes.
- Reduce heat to medium, pour in cream, and simmer 3-4 minutes until sauce coats the back of a spoon.
- Toss panko with olive oil, thyme, salt, and pepper. Toast in a dry skillet 2-3 minutes until golden.
- Layer rice into containers, top with creamy mushrooms, and pack breadcrumbs in a separate container.
Whirl Finish: The breadcrumbs stay crispy if you pack them separately and scatter them over the warm mushrooms just before eating. The cream sauce actually coats the rice better as it cools, making this a better lunch-box choice than a fresh-from-the-stove meal.
Storage: Keeps 3 days. Pack breadcrumbs separately. Reheat gently in the microwave (30 seconds) and add fresh breadcrumbs before eating. The mushroom flavor deepens overnight.
8. Roasted Salmon with Dill Cream Sauce
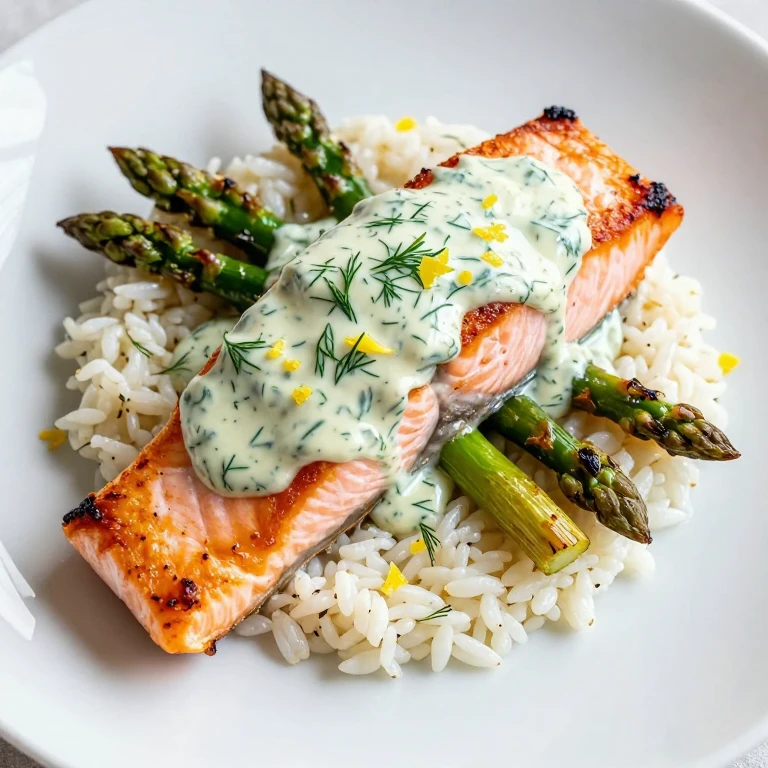
Pan-seared salmon fillet over jasmine rice with a silky dill-cream sauce, roasted asparagus, and lemon. This is my protein-forward move when I want something that feels special but actually reheats beautifully.
Ingredients
- 4 salmon fillets (5-6 oz each)
- 2 tablespoons olive oil
- Salt and pepper
- 1/2 cup heavy cream
- 2 tablespoons fresh dill, chopped
- Zest and juice of 1 lemon
- 2 cloves garlic, minced
- 2 cups cooked jasmine rice
- 1.5 cups asparagus, trimmed
- Fleur de sel
Instructions
- Heat 1 tablespoon oil in a skillet over medium-high heat. Season salmon with salt and pepper. Sear 4 minutes per side until the internal temperature reaches 145°F.
- In a separate pot, combine cream, dill, lemon zest, lemon juice, and garlic. Simmer 2-3 minutes until slightly thickened.
- Toss asparagus with 1 tablespoon oil, salt, and pepper. Roast at 400°F for 12 minutes until tender and lightly charred.
- Layer rice into containers, top with roasted asparagus and salmon fillet.
- Spoon dill cream sauce over the top.
- Pack a lemon wedge for extra brightness if desired.
Whirl Finish: The dill cream sauce is the move here—it keeps the salmon moist and adds richness without heaviness. The asparagus stays tender and the lemon keeps everything from feeling too rich.
Storage: Keeps 3 days. Reheat salmon gently (20-30 seconds in the microwave) so it stays moist. The sauce actually coats the rice better when it’s cool, making this a solid lunch-box choice.
9. Creamy Chicken and Wild Rice with Roasted Root Vegetables
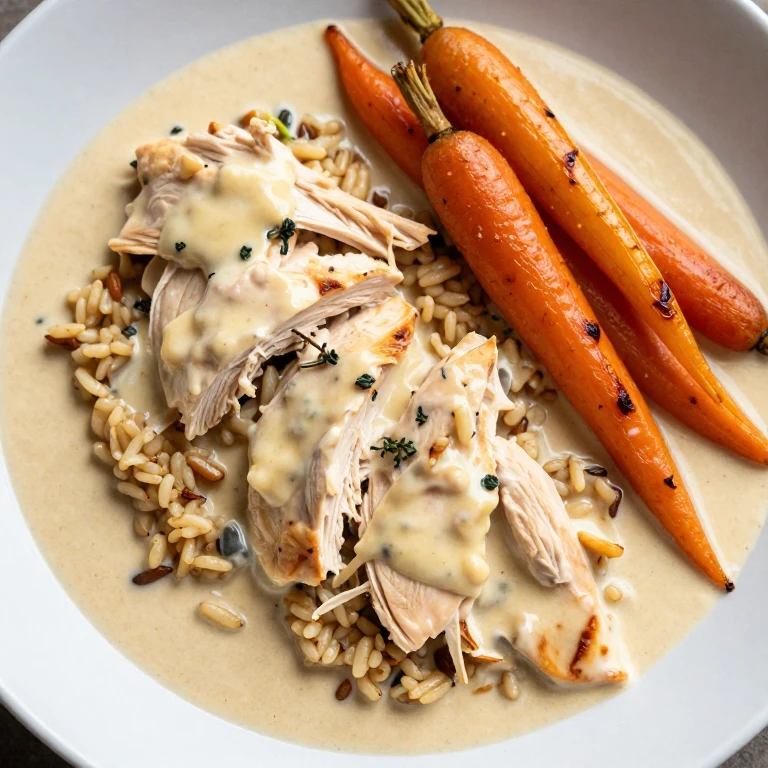
Shredded chicken thighs in a light cream sauce over wild rice blend, with roasted parsnips and carrots. The Whirl Factor is using thighs instead of breast—they stay moist and the cream sauce becomes part of the whole story.
Ingredients
- 1.5 lbs boneless chicken thighs
- 2 tablespoons butter
- 1/2 cup chicken broth
- 1/3 cup heavy cream
- 1 teaspoon Dijon mustard
- 2 cups cooked wild rice blend
- 2 large carrots, cut into batons
- 2 parsnips, cut into batons
- 2 tablespoons olive oil
- 1 teaspoon fresh thyme
- Salt and pepper
Instructions
- Season chicken with salt and pepper. Heat 1 tablespoon butter in a large skillet over medium-high heat. Sear chicken 5-6 minutes per side until golden. Remove and set aside.
- Toss carrots and parsnips with olive oil, thyme, salt, and pepper. Roast at 400°F for 20 minutes until tender and caramelized.
- In the same skillet used for chicken, melt remaining butter. Add broth and scrape up browned bits. Simmer 3 minutes.
- Stir in cream and Dijon mustard. Shred the cooked chicken and add it back to the pan. Simmer 2-3 minutes.
- Layer wild rice into containers, top with creamy chicken and roasted vegetables.
Whirl Finish: Wild rice has a chewier texture than white or brown rice, which means it holds up beautifully to the cream sauce. The roasted root vegetables add sweetness and substance.
Storage: Keeps 4 days. The cream sauce actually binds everything together better as it cools. Reheat gently (30-45 seconds) and taste for seasoning—you may want a pinch more salt.
Quick-Prep Protein-Forward Lunch Box Rice Bowls
These bowls prioritize speed and protein density. The Whirl Factor is using shortcuts that don’t sacrifice flavor—rotisserie chicken, canned beans, quick-sear proteins. These pack tight and keep you full all afternoon.
10. Rotisserie Chicken with Quick Salsa Verde
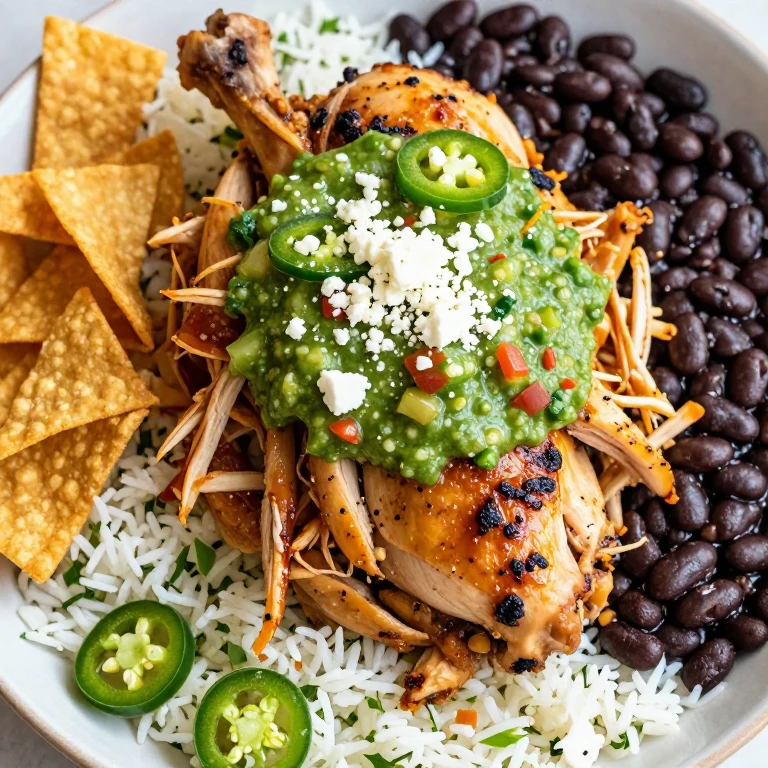
Shredded rotisserie chicken over cilantro-lime rice, topped with fresh salsa verde, black beans, and crispy tortilla strips. This is my weeknight workhorse—zero cooking required for the protein, and the salsa verde brings brightness that makes it feel fresh even hours later.
Ingredients
- 1 rotisserie chicken, shredded
- 2 cups cooked white rice
- 1/4 cup fresh cilantro, chopped
- Juice of 1 lime
- 1.5 cups fresh salsa verde
- 1 can black beans, drained and rinsed
- 1/2 cup crispy tortilla strips
- 1/4 cup crumbled queso fresco
- 1 jalapeño, thinly sliced
- Salt and pepper
Instructions
- Toss warm rice with cilantro and lime juice. Let cool slightly.
- Warm black beans in a small pot with a pinch of salt and cumin if you have it.
- Layer cilantro-lime rice into containers, top with shredded rotisserie chicken and warm black beans.
- Spoon salsa verde over the top.
- Pack tortilla strips and queso fresco in separate compartments.
- Scatter fresh jalapeño over just before eating.
Whirl Finish: The salsa verde is the whole move—it’s bright, it’s fresh, and it keeps the rotisserie chicken from tasting like, well, rotisserie. The tortilla strips add crunch and the queso brings salt.
Storage: Keeps 3 days. Pack tortilla strips separately so they stay crispy. The salsa verde actually deepens the chicken flavor as it sits, which means day-two lunches taste even better.
11. Soy-Ginger Beef with Crispy Rice
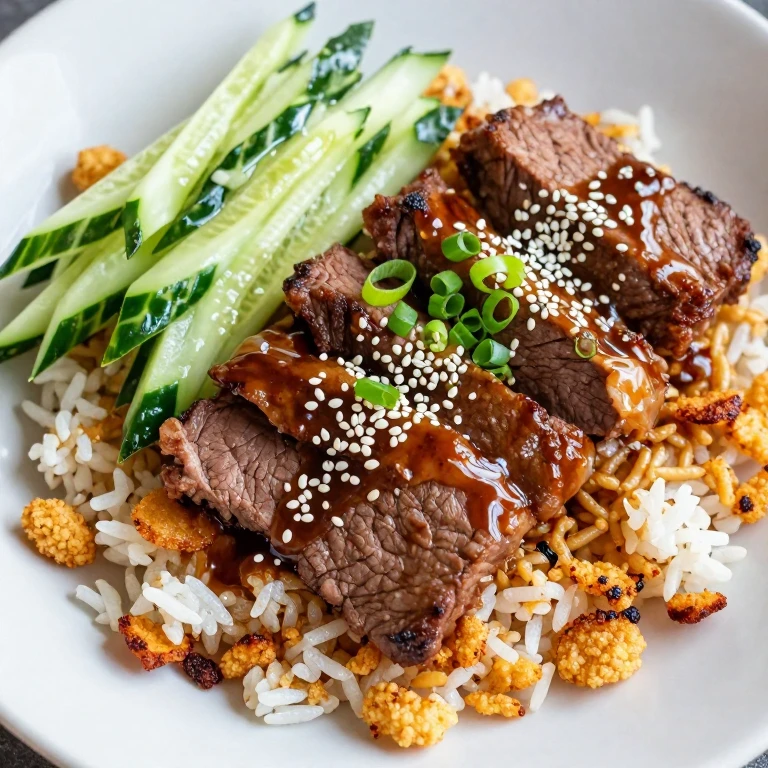
Thin-sliced beef sirloin in a soy-ginger glaze over crispy rice, topped with sesame cucumber and scallions. The Whirl Factor is the crispy rice—it’s cooked extra until the edges brown, which gives you texture that stands up to the tender beef.
Ingredients
- 1 lb beef sirloin, thinly sliced against the grain
- 3 tablespoons soy sauce
- 1 tablespoon rice vinegar
- 1 teaspoon grated ginger
- 2 cloves garlic, minced
- 2 tablespoons sesame oil
- 2.5 cups cooked white rice
- 1 English cucumber, julienned
- 2 tablespoons rice vinegar (for cucumber)
- 4 scallions, sliced
- 1 tablespoon sesame seeds
Instructions
- Whisk soy sauce, rice vinegar, ginger, and garlic in a bowl.
- Heat 1 tablespoon sesame oil in a large skillet over high heat. Sear beef in batches 1-2 minutes per side until browned. Transfer to a plate.
- Add glaze to the skillet and return beef. Toss to coat and cook 1 minute.
- Toss cucumber with 2 tablespoons rice vinegar and a pinch of salt. Let sit 10 minutes.
- To make crispy rice: spread cooked rice on a baking sheet, drizzle with remaining sesame oil, and broil 3-4 minutes until edges brown (watch carefully).
- Layer crispy rice into containers, top with glazed beef, cucumber, and scallions. Finish with sesame seeds.
Whirl Finish: The crispy rice is the non-negotiable texture here—it gives you something to bite into that contrasts with the tender beef. The pickled cucumber brings acid and snap.
Storage: Keeps 3 days. Pack cucumber separately if you prefer it crisp; otherwise, the pickling liquid softens it slightly, which is fine. The beef glaze actually coats the rice better as it cools.
12. Spiced Chickpea and Cauliflower with Yogurt Sauce
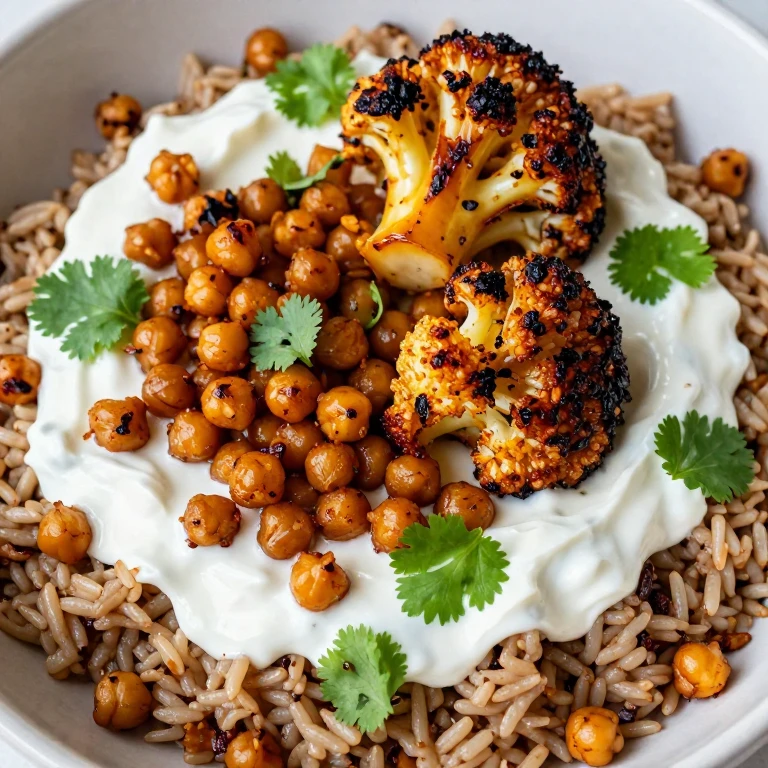
Roasted chickpeas and cauliflower tossed in warm spices, cooled and layered over brown rice with a cooling yogurt-tahini sauce. This is my plant-forward power move—the chickpeas and cauliflower roast together, the spices deepen as it cools, and the yogurt sauce keeps everything creamy without heaviness.
Ingredients
- 2 cans chickpeas, drained and rinsed
- 3 cups cauliflower florets
- 3 tablespoons olive oil
- 2 teaspoons cumin
- 1 teaspoon paprika
- 1/2 teaspoon cayenne
- 2 cloves garlic, minced
- 2 cups cooked brown rice
- 1 cup plain Greek yogurt
- 2 tablespoons tahini
- Juice of 1 lemon
- 1/4 cup fresh cilantro, chopped
- Salt and pepper
Instructions
- Toss chickpeas and cauliflower with olive oil, cumin, paprika, cayenne, garlic, salt, and pepper.
- Spread on a baking sheet and roast at 425°F for 25-30 minutes, stirring halfway, until chickpeas are crispy and cauliflower is charred.
- Whisk yogurt, tahini, lemon juice, and 2 tablespoons water until smooth and pourable.
- Layer rice into containers, top with roasted chickpea and cauliflower mixture.
- Spoon yogurt sauce over the top.
- Pack fresh cilantro in a separate container and scatter over just before eating.
Whirl Finish: The roasted chickpeas get crispy on the outside and stay creamy inside—that’s the texture contrast that makes this bowl work. The yogurt sauce brings cooling richness that balances the warm spices.
Storage: Keeps 4 days. Pack the yogurt sauce separately and add it fresh just before eating so the grains stay fluffy. The roasted chickpeas and cauliflower actually taste better cold, and the spices deepen overnight.
When to Choose Each Style
- Bold Asian-Inspired: You want maximum flavor impact and don’t mind assembling a few components. Pick this when you have 20 minutes to cook and want your lunch to taste restaurant-quality.
- Bright Mediterranean: You’re looking for something that improves overnight and feels light but substantial. Choose this when you want flavors that deepen as the bowl sits.
- Creamy Comfort: You want richness and satiety without feeling sluggish. Pick this when you need something that reheats beautifully and keeps you full through the afternoon.
- Quick-Prep Protein-Forward: You’re short on time but want maximum protein and flavor. Choose this when you’re using shortcuts like rotisserie chicken or canned beans but don’t want to sacrifice taste.
FAQ
How do I keep rice from getting mushy in a lunch box?
Layer strategically: rice on the bottom, protein and sauce in the middle, fresh elements on top or in a separate compartment. Let the rice cool completely before packing—warm rice in a sealed container creates steam that softens everything. Brown rice and wild rice hold up better than white rice for lunch boxes because they have more structure. If you’re packing a saucy bowl (like the creamy mushroom or teriyaki chicken), the sauce should coat the rice, not soak it—there’s a difference.
Should I pack the sauce separately or mix it in?
It depends on the sauce and how long it’s sitting. Soy-based and oil-based dressings (teriyaki, sesame, olive oil) actually improve the rice as they sit, so mix them in. Creamy sauces and yogurt-based dressings should go in a separate compartment or be added just before eating if you want the rice to stay fluffy. Acidic sauces like salsa verde and pickled vegetables are fine mixed in—the acid actually keeps the rice from getting mushy.
Can I meal prep these for the whole week?
Yes, but with strategy. Cook grains and proteins on Sunday, store them separately. Assemble bowls no more than 2 days ahead. Fresh elements—herbs, crispy toppings, pickled vegetables—should be packed separately and added the morning you eat. The Mediterranean and creamy comfort bowls actually improve on day two because flavors deepen. The Asian-inspired bowls are best on days one and two. Quick-prep bowls last 3 days because the proteins are already cooked.
What’s the best container for a lunch box rice bowl?
A divided bento-style container with a tight-seal lid is ideal. It keeps components separate so crispy elements stay crispy and fresh herbs don’t wilt. If you’re packing sauce, use a container with a compartment that seals separately. Glass containers keep food fresher longer than plastic, but plastic is lighter for a lunch box. Whatever you choose, make sure the lid actually seals—steam is the enemy of texture.
How do I reheat a rice bowl without drying it out?
Microwave is your friend here. Add a splash of water (1-2 tablespoons) to the container, cover loosely, and microwave 30-45 seconds until warm. The water creates steam that rehydrates the rice without cooking it further. If you’ve packed components separately, add fresh elements after reheating. Avoid the microwave for crispy-topped bowls (like the breadcrumb or fried shallot versions)—eat those at room temperature or add crispy elements after reheating.
What if I don’t have all the exact ingredients?
These recipes are built on Whirl Factor principles: a signature twist and a texture contrast. You can swap proteins (chicken for shrimp, tofu for chickpeas), swap grains (white rice for brown, quinoa for wild rice), and swap vegetables (asparagus for snap peas, beets for carrots). Keep the core twist and at least one crunchy or bright element, and the bowl will work. The sauce is usually the non-negotiable part—that’s where the flavor comes from.
Conclusion
These 12 lunch box rice bowls cover every flavor direction and time commitment. Pick one, pack it tight, and taste the difference that intentional layering and texture contrast make. Your lunch box doesn’t have to be boring—it just needs a plan.