
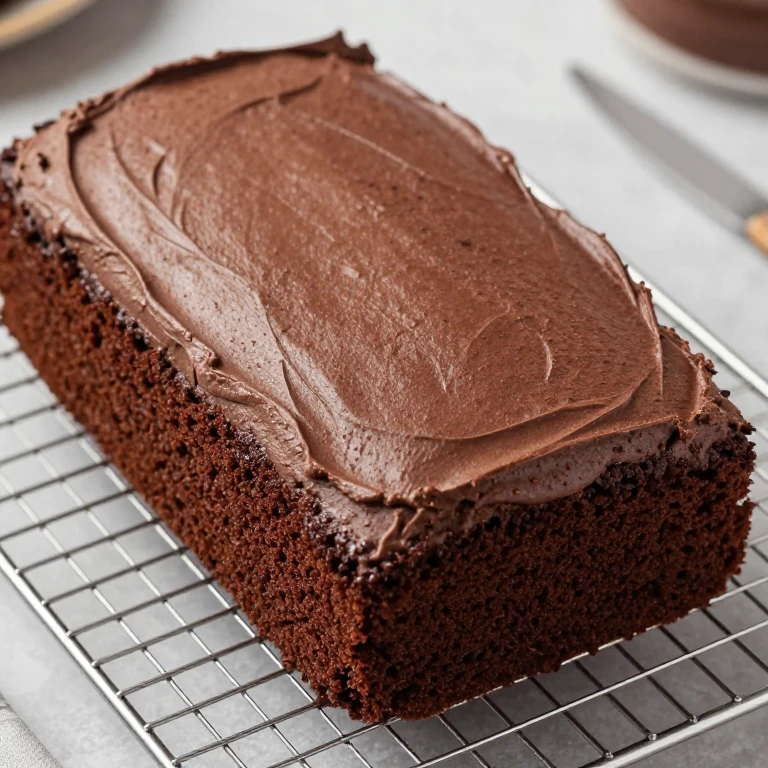
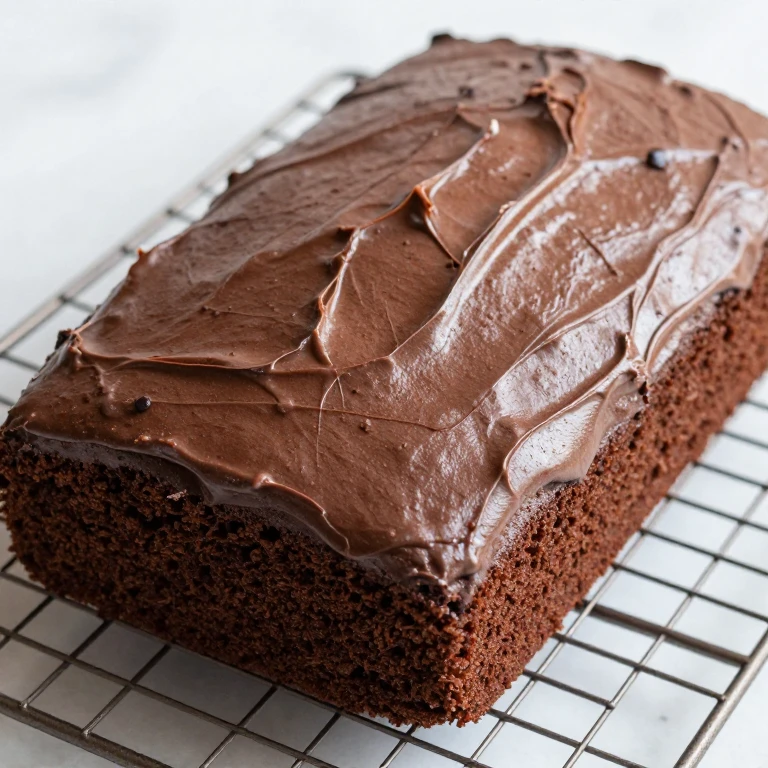
Whether you’re celebrating a milestone birthday or throwing together a last-minute party, a sheet cake is the ultimate canvas for making her day feel special. I’ve found that the magic isn’t just in the flavor—it’s in the design. A well-executed cake design transforms a simple dessert into a showstopper, and the best part? You don’t need advanced piping skills or fondant expertise. These 11 designs pair bold, modern decorating techniques with straightforward recipes that deliver reliable results every time. Each one has a clear visual identity and a flavor twist that makes it memorable.
What ties these designs together is the balance of approachability and impact. Some lean into color blending and ombré effects; others play with piped details, sprinkle borders, or geometric patterns. I’ve organized them by occasion so you can pick the right design for the moment—whether you’re baking on a weeknight, prepping ahead for a dinner party, or batch-baking for the week. Each design includes the cake recipe, frosting base, and the specific decorating moves that make it work.
Girls’ Birthday Sheet Cake Designs for Weeknight Baking
When time is tight but the birthday still needs celebrating, these designs deliver maximum visual impact with minimal fuss. I focus on techniques that work fast: simple color blocking, sprinkle applications, and piped borders that look intentional without requiring hours at the stand mixer. Total active time for each is under 30 minutes once the cake is baked and cooled.
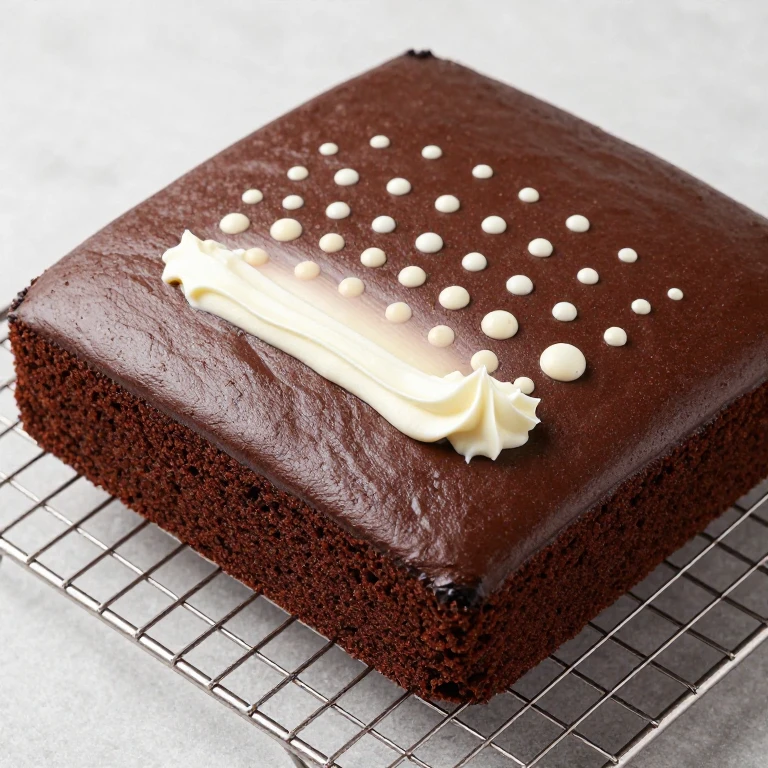
1. Ombré Pastel Dream
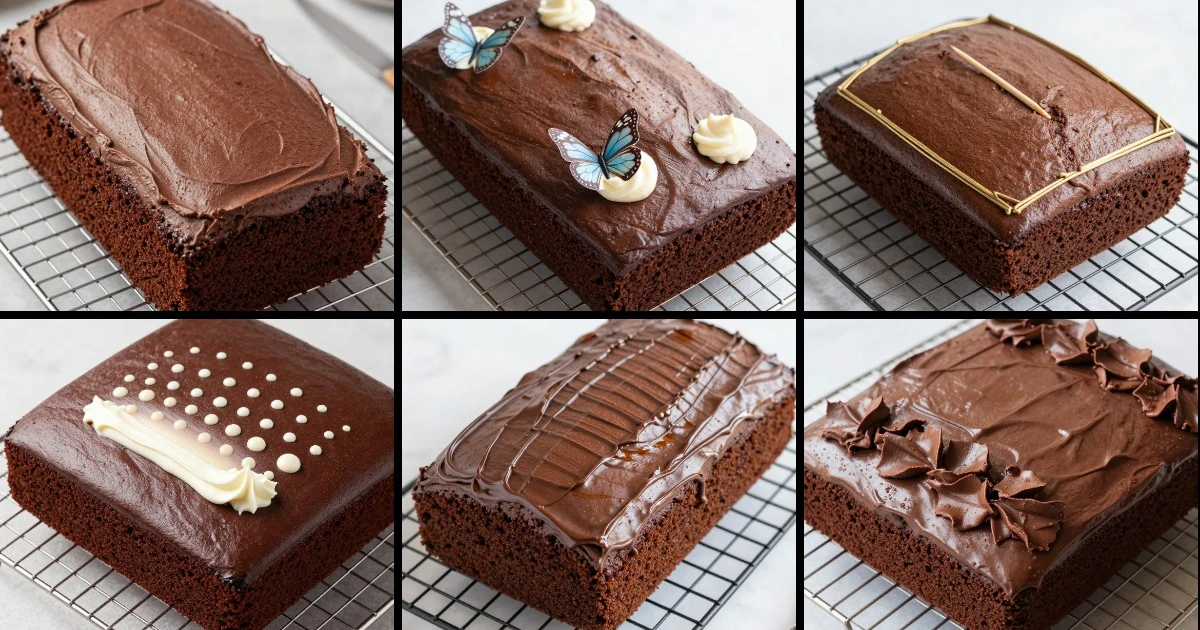
This design uses a single color family—soft pink, blush, and cream—blended across the cake in horizontal stripes. The ombré effect creates depth without complexity, and it’s forgiving if your blending isn’t pixel-perfect. I pipe a simple shell border in white buttercream to frame the design, then finish with edible pearl dust for subtle shimmer.
Ingredients
- 2 cups all-purpose flour
- 1.5 cups granulated sugar
- 3/4 cup unsweetened cocoa powder
- 2 teaspoons baking soda
- 1 teaspoon baking powder
- 1 teaspoon salt
- 2 large eggs
- 1 cup strong brewed coffee (cooled)
- 1/2 cup vegetable oil
- 1/2 cup buttermilk
- 1 teaspoon vanilla extract
Instructions
- Preheat oven to 350°F. Grease and flour a 9×13-inch sheet pan.
- Whisk together flour, sugar, cocoa, baking soda, baking powder, and salt in a large bowl.
- Add eggs, cooled coffee, oil, buttermilk, and vanilla. Beat on medium speed for 2 minutes until smooth.
- Pour batter into prepared pan and bake 30–35 minutes until a toothpick inserted in the center comes out clean.
- Cool in pan for 15 minutes, then turn out onto a wire rack to cool completely.
Whirl Factor: The cocoa base pairs with a silky ermine frosting tinted in graduated pastels. The texture contrast—tender crumb against smooth frosting—stays clean through the ombré application.
Decorating Tip: Divide buttercream into four bowls. Tint one with pink gel color (light), one with deeper pink, one with blush, and leave one white. Spread each shade horizontally across the cake in 2-inch bands, then use an offset spatula to blend where colors meet. Pipe the shell border last.
Make-Ahead Note: Bake and cool the cake up to 2 days ahead. Frost and decorate no more than 4 hours before serving so the ombré edges stay crisp.
2. Sprinkle Border Celebration
Simple, bold, and impossible to mess up—this design frames the cake with a thick border of rainbow sprinkles pressed into white or pastel frosting. The sprinkles add texture and movement, and the simplicity means you can focus on getting the frosting smooth across the top.
Ingredients
- 1.5 cups all-purpose flour
- 1 cup granulated sugar
- 1/2 cup unsweetened cocoa powder
- 1.5 teaspoons baking soda
- 1/2 teaspoon baking powder
- 1/2 teaspoon salt
- 1 large egg
- 1/2 cup hot water
- 1/4 cup vegetable oil
- 1/4 cup buttermilk
- 1/2 teaspoon vanilla extract
Instructions
- Preheat oven to 350°F. Grease a 9×13-inch sheet pan.
- Combine flour, sugar, cocoa, baking soda, baking powder, and salt in a mixing bowl.
- Add egg, hot water, oil, buttermilk, and vanilla. Mix on medium speed until just combined, about 1 minute.
- Spread batter evenly into the prepared pan.
- Bake 25–30 minutes until the cake springs back when lightly touched.
- Cool completely before frosting and decorating.
Whirl Factor: Rich chocolate cake meets airy vanilla buttercream, with sprinkles adding a crisp, playful crunch. The textural contrast—tender crumb, smooth frosting, crunchy sprinkles—is the whole appeal.
Decorating Tip: Frost the entire cake with a thin crumb coat, chill for 10 minutes, then apply a second, smooth layer. Pour sprinkles into a shallow dish, then press them into the frosting along the top and bottom edges using a small offset spatula or your fingers. The frosting should be firm enough to hold them but not so cold they crack off.
Make-Ahead Note: Decorate this cake no more than 2 hours before serving. Sprinkles absorb moisture from the frosting over time, so early decoration softens the crunch.
3. Piped Heart Scattered Design
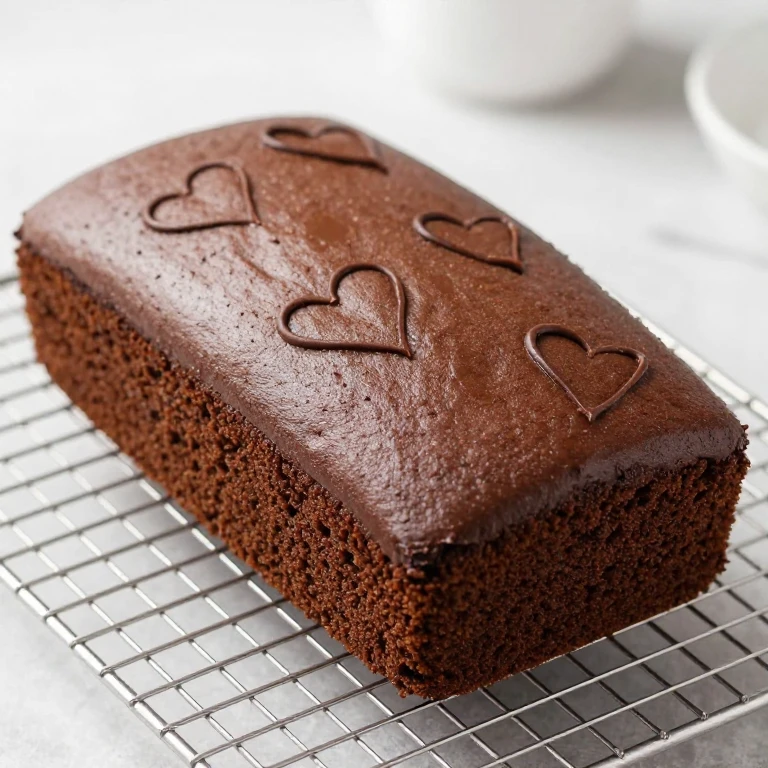
Tiny piped hearts scattered across a smooth frosting base create a sweet, intentional look without requiring perfect spacing or symmetry. I use a small round piping tip and white or pastel buttercream, working quickly so the frosting stays pliable.
Ingredients
- 2 cups all-purpose flour
- 1.5 cups granulated sugar
- 1/2 cup unsweetened cocoa powder
- 2 teaspoons baking soda
- 1 teaspoon baking powder
- 1 teaspoon salt
- 2 large eggs
- 3/4 cup strong brewed coffee (cooled)
- 1/2 cup vegetable oil
- 1/3 cup buttermilk
- 1 teaspoon vanilla extract
Instructions
- Preheat oven to 350°F. Prepare a 9×13-inch sheet pan with parchment and grease.
- Whisk flour, sugar, cocoa, baking soda, baking powder, and salt together.
- Stir in eggs, cooled coffee, oil, buttermilk, and vanilla until smooth.
- Pour into pan and bake 30–32 minutes until a toothpick comes out clean.
- Cool in pan for 10 minutes, then transfer to a wire rack.
Whirl Factor: The piped hearts add a signature decorative layer without changing the flavor profile. Pairing rich cocoa cake with Swiss meringue buttercream creates a sturdy, elegant base that supports detailed piping.
Decorating Tip: Frost the cake smoothly with a pastel-tinted buttercream. Fit a piping bag with a small round tip (#3 or #4) and fill with white buttercream. Pipe small dots across the top, then use a toothpick to drag each dot downward into a heart shape. Work in sections to keep the frosting pliable.
Make-Ahead Note: Bake the cake up to 2 days ahead. Frost and pipe hearts 3–4 hours before serving for the best definition.
Girls’ Birthday Sheet Cake Designs for Dinner Party Moments
When you’re serving this cake as the centerpiece of a celebration, these designs elevate the presentation and show intention. I’ve chosen designs that can be prepped in stages, so you’re not rushing at the last minute. Each one includes a make-ahead strategy so you can focus on the party itself.
4. Butterfly Garden Scatter
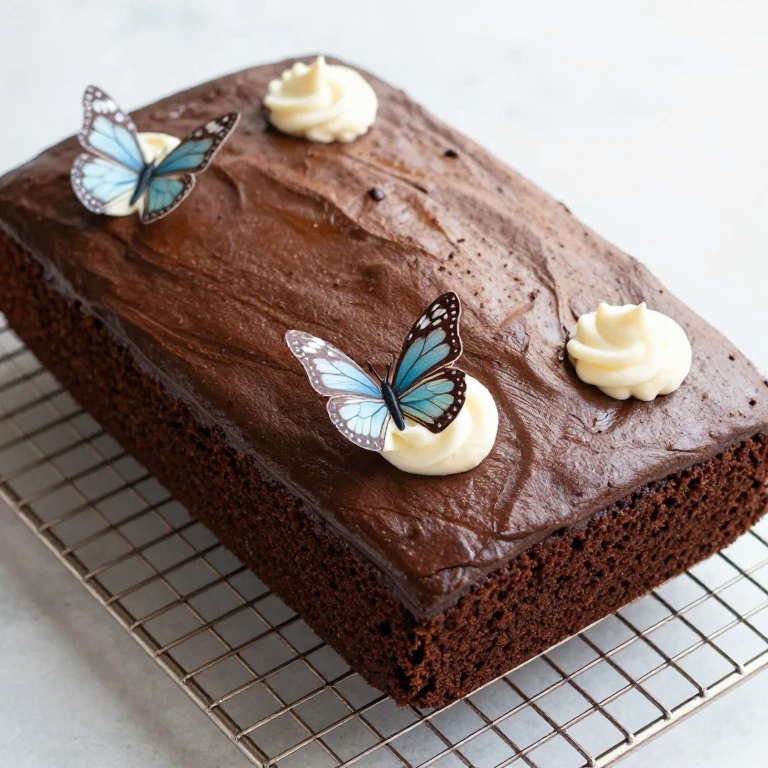
Hand-piped or fondant butterflies scattered across the cake create a whimsical, Instagram-worthy moment. I use a combination of piped wings and small fondant accents to build dimension. The design feels elaborate but breaks down into simple, repeatable moves.
Ingredients
- 2.5 cups all-purpose flour
- 2 cups granulated sugar
- 3/4 cup unsweetened cocoa powder
- 2 teaspoons baking soda
- 1 teaspoon baking powder
- 1 teaspoon salt
- 2 large eggs
- 1 cup strong brewed coffee (cooled)
- 1/2 cup vegetable oil
- 1/2 cup sour cream
- 1 teaspoon vanilla extract
Instructions
- Preheat oven to 350°F. Grease and line a 9×13-inch pan with parchment.
- Whisk together flour, sugar, cocoa, baking soda, baking powder, and salt.
- Add eggs, cooled coffee, oil, sour cream, and vanilla. Beat on medium speed until smooth, about 2 minutes.
- Spread batter evenly into the prepared pan.
- Bake 32–36 minutes until a toothpick inserted in the center comes out with just a few moist crumbs.
- Cool in pan for 15 minutes, then turn onto a wire rack to cool completely.
Whirl Factor: Sour cream adds richness and tang to the cocoa base, creating a moist crumb that holds detail. The butterflies—whether piped or fondant—add a sculptural element that transforms the cake into a centerpiece.
Decorating Tip: Frost the cake with a smooth base of tinted buttercream. Prepare butterfly templates using parchment. Pipe butterflies onto parchment using a medium round tip, then chill until firm. Carefully peel them off and arrange across the cake. Alternatively, roll small fondant butterflies and position them with a tiny dot of frosting as adhesive.
Make-Ahead Note: Bake and cool the cake up to 2 days ahead. Frost the base 1 day ahead. Pipe or prepare butterflies the morning of the party, then position them 2–3 hours before serving so they hold their shape.
5. Watercolor Wash Effect
A soft, blended color wash across the cake creates an artistic, sophisticated look. I thin buttercream with a touch of milk and apply it with a sponge or offset spatula, allowing colors to mingle naturally. The effect is impressionistic and forgiving.
Ingredients
- 2 cups all-purpose flour
- 1.5 cups granulated sugar
- 1/2 cup unsweetened cocoa powder
- 2 teaspoons baking soda
- 1 teaspoon baking powder
- 1 teaspoon salt
- 2 large eggs
- 3/4 cup strong brewed coffee (cooled)
- 1/2 cup vegetable oil
- 1/3 cup buttermilk
- 1 teaspoon vanilla extract
Instructions
- Preheat oven to 350°F. Prepare a 9×13-inch sheet pan with parchment and grease.
- Combine flour, sugar, cocoa, baking soda, baking powder, and salt in a large bowl.
- Add eggs, cooled coffee, oil, buttermilk, and vanilla. Beat on medium speed until smooth.
- Pour into the prepared pan and spread evenly.
- Bake 28–32 minutes until a toothpick comes out clean.
- Cool completely on a wire rack before decorating.
Whirl Factor: The watercolor effect is pure visual impact with minimal technical skill required. The thin, blended frosting creates a delicate finish that contrasts beautifully with the dense, moist cake underneath.
Decorating Tip: Frost the cake with a thin base coat of white buttercream. Thin small amounts of buttercream with milk (a few drops at a time) to create a paint-like consistency. Using a natural sponge or damp brush, dab and blend colors across the cake—soft pinks, lavenders, peaches—allowing them to merge organically. Work in sections and step back frequently to assess balance.
Make-Ahead Note: Bake the cake up to 2 days ahead. Apply the watercolor wash 4–6 hours before serving so the colors remain vibrant and the frosting sets properly.
6. Geometric Gold Accent Border
Clean lines, geometric shapes, and metallic gold accents create a modern, polished look. I pipe simple triangles, stripes, or chevrons along the top edge, then add edible gold dust for luxury. The design feels intentional without being fussy.
Ingredients
- 2 cups all-purpose flour
- 1.5 cups granulated sugar
- 3/4 cup unsweetened cocoa powder
- 2 teaspoons baking soda
- 1 teaspoon baking powder
- 1 teaspoon salt
- 2 large eggs
- 1 cup strong brewed coffee (cooled)
- 1/2 cup vegetable oil
- 1/2 cup buttermilk
- 1 teaspoon vanilla extract
Instructions
- Preheat oven to 350°F. Grease and line a 9×13-inch pan.
- Whisk together flour, sugar, cocoa, baking soda, baking powder, and salt.
- Add eggs, cooled coffee, oil, buttermilk, and vanilla. Mix on medium speed until combined.
- Spread batter into the prepared pan.
- Bake 30–34 minutes until a toothpick comes out clean.
- Cool in pan for 15 minutes, then transfer to a wire rack to cool completely.
Whirl Factor: The geometric pattern adds structure and modernity to a classic cocoa base. Edible gold dust catches light and creates a high-impact finish that feels special without overwhelming the cake’s flavor.
Decorating Tip: Frost the cake with a smooth, neutral-toned buttercream (white or soft gray). Using a piping bag fitted with a medium round tip, pipe small triangles, dots, or lines along the top edge in contrasting buttercream. Once piped details are set, dust lightly with edible gold powder using a small, dry brush. The gold should catch the light without coating the entire design.
Make-Ahead Note: Bake and frost the cake up to 1 day ahead. Pipe geometric details and apply gold dust 3–4 hours before serving so the metallic finish remains luminous.
Girls’ Birthday Sheet Cake Designs for Meal Prep and Batch Baking
When you’re baking multiple cakes or prepping ahead for several celebrations, these designs hold up beautifully to advance preparation and refrigeration. I focus on techniques that actually improve with time—flavors meld, frosting sets firm, and decorative elements stay crisp. Each design includes specific reheating and storage guidance.
7. Pastel Confetti Sprinkle Mix
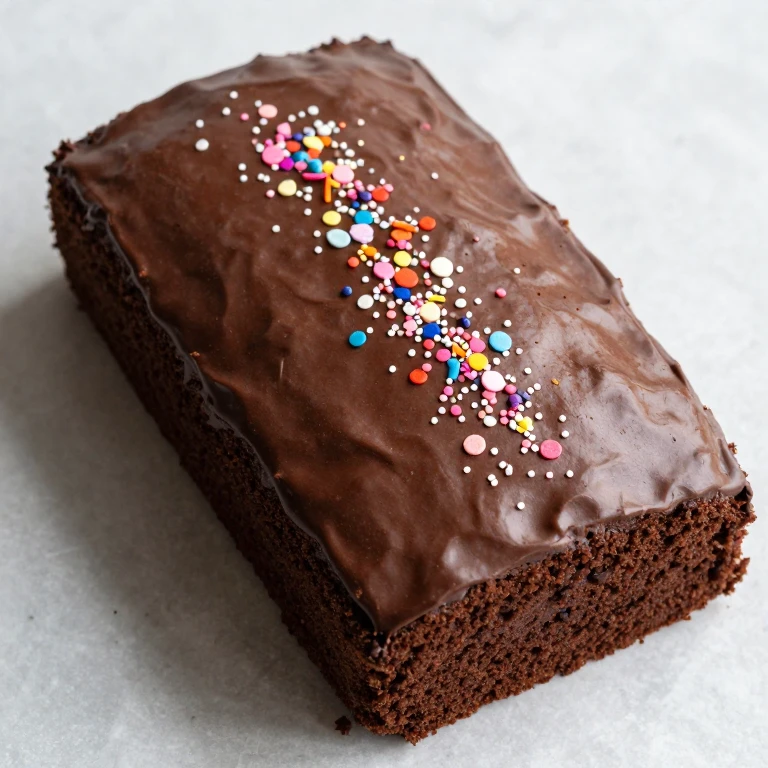
A combination of pearl sprinkles, nonpareils, and pastel sugar pearls creates visual texture and movement. This design is forgiving because the sprinkles hide any frosting imperfections, and they don’t soften as quickly as traditional jimmies. I press them into a firm frosting base for maximum hold.
Ingredients
- 2 cups all-purpose flour
- 1.5 cups granulated sugar
- 1/2 cup unsweetened cocoa powder
- 2 teaspoons baking soda
- 1 teaspoon baking powder
- 1 teaspoon salt
- 2 large eggs
- 3/4 cup strong brewed coffee (cooled)
- 1/2 cup vegetable oil
- 1/3 cup buttermilk
- 1 teaspoon vanilla extract
Instructions
- Preheat oven to 350°F. Prepare a 9×13-inch sheet pan with parchment and grease.
- Whisk flour, sugar, cocoa, baking soda, baking powder, and salt together.
- Add eggs, cooled coffee, oil, buttermilk, and vanilla. Beat on medium speed until smooth.
- Pour batter into the prepared pan and spread evenly.
- Bake 28–32 minutes until a toothpick inserted in the center comes out clean.
- Cool completely before frosting and decorating.
Whirl Factor: The variety of sprinkle textures—pearl, nonpareil, sugar pearl—creates a multi-sensory experience. Each bite combines the moist cocoa cake with the crisp, delicate crunch of different sprinkle types.
Decorating Tip: Frost the cake with a firm buttercream base (chill if needed). Pour each sprinkle type into separate shallow dishes. Using your fingers or a small offset spatula, press sprinkles into the frosting, alternating types and colors. Work in sections and press firmly so sprinkles adhere. The frosting should be cool enough to hold them without smudging.
Storage Note: This cake stores beautifully in an airtight container for up to 4 days. The sprinkles stay crisp because they’re pressed into firm frosting. Refrigerate after day 1 to maintain crispness. Bring to room temperature 30 minutes before serving.
8. Ombré Gradient with Piped Dots
A smooth gradient from dark to light, topped with a scattered pattern of piped dots in contrasting colors. This design is elegant and holds up well when refrigerated. The gradient improves with chilling because the frosting sets firm and the color transitions become more defined.
Ingredients
- 2.5 cups all-purpose flour
- 2 cups granulated sugar
- 3/4 cup unsweetened cocoa powder
- 2 teaspoons baking soda
- 1 teaspoon baking powder
- 1 teaspoon salt
- 2 large eggs
- 1 cup strong brewed coffee (cooled)
- 1/2 cup vegetable oil
- 1/2 cup sour cream
- 1 teaspoon vanilla extract
Instructions
- Preheat oven to 350°F. Grease and line a 9×13-inch pan with parchment.
- Whisk together flour, sugar, cocoa, baking soda, baking powder, and salt.
- Add eggs, cooled coffee, oil, sour cream, and vanilla. Beat on medium speed until smooth, about 2 minutes.
- Spread batter evenly into the prepared pan.
- Bake 32–36 minutes until a toothpick comes out with just a few moist crumbs.
- Cool in pan for 15 minutes, then transfer to a wire rack to cool completely.
Whirl Factor: Sour cream creates a tender, moist crumb that stays fresh longer. The ombré gradient paired with scattered piped dots creates visual sophistication without requiring advanced piping skills.
Decorating Tip: Divide buttercream into four bowls and tint each with a different shade of the same color family (darkest to lightest). Frost the cake in horizontal stripes, blending slightly where colors meet. Chill for 15 minutes until firm. Fit a piping bag with a small round tip and fill with contrasting buttercream. Pipe small dots randomly across the cake, varying the spacing. Chill again before serving.
Storage Note: This cake actually improves after 1 day of refrigeration—the frosting sets perfectly and the dots hold their shape. Store covered for up to 5 days. Bring to room temperature 45 minutes before serving so the cake’s texture softens slightly.
9. Striped Ribbon Effect
Thin, evenly spaced stripes in two or three colors create a bold, modern look. I use a piping bag with a thin round tip to pipe parallel lines, which is fast and repeatable. The stripes stay crisp when refrigerated and actually look sharper after chilling.
Ingredients
- 2 cups all-purpose flour
- 1.5 cups granulated sugar
- 1/2 cup unsweetened cocoa powder
- 2 teaspoons baking soda
- 1 teaspoon baking powder
- 1 teaspoon salt
- 2 large eggs
- 3/4 cup strong brewed coffee (cooled)
- 1/2 cup vegetable oil
- 1/3 cup buttermilk
- 1 teaspoon vanilla extract
Instructions
- Preheat oven to 350°F. Prepare a 9×13-inch sheet pan with parchment and grease.
- Combine flour, sugar, cocoa, baking soda, baking powder, and salt in a large bowl.
- Add eggs, cooled coffee, oil, buttermilk, and vanilla. Beat on medium speed until smooth.
- Pour into the prepared pan and spread evenly.
- Bake 28–32 minutes until a toothpick comes out clean.
- Cool completely on a wire rack before decorating.
Whirl Factor: Thin, parallel piped stripes create movement and visual rhythm. The contrast between the smooth base frosting and the defined lines gives the cake a polished, modern finish.
Decorating Tip: Frost the cake with a smooth base in a neutral tone (white or pale gray). Fit a piping bag with a thin round tip (#2 or #3) and fill with tinted buttercream in your first color. Pipe thin, evenly spaced horizontal lines across the entire cake, working from top to bottom. Repeat with a second color, piping lines between the first set. Chill for 10 minutes to set the piped details.
Storage Note: Stripes hold their definition beautifully when refrigerated. Store covered for up to 4 days. The frosting actually sets more cleanly with refrigeration, making the stripes look sharper. Remove from the fridge 30 minutes before serving.
10. Floral Petal Cascade
Fondant or buttercream petals arranged in a flowing pattern down one side of the cake create movement and elegance. I make small petal shapes in advance, so assembly is quick. The petals hold their shape indefinitely when stored properly, making this ideal for advance prep.
Ingredients
- 2 cups all-purpose flour
- 1.5 cups granulated sugar
- 3/4 cup unsweetened cocoa powder
- 2 teaspoons baking soda
- 1 teaspoon baking powder
- 1 teaspoon salt
- 2 large eggs
- 1 cup strong brewed coffee (cooled)
- 1/2 cup vegetable oil
- 1/2 cup buttermilk
- 1 teaspoon vanilla extract
Instructions
- Preheat oven to 350°F. Grease and line a 9×13-inch pan with parchment.
- Whisk together flour, sugar, cocoa, baking soda, baking powder, and salt.
- Add eggs, cooled coffee, oil, buttermilk, and vanilla. Mix on medium speed until combined.
- Spread batter into the prepared pan.
- Bake 30–34 minutes until a toothpick comes out clean.
- Cool in pan for 15 minutes, then transfer to a wire rack to cool completely.
Whirl Factor: Fondant petals add a sophisticated, sculptural element while keeping the cake’s flavor pure and simple. The petals’ smooth finish contrasts with the cake’s tender crumb.
Decorating Tip: Prepare fondant petals 2–3 days ahead by rolling small pieces of tinted fondant into oval shapes, then gently curving them. Store in an airtight container. Frost the cake with a smooth buttercream base. Arrange petals in a cascading pattern down one side or corner, using a tiny dot of frosting as adhesive. Start with larger petals at the top and graduate to smaller ones as you move down.
Storage Note: Fondant petals are incredibly stable. This cake can be decorated up to 3 days ahead and stored covered at room temperature. The petals won’t soften or lose shape. Refrigerate only if the buttercream base needs firming; bring to room temperature before serving.
11. Rainbow Layer Stripes with White Frosting
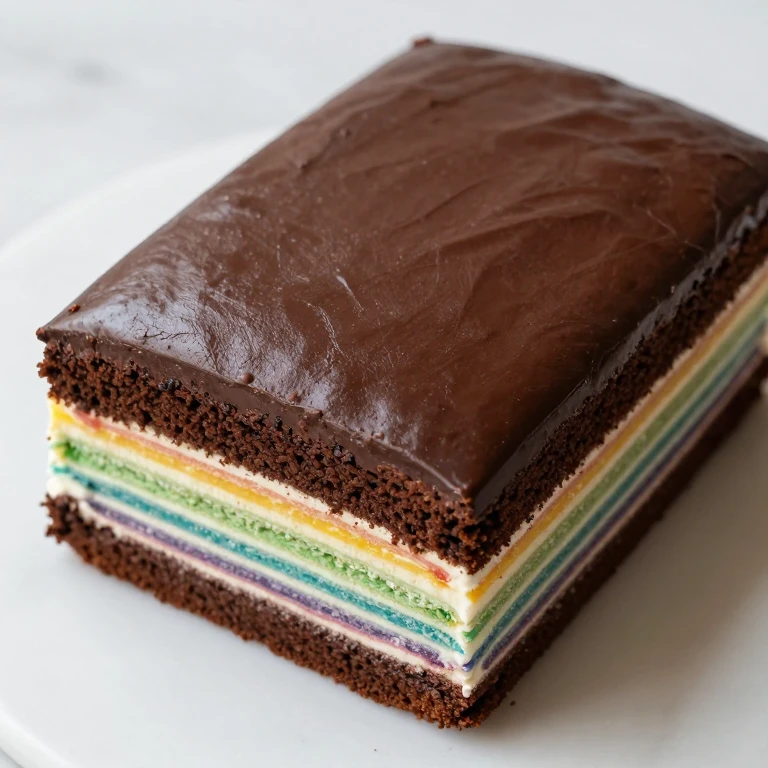
Thin layers of tinted frosting piped or spread horizontally create a rainbow effect when you cut into the cake. This design showcases the cake’s structure and creates a delightful surprise. I use a thin frosting layer between each stripe so the cake stays moist.
Ingredients
- 2 cups all-purpose flour
- 1.5 cups granulated sugar
- 1/2 cup unsweetened cocoa powder
- 2 teaspoons baking soda
- 1 teaspoon baking powder
- 1 teaspoon salt
- 2 large eggs
- 3/4 cup strong brewed coffee (cooled)
- 1/2 cup vegetable oil
- 1/3 cup buttermilk
- 1 teaspoon vanilla extract
Instructions
- Preheat oven to 350°F. Prepare a 9×13-inch sheet pan with parchment and grease.
- Whisk flour, sugar, cocoa, baking soda, baking powder, and salt together.
- Add eggs, cooled coffee, oil, buttermilk, and vanilla. Beat on medium speed until smooth.
- Pour batter into the prepared pan and spread evenly.
- Bake 28–32 minutes until a toothpick inserted in the center comes out clean.
- Cool completely before frosting and decorating.
Whirl Factor: The surprise of rainbow stripes inside a simply frosted cake creates a moment of delight when you cut into it. The thin frosting layers keep the cake moist and add flavor depth.
Decorating Tip: Once the cake is completely cool, divide buttercream into five bowls and tint each with a different color (red, orange, yellow, green, blue). Using an offset spatula or piping bag fitted with a large round tip, spread or pipe thin horizontal lines of each color across the top surface, alternating colors. The lines don’t need to be perfect—they’ll blend slightly when you frost the exterior. Frost the entire cake with white buttercream to create a clean, simple exterior that hides the colorful surprise inside.
Storage Note: This cake improves with 1 day of refrigeration—the frosting layers set firm and the colors stay vibrant. Store covered for up to 5 days. The internal stripes won’t dry out because they’re sealed under the white frosting layer. Bring to room temperature 30 minutes before serving.
Girls’ Birthday Sheet Cake Designs for Family-Friendly Celebrations
These designs are approachable for younger bakers and adaptable for different skill levels. I focus on techniques that are hard to mess up and flexible enough that small imperfections add charm rather than detract. Each design includes a kid-friendly modification or a simple swap for different abilities.
Flavor Spin: Strawberry Milk Cake Base
For a lighter option across any of these designs, I swap the cocoa base for a strawberry-tinged vanilla cake. Use 2 cups all-purpose flour, 1.5 cups granulated sugar, 2 teaspoons baking powder, 1 teaspoon salt, 3 large eggs, 3/4 cup whole milk mixed with 2 tablespoons strawberry jam, 1/2 cup vegetable oil, and 1 teaspoon vanilla extract. Bake at 350°F for 25–30 minutes in a greased 9×13-inch pan. The result is a tender, mildly fruity cake that pairs beautifully with pastel frostings and lighter decorative elements.
Flavor Spin: Lemon Raspberry Twist
For a brighter flavor profile, I use a lemon cake base with raspberry buttercream. Combine 2 cups all-purpose flour, 1.5 cups granulated sugar, 2 teaspoons baking powder, 1/2 teaspoon salt, 3 large eggs, 3/4 cup whole milk, 1/2 cup vegetable oil, 1/4 cup fresh lemon juice, and 1 tablespoon lemon zest. Bake at 350°F for 25–30 minutes. For the frosting, make standard buttercream and fold in 1/2 cup fresh or frozen raspberries (mashed) and 1 tablespoon raspberry jam. The tartness balances the sweetness and adds sophistication.
Flavor Spin: Cookies-and-Cream Cake
A vanilla cake studded with crushed sandwich cookies creates a playful, familiar flavor. Use 2 cups all-purpose flour, 1.5 cups granulated sugar, 2 teaspoons baking powder, 1 teaspoon salt, 3 large eggs, 3/4 cup whole milk, 1/2 cup vegetable oil, 1 teaspoon vanilla extract, and fold in 1 cup crushed sandwich cookies (about 10 cookies) after mixing the wet and dry ingredients. Bake at 350°F for 28–32 minutes. Pair with cookies-and-cream buttercream for extra flavor punch.
FAQ
What’s the best cocoa cake base for these designs?
I use a simple cocoa cake that’s reliable and forgiving. The one I’ve included in the weeknight section is my go-to—it’s moist, holds detail, and stays fresh for several days. The key is using hot coffee to bloom the cocoa powder, which deepens flavor without adding extra liquid. If you prefer a lighter cake, the strawberry milk variation works beautifully with any of these designs and bakes in slightly less time.
How far ahead can I bake the cake?
Bake the cake up to 2 days ahead and store it wrapped tightly at room temperature or refrigerated. Cocoa cakes actually improve slightly after a day—flavors meld and the crumb becomes more tender. If you’re refrigerating, bring the cake to room temperature before frosting so the frosting adheres smoothly.
Can I make these designs ahead of time?
Yes, depending on the design. Simple frosting and sprinkle designs should be decorated no more than 4–6 hours before serving so the frosting stays crisp. Piped details hold better when decorated 3–4 hours ahead and chilled. Fondant petals and other non-frosting decorations can be applied 1–3 days ahead because they don’t absorb moisture. Watercolor washes and ombré effects look best when decorated 4–6 hours ahead so colors remain vibrant.
How do I store decorated cakes?
For cakes with buttercream frosting and sprinkles, store covered at room temperature for up to 4 hours, then refrigerate if needed. Sprinkles stay crispest when the frosting is cool and firm. For cakes decorated with fondant elements, store covered at room temperature away from humidity. Refrigerate only if the buttercream base needs firming. Always bring cakes to room temperature before serving—this takes 30–45 minutes and restores the cake’s tender texture.
What frosting works best for piping details?
Swiss meringue buttercream is my top choice because it’s stable, silky, and holds piped details beautifully. American buttercream (butter and powdered sugar) is simpler and works well for casual designs. For more advanced piping, Swiss meringue holds its shape longer. Whichever you choose, make sure the frosting is at the right temperature—cool but not cold, so it pipes smoothly without tearing.
Can kids help with these designs?
Absolutely. The sprinkle border, scattered heart design, and striped ribbon effects are perfect for younger decorators. Kids can press sprinkles into frosting, pipe simple dots, or help blend ombré colors. These designs are forgiving because imperfections add charm. For more advanced designs like butterflies or floral cascades, kids can help prepare elements (rolling fondant, piping on parchment) while you handle the final assembly.
What if I want to scale these designs to a larger cake?
These recipes are designed for a standard 9×13-inch sheet pan. To scale up, prepare two sheet cakes and stack them (with frosting between layers) for a taller presentation, or double the recipe for a thicker single cake. The decorating techniques scale proportionally—just allow more time for piping or blending larger surface areas. The same storage and make-ahead rules apply regardless of size.