
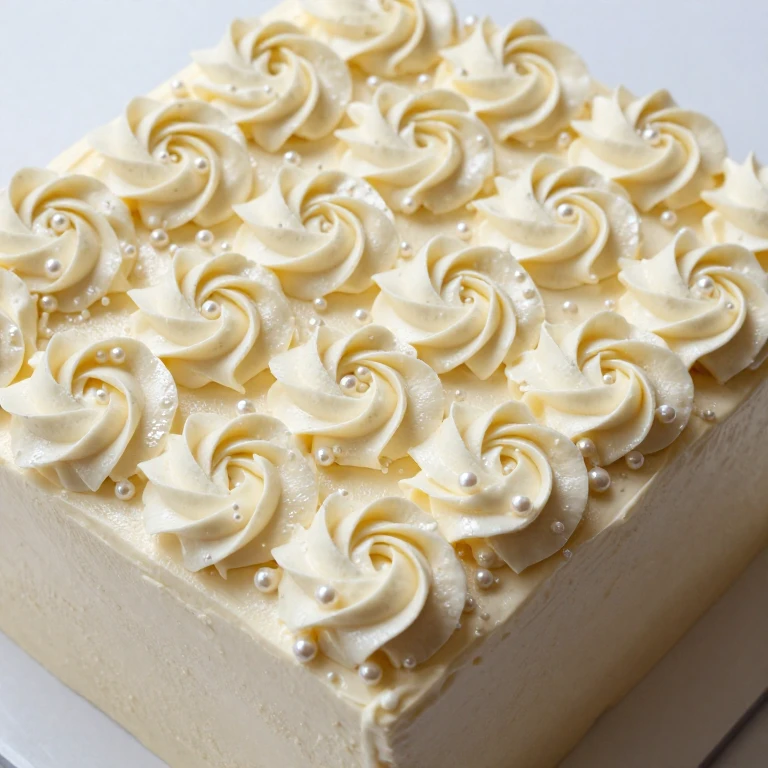
This flowers and pearls sheet cake recipe delivers an elegant, timeless design that looks like you spent hours piping—but I’ve built it around a foolproof buttercream technique and strategic spacing that keeps every rosette crisp and every pearl perfectly placed. You’ll start with a sturdy vanilla or almond cake base, apply a silky Swiss meringue buttercream that holds its shape under a piping bag, then add buttercream blooms and edible pearl accents in a pattern that reads refined, not fussy. The result is a show-stopping sheet cake that’s actually repeatable, with clean finishes that stay picture-perfect from plating to the last slice.
Why You’ll Love This
- Foolproof buttercream formula that holds piped details without weeping or collapsing, even in warm kitchens
- Scalable design—work with a standard 9×13″ sheet or adapt the pattern to any rectangular pan size
- Pearl accents add luxury without requiring advanced decorating skills; press them into soft buttercream and they stay put
- Make-ahead friendly: bake the cake 1–2 days ahead, pipe decorations the morning of service, and store covered at room temperature
- Works for weddings, showers, milestone birthdays, or any occasion where understated elegance matters
- Almond or vanilla bean options let you match the cake flavor to your guest list and season
Ingredient Breakdown
For the Cake
- 2 cups all-purpose flour
- 1 3/4 teaspoons baking powder
- 1/2 teaspoon kosher salt
- 1/2 cup (1 stick) unsalted butter, softened to room temperature
- 1 cup granulated sugar
- 3 large eggs, room temperature
- 1 teaspoon vanilla extract (or 1/2 teaspoon almond extract for almond cake)
- 1/2 cup whole milk, room temperature
For the Swiss Meringue Buttercream
- 4 large egg whites, room temperature
- 1 cup granulated sugar
- 1 pound (4 sticks) unsalted butter, cut into cubes and softened to cool room temperature
- 1/2 teaspoon vanilla extract (or 1/4 teaspoon almond extract)
- Pinch of kosher salt
For Decoration
- Edible pearl dust or pearlescent luster dust (optional, for shimmer)
- Edible pearl beads or sugar pearls (1/4 to 1/2 cup, depending on coverage)
- Gel or paste food coloring (optional, to tint buttercream)
The Swiss meringue buttercream is the anchor here—it holds piped rosettes without slumping and resists humidity better than American buttercream. If you prefer a faster route, Swiss meringue can be made 1 day ahead and refrigerated, then re-whipped before piping.
Whirl Hook
This sheet cake’s signature move is the Swiss meringue buttercream paired with a tight piping technique and edible pearl accents. The buttercream creates a silky, stable base that holds its shape in warm conditions, while the pearls add a textural contrast—crisp, delicate spheres against soft, velvety frosting. Together, they deliver that high-end bakery finish without requiring advanced decorating experience.
Step-by-Step
Make the Cake
- Preheat your oven to 350°F. Grease a 9×13″ baking pan and line the bottom with parchment paper for easy removal.
- Whisk together flour, baking powder, and salt in a medium bowl; set aside.
- In a large bowl, cream softened butter and granulated sugar on medium-high speed for 3–4 minutes until pale and fluffy, scraping the bowl halfway through.
- Add eggs one at a time, beating on medium speed for 20–30 seconds after each addition. Pour in vanilla extract and mix until combined.
- Alternate adding flour mixture and milk in three additions, starting and ending with flour. Mix on low speed just until combined after each addition; do not overmix.
- Pour batter into the prepared pan and spread evenly with an offset spatula.
- Bake for 28–32 minutes until a toothpick inserted in the center comes out with a few moist crumbs and the top springs back lightly when touched. The cake should be golden and just set at the edges.
- Cool in the pan for 15 minutes, then turn out onto a wire rack to cool completely (at least 1 hour, or up to overnight wrapped airtight).
Make the Swiss Meringue Buttercream
- Set up a double boiler: place a heatproof bowl over a pot of simmering water, making sure the bowl doesn’t touch the water.
- Add egg whites and granulated sugar to the bowl and whisk constantly for 8–10 minutes until the mixture reaches 160°F on an instant-read thermometer and feels warm to the touch. This pasteurizes the eggs and dissolves the sugar.
- Transfer the warm mixture to a stand mixer fitted with the whisk attachment. Whip on medium-high speed for 8–10 minutes until stiff peaks form and the meringue is cool to the touch.
- Switch to the paddle attachment. With the mixer on low speed, add softened butter one cube at a time, waiting 10–15 seconds between additions. The mixture will look curdled at first—this is normal. Keep mixing.
- Once all butter is incorporated, increase speed to medium and beat for 2–3 minutes until the buttercream is smooth, pale, and fluffy. Add vanilla extract, almond extract (if using), and a pinch of salt. Mix until combined.
- If the buttercream is too soft, refrigerate for 5–10 minutes, then re-whip on medium speed until it reaches piping consistency. It should hold a peak but still be spreadable.
Assemble and Decorate
- Place the cooled cake on a level work surface. If the top is domed, use a serrated knife to gently level it.
- Transfer 1/3 of the buttercream to a piping bag fitted with a medium round tip (Ateco #806 or similar). Reserve the remaining buttercream for filling and base coat.
- Spread a thin crumb coat of buttercream over the top and sides of the cake using an offset spatula. Refrigerate for 15–20 minutes until set.
- Apply a second, thicker coat of buttercream over the crumb coat, smoothing it as evenly as possible with a warm, damp offset spatula or cake scraper.
- Plan your piping pattern: I work in rows, spacing rosettes about 1 1/2 inches apart. Start from one corner and pipe in a grid or staggered pattern for visual rhythm.
- Hold the piping bag perpendicular to the cake surface, about 1/4 inch above the buttercream. Squeeze gently while moving the bag in a small circle (about 1 inch diameter) to form a rosette. Release pressure and pull the bag away cleanly.
- Pipe rosettes across the entire top surface, working in rows from one end to the other. Aim for 20–30 rosettes depending on cake size and spacing preference.
- Once all rosettes are piped, gently press edible pearl beads into the buttercream between and around the rosettes, or create a pearl border around the outer edge. The soft buttercream will hold them securely.
- If using pearl dust, lightly brush or dust it over the entire decorated surface with a soft pastry brush for a subtle shimmer (optional).
Visual Cooking Timeline
- 0:00 — Preheat oven to 350°F, prep baking pan with parchment, gather ingredients
- 0:10 — Mix dry ingredients, cream butter and sugar, alternate wet and dry additions, pour into pan
- 0:15 — Bake cake for 28–32 minutes
- 0:50 — Cake cools in pan (15 minutes), then turns out to cool completely (1+ hours)
- 2:00 — Prepare Swiss meringue buttercream: warm egg whites and sugar over double boiler (10 minutes), whip to stiff peaks (10 minutes), add butter cubes (5–7 minutes), beat until smooth (3 minutes)
- 2:30 — Apply crumb coat, refrigerate 15–20 minutes
- 2:50 — Apply final buttercream coat, smooth with offset spatula
- 3:00 — Pipe rosettes in planned pattern (15–20 minutes)
- 3:20 — Press edible pearls into buttercream, dust with pearl luster if desired, ready to serve or refrigerate until plating
Flavor Spin
The Swiss meringue buttercream is your canvas here. I keep the base vanilla or almond, but you can tint it with gel food coloring to match your event—soft blush, sage, ivory, or even a subtle two-tone effect by piping different colored rosettes. For flavor depth, try adding 1/4 teaspoon of rose water or a pinch of cardamom to the buttercream; it keeps the elegance but adds intrigue. You can also swap the cake base: almond extract instead of vanilla for a nuttier crumb, or add 1 tablespoon of lemon zest to the batter for brightness.
Whirl Factor
The texture contrast is what makes this cake memorable: silky, velvety buttercream rosettes against the crisp, delicate snap of edible pearls, all sitting on a tender, moist cake crumb. The Swiss meringue buttercream is stable enough to hold piped detail under pressure, yet soft enough to yield cleanly to a fork. The pearls add visual luxury and a subtle textural surprise—they catch light and add dimension without requiring any advanced decorating skill.
Spin Options
Variation 1: Ombre Pearl Border
Skip the rosette piping entirely and create a simpler finish: smooth buttercream over the top and sides, then press a dense border of edible pearls around the outer edge of the cake, graduating from one pearl color to another (ivory to blush, for example). Pipe a single decorative line of buttercream around the pearl border for polish. This approach takes 10 minutes and reads just as elegant.
Variation 2: Tinted Buttercream with Metallic Accents
Divide the buttercream into two bowls and tint one with gel food coloring (sage, blush, or lavender work beautifully). Pipe rosettes alternating between white and tinted buttercream in a checkerboard or scattered pattern. Dust the entire finished cake lightly with edible gold or silver luster dust for a refined shimmer.
Variation 3: Fresh Flower and Pearl Hybrid
Pipe buttercream rosettes in a scattered pattern, then tuck small, pesticide-free fresh flowers (pansies, violas, or spray roses) between the rosettes and press pearls around them. This adds botanical texture while keeping the pearl accent subtle. Remove fresh flowers before serving if desired, or leave them as part of the presentation.
Quick Tips
- Keep all buttercream ingredients at cool room temperature before mixing—warm butter will break the emulsion and create a grainy texture. If this happens, refrigerate the mixture for 10 minutes and re-whip on medium speed.
- Piping consistency matters: the buttercream should hold a peak when you lift the spatula, but still feel slightly soft. If it’s too firm, it will tear and look rough; too soft, and rosettes will slump.
- Work on a level surface and use a turntable if you have one—it makes spacing rosettes evenly much easier and faster.
- Edible pearls adhere best to freshly piped, still-soft buttercream. Press them in gently but firmly within a few minutes of piping; if the buttercream crusts over, they won’t stick.
- If your kitchen is warm (above 72°F), refrigerate the piped cake for 20 minutes before serving to set the buttercream and keep rosettes crisp-looking.
- Use a long serrated knife dipped in hot water and wiped clean between cuts for clean, neat slices that showcase the piped detail.
Substitution Ideas
- Cake flavor: Vanilla → Almond (swap 1 teaspoon vanilla for 1/2 teaspoon almond extract) or Lemon (add 1 tablespoon lemon zest to batter and reduce milk by 1 tablespoon). Both bake in the same time.
- Buttercream base: Swiss meringue → American buttercream (beat softened butter with powdered sugar, vanilla, and salt). American buttercream is faster but slightly less stable in warm conditions; add 1–2 tablespoons of meringue powder to improve structure.
- Edible pearls: Sugar pearls → Dragées (larger, metallic spheres; use fewer for visual impact) or pearl dust alone (skip the beads and dust the entire cake with pearlescent luster for a subtle shimmer).
- Piping detail: Rosettes → Piped dots, daisies, or a simple scalloped buttercream border. All hold equally well and read just as elegant with less piping time.
- Dairy-free option: Use vegan butter (cold-pressed, high-fat variety) in both cake and buttercream. Bake time may increase by 2–3 minutes; check with a toothpick. Swiss meringue requires pasteurized egg whites or aquafaba (3 tablespoons per egg white).
Make-Ahead Options
Two days before: Bake the cake, cool completely, wrap airtight, and store at room temperature. The cake will actually develop better flavor and moisture after a day of rest. One day before: Make the Swiss meringue buttercream, let it cool completely, transfer to an airtight container, and refrigerate. Before use, re-whip on medium speed for 2–3 minutes to restore piping consistency. Morning of service: Remove the buttercream from the refrigerator 30 minutes before decorating. Apply the crumb coat and final coat, refrigerate the cake for 20 minutes, then pipe rosettes and press pearls into place. The cake is now ready to serve or can be held at room temperature (below 72°F) for up to 4 hours. Do not make ahead: Piped rosettes are best done within a few hours of serving; buttercream can crust over in dry conditions or soften too much in heat, and pearls may shift. If you must pipe ahead, refrigerate the finished cake and bring to room temperature 30 minutes before serving.
Whirl Finish
Serve this cake on a cake server or large, flat spatula to keep slices intact and show off the piped detail. Plate on room-temperature dessert plates so the buttercream stays silky and the pearls catch light. Leftover slices keep, covered, at room temperature for up to 2 days, or refrigerate for up to 4 days. The buttercream will firm up when cold; bring slices to room temperature for 15 minutes before serving to restore the silky texture. If you need to transport the cake, refrigerate it first so the buttercream sets, then keep it in a sturdy cake box in a cool car or climate-controlled space.
FAQ
Can I make this cake smaller or larger?
Yes. For a 8×8″ square cake, halve all ingredients and bake 22–26 minutes. For a 10×15″ sheet cake, increase ingredients by 50% and bake 30–35 minutes. The piping pattern scales proportionally—just adjust rosette spacing to fit your pan size.
What if my buttercream breaks or looks grainy?
This happens when butter temperature is wrong (too warm or too cold). Stop mixing, refrigerate the entire bowl for 10 minutes, then re-whip on medium speed. It should come back together. If it doesn’t, start fresh with room-temperature butter and go slower when adding cubes.
Can I use store-bought buttercream or frosting?
You can, but Swiss meringue holds piped detail better than most store-bought options. If you do use store-bought, choose a Swiss meringue or ermine frosting if available; avoid American buttercream blends, which often contain vegetable shortening and won’t hold fine piping detail as crisply.
How do I prevent the cake from sliding or shifting on the plate?
Place a small dollop of buttercream on the plate first, then set the slice down on top. The buttercream acts as an anchor and keeps the slice from moving. This also adds a professional touch to plating.
Can I freeze this cake?
Yes. Bake and cool the cake, wrap it airtight, and freeze for up to 1 month. Thaw at room temperature for 2–3 hours before frosting. You can also freeze the buttercream in an airtight container for up to 2 weeks; re-whip before piping. Do not freeze the finished, decorated cake—the pearls may crack and the buttercream may separate during thawing.
What’s the best way to color the buttercream without making it grainy?
Use gel or paste food coloring, never liquid. Add color drop by drop, mixing on low speed after each addition. Gel coloring is concentrated, so a little goes a long way; liquid coloring can add moisture and break the buttercream. For pastel tones, start with 1–2 drops; for deeper tones, use 4–6 drops.
How far in advance can I pipe the rosettes?
Pipe rosettes no more than 4–6 hours before serving if your kitchen is cool (below 72°F). In warmer conditions, pipe closer to serving time. If you must pipe ahead, refrigerate the finished cake and bring it to room temperature 30 minutes before plating so the buttercream softens and looks fresh.
Flowers and Pearls Sheet Cake with Classic Buttercream
Ingredients
Method
- Preheat oven to 350°F. Grease a 9×13" baking pan and line the bottom with parchment paper for easy removal.
- Whisk together flour, baking powder, and salt in a medium bowl; set aside.
- In a large bowl, cream softened butter and granulated sugar on medium-high speed for 3–4 minutes until pale and fluffy, scraping the bowl halfway through.
- Add eggs one at a time, beating on medium speed for 20–30 seconds after each addition. Pour in vanilla extract and mix until combined.
- Alternate adding flour mixture and milk in three additions, starting and ending with flour. Mix on low speed just until combined after each addition; do not overmix.
- Pour batter into the prepared pan and spread evenly with an offset spatula.
- Bake for 28–32 minutes until a toothpick inserted in the center comes out with a few moist crumbs and the top springs back lightly when touched. The cake should be golden and just set at the edges.
- Cool in the pan for 15 minutes, then turn out onto a wire rack to cool completely (at least 1 hour, or up to overnight wrapped airtight).
- Set up a double boiler: place a heatproof bowl over a pot of simmering water, making sure the bowl doesn't touch the water.
- Add egg whites and granulated sugar to the bowl and whisk constantly for 8–10 minutes until the mixture reaches 160°F on an instant-read thermometer and feels warm to the touch. This pasteurizes the eggs and dissolves the sugar.
- Transfer the warm mixture to a stand mixer fitted with the whisk attachment. Whip on medium-high speed for 8–10 minutes until stiff peaks form and the meringue is cool to the touch.
- Switch to the paddle attachment. With the mixer on low speed, add softened butter one cube at a time, waiting 10–15 seconds between additions. The mixture will look curdled at first—this is normal. Keep mixing.
- Once all butter is incorporated, increase speed to medium and beat for 2–3 minutes until the buttercream is smooth, pale, and fluffy. Add vanilla extract and a pinch of salt. Mix until combined.
- If the buttercream is too soft, refrigerate for 5–10 minutes, then re-whip on medium speed until it reaches piping consistency. It should hold a peak but still be spreadable.
- Place the cooled cake on a level work surface. If the top is domed, use a serrated knife to gently level it.
- Transfer 1/3 of the buttercream to a piping bag fitted with a medium round tip. Reserve the remaining buttercream for filling and base coat.
- Spread a thin crumb coat of buttercream over the top and sides of the cake using an offset spatula. Refrigerate for 15–20 minutes until set.
- Apply a second, thicker coat of buttercream over the crumb coat, smoothing it as evenly as possible with a warm, damp offset spatula or cake scraper.
- Plan your piping pattern: work in rows, spacing rosettes about 1 1/2 inches apart. Start from one corner and pipe in a grid or staggered pattern for visual rhythm.
- Hold the piping bag perpendicular to the cake surface, about 1/4 inch above the buttercream. Squeeze gently while moving the bag in a small circle (about 1 inch diameter) to form a rosette. Release pressure and pull the bag away cleanly.
- Pipe rosettes across the entire top surface, working in rows from one end to the other. Aim for 20–30 rosettes depending on cake size and spacing preference.
- Once all rosettes are piped, gently press edible pearl beads into the buttercream between and around the rosettes, or create a pearl border around the outer edge. The soft buttercream will hold them securely.
- If using pearl dust, lightly brush or dust it over the entire decorated surface with a soft pastry brush for a subtle shimmer (optional).