
A flowers and butterflies sheet cake recipe isn’t just about stacking layers and calling it done. This one pivots on a critical texture contrast: soft, cloud-like buttercream blooms piped in pastel shades against a sturdy, slice-clean cake crumb. The payoff? A cake that looks whimsical enough for spring showers and birthday celebrations, but holds structure when you transport it or cut into it.
I’ve built this cake around a simple vanilla-almond base that stays moist without becoming dense, paired with a Swiss meringue buttercream that holds shape under room-temperature conditions and pipes with precision. The butterfly accents use the same buttercream, so you’re working with one core component across the entire design. No fondant fussiness, no overnight chilling requirements.
What makes this version worth your time is the balance between visual impact and genuine repeatability. The color palette stays soft and intentional. The piping techniques layer from simple to slightly more detailed, so you can start basic and build confidence. Let’s walk through how to build it.
Quick Snapshot
- Prep Time: 45-50 minutes (cake assembly and decoration)
- Bake Time: 28-32 minutes
- Total Time: 3-4 hours (includes cooling)
- Yield: 12-15 servings
- Texture: Tender crumb with smooth, pipeable buttercream
- Flavor Profile: Vanilla-almond cake with subtle warmth; buttercream is rich but not cloying
- Skill Level: Intermediate (piping experience helpful, not required)
Why This Recipe Works
The vanilla-almond cake uses a combination of cake flour and all-purpose flour, which gives you structure without toughness. Almond extract amplifies vanilla without adding extra liquid, so the crumb stays stable during transport and cutting. Baking soda paired with lemon juice creates lift without relying solely on eggs, which means the cake rises evenly and stays level.
Swiss meringue buttercream is the anchor here. Unlike American buttercream, it whips to a silkier, more stable texture that holds piped shapes even in warm kitchens. The egg-white base means it doesn’t break when you add color, and it pipes clean lines without the greasiness that can blur fine details.
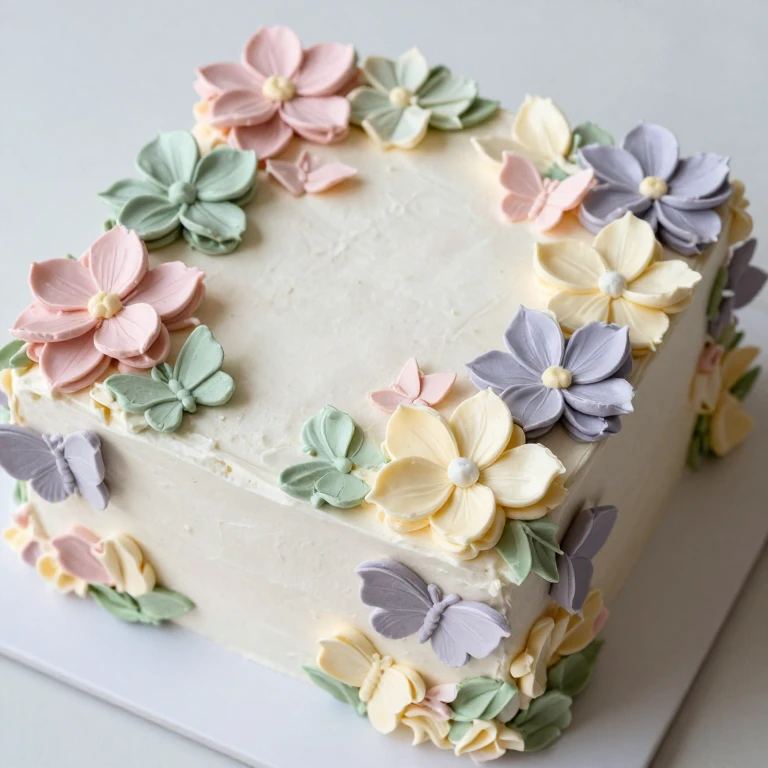
The flower piping uses a petal tip and a simple back-and-forth motion—no advanced techniques required. Butterfly accents are built from two simple curved strokes, which trains your hand without demanding perfection. The pastel color palette (soft pink, pale yellow, light lavender, sage green) reads unified and intentional, not random.
Ingredient Overview
- For the Cake:
- 1 3/4 cups cake flour
- 1/2 cup all-purpose flour
- 1 3/4 teaspoons baking powder
- 1/2 teaspoon baking soda
- 1/2 teaspoon fine sea salt
- 1/2 cup (1 stick) unsalted butter, softened
- 1 cup granulated sugar
- 3 large eggs, room temperature
- 1/2 cup whole milk, room temperature
- 2 tablespoons fresh lemon juice
- 2 teaspoons vanilla extract
- 1/4 teaspoon almond extract
- For the Buttercream:
- 6 large egg whites
- 1 1/2 cups granulated sugar
- 1 pound (4 sticks) unsalted butter, cubed and softened
- 2 teaspoons vanilla extract
- 1/4 teaspoon fine sea salt
- Gel food coloring (soft pink, pale yellow, light lavender, sage green)
- For Assembly:
- Parchment paper or cake boards
- Pastry bags and petal tips (size 104 or similar)
- Butterfly-shaped cutters or stencils (optional)
The cake flour-to-all-purpose ratio is deliberate. Cake flour has lower protein content, which keeps the crumb tender, while the all-purpose flour adds just enough structure to support the weight of the buttercream and decorations. If you can’t find cake flour, sift all-purpose flour with a small amount of cornstarch as a substitute.
For the buttercream, pasteurized egg whites are safe to use raw, but if you’re uncomfortable with that, you can use meringue powder mixed with water according to package directions. The Swiss meringue method (heating the egg whites and sugar to 160°F) pasteurizes them naturally, so there’s no food-safety concern if you follow the steps precisely.
Gel food coloring is non-negotiable here. Liquid food coloring adds too much moisture and can break the buttercream; gel colors are concentrated and won’t thin your frosting. Buy them at baking supply stores or online—they last for years and give you the soft, sophisticated pastels this design demands.
Whirl Hook
This flowers and butterflies sheet cake recipe flips the script on spring desserts. Instead of heavy fondant or fussy modeling, you’re working with one buttercream that pipes blooms in minutes and holds its shape through transport and service. The twist is the texture contrast: a tender, slice-clean cake crumb paired with silky Swiss meringue that doesn’t weep or shift. The result is a cake that looks gallery-ready but tastes like home baking, not a bakery copy.
Step-by-Step Instructions
Bake the Cake
- Preheat your oven to 350°F. Line a 9×13-inch sheet pan with parchment paper, leaving slight overhang on two sides for easy removal.
- In a medium bowl, whisk together cake flour, all-purpose flour, baking powder, baking soda, and salt. Set aside.
- In a large bowl, cream softened butter and granulated sugar together for 3-4 minutes until pale and fluffy. Scrape the bowl halfway through. You’re looking for a texture that holds a peak when you lift the beaters.
- Add eggs one at a time, beating for about 30 seconds after each addition. The mixture should look smooth and emulsified, not curdled or separated.
- In a small bowl, whisk together milk and lemon juice. Let it sit for 1 minute—it will curdle slightly, which is correct.
- Add half the flour mixture to the butter mixture, beat on low speed for about 20 seconds until just combined. Don’t overmix. Pour in the milk mixture, beat for another 20 seconds. Add the remaining flour, beat until just combined. Fold in vanilla and almond extracts by hand with a rubber spatula.
- Pour batter into the prepared pan and smooth the top with an offset spatula. The batter should be level but doesn’t need to be perfectly even—it will level as it bakes.
- Bake for 28-32 minutes, until a toothpick inserted in the center comes out with a few moist crumbs. The cake will spring back when you gently press the center, and the edges will pull slightly from the pan sides.
- Cool in the pan for 15 minutes, then turn out onto a wire rack. Cool completely before frosting—at least 1 hour, or up to 2 hours. A warm cake will melt the buttercream.
Make the Swiss Meringue Buttercream
- Set up a double boiler: place a heatproof bowl over a pot of simmering water, making sure the bowl doesn’t touch the water.
- Add egg whites and granulated sugar to the bowl. Whisk constantly for 3-5 minutes until the mixture reaches 160°F on an instant-read thermometer and feels warm to the touch. The sugar should be completely dissolved—rub a tiny bit between your fingers; if you feel grains, keep whisking.
- Transfer the warm mixture to a stand mixer bowl (or a large mixing bowl if using a hand mixer). Whip on medium-high speed for 8-10 minutes until the mixture is cool, fluffy, and forms stiff peaks. This takes longer than you’d expect—be patient. The meringue should look glossy and pale.
- Reduce mixer speed to medium. Add softened butter cubes one at a time, beating for about 15 seconds between additions. The buttercream may look broken or curdled after the first few additions—this is normal. Keep adding butter and beating. Once all butter is incorporated, increase speed to medium-high and beat for 2-3 minutes until smooth and fluffy.
- Add vanilla extract and salt. Beat for another 30 seconds until fully combined.
- Divide buttercream into separate bowls and tint each portion with gel food coloring. Start with a toothpick-dab of color and stir thoroughly. You can always add more color, but you can’t remove it. Aim for soft, muted tones—pastels, not candy colors.
Assemble and Decorate
- Place the cooled cake on a clean work surface or cake board. If the cake has a domed top, use a serrated knife to level it with a gentle sawing motion. Save the trimmings for snacking or crumble-topping uses.
- Spread a thin layer of white (or pale) buttercream over the top of the cake as a crumb coat. This seals in loose crumbs and gives you a clean surface for piping. Chill for 15-20 minutes until the crumb coat is set.
- Transfer one color of buttercream into a pastry bag fitted with a petal tip (size 104 or similar). Hold the bag at a 45-degree angle to the cake surface, with the narrow end of the tip pointing slightly upward. Squeeze and move the bag in a small back-and-forth motion while moving your hand slightly forward. This creates a petal shape. Pipe 4-5 petals in a loose circle to form a simple flower. Repeat across the cake surface, varying the spacing and leaving room for butterflies.
- Switch to a second color and repeat the flower piping in different areas. Continue with the remaining colors until the cake is covered with blooms. Don’t aim for perfect symmetry—organic spacing reads more intentional.
- For butterfly accents, use a piping bag with a small round tip (size 3 or 4). Pipe two curved strokes side-by-side to form wings, then add a small dot or short line for the body. Tuck butterflies between flowers or along the cake edges. If you prefer, use butterfly-shaped cutters to cut thin fondant or modeling chocolate shapes and place them on top of the frosting.
- Chill the finished cake for at least 30 minutes before serving or transporting. The buttercream will set and hold its shape better.
Pro Tips for Best Results
- Room-temperature ingredients are non-negotiable. Cold eggs or milk won’t emulsify properly with the butter, and you’ll end up with a grainy batter. Pull eggs and milk from the fridge 30 minutes before mixing. This single step prevents most mixing disasters.
- Don’t skip the double-boiler step for the meringue. If you try to whip cold egg whites and sugar together, you’ll beat for 20 minutes and still have a thin, broken mess. The heat dissolves the sugar and pasteurizes the eggs, so you get a stable, silky base that whips to stiff peaks in minutes.
- Pipe flowers while the buttercream is still slightly soft. If it’s been in the fridge too long, it becomes stiff and won’t form smooth petals. Let it sit at room temperature for 5-10 minutes before piping. If it’s too soft, it will slump. The sweet spot is when it holds a peak but pipes smoothly.
- Use a turntable if you have one, but it’s not required. A lazy Susan or even a cake board on a smooth surface works fine. The key is being able to rotate the cake toward you as you pipe, so you’re always piping in a comfortable direction. This prevents hand strain and gives you more consistent petal shapes.
- Transport the cake on a flat, stable surface in a cardboard cake box. Even though the buttercream is stable, sudden movements or tilting can cause petals to shift. A box keeps the cake level and protected from drafts, which can cause the frosting to crack.
- Make this cake the day before if possible. The flavors meld overnight, and the cake is easier to slice cleanly when it’s fully set. The buttercream also becomes more stable, so piping is slightly easier on day two.
Flavor Spin
The core twist here is the texture contrast: tender cake, silky buttercream, and the visual movement created by the piping. But you can spin the flavor profile without changing the structure.
Lemon Lavender Variation
Replace the almond extract with 1/4 teaspoon dried culinary lavender (ground to a powder in a spice grinder). Increase the lemon juice to 3 tablespoons and reduce the milk by 1 tablespoon. The lavender adds a subtle floral note that pairs beautifully with the lemon, and it stays muted—not perfume-like. Tint the buttercream in purples and soft greens to echo the flavor.
Strawberry Shortcake Spin
Bake the cake as written, then fold 1/2 cup freeze-dried strawberries (crushed) into the finished buttercream. Add 1 tablespoon strawberry jam thinned with 1 teaspoon water to deepen the flavor without adding too much moisture. Pipe flowers in soft pink and white, and the cake will taste like spring berries without tasting artificial.
Almond-Cardamom Remix
Keep the almond extract, but add 1/4 teaspoon ground cardamom to the flour mixture. Cardamom is warm and slightly floral, so it amplifies the almond without changing the texture. Use warm, muted tones in the buttercream (dusty rose, soft gold, pale green) to echo the spiced warmth of the cake.
Whirl Factor
The texture contrast is what makes this cake sing. A tender, slice-clean crumb paired with buttercream that holds piped shapes without weeping or shifting. The flavor is straightforward vanilla-almond—nothing fussy—so the focus stays on the finish. The piping techniques layer from simple to slightly more involved, so you can build confidence without feeling overwhelmed. And because you’re working with one buttercream across the entire design, there’s no juggling multiple frostings or waiting for layers to set between piping steps. Everything moves forward in one cohesive sequence.
Spin Options
Minimalist Approach
If piping feels intimidating, simplify the design. Spread a smooth layer of buttercream over the cake, then use a palette knife to create soft, organic texture across the surface. Pipe simple dots or dashes in different pastel colors, scatter a few butterfly accents, and call it done. The cake reads intentional and modern, not unfinished.
Elevated Celebration Version
Bake two 9×13 cakes, level them, and stack with a thin layer of buttercream between. This doubles the visual impact and gives you more surface area for piping. Add gold or silver edible dust to the buttercream for shimmer, or pipe tiny dots of contrasting colors inside each flower for depth. The structure stays the same; you’re just amplifying the finish.
Single-Color Monochrome
Tint all the buttercream in one color—dusty blush, soft sage, or pale gold. Pipe flowers using only that color, varying the density and placement so the cake reads as textured rather than monotone. Add white butterfly accents for contrast. This approach is more sophisticated and works beautifully for formal events.
Serving Suggestions
Serve this cake with fresh whipped cream and a scatter of fresh berries—strawberries or raspberries complement the vanilla-almond base without competing for attention. The cream cuts the richness of the buttercream, and the berries add a bright, tart note that lifts the whole plate.
For a more elevated option, pair slices with a light lemon curd or strawberry jam on the side. A small spoonful adds brightness and texture contrast without overwhelming the cake’s delicate flavor. This works especially well if you’ve chosen a lemon or strawberry variation.
A simple pairing: serve with cold milk or a light herbal tea. The buttercream is rich, so something simple and refreshing keeps the meal balanced. Chamomile or lavender tea echoes the floral design without being heavy.
Whirl Finish
Storage & Transport
Store the finished cake in an airtight container at room temperature for up to 2 days. The buttercream stays stable, and the cake stays moist. If your kitchen is warm (above 72°F), refrigerate the cake and bring it to room temperature 30 minutes before serving—cold buttercream can taste waxy.
For longer storage, wrap the unfrosted cake tightly in plastic wrap and freeze for up to 3 months. Thaw at room temperature for 2 hours, then frost and decorate. The frosted cake can be refrigerated for up to 5 days in an airtight container, though the buttercream may develop slight condensation when you first open it—this is normal and disappears as it adjusts to room temperature.
To transport, place the finished cake in a sturdy cardboard cake box on a flat, level surface in your vehicle. Avoid placing it on a seat where it might slide during turns. If you’re traveling more than 30 minutes, keep the cake in a cool environment or use a cooler with ice packs positioned away from the cake itself. The buttercream can soften in direct heat, which may cause piped details to blur.
FAQ
Can I make this cake without a stand mixer?
Yes, but the Swiss meringue buttercream will take longer to whip. Use a hand mixer and plan for 12-15 minutes of beating after you add the butter. The meringue base (egg whites and sugar) can be whisked by hand over the double boiler, but whipping it to stiff peaks without a mixer is genuinely difficult. If you don’t have a mixer, consider making American buttercream instead: cream softened butter with powdered sugar, add vanilla and a pinch of salt, and adjust consistency with milk. It’s less stable in warm conditions, but it’s faster and requires only a hand mixer.
What if my buttercream breaks or looks curdled?
This usually happens when the butter temperature doesn’t match the meringue temperature. If the meringue is too cold and the butter is too warm, they won’t emulsify. Stop the mixer, let the buttercream sit at room temperature for 10 minutes, then resume beating on medium speed. If it’s still broken, gently warm the bowl by setting it over the double boiler for 10 seconds at a time, stirring between intervals, until the mixture reaches about 70°F. Then beat again. Patience and temperature adjustment fix this almost every time.
Can I make the cake and buttercream the day before?
Absolutely. Bake the cake, cool it completely, wrap it tightly in plastic wrap, and store it at room temperature overnight. Make the buttercream, divide and tint it, and store it in airtight containers at room temperature. The next day, bring the buttercream to room temperature (about 30 minutes), give it a quick stir to restore smoothness, and pipe. This actually makes the project less stressful because you’re spreading the work across two days.
What piping tip size do I need for the flowers?
A petal tip size 104 is ideal, but sizes 103 and 105 work similarly. If you don’t have a petal tip, you can approximate flowers with a round tip by piping overlapping dots, or use a small star tip for a different texture. The technique changes slightly, but the visual effect is still whimsical and intentional.
Is Swiss meringue buttercream safe to eat raw?
The Swiss meringue method heats the egg whites and sugar to 160°F, which pasteurizes them and kills harmful bacteria. If you reach that temperature and hold it for 1 minute (check with an instant-read thermometer), the buttercream is safe to eat raw. If you’re uncomfortable with raw eggs even with pasteurization, use pasteurized egg whites or meringue powder mixed with water according to package directions.
How do I get the buttercream colors to be soft pastels instead of bright?
Use gel food coloring and add it gradually. Start with a toothpick-dab and stir thoroughly. The color will deepen as you stir, so you might need less than you think. If you overshoot and the color is too bright, add more white buttercream to dilute it. Soft pastels require restraint—stop adding color before you think you’re done, and you’ll land in the right range.
Can I scale this recipe up for a larger cake?
Yes, but not by simply doubling. A 9×13 cake is already a generous size. If you want a larger cake, bake two 9×13 cakes and stack them, which gives you more surface area for piping and a more impressive height. Alternatively, bake in a 12×18 sheet pan and scale all ingredients by 1.5 times. If you go the 12×18 route, increase bake time by 5-8 minutes and check for doneness at the 33-minute mark. The buttercream recipe (which makes about 6 cups) is enough to frost and decorate two 9×13 cakes, so if you’re baking larger, make 1.5 times the buttercream as well.
Final Notes
This flowers and butterflies sheet cake recipe is built for repeatability and impact. The texture contrast between tender cake and silky buttercream is the core payoff, and the piping techniques are designed so you can start simple and build confidence. Make it once to learn the steps, and the second time, you’ll move through it with ease. The color palette stays soft and intentional, which means the cake reads as modern and polished, not chaotic. That’s the point: a cake that looks gallery-ready but tastes like genuine home baking, and that you can actually repeat without stress.
Flowers and Butterflies Sheet Cake with Pastel Buttercream
Ingredients
Method
- Preheat oven to 350°F. Line a 9x13-inch sheet pan with parchment paper, leaving slight overhang on two sides for easy removal.
- In a medium bowl, whisk together cake flour, all-purpose flour, baking powder, baking soda, and salt. Set aside.
- In a large bowl, cream softened butter and granulated sugar together for 3-4 minutes until pale and fluffy. Scrape the bowl halfway through until the mixture holds a peak when you lift the beaters.
- Add eggs one at a time, beating for about 30 seconds after each addition until the mixture looks smooth and emulsified.
- In a small bowl, whisk together milk and lemon juice. Let it sit for 1 minute until it curdles slightly.
- Add half the flour mixture to the butter mixture, beat on low speed for about 20 seconds until just combined. Pour in the milk mixture, beat for another 20 seconds. Add the remaining flour, beat until just combined. Fold in vanilla and almond extracts by hand.
- Pour batter into the prepared pan and smooth the top with an offset spatula.
- Bake for 28-32 minutes, until a toothpick inserted in the center comes out with a few moist crumbs and the cake springs back when gently pressed.
- Cool in the pan for 15 minutes, then turn out onto a wire rack. Cool completely for at least 1 hour before frosting.
- For the buttercream, set up a double boiler with a heatproof bowl over simmering water, making sure the bowl doesn't touch the water.
- Add egg whites and granulated sugar to the bowl. Whisk constantly for 3-5 minutes until the mixture reaches 160°F and feels warm to the touch, ensuring all sugar is dissolved.
- Transfer the warm mixture to a stand mixer bowl. Whip on medium-high speed for 8-10 minutes until cool, fluffy, and forming stiff peaks.
- Reduce mixer speed to medium. Add softened butter cubes one at a time, beating for about 15 seconds between additions. Continue until all butter is incorporated, then beat on medium-high for 2-3 minutes until smooth and fluffy.
- Add vanilla extract and salt. Beat for another 30 seconds until fully combined.
- Divide buttercream into separate bowls and tint each portion with gel food coloring, starting with a toothpick-dab and stirring thoroughly. Aim for soft, muted pastel tones.
- Place the cooled cake on a clean work surface. If the cake has a domed top, level it with a serrated knife using gentle sawing motions.
- Spread a thin layer of white or pale buttercream over the top of the cake as a crumb coat. Chill for 15-20 minutes until set.
- Transfer one color of buttercream into a pastry bag fitted with a petal tip. Hold the bag at a 45-degree angle with the narrow end pointing slightly upward. Squeeze and move the bag in a back-and-forth motion while moving forward to create petal shapes. Pipe 4-5 petals in a loose circle to form flowers. Repeat across the cake surface, varying spacing and leaving room for butterflies.
- Switch to a second color and repeat the flower piping in different areas. Continue with remaining colors until the cake is covered with blooms.
- For butterfly accents, use a piping bag with a small round tip. Pipe two curved strokes side-by-side to form wings, then add a small dot or short line for the body. Tuck butterflies between flowers or along the cake edges.
- Chill the finished cake for at least 30 minutes before serving or transporting so the buttercream sets and holds its shape.