
Pickled onions are one of those condiments that transform a meal with just a handful of slices. I’ve always loved how they cut through richness, brighten bowls, and add snap to tacos. But traditional recipes often load the brine with sugar, turning what should be a sharp, tangy accent into something cloyingly sweet. That’s where this low-sugar version comes in. I wanted to create a pickled onion recipe that keeps all the crisp texture and bright vinegar punch while cutting the sweetness dramatically. The result is a quick refrigerator method that’s ready in hours, not days, and works beautifully across salads, grain bowls, sandwiches, and any dish that needs a bold acidic lift.
What makes this recipe stand out is the balanced brine formula. Instead of relying on sugar to smooth the vinegar’s edge, I’m using just enough honey or maple syrup to round the flavor without overwhelming it. A touch of sea salt, whole spices, and fresh aromatics do the real work here. The onions themselves stay crisp because we’re not cooking them—just pouring hot brine over them and letting the fridge do the magic. I always use red onions because their natural sweetness plays beautifully against the tart brine, but you can adapt this method to white or yellow onions if you prefer.
This guide walks you through the technique, shows you how to adjust sweetness to your taste, and gives you flavor add-in options so you can make this recipe your own. Whether you’re managing carbs, simply prefer less sugar, or just want a sharper condiment, this method delivers every time.
Quick Snapshot
- Prep Time: 15 minutes
- Chill Time: 2–4 hours (or overnight for deeper flavor)
- Total Time: 2 hours 15 minutes (plus chilling)
- Yield: About 2 cups
- Texture: Crisp, snappy, with tender-but-firm bite
- Flavor Profile: Bright, tangy, lightly sweet, with subtle spice
- Skill Level: Beginner-friendly
Why This Recipe Works
The balance between vinegar, salt, and minimal sweetener is what makes this recipe sing. I’m using equal parts vinegar and water as the base—this keeps the brine sharp without being harsh. The sea salt (about 1 teaspoon per cup of brine) seasons the onions directly and helps draw out their natural juices, creating a brine that tastes intentional, not thin. Most pickled onion recipes rely on 1/4 to 1/2 cup of sugar for a full batch; I’m using just 1–2 tablespoons of honey or maple syrup, which rounds the vinegar’s edge without tipping into sweetness. The onions stay crisp because we’re using the refrigerator method—no cooking, no thermal breakdown, just cold infusion.
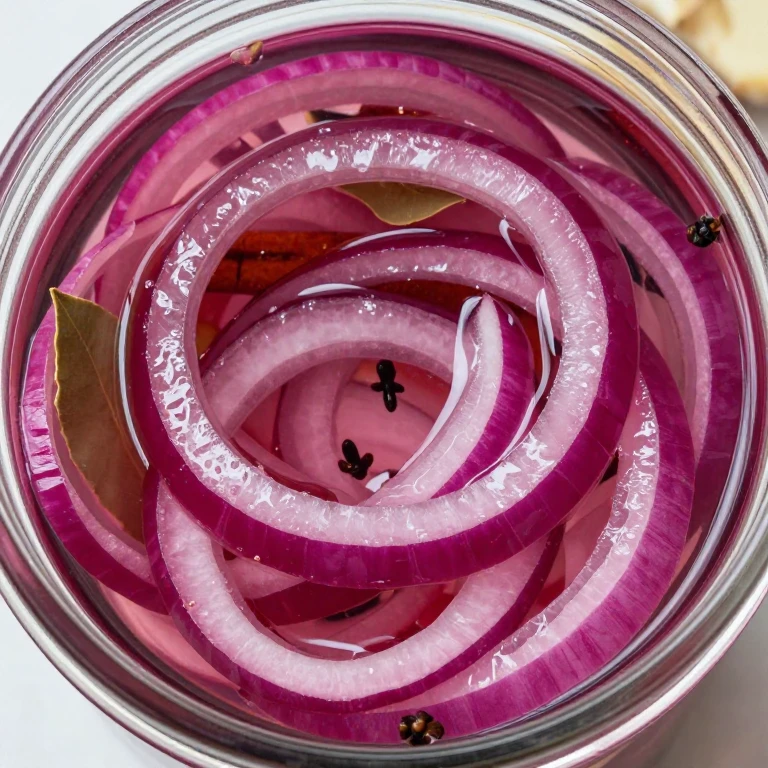
The spice choice matters too. I add a few whole cloves, a small piece of cinnamon stick, and maybe a bay leaf or peppercorns. These warm, subtle notes complement the vinegar and onion without competing with them. Fresh garlic and a slice of fresh ginger (if you like) add brightness without overpowering the brine. The whole spices stay intact, so they release flavor gradually—you control the intensity by how long the onions sit. This is a recipe built for control, not guesswork.
Ingredient Overview
- Red onions: 1 pound (about 3–4 medium onions), thinly sliced
- Red wine vinegar or apple cider vinegar: 1 cup
- Water: 1 cup
- Sea salt: 1 teaspoon
- Honey or pure maple syrup: 1–2 tablespoons (adjust to taste)
- Whole cloves: 3–4
- Cinnamon stick: 1 small piece (about 1 inch)
- Fresh garlic: 2 cloves, lightly crushed
- Bay leaf: 1 (optional)
- Black peppercorns: 1/2 teaspoon (optional)
- Fresh ginger: 1 thin slice (optional, about 1/2 inch)
Red onions are my go-to because they’re naturally sweeter than yellow or white onions, which means they balance the tart brine beautifully. Their color also bleeds slightly into the brine, creating that stunning deep pink hue. If you prefer a milder onion flavor, white or yellow onions work fine—just know they’ll be sharper in the final bite.
The vinegar choice shapes the flavor profile. Red wine vinegar gives a deeper, slightly fruity note. Apple cider vinegar adds warmth and a subtle apple undertone. White vinegar would work too, but it’s harsher and less forgiving. I prefer red wine or apple cider for this recipe. The honey or maple syrup isn’t about making these sweet—it’s about rounding the vinegar’s sharp edge so the brine tastes balanced, not aggressive. If you’re using stevia or monk fruit sweetener, use about 1/4 to 1/2 teaspoon and taste as you go, since these sweeteners are much more concentrated.
Whirl Hook
This low-sugar pickled onion recipe cuts the sweetness in half while keeping every bit of the crisp snap and tangy punch. The signature move is a balanced brine that lets vinegar and salt do the heavy lifting, with just a whisper of honey to smooth the edge. No cooking, no guesswork—just bright, repeatable results.
Flavor Spin
The core twist here is flipping the traditional sugar-heavy brine on its head. Instead of sweetness being the main event, it’s the supporting note. Vinegar becomes the star, salt brings focus, and just 1–2 tablespoons of honey rounds everything out. The result is a condiment that tastes intentional and balanced, not cloying. This approach works because the onions themselves bring natural sweetness—we’re not fighting that, we’re amplifying the contrast between their mild sweetness and the brine’s sharp tang.
Whirl Factor
The texture contrast is where this recipe delivers. You get crisp, snappy onion slices with a tender bite—no mushiness, no thermal breakdown. The flavor contrast is equally bold: bright vinegar tang cuts through richness, the subtle warm spices (clove, cinnamon) add depth without noise, and the minimal sweetness keeps everything sharp and usable across any dish. These onions won’t overpower a taco, salad, or bowl—they’ll elevate it.
Step-by-Step Instructions
Prepare the Onions
- Peel and slice your red onions into thin rings or half-moons, about 1/8 inch thick. I use a mandoline for consistent slices, but a sharp knife works fine—just take your time to keep thickness even. Thinner slices pickle faster and stay crispier. Place the sliced onions in a clean glass jar or heatproof container.
Build the Brine
- In a small saucepan, combine 1 cup red wine vinegar (or apple cider vinegar), 1 cup water, and 1 teaspoon sea salt. Stir until the salt dissolves. Add 1–2 tablespoons honey or pure maple syrup and stir again. Taste the brine—it should taste sharp and tangy with just a whisper of sweetness. If it’s too vinegary for you, add another 1/2 tablespoon honey. If it’s too sweet, add another 2 tablespoons vinegar. This is your chance to dial in the balance.
- Add your whole spices to the brine: 3–4 whole cloves, 1 small cinnamon stick piece (about 1 inch), 2 crushed garlic cloves, and optionally 1 bay leaf, 1/2 teaspoon black peppercorns, and 1 thin slice fresh ginger. Stir gently.
- Bring the brine to a boil over medium-high heat. Once it reaches a rolling boil, remove it from the heat and let it cool for about 2 minutes. You want it hot but not scalding—this will soften the onions just slightly without cooking them through.
Combine and Chill
- Carefully pour the hot brine (with all the spices) over the sliced onions in your jar. Make sure the onions are fully submerged. If they’re floating above the brine, weight them down with a small glass or ceramic dish. Let the jar sit at room temperature for about 15 minutes so the onions begin to soften.
- Cover the jar and transfer it to the refrigerator. The onions will be lightly pickled and ready to use in 2–4 hours. For deeper flavor and more tender texture, let them sit overnight or up to 3 days. The longer they sit, the more the spice flavors infuse and the softer they become, but they’ll still hold their snap.
Pro Tips for Best Results
- Slice thickness matters: Aim for 1/8 inch slices. Thicker slices stay crunchier but take longer to pickle. Thinner slices soften faster and absorb brine more quickly. Consistency is key—use a mandoline if you have one.
- Taste the brine before pouring: Every palate is different. Some people prefer more vinegar tang, others want a touch more sweetness. Adjust the brine to your preference before it hits the onions. You can always add more honey or vinegar, but you can’t undo it once it’s in the jar.
- Don’t skip the hot brine step: The heat softens the onions just enough to make them tender while keeping them crisp. It also helps the brine penetrate faster. Cold brine will work, but it takes longer and the texture stays more raw.
- Keep whole spices whole: Don’t grind or crush them (except the garlic). Whole spices release flavor gradually, giving you control over intensity. If you want stronger spice flavor, leave them in longer. If you want to dial it back, remove them after a few hours.
- Use a glass jar: Glass doesn’t react with vinegar the way metal can. It’s also easy to see how the onions are progressing and how much brine is left.
- Store in the coldest part of your fridge: The back of the fridge, away from the door, keeps these onions crisp and flavorful longer. Temperature fluctuations can soften them faster.
- Make a double batch: These keep for up to 3 weeks in the fridge, so doubling the recipe means you always have pickled onions on hand for tacos, salads, sandwiches, and bowls.
Whirl Finish
These pickled onions are ready to eat in 2–4 hours, but they’re even better the next day. They keep for up to 3 weeks in the refrigerator in a sealed jar. The flavor actually improves as the brine infuses—day one is sharp and fresh, day three is deeper and more rounded. Use them anywhere you want bright, acidic contrast: tacos, salads, grain bowls, sandwiches, charcuterie boards, or alongside roasted vegetables and proteins.
Serving Suggestions
- Tacos and Taco Bowls: These are the ultimate taco topping. Use them on carnitas, al pastor, fish tacos, or veggie tacos. The bright tang cuts through richness and adds textural contrast. About 2–3 tablespoons per taco is the sweet spot.
- Salads and Grain Bowls: Scatter them over green salads, grain bowls, or Buddha bowls. They add crunch and acidity without needing extra dressing. Try them on quinoa bowls with roasted vegetables and tahini dressing, or on mixed greens with goat cheese and walnuts.
- Sandwiches and Wraps: Layer them on pulled pork sandwiches, turkey sandwiches, or veggie wraps. They add snap and brightness that elevates simple sandwiches. About 2 tablespoons per sandwich is plenty.
- Charcuterie and Cheese Boards: Include a small bowl of these on any charcuterie board. They pair beautifully with cured meats, aged cheeses, and crusty bread. Guests love having a bright, tangy option to balance the richness of cheese and cured meat.
- Roasted Vegetables and Proteins: Spoon these over roasted chicken, grilled fish, or roasted root vegetables. The acidity brightens cooked foods and adds textural contrast. Try them on top of a simple roasted chicken breast or alongside roasted Brussels sprouts.
- Nachos and Loaded Sides: Use them as a topping for nachos, loaded fries, or loaded sweet potato fries. They add crunch and acidity that balances cheese and sour cream.
- Breakfast and Brunch: Add a small handful to avocado toast, breakfast sandwiches, or scrambled egg bowls. They add brightness and contrast that elevates simple morning dishes.
Storage and Reheating
Refrigerator Storage: These pickled onions keep for up to 3 weeks in a sealed glass jar in the refrigerator. The flavor actually improves over the first few days as the brine infuses deeper. After about a week, the onions become softer and more tender, but they maintain good flavor. The spices can be removed after 3–4 days if you want to slow down the infusion.
No Reheating Needed: These are a cold condiment—serve them straight from the fridge. The cold temperature keeps them crisp and refreshing. If you want to use them warm (on a hot taco or sandwich, for example), simply spoon them onto the warm food. The contrast between cold pickled onions and hot food is actually part of their appeal.
Make-Ahead Tip: These are perfect for meal prep. Make a batch on Sunday and use them throughout the week on salads, tacos, bowls, and sandwiches. Having them on hand makes it easy to add brightness and texture to any meal.
Freezing: I don’t recommend freezing these. The texture breaks down significantly when thawed, and they become mushy rather than crisp. Stick with refrigerator storage for the best results.
FAQ
Can I use white or yellow onions instead of red?
Yes, absolutely. White and yellow onions work fine—they’ll just taste sharper and more onion-forward. Red onions have more natural sweetness, which balances the tart brine beautifully. If you use white or yellow onions, you might want to add an extra 1/2 tablespoon of honey to round the flavor. The color will also be less striking—white or yellow onions won’t bleed color into the brine the way red onions do.
How much sweetener should I use?
Start with 1 tablespoon honey or maple syrup for a 2-cup batch. Taste the brine before pouring it over the onions. If it’s too vinegary, add another 1/2 tablespoon. If it’s too sweet, add more vinegar. Everyone’s preference is different—this is your chance to dial it in. If you’re using stevia or monk fruit sweetener, start with 1/4 teaspoon and taste as you go. These sweeteners are much more concentrated than honey, so a little goes a long way.
Can I use white vinegar instead of red wine or apple cider?
White vinegar will work, but it’s harsher and less forgiving. Red wine vinegar has a deeper, slightly fruity flavor that’s more forgiving and works better in this recipe. Apple cider vinegar adds warmth. If you only have white vinegar on hand, use it, but consider adding an extra 1/2 tablespoon of honey to round the flavor and make it less aggressive.
How long do these take to pickle?
These are ready to eat in 2–4 hours in the refrigerator. For lighter, crispier onions, use them after 2–3 hours. For deeper flavor and softer texture, let them sit overnight or up to 3 days. The longer they sit, the more the spice flavors infuse and the more tender they become, but they’ll still hold their snap if you’ve sliced them thin.
Do I need to cook the onions?
No. The hot brine softens them just slightly, but there’s no actual cooking. The onions stay mostly raw with a tender bite. If you prefer them softer, you can pour boiling brine over them and let them sit for 10 minutes before refrigerating, but this isn’t necessary. The cold infusion method keeps them crispiest.
Can I make a larger batch?
Yes. This recipe scales easily. For every 1 pound of onions, use 1 cup vinegar, 1 cup water, 1 teaspoon salt, and 1–2 tablespoons honey. Scale the spices proportionally. Make a double or triple batch and keep it in the fridge for up to 3 weeks. Having pickled onions on hand makes it easy to add brightness to any meal.
What if my onions are too soft?
You’ve likely left them in the brine too long or the brine was too hot. For crispier results, use thinner slices, pour the brine when it’s hot but not boiling, and use them within 2–4 hours. If you prefer softer onions, this isn’t a problem—they’re still delicious and flavorful. It’s really about personal preference.
Can I remove the spices after a certain time?
Yes. If you want to slow down the infusion and keep the flavor more subtle, remove the spices after 3–4 hours or a day. The onions will continue to pickle and soften, but the spice flavor won’t get stronger. This is helpful if you’re making a big batch and want consistent flavor throughout the storage period.
Are these low-carb?
Yes. With just 1–2 tablespoons of honey for a 2-cup batch, these are very low in sugar compared to traditional pickled onion recipes. One tablespoon of honey has about 17 grams of carbs, so spread across a 2-cup batch, each serving is quite minimal. If you’re strictly tracking carbs, use stevia or monk fruit sweetener instead—these have virtually no carbs.
Low-Sugar Pickled Onions Recipe, Balanced and Bright
Ingredients
Method
- Peel and slice red onions into thin rings or half-moons, about 1/8 inch thick. Place sliced onions in a clean glass jar or heatproof container.
- In a saucepan, combine 1 cup vinegar, 1 cup water, and 1 teaspoon sea salt. Add 3-4 whole cloves, 1 small piece cinnamon stick, 2 crushed garlic cloves, 1 bay leaf, 1/2 teaspoon peppercorns, and 1 thin slice fresh ginger if using.
- Bring the brine to a simmer over medium heat. Let it heat for 2-3 minutes until fragrant, then remove from heat and stir in 1-2 tablespoons honey or maple syrup. Taste the brine—it should balance tangy with a subtle sweetness. Adjust honey or vinegar to your preference.
- Pour the hot brine over the sliced onions in the jar, making sure all onions are submerged. If needed, add a bit more vinegar and water in equal parts. Let the jar cool to room temperature, about 15-20 minutes.
- Cover the jar and refrigerate for at least 2 hours before using. The onions will continue to soften and the flavor will deepen over 24 hours. They'll stay crisp and flavorful for up to 3 weeks in the refrigerator.