
I’m standing at my kitchen counter on a Tuesday evening, and the smell of apple cider vinegar hitting warm spices fills the air. There’s something deeply satisfying about the ritual of pickling—the snap of a jar lid, the promise of bright, tangy condiments waiting in the fridge for the week ahead. These paleo pickled onions are my secret weapon for adding punch to grilled meats, veggie bowls, and simple salads without relying on processed condiments or refined sugar.
I’ve built this recipe around a clean approach: apple cider vinegar for tang, a touch of honey for balance, and a refrigerator method that keeps the onions crisp and meal-prep friendly. No canning knowledge required, no complicated timing. Just real ingredients and a straightforward brine that works every single time.
What Makes This Dish Special
The core of this recipe sits in the texture contrast and flavor balance. Red onions soften just enough to absorb the brine while staying snappy when you bite into them—that’s the whirl factor here. Most pickled onion recipes rely on heavy sugar or processed vinegars; I’m using apple cider vinegar for its complex tang and a measured amount of honey to round out the sharpness without oversweetening.
The refrigerator method is non-negotiable for me. You’re not processing jars or dealing with canning equipment. The onions develop flavor as they sit, getting more complex over 24 to 48 hours. They’ll keep for weeks in the fridge, making them genuinely useful for weeknight cooking. And because there’s no high-heat processing, the onions retain a firm bite that transforms a simple bowl into something more intentional.
Flavor Profile Breakdown
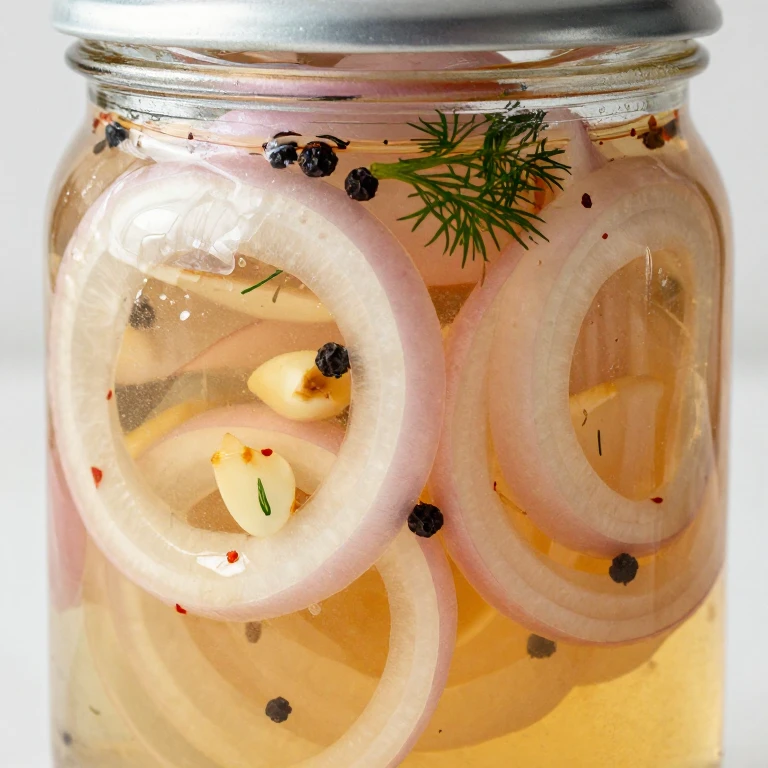
These pickled onions hit in layers. The base is the red onion’s natural sweetness, which softens slightly in the brine but stays grounded. The mid-palate is all apple cider vinegar—bright, slightly funky, with those complex notes you don’t get from distilled vinegar. The finish is where the honey comes in: not cloying, just enough to ease the sharp edges and let the spice notes (peppercorns, dill, garlic) shine. Salt anchors everything, making the acid feel balanced rather than aggressive. It’s the interplay of sweet, sour, and salt that keeps you reaching for more.
Ingredient Highlights
Red onions are the star here. I choose them for their color, their slight sweetness, and how they soften without turning mushy in the brine. Yellow onions work too, but they’re less visually striking and slightly more pungent—save those for when you want a sharper bite.
Apple cider vinegar is non-negotiable. It brings complexity that plain white vinegar can’t match. If you don’t have it on hand, raw apple cider vinegar with the mother is even better for gut health, though filtered works fine too. In a pinch, white wine vinegar or champagne vinegar will work, though the flavor profile shifts slightly warmer and less funky.
Honey is the paleo-friendly sweetener here, and I use just enough to balance the vinegar without making these taste like a condiment for a charcuterie board. If you’re avoiding honey, maple syrup works, though it adds an earthier note. For strict paleo, honey is your best bet.
Whirl Hook
The signature move: crisp-tender red onions brined in apple cider vinegar and honey, ready to add bright tang to any paleo meal without processed ingredients or refined sugar.
Cooking Walkthrough
Ingredients:
- 1 pound red onions (about 3 medium onions)
- 1 cup apple cider vinegar
- 1 cup filtered water
- 2 tablespoons raw honey
- 1 tablespoon fine sea salt
- 1 teaspoon black peppercorns
- 3 cloves garlic, smashed
- 3 sprigs fresh dill (or 1 teaspoon dried dill)
- 1 bay leaf
- Optional: 1/4 teaspoon red pepper flakes for heat
Steps:
- Prep the onions. Slice red onions into thin rings—about 1/8 inch thick. I use a sharp knife or mandoline for consistency. Place the sliced onions in a clean glass jar or heatproof container. Don’t pack them tightly; they need room for the brine to circulate.
- Build the brine. In a small saucepan, combine apple cider vinegar, water, honey, and sea salt. Heat over medium-low until the honey dissolves and the brine is warm but not boiling—around 160°F to 170°F. You want it hot enough to soften the onions slightly but cool enough that you’re not cooking away the vinegar’s complexity.
- Add aromatics to the hot brine. Stir in peppercorns, smashed garlic cloves, dill, and bay leaf. Let this sit for 1 minute off the heat so the flavors begin to bloom into the liquid.
- Pour brine over onions. Carefully pour the hot brine and all aromatics over the sliced onions in the jar. The onions will begin to soften immediately as the heat hits them. Make sure all onions are submerged—if needed, place a small weight or plate on top to keep them under the liquid.
- Cool to room temperature. Let the jar sit on the counter for about 1 hour. The onions will continue to soften as the brine cools, and the flavors will begin to meld.
- Refrigerate and wait. Once cooled, cover the jar and move it to the fridge. The onions are technically ready to eat after 4 hours, but they’re genuinely better after 24 to 48 hours. The flavor deepens, and the texture becomes more evenly tender while staying crisp at the bite.
Flavor Spin
The core twist here is simplicity with intentional ingredients. No sugar beyond honey, no vinegar beyond apple cider, no preservatives beyond salt and the natural preservation of the brine. The texture contrast—soft enough to fold into a bowl, crisp enough to add snap—is what makes these feel finished rather than just pickled.
Whirl Factor
Crisp-tender texture meets bright, balanced tang. The apple cider vinegar brings funk and complexity; the honey rounds the edges without sweetness taking over. Red onions stay visually striking and add subtle sweetness to the brine itself, making the final product more nuanced than standard pickled onions.
Chef Notes
- I always slice onions consistently—a mandoline takes the guesswork out of thickness and ensures even softening in the brine.
- In my kitchen, I’ve found that letting the brine cool slightly before pouring it over onions gives you more control over texture. Too hot, and they soften too fast; room temperature, and they stay firmer but take longer to pickle.
- When I make these, I save the leftover brine after the onions are gone. It’s excellent for quick-pickling other vegetables—radishes, cucumbers, or even hard-boiled eggs—and the flavor is already established.
- I always use raw honey when possible. It adds a subtle floral note that refined honey can’t match, though any honey works fine if that’s what you have.
- You’ll notice the onions release liquid as they sit. This is normal and actually deepens the flavor as the brine becomes more concentrated. Don’t drain it off; it’s part of the final product.
Spin Options
Spicy Version: Add 1/4 to 1/2 teaspoon red pepper flakes to the brine for heat that builds over time. The heat mellows slightly as the onions sit, so don’t be shy—it won’t be overwhelming after a few days.
Herb-Forward Version: Double the dill and add 2 sprigs fresh thyme or 1 teaspoon dried oregano. This version leans into the herb profile and pairs beautifully with grilled chicken or fish.
Garlic-Heavy Version: Use 6 to 8 cloves of garlic instead of 3, sliced thin rather than smashed. The garlic mellows significantly in the brine and becomes almost sweet—perfect if you love garlic in every bite.
Texture & Taste Expectations
Your finished pickled onions will be deep purple-red, with a glossy appearance from the brine. When you bite into them, you’ll get immediate tang from the apple cider vinegar, followed by the onion’s natural sweetness and a subtle honey finish. The texture should be tender enough to fold easily but still snappy—not mushy. The aromatics (garlic, dill, peppercorns) will be present but not aggressive; they’re there to support the onion and vinegar, not overpower them. After 48 hours, the flavor will be more integrated and complex than at 24 hours, so patience pays off here.
Customization Ideas
- Dairy-Free and Vegan: This recipe is already both—honey is the only potential swap point, and maple syrup or coconut sugar work in its place, though they shift the flavor slightly.
- Lower-Sugar Version: Reduce honey to 1 tablespoon or skip it entirely. The onions will be sharper and less balanced, but if you’re strictly low-carb, this works. The brine will be more aggressively sour, so use these on milder proteins or in larger quantities on salads where the tang reads as a dressing.
- Whole Onion Chunks: Cut onions into wedges or thick rings instead of thin slices. They’ll take longer to pickle (48 to 72 hours) but will have a different mouthfeel—more substantial and less likely to break apart when serving.
- Add Vegetables: Once you’ve mastered the basic recipe, try adding thin slices of jalapeño, radish, or cucumber to the jar. They’ll pickle at different rates, so add them after the onions have been in the brine for 12 hours if you want them to stay firmer.
Whirl Finish
These pickled onions keep in the fridge for up to 4 weeks, covered. The flavor actually improves for the first 2 weeks, then stabilizes. Use them straight from the jar as a condiment, or drain them slightly and fold into bowls, tacos, or grain dishes. The leftover brine is liquid gold—save it for quick-pickling other vegetables or drizzling over roasted meats for extra tang.
Pairing Ideas
I serve these alongside grilled steak or lamb, where the bright tang cuts through richness beautifully. They’re equally at home on a simple green salad with olive oil and salt, or folded into a cauliflower rice bowl with roasted vegetables and a protein. For something unexpected, try them on top of avocado toast (paleo-style, on a vegetable base) or alongside smoked salmon and cucumber slices for a quick appetizer.
FAQ
Can I use white onions instead of red?
Yes, white onions work fine, though they’re slightly more pungent and less visually striking. Yellow onions are also fine but will be sweeter and less vibrant in color. Red onions are my choice because they soften beautifully and stay colorful, making the final jar more appealing.
How long do these take to be ready to eat?
Technically, 4 hours. Realistically, 24 to 48 hours for the best flavor development. The onions soften and absorb the brine flavors as they sit, so patience genuinely improves the final product.
Do I need to sterilize the jar?
Since these are refrigerated and not shelf-stable, a clean jar is enough. Wash it with hot soapy water and rinse well. No special canning procedures needed.
Can I make these without honey?
Yes. Skip the honey entirely for a sharper, more aggressive pickle, or use maple syrup or coconut sugar for a different sweetness profile. Honey is paleo-friendly and adds a subtle floral note, but it’s not essential to the recipe.
What if my onions are still too soft after pickling?
This usually means the brine was too hot or the onions were sliced too thin. Next time, let the brine cool to around 160°F before pouring, and slice onions slightly thicker. If they’re already soft, they’re still delicious—just use them in applications where texture is less critical, like blended into dressings or chopped fine for garnish.
Can I reuse the brine?
Absolutely. Once the onions are gone, the brine is perfect for pickling other vegetables—radishes, cucumbers, or even hard-boiled eggs. The flavor is already established and will deepen with each use. I typically reuse it 2 to 3 times before discarding.
Are these actually paleo?
Yes. Red onions, apple cider vinegar, honey, salt, and fresh herbs are all paleo-compliant. No grains, legumes, dairy, or processed ingredients. The only ingredient some strict paleo followers might question is honey, but it’s widely accepted in paleo eating in small quantities.
Paleo Pickled Onions Recipe With ACV and Honey
Ingredients
Method
- Slice onions into thin rings, about 1/8 inch thick. Place in a clean glass jar or container.
- In a small bowl, whisk together apple cider vinegar, filtered water, raw honey, and sea salt until honey dissolves completely.
- Add smashed garlic, peppercorns, dill, and red pepper flakes to the jar with onions.
- Pour brine over onions, ensuring they are fully submerged. Press down gently to keep onions under liquid.
- Cover jar and refrigerate for at least 2 hours before serving. Onions develop deeper flavor after 24 hours.
- Store in refrigerator for up to 3 weeks. Shake jar gently before each use to redistribute brine and flavors.