
I’ve found that mastering classic egg techniques transforms breakfast from rushed and forgettable into something genuinely satisfying. These twelve methods aren’t trendy shortcuts or viral hacks—they’re the foundational techniques that have anchored breakfast tables for generations. What makes them worth revisiting now is how they each deliver a distinct texture, flavor profile, and moment of presence at the table. I’ve organized these by cooking style: quick stovetop methods, gentle poached and boiled approaches, composed dishes, and the showstopper preparations that feel restaurant-worthy but work at home.
Whether you’re refining a technique you half-remember or building your breakfast repertoire from scratch, these recipes give you the core method, the texture payoff, and the practical finish that makes each one repeatable. Pick one to master this weekend, and you’ll find yourself reaching for it regularly.
Quick Stovetop Egg Recipes
These methods happen in minutes and deliver high-impact texture contrasts—from crispy edges to creamy centers. They’re your go-to when you want breakfast on the table without fuss, but with real presence.
1. Butter-Basted Sunny-Side Up Eggs
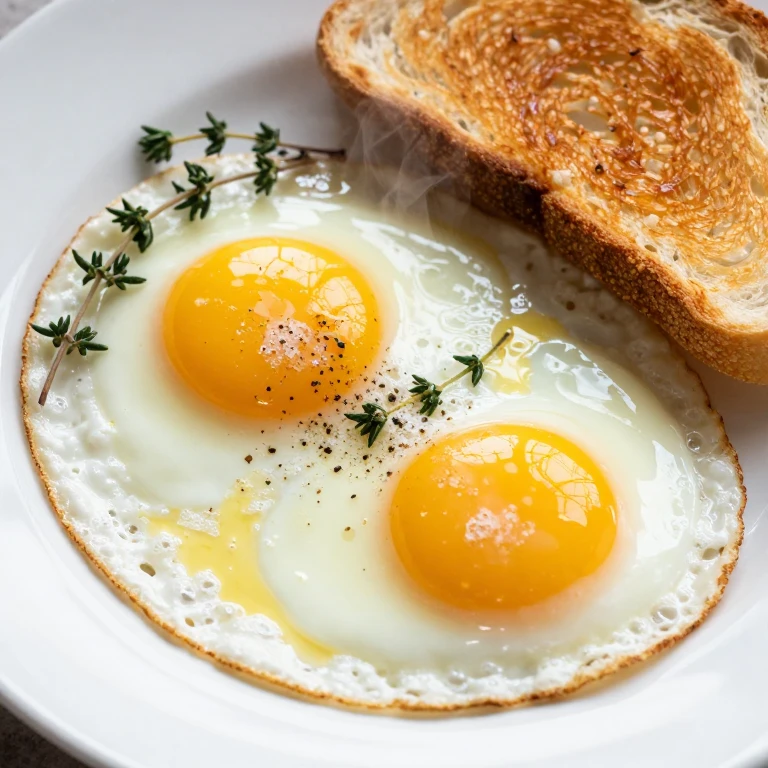
This is the gold standard for sunny-side eggs: the white sets completely while the yolk stays liquid and glossy, and the butter creates a lacy, golden crust at the edges. I love the textural contrast—crispy, caramelized edges against that runny center.
Ingredients
- 2 large eggs
- 2 tablespoons butter
- Sea salt
- Freshly cracked black pepper
- Fresh thyme or chives (optional)
Instructions
- Heat a nonstick skillet over medium heat and add 1 tablespoon butter, swirling until foaming.
- Crack both eggs into the pan and reduce heat to medium-low.
- Once whites begin to set, add the remaining tablespoon of butter and tilt the pan, spooning the foaming butter over the yolks continuously for 2–3 minutes.
- Cook until whites are fully opaque and yolks jiggle slightly when the pan moves, about 4–5 minutes total.
- Slide onto a warm plate, season with salt and pepper, and serve immediately with toast.
Whirl Factor: The basting technique—tilting and spooning hot butter over the yolks—creates that glossy finish and gentle heat that keeps the yolk liquid while the whites firm completely. It’s the difference between undercooked whites and that perfect, creamy center.
Practical tip: Use clarified butter or ghee if you want deeper, nuttier flavor without the milk solids browning too fast.
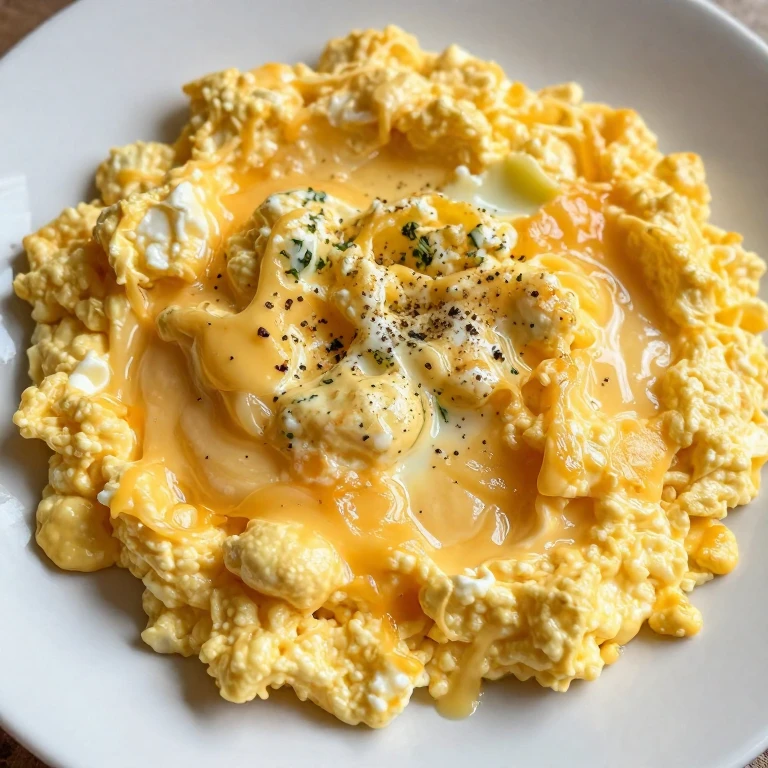
2. Soft Scramble with Butter and Timing

A true soft scramble lives in the space between wet and set—small, custard-like curds with a glossy finish. I pull the pan off heat while the eggs still look slightly underdone, and the residual heat finishes them perfectly.
Ingredients
- 3 large eggs
- 2 tablespoons butter, divided
- 2 tablespoons whole milk or cream
- Sea salt
- White pepper
- Fresh chives (optional)
Instructions
- Whisk eggs with milk, salt, and pepper in a bowl until just combined—don’t overbeat.
- Heat a nonstick pan over medium-low heat and add 1 tablespoon butter.
- Pour in eggs and let them sit for 10 seconds, then gently push them toward the center with a spatula, tilting the pan so uncooked egg flows to the edges.
- Repeat every 15–20 seconds for 2–3 minutes, until curds form but the surface still looks slightly wet.
- Remove from heat, add the second tablespoon of butter, fold gently, and serve immediately.
Whirl Factor: The timing pull—removing heat while the eggs still look slightly underdone—is the secret. Residual heat finishes them to that creamy, custard texture without overcooking.
Storage note: Soft scramble is best eaten immediately, but if you’re prepping for meal prep, slightly undercook them and reheat gently in a low oven with a pat of butter.
3. Medium Scramble with Texture Variation
This version sits between soft and firm—you get distinct, small curds with a bit more structure, but still creamy. It’s more forgiving than soft scramble if timing isn’t perfect, and it holds up better on a plate.
Ingredients
- 3 large eggs
- 1.5 tablespoons butter
- 1 tablespoon whole milk
- Sea salt and black pepper
- Optional mix-ins: cheese, herbs, diced ham
Instructions
- Whisk eggs with milk, salt, and pepper until fully combined.
- Heat a nonstick pan over medium heat and add butter, swirling until foaming.
- Pour in eggs and let them set for 5 seconds, then push curds toward the center, tilting the pan to let uncooked egg flow to the edges.
- Repeat every 15 seconds for 3–4 minutes, stirring in any mix-ins during the last minute of cooking.
- When curds are mostly set but still glossy on top, transfer to a plate and serve.
Whirl Factor: The medium scramble gives you visible, tender curds with enough structure to hold their shape, while the butter and milk create a creamy finish. It’s the versatile sweet spot.
Practical tip: Add cheese or fresh herbs in the last 30 seconds of cooking so they warm through without breaking down.
Gentle Poached and Boiled Egg Recipes
These techniques use gentle, indirect heat to set the whites while keeping yolks tender. They’re elegant on their own or as the centerpiece of a composed dish, and they deliver that silky texture contrast that feels refined.
4. Poached Eggs with Vinegar Method
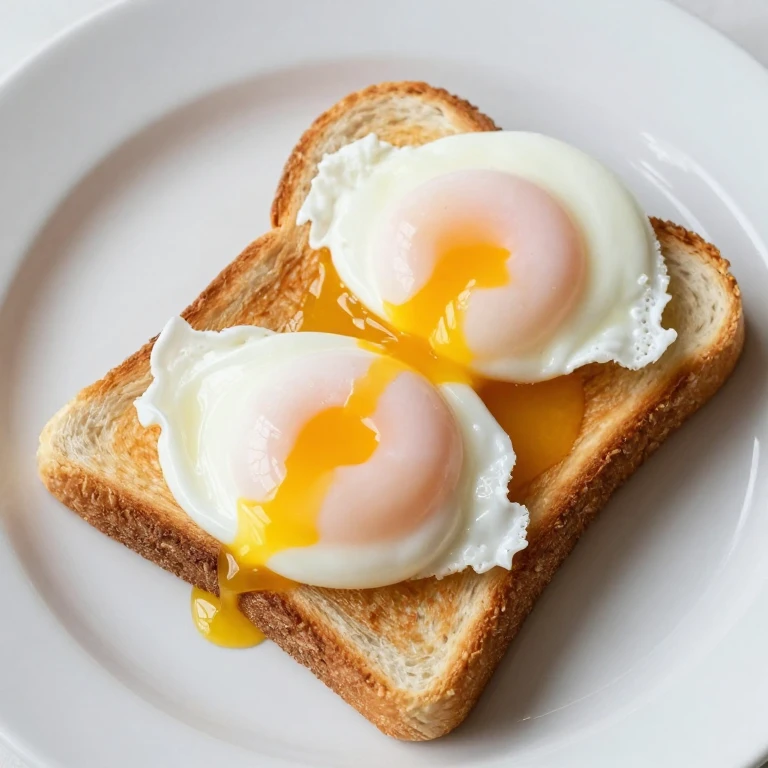
Poaching intimidates people, but the vinegar trick is reliable: it helps the whites coagulate quickly so they hold their shape while the yolk stays liquid. I get a tender white exterior with no ragged edges.
Ingredients
- 2 large eggs
- 4 cups water
- 1 tablespoon white vinegar
- Sea salt
- Slotted spoon
Instructions
- Bring water and vinegar to a gentle simmer in a shallow pan—you want small bubbles rising, not a rolling boil.
- Crack an egg into a small cup or ramekin.
- Create a gentle whirlpool in the water by stirring with a spoon, then slide the egg into the center.
- Cook for 3–4 minutes until the white is set and opaque but the yolk jiggles slightly.
- Lift out with a slotted spoon and serve immediately on toast, salad, or with hollandaise.
Whirl Factor: The vinegar acidifies the water just enough to set the whites instantly while the gentle heat keeps the yolk liquid and silky. The whirlpool keeps everything compact and elegant.
Practical tip: If your eggs are very fresh (less than a week old), the whites hold together better. Older eggs spread more, which is fine for salads but less ideal for plating on toast.
5. Soft-Boiled Eggs with Jammy Yolk
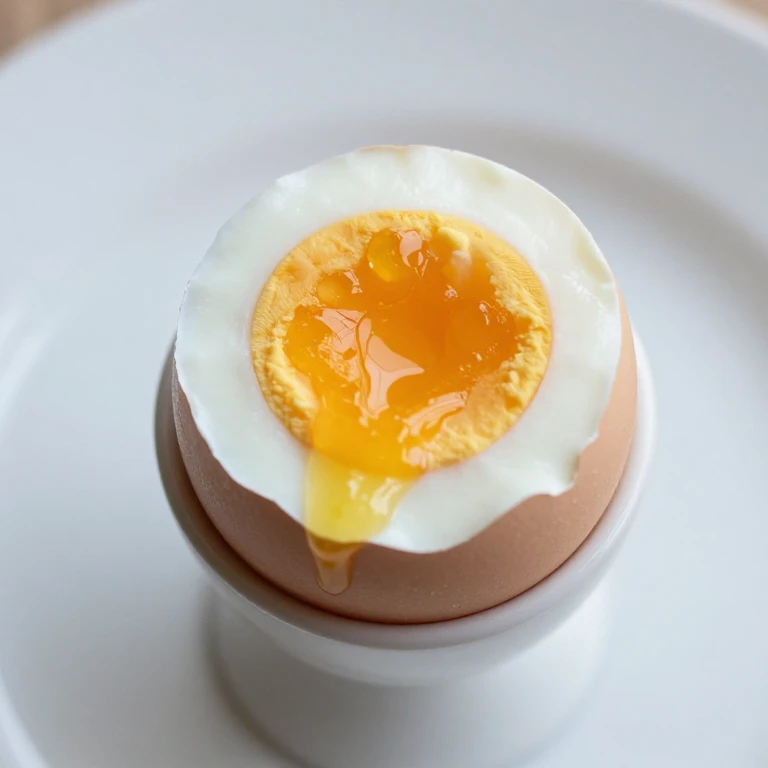
A soft-boiled egg with a jammy, runny yolk is breakfast luxury made simple. The timing is precise but worth learning—you get a fully set white with a warm, liquid center that’s perfect for dipping or topping toast.
Ingredients
- 2 large eggs
- Water (enough to cover eggs by 1 inch)
- Sea salt (for ice bath)
- Ice
Instructions
- Bring a pot of water to a rolling boil and gently lower room-temperature eggs into the water using a spoon.
- Set a timer for 6 minutes 30 seconds (for a jammy, runny center).
- While eggs cook, prepare an ice bath in a bowl.
- When the timer goes off, transfer eggs immediately to the ice bath to stop cooking.
- Once cool enough to handle, gently tap and peel under cool running water, starting at the wider end.
Whirl Factor: The precise timing and immediate ice bath lock in that jammy yolk—warm and liquid but not raw, with a fully set white. It’s the texture contrast that makes this feel special.
Storage note: Soft-boiled eggs are best eaten fresh, but you can refrigerate peeled eggs for up to 2 days and reheat gently in warm water.
6. Hard-Boiled Eggs with Creamy Center
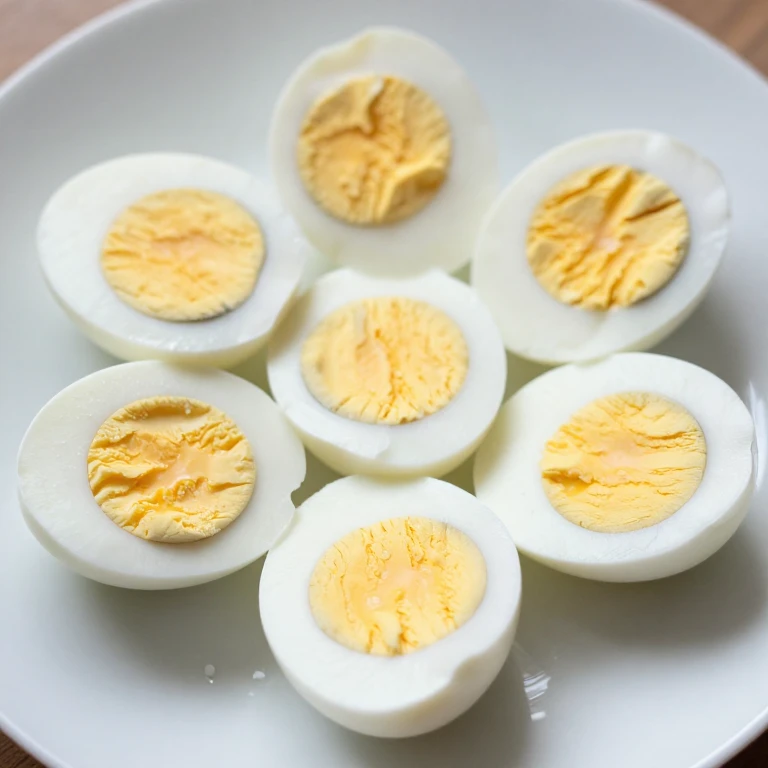
Hard-boiled eggs are meal-prep gold, and getting the texture right—fully set whites with a pale yellow center, no gray-green ring—takes one small trick: the ice bath. I use these for egg salad, grain bowls, and quick protein additions all week.
Ingredients
- 6 large eggs
- Water (enough to cover by 1 inch)
- Ice
- Sea salt
Instructions
- Bring a pot of water to a rolling boil and gently lower room-temperature eggs into the water.
- Set a timer for 11 minutes.
- Prepare an ice bath while eggs cook.
- Transfer eggs to ice bath immediately when timer goes off; let sit for at least 5 minutes.
- Peel under cool running water, starting at the wider end where the air pocket is.
Whirl Factor: The ice bath stops the cooking instantly, preventing that gray-green ring around the yolk. You get a creamy, pale yellow center and a fully set white—perfect for slicing and serving.
Practical tip: Eggs that are 7–10 days old peel more easily than very fresh eggs. If you’re buying eggs specifically for hard-boiling, choose older cartons.
Composed and Skillet Egg Recipes
These recipes build a complete dish around eggs—frittatas, hash, and egg-in-a-hole all deliver eggs as the centerpiece with supporting flavors and textures. They’re satisfying, often one-pan, and feel more composed than scrambled eggs alone.
7. French Omelette (Omelette Baveuse)

A French omelette is all about technique: high heat, constant motion, and pulling the pan off heat while the center is still slightly wet. I get a tender, barely-set exterior with a creamy, custardy center that folds perfectly.
Ingredients
- 3 large eggs
- 1.5 tablespoons butter
- Sea salt and white pepper
- Fillings: cheese, herbs, ham, or sautéed vegetables (optional)
Instructions
- Whisk eggs with salt and pepper until fully combined but not foamy.
- Heat a nonstick 8-inch pan over medium-high heat and add butter, swirling until it foams and the foam subsides.
- Pour in eggs and immediately stir with a fork, dragging cooked portions from the edges to the center, tilting the pan so uncooked egg flows to the edges.
- When the top is still slightly wet but the bottom is set, add fillings if using, then fold in thirds and slide onto a plate.
- Serve immediately—the residual heat finishes the center.
Whirl Factor: The constant motion and high heat create a tender, barely-set exterior, while pulling the pan off heat while the center is still wet gives you that creamy, custardy finish. It’s elegance through technique.
Practical tip: Practice the motion without heat first—dragging cooked portions from edges to center while tilting the pan. Once the motion is automatic, the omelette comes together in seconds.
8. Farmers’ Omelette (Omelette Paysanne)
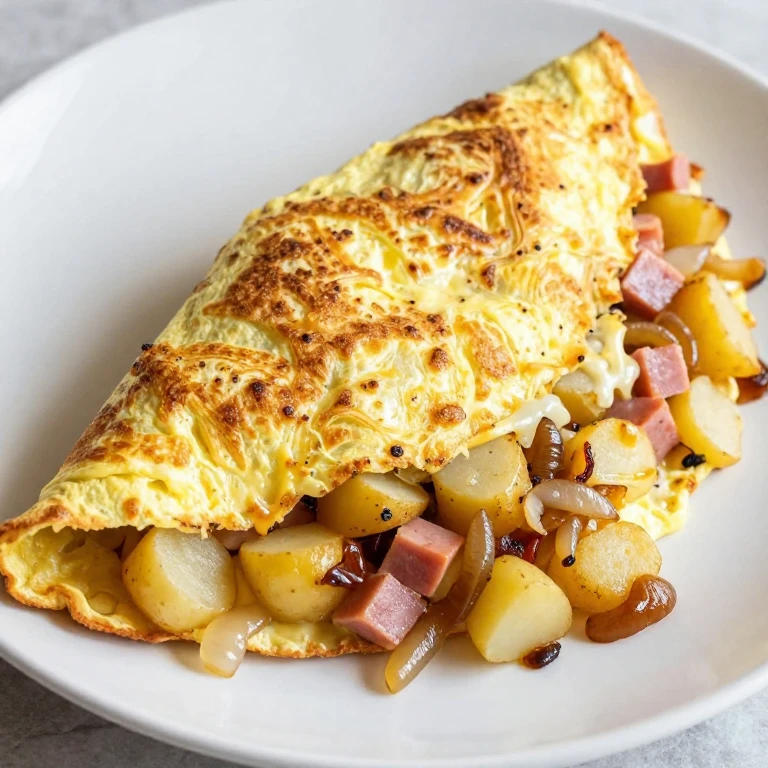
This is the heartier cousin to the French omelette—diced potatoes, onions, and ham cooked into the eggs, then folded and finished with cheese. It’s more rustic, more forgiving, and completely satisfying.
Ingredients
- 3 large eggs
- 1/2 cup diced potatoes (parboiled or leftover cooked)
- 1/4 cup diced onion
- 1/4 cup diced ham or bacon
- 1/4 cup shredded cheese
- 2 tablespoons butter
- Sea salt and black pepper
Instructions
- Heat 1 tablespoon butter in a nonstick 8-inch pan over medium heat and sauté potatoes and onions until softened, about 3–4 minutes. Add ham and warm through.
- Whisk eggs with salt and pepper, then pour over the potato mixture.
- Stir gently, dragging cooked portions from edges to center, until eggs are mostly set but still slightly wet on top, about 2–3 minutes.
- Sprinkle cheese over the top, fold in thirds, and slide onto a plate.
- Serve immediately.
Whirl Factor: The cooked potatoes and ham create texture contrast against the creamy eggs, while the cheese adds a savory finish. It’s a complete, one-pan breakfast.
Storage note: Leftover farmers’ omelette can be refrigerated and reheated gently in a low oven or on a skillet over low heat.
9. Stovetop Frittata (Quick 15-Minute Version)
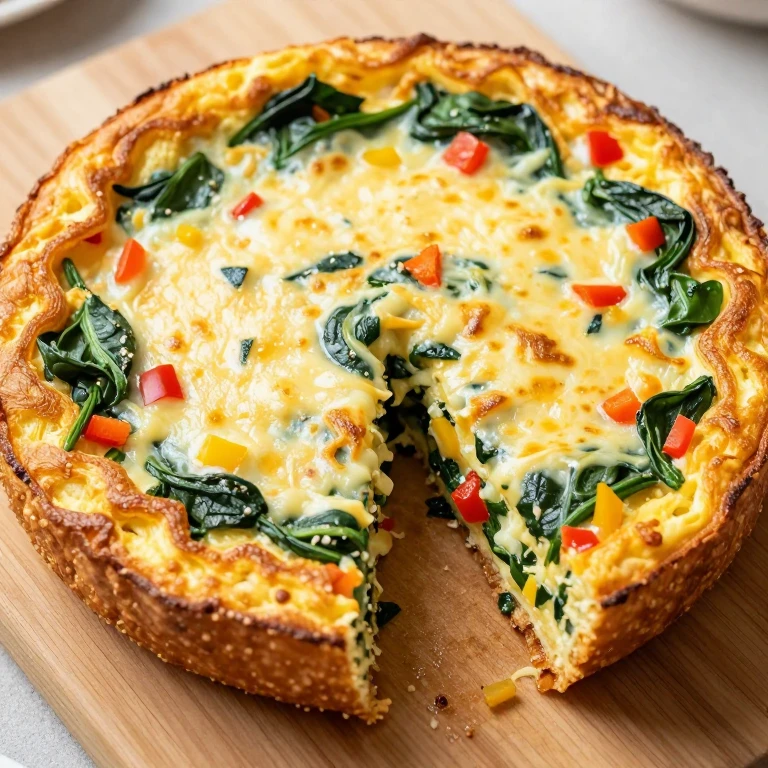
A frittata is an omelette that stays in the pan—no folding, no flipping. I cook it on the stovetop until the edges are set, then finish under the broiler. It’s faster than you’d think and feeds multiple people from one pan.
Ingredients
- 6 large eggs
- 1/4 cup whole milk or cream
- 1 cup mixed vegetables (sautéed spinach, diced peppers, onions)
- 1/2 cup shredded cheese
- 2 tablespoons butter or olive oil
- Sea salt and black pepper
Instructions
- Preheat your broiler to high.
- Heat butter in a 10-inch oven-safe skillet over medium heat and add your pre-cooked vegetables, warming through.
- Whisk eggs with milk, salt, and pepper, then pour over vegetables.
- Cook on the stovetop for 3–4 minutes until edges are set but the center still jiggles slightly.
- Sprinkle cheese over the top and transfer to the broiler for 2–3 minutes until the top is golden and set.
- Let cool for 1 minute, then slide onto a cutting board and slice into wedges.
Whirl Factor: The two-stage cooking—stovetop then broiler—gives you set edges and a creamy center with a golden, slightly puffed top. It’s composed, elegant, and faster than a traditional omelette.
Practical tip: Pre-cook your vegetables before adding them to the egg mixture so they’re tender and flavorful, not watery or raw.
Showstopper Egg Recipes
These dishes feel restaurant-worthy because they layer technique, components, and finishing moves. Eggs Benedict, hash, and egg-in-a-hole all deliver that sense of occasion while remaining completely doable at home.
10. Eggs Benedict with Blender Hollandaise
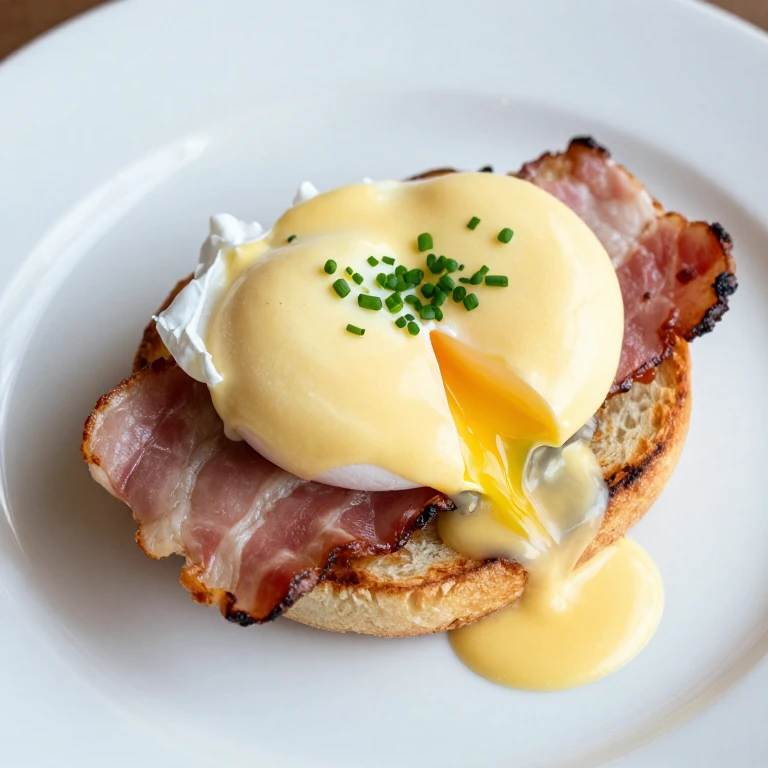
Eggs Benedict is the ultimate composed breakfast: poached eggs, Canadian bacon, English muffin, and silky hollandaise. The blender hollandaise trick—whisking yolk and lemon juice first, then streaming in hot butter—makes it foolproof and takes 2 minutes.
Ingredients
- 2 poached eggs
- 1 English muffin, split and toasted
- 2 slices Canadian bacon, warmed
- 1 egg yolk
- 1 tablespoon fresh lemon juice
- 6 tablespoons butter, melted and hot
- Pinch of cayenne
- Sea salt
Instructions
- Make hollandaise: combine egg yolk and lemon juice in a blender, blend for 30 seconds, then with the blender running, slowly drizzle in hot melted butter until the sauce is thick and pale, about 1 minute. Season with cayenne and salt.
- Toast English muffin halves and warm Canadian bacon in a skillet.
- Poach eggs using the vinegar method (see recipe 4).
- Assemble: muffin, bacon, poached egg, then spoon hollandaise over the top.
- Serve immediately, garnished with fresh chives if desired.
Whirl Factor: The blender hollandaise is the high-impact move—silky, emulsified, and foolproof. Layering poached eggs, warm bacon, and that rich sauce creates textural and flavor contrast: soft egg, salty bacon, tangy sauce.
Practical tip: If hollandaise breaks (becomes grainy or separates), start with a fresh egg yolk and slowly whisk in the broken sauce—it will re-emulsify.
11. Diner-Style Hash with Eggs
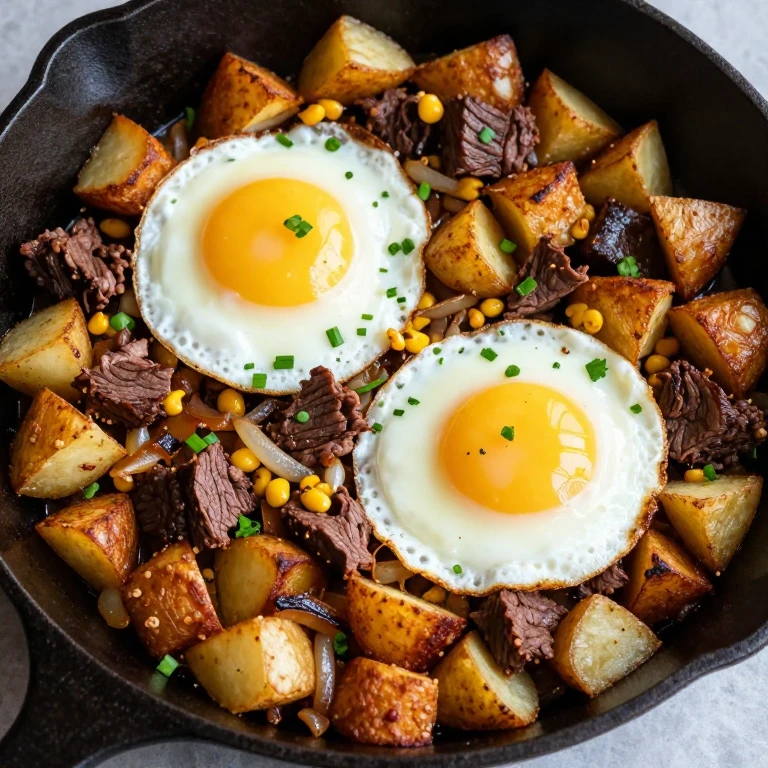
Hash is diced potatoes, onions, and meat cooked until crispy at the bottom of the pan, then topped with a fried or poached egg. I love the textural contrast—crispy, caramelized potatoes against a soft egg.
Ingredients
- 2 cups diced potatoes (about 1/2-inch cubes)
- 1 cup diced onion
- 1/2 cup diced corned beef or ham
- 3 tablespoons butter or bacon fat
- Sea salt and black pepper
- 2 eggs (fried or poached)
- Fresh chives or hot sauce for serving
Instructions
- Heat butter in a large cast-iron or nonstick skillet over medium-high heat.
- Add potatoes and onions, stirring occasionally, until potatoes are tender and beginning to brown, about 8–10 minutes.
- Add corned beef and season with salt and pepper, then press the mixture down with a spatula to encourage a crispy bottom layer, about 3–4 minutes.
- Make two wells in the hash and crack an egg into each, or top with poached eggs.
- Cover and cook until egg whites are set, about 3–4 minutes, then serve with chives or hot sauce.
Whirl Factor: The crispy, caramelized bottom layer of potatoes and meat creates textural contrast against the soft, runny-yolk egg on top. It’s rustic, satisfying, and completely one-pan.
Storage note: Hash (without the egg) keeps refrigerated for up to 3 days and reheats beautifully in a cast-iron skillet over medium heat.
12. Egg-in-a-Hole (Toad in a Hole)
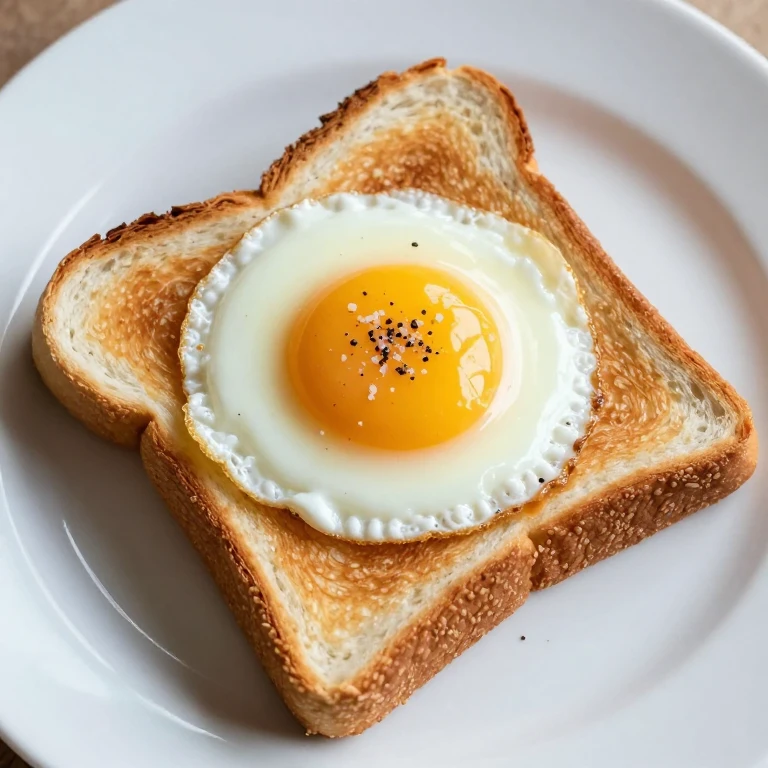
This is the playful one: a slice of bread with a hole cut in the center, fried in butter until golden, with an egg cracked into the hole. It’s faster than toast and eggs, and the crispy bread edges against the soft egg are textural gold.
Ingredients
- 1 slice bread (white, whole wheat, or sourdough)
- 1 large egg
- 2 tablespoons butter
- Sea salt and black pepper
- Optional: cheese, ham, fresh herbs
Instructions
- Using a small glass or cookie cutter, cut a hole in the center of the bread slice, about 2 inches in diameter.
- Heat butter in a nonstick skillet over medium heat until foaming.
- Place bread in the pan and crack an egg directly into the hole.
- Cook for 2–3 minutes until the bread is golden on the bottom and the egg white is set, then flip carefully and cook the other side for 1–2 minutes until the bread is golden and the yolk is still soft.
- Slide onto a plate, season with salt and pepper, and serve immediately.
Whirl Factor: The butter-fried bread becomes crispy and golden while the egg cooks gently in the hole, creating a textural contrast between crunchy bread and soft, runny yolk. It’s simple, fast, and feels special.
Practical tip: Save the bread circle you cut out—fry it alongside the egg-in-a-hole for dunking or serving on the side.
When to Choose Each Style
- Need breakfast in under 5 minutes? Reach for Butter-Basted Sunny-Side Up or Medium Scramble. Both are fast, require minimal technique, and deliver satisfaction instantly.
- Prepping breakfast for the week? Hard-Boiled Eggs are your anchor. Cook a batch on Sunday and use them throughout the week in grain bowls, salads, or as quick protein on toast.
- Want to feel like you’re eating at a restaurant? Eggs Benedict or French Omelette deliver that composed, technique-forward meal that feels elevated but works at home.
- Feeding a group or family? Stovetop Frittata scales easily—one pan, multiple servings, and minimal plating fuss.
- Looking for textural contrast and crispiness? Hash or Egg-in-a-Hole give you crispy, caramelized elements against soft, runny yolks.
- Want elegance with minimal fuss? Poached Eggs are versatile—serve on toast, over salad, or as part of a grain bowl, and they’re faster than you’d think once you’ve practiced once or twice.
FAQ
What’s the best way to prevent rubbery, overcooked eggs?
Pull the pan off heat slightly before the eggs look fully done. Residual heat continues cooking them for 10–30 seconds after you remove the pan, depending on the method. This is especially true for soft scramble, French omelette, and poached eggs. With fried eggs, lower the heat once the whites begin to set and use the basting method to cook the yolk gently rather than aggressively.
How do I know when a poached egg is done?
The white should be fully opaque and set, and the yolk should jiggle slightly when the spoon moves. If you want a fully set yolk, cook for an additional 30–45 seconds. The whole process takes 3–4 minutes once the egg hits the water. Use a slotted spoon to lift the egg and gently press the white—if it feels firm but the yolk gives slightly under pressure, you’re at the jammy stage.
Can I make hollandaise ahead of time?
Blender hollandaise is best made fresh, but you can hold it in a warm spot (not hot) for up to 30 minutes. If it cools and breaks, reheat gently over a double boiler, whisking constantly. For meal prep, make the components separately—poach eggs and store in ice water (reheat gently in warm water), toast muffins fresh, and warm bacon as needed. Make hollandaise fresh just before serving.
Why do my eggs stick to the pan even with nonstick cookware?
Nonstick pans need adequate fat and proper heat. Make sure you’re using enough butter (at least 1 tablespoon per 2 eggs for fried or scrambled), and let the butter foam and settle before adding eggs. If your pan is old or scratched, the nonstick coating may be compromised—consider replacing it. Cast iron, properly seasoned, is also excellent for eggs once you’ve built up the seasoning.
How far ahead can I prep ingredients for a frittata?
You can sauté vegetables and dice ham the night before, storing them in separate containers in the fridge. Whisk your eggs and milk together up to 2 hours ahead. Assemble and cook the frittata fresh when you’re ready to eat—it takes only 10 minutes from start to finish.
What’s the difference between a frittata and an omelette?
An omelette is cooked entirely on the stovetop, folded, and served from the pan. A frittata stays in the pan, is started on the stovetop, and finished under the broiler, creating a puffed, golden top. Frittatas are easier to scale for groups and require less active technique than omelettes.
Conclusion
These twelve techniques are the foundation of breakfast mastery. Pick one to practice this weekend—maybe Butter-Basted Sunny-Side Up or Soft Scramble—and once it feels automatic, move to the next. Within a few weeks, you’ll have a repertoire of methods that make breakfast feel less like a chore and more like a moment of presence. Save this post, bookmark your favorite, and come back whenever you want to refine a technique or try something new.