
I’ve found that breakfast rice bowls are the ultimate weekday win—they’re fast, forgiving, and endlessly customizable. What makes them special isn’t just the fluffy rice base; it’s the bold texture contrasts and high-impact finishes that transform leftover rice into something you actually crave. Whether you’re working with what’s in your fridge or building from scratch, these 12 bowls prove that savory mornings beat sweet every time. From garlicky greens and jammy eggs to crispy fried rice and umami-packed miso, each one delivers a clear flavor spin and a textural payoff that makes breakfast feel intentional.
I’ve tested these recipes across busy weekdays and lazy weekends alike. They all share one thing: they’re built to work with pantry staples and leftover rice, so you can get a restaurant-quality bowl on the table in under 15 minutes. Some are pure comfort; others push into bolder territory with fermented heat or Asian-inspired twists. All of them prove you don’t need elaborate technique—just smart layering and purposeful finishing moves.
What You’ll Find in This List
This collection spans a range of flavor profiles and skill levels, all anchored by the same simple framework: rice, protein, greens, and a bold finish. You’ll discover bowls built around soft eggs and miso, crispy textures and chili heat, smoked fish and fresh herbs, and fermented funk that wakes up your palate. Whether you’re a beginner looking for a foolproof formula or someone ready to play with bolder flavor combinations, there’s a bowl here that fits your morning. Most recipes use leftover rice and take 12–15 minutes from start to finish.
1. Garlicky Greens and Jammy Egg Bowl
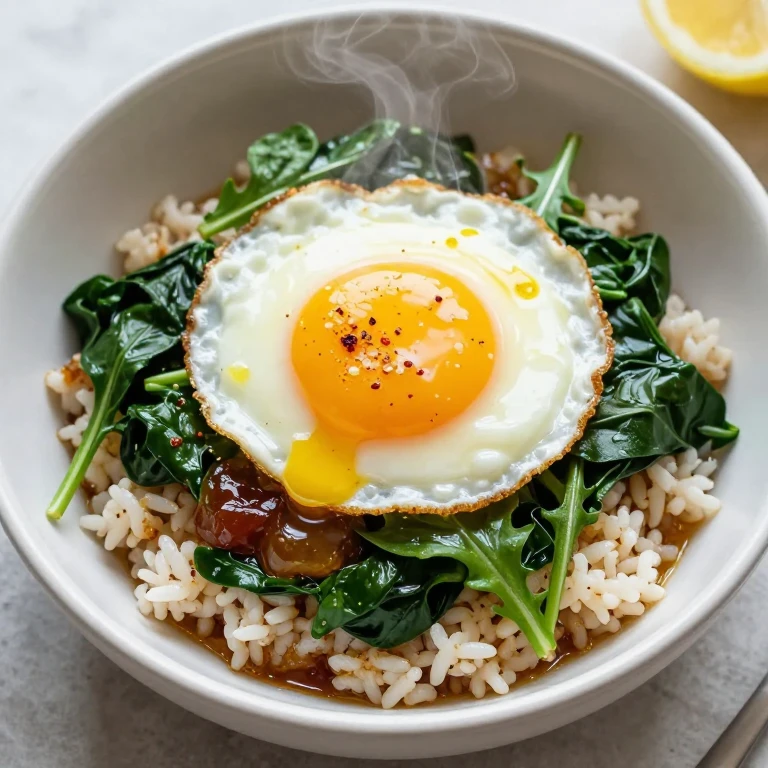
This is my go-to when I need something fast and deeply satisfying. Wilted greens, a soft-yolked egg, and crispy garlic oil create a textural contrast that makes plain rice sing. The garlic-infused oil is the whirl factor here—it’s bold, punchy, and transforms the whole bowl with minimal effort. Perfect for a weeknight breakfast that feels intentional without the fuss.
Flavor profile: Savory, garlicky, with bright green earthiness and rich egg yolk.
Occasion tag: Weeknight breakfast, quick meal-prep base.
Ingredients
- 1 cup cooked rice (white or brown)
- 2 cups fresh greens (spinach, arugula, or kale)
- 1 large egg
- 3 cloves garlic, thinly sliced
- 3 tablespoons olive oil
- 1 teaspoon soy sauce
- Pinch of red pepper flakes
- Salt and black pepper to taste
- Lemon wedge for finishing
Instructions
- Warm the rice in a small pot or microwave until steaming, about 2 minutes.
- Heat olive oil in a skillet over medium heat; add garlic slices and cook until they turn golden and smell fragrant, about 3–4 minutes—watch for the shift from pale to amber.
- Add greens to the hot oil and toss until wilted and glossy, about 2 minutes.
- In the same skillet, push greens to the side and crack the egg into the center; cook until the white is set but the yolk jiggles when you shake the pan, about 3–4 minutes.
- Transfer rice to a bowl, top with the garlic greens and egg, then drizzle the garlicky oil over everything.
- Finish with a squeeze of lemon, a pinch of red pepper flakes, and a dash of soy sauce.
The key here is watching the garlic closely—it goes from pale to burnt in seconds. I pull it off the heat the moment it turns golden amber; it keeps cooking slightly as it cools, so timing matters. If your garlic browns too fast, lower the heat and use medium or medium-low for a gentler infusion.
Make-ahead tip: Cook the garlic oil up to 3 days ahead and store it in an airtight container in the fridge. Warm the rice and greens fresh in the morning, then finish with a fresh egg.
2. Miso Mushroom and Soft Egg Bowl
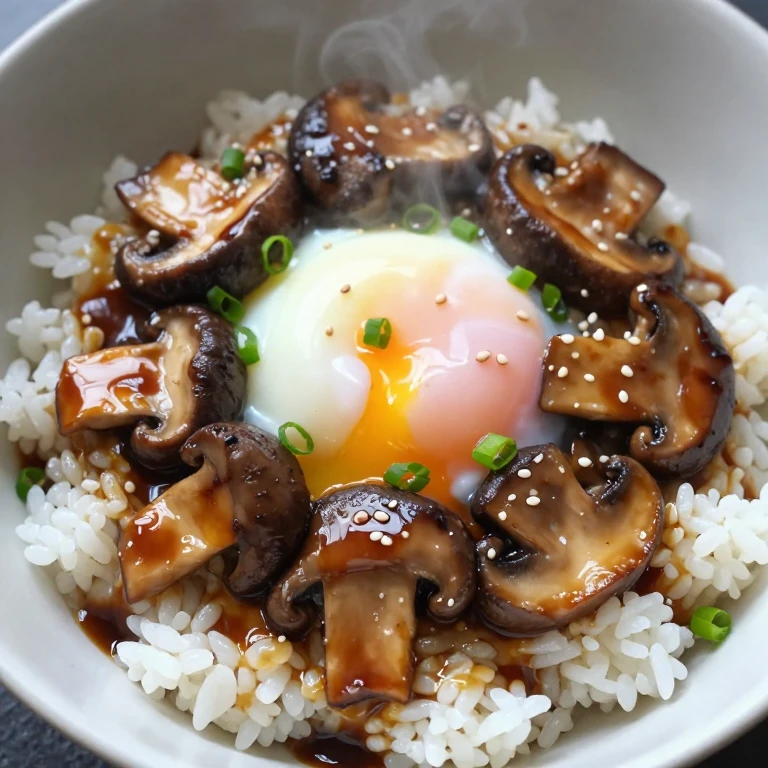
I discovered this combination while testing umami-forward breakfast ideas, and it’s become my weekend staple. Caramelized mushrooms tossed with white miso create an earthy, salty depth that anchors the whole bowl. The whirl factor is the miso-butter glaze—it’s savory, slightly sweet, and builds complexity that a plain sautéed mushroom can’t match. Top with a soft egg and you’ve got textural contrast and rich, creamy richness in every bite.
Flavor profile: Umami-forward, earthy, with subtle sweetness and silky egg yolk.
Occasion tag: Weekend breakfast, meal-prep friendly.
Ingredients
- 1 cup cooked rice
- 8 oz mushrooms (cremini, oyster, or mixed), sliced
- 2 tablespoons unsalted butter
- 1.5 tablespoons white miso paste
- 1 clove garlic, minced
- 1 large egg
- 1 teaspoon soy sauce
- 1 teaspoon rice vinegar
- Chopped scallions and sesame seeds for garnish
Instructions
- Melt butter in a large skillet over medium-high heat; add mushroom slices in a single layer and cook without stirring for 3–4 minutes until they develop a golden crust.
- Stir the mushrooms and cook another 3–4 minutes until tender and deeply browned.
- Whisk miso paste with 1 tablespoon water to create a smooth paste; add it to the mushrooms along with minced garlic and stir constantly for 1 minute until the mixture coats the mushrooms.
- Push mushrooms to the side, crack the egg into the center, and cook until the white is set and the yolk is still soft, about 3–4 minutes.
- Transfer rice to a bowl and top with miso mushrooms and the egg.
- Drizzle with soy sauce and rice vinegar; finish with scallions and sesame seeds.
Miso paste can seize if it hits direct high heat, so whisking it with water first prevents clumping. I always stir constantly for that first minute to ensure it coats the mushrooms evenly. If the mixture looks dry, add another splash of water—miso should glaze, not clump.
Storage note: Prepare the miso mushrooms up to 2 days ahead; store in an airtight container in the fridge. Reheat gently in a skillet before serving and top with a fresh egg.
3. Smoked Salmon and Avocado Bowl
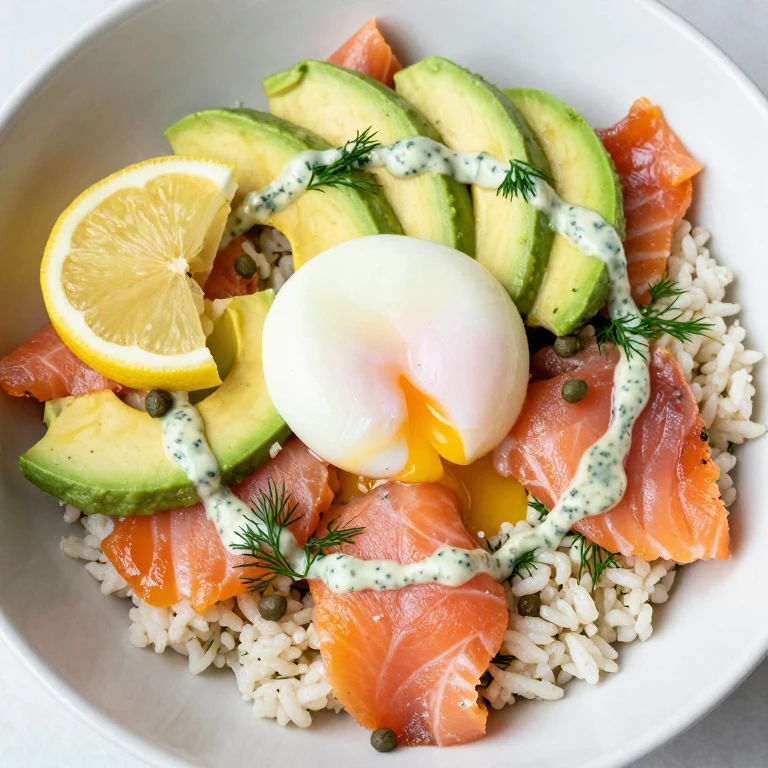
This one walks the line between breakfast and brunch, and I lean into that with a fresh, bright approach. Smoked salmon brings a salty, smoky punch; creamy avocado softens it; and a poached egg ties everything together with silky richness. The whirl factor is the dill-caper vinaigrette—it’s sharp, herbaceous, and cuts through the richness while adding textural crunch from capers. It’s the kind of bowl you’d order at a fancy café, but you’re making it at home in 12 minutes.
Flavor profile: Bright, briny, herbaceous, with creamy richness and subtle smoke.
Occasion tag: Brunch-style breakfast, special morning.
Ingredients
- 1 cup cooked rice
- 3 oz smoked salmon, torn into pieces
- 1 ripe avocado, sliced
- 1 large egg
- 2 tablespoons crème fraîche or sour cream
- 1 tablespoon fresh dill, chopped
- 1 tablespoon capers, drained
- 1 tablespoon lemon juice
- 1 teaspoon Dijon mustard
- Salt and pepper to taste
Instructions
- Bring a small pot of water to a gentle simmer; add a splash of white vinegar to help the egg white set faster.
- Slide the egg into the water and poach until the white is set but the yolk is still soft, about 3–4 minutes.
- While the egg poaches, whisk together crème fraîche, lemon juice, Dijon mustard, dill, and capers to create a bright vinaigrette.
- Warm the rice and transfer to a bowl; layer with avocado slices and torn smoked salmon.
- Top with the poached egg and drizzle the dill-caper vinaigrette over everything.
- Season with salt and pepper and serve immediately.
Poaching an egg takes practice, but the key is simmering water—not boiling. A splash of vinegar helps the white set without affecting flavor. If you’re nervous about poaching, a soft-boiled or jammy egg works beautifully here too. The richness of the yolk is what matters.
Make-ahead tip: Prepare the dill-caper vinaigrette up to 3 days ahead. Assemble the bowl fresh each morning, poaching the egg last so the yolk is still warm and runny.
4. Kimchi Fried Rice with Crispy Egg
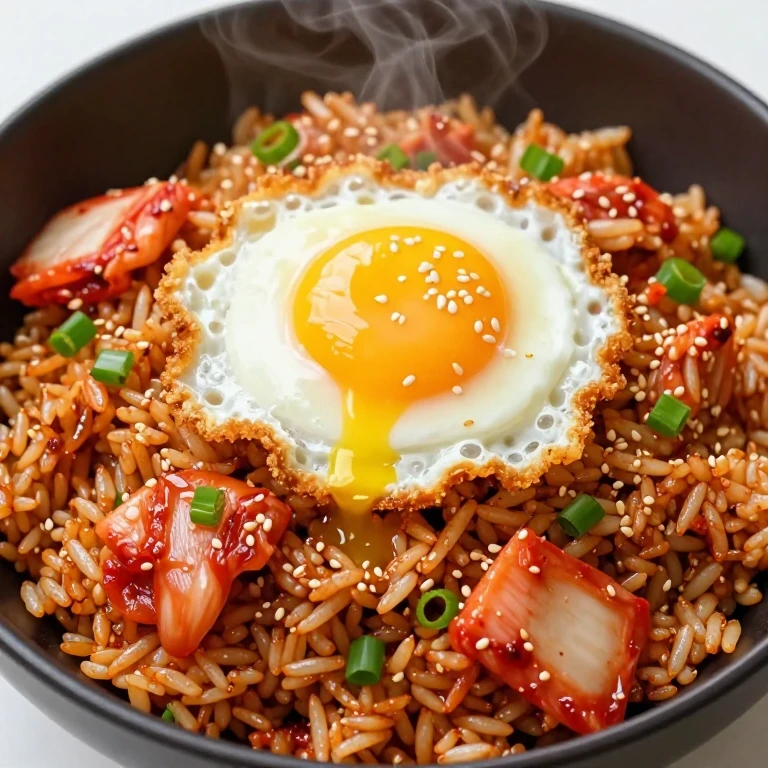
I created this when I wanted to push breakfast into bolder territory—kimchi fried rice is my answer. The fermented heat, the funk of kimchi, and the crispy rice edges create a breakfast that actually wakes you up. The whirl factor is the crispy-bottom rice with kimchi and scallion oil; it’s textural, bold, and unapologetically savory. A crispy-edged fried egg on top adds richness and a textural contrast that makes the whole thing sing.
Flavor profile: Spicy, fermented, umami-forward, with crispy edges and rich egg yolk.
Occasion tag: Bold breakfast, leftover rice hero.
Ingredients
- 1.5 cups cooked rice (day-old works best)
- 0.75 cup kimchi, chopped
- 2 tablespoons kimchi juice
- 2 tablespoons neutral oil
- 1 large egg
- 2 scallions, sliced
- 1 clove garlic, minced
- 1 teaspoon soy sauce
- 1 teaspoon sesame oil
- Sesame seeds for garnish
Instructions
- Heat neutral oil in a large skillet over medium-high heat; add the rice and press it into the pan, letting it sit undisturbed for 2–3 minutes until the bottom develops a golden crust.
- Break up the rice and stir-fry for 2 minutes, then add minced garlic and chopped kimchi; toss constantly for 2 minutes.
- Add kimchi juice and soy sauce; stir until the rice is evenly coated and heated through, about 1 minute.
- Push the fried rice to the side of the pan; crack the egg into the empty space and cook until the white is set but the yolk is still runny, about 3–4 minutes.
- Transfer to a bowl and drizzle with sesame oil; top with scallions and sesame seeds.
Day-old rice is crucial here—fresh rice is too moist and won’t crisp. The key to crispy edges is letting the rice sit undisturbed for those first few minutes; you’ll hear it sizzle and smell the caramelization. Don’t stir too early or you’ll lose that textural payoff.
Storage note: Prepare the kimchi fried rice up to 2 days ahead and store in an airtight container in the fridge. Reheat in a skillet over medium-high heat and top with a fresh crispy egg.
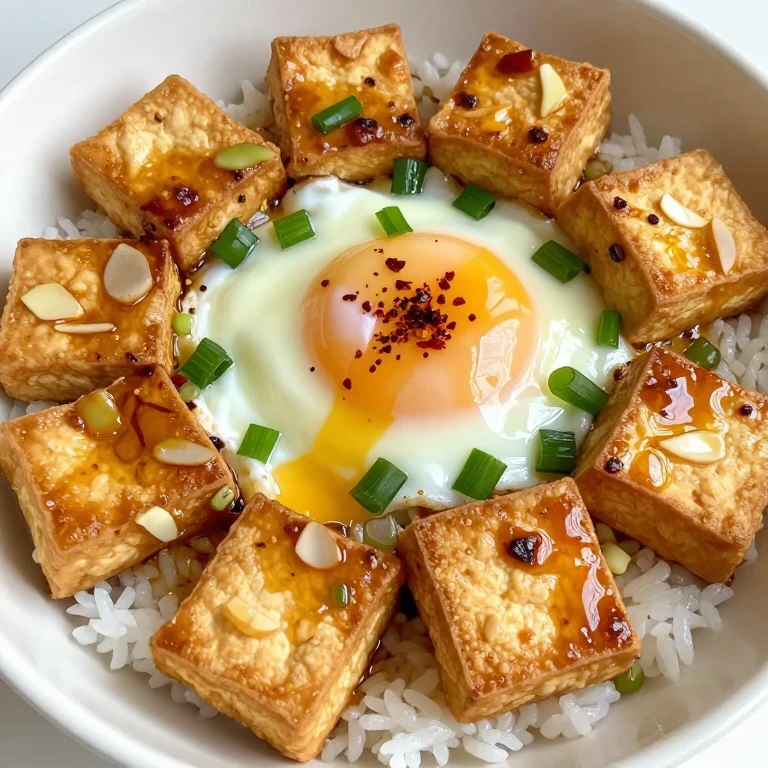
5. Peanut-Egg Tofu Bowl
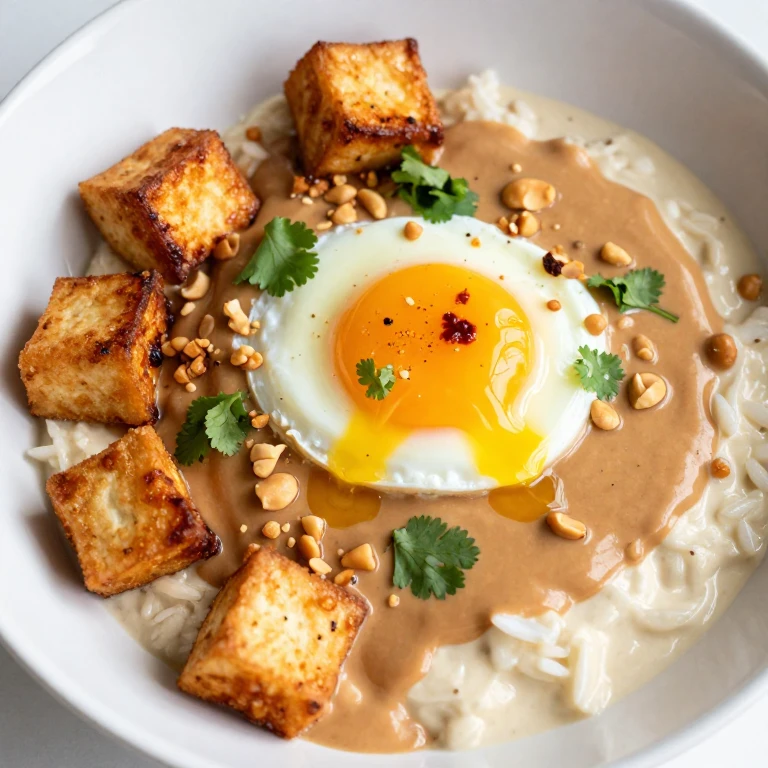
This bowl came from experimenting with Southeast Asian breakfast ideas, and it’s become a weekday favorite. Crispy tofu, a runny egg, and a punchy peanut sauce create a breakfast that’s satisfying and bold without being heavy. The whirl factor is the peanut sauce—it’s nutty, slightly spicy, and brings textural contrast with crushed peanuts scattered on top. It’s the kind of bowl that makes you feel like you’re eating something special, even on a Tuesday morning.
Flavor profile: Nutty, slightly spicy, rich, with crispy tofu and silky egg yolk.
Occasion tag: Weekday breakfast, protein-forward.
Ingredients
- 1 cup cooked rice
- 6 oz extra-firm tofu, pressed and cubed
- 2 tablespoons neutral oil
- 1 large egg
- 3 tablespoons natural peanut butter
- 1 tablespoon soy sauce
- 1 tablespoon lime juice
- 1 teaspoon sriracha or chili paste
- 1 clove garlic, minced
- Crushed peanuts and cilantro for garnish
Instructions
- Press the tofu between paper towels for 10 minutes to remove excess moisture, then cut into 0.75-inch cubes.
- Heat oil in a large skillet over medium-high heat; add tofu cubes and cook until golden on all sides, about 8–10 minutes total, stirring occasionally.
- While the tofu cooks, whisk together peanut butter, soy sauce, lime juice, sriracha, garlic, and 2 tablespoons warm water to create a smooth sauce.
- Push the crispy tofu to the side; crack the egg into the center and cook until the white is set and the yolk is soft, about 3–4 minutes.
- Transfer rice to a bowl and top with crispy tofu and the egg.
- Drizzle the peanut sauce over everything and finish with crushed peanuts and fresh cilantro.
Pressing the tofu is non-negotiable if you want crispy edges. I use a tofu press or wrap it in clean kitchen towels and place a heavy skillet on top for 10 minutes. Dry tofu crisps; wet tofu steams. Also, don’t crowd the pan—give each cube space or they’ll steam instead of brown.
Make-ahead tip: Prepare the peanut sauce up to 5 days ahead and store in an airtight container in the fridge. Fry the tofu fresh each morning for maximum crispiness.
6. Herb-Roasted Chicken and Green Goddess Bowl
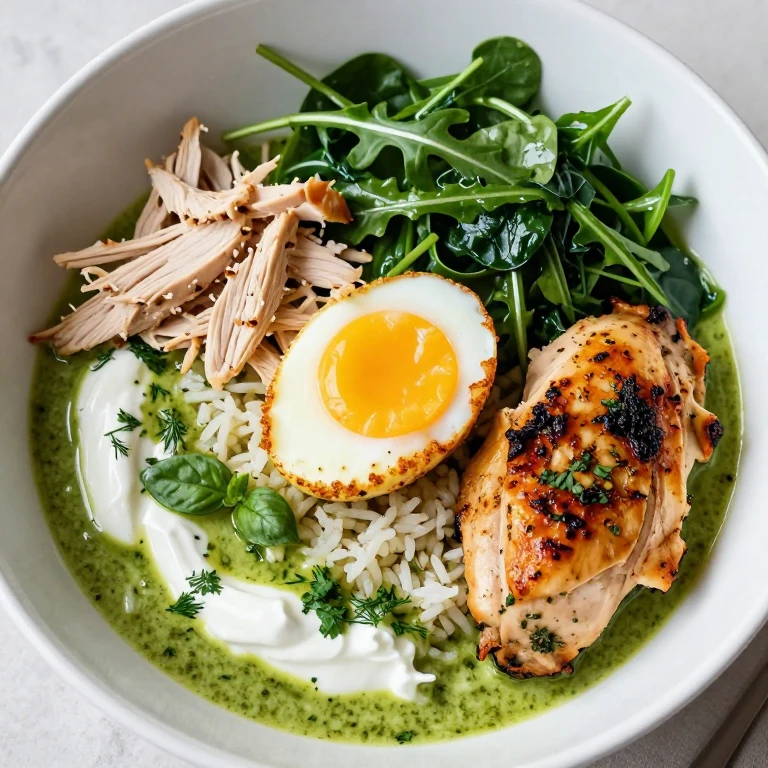
When I want breakfast to feel like a full meal, this is the bowl I reach for. Tender chicken, fresh herbs, and a bright green goddess dressing create something that’s simultaneously light and deeply satisfying. The whirl factor is the green goddess sauce—it’s herbaceous, creamy, and brings a textural contrast with fresh herbs and a crispy fried egg on top. It’s the kind of bowl that makes you forget you’re eating breakfast.
Flavor profile: Herbaceous, fresh, creamy, with tender protein and crispy edges.
Occasion tag: Meal-prep friendly, protein-forward breakfast.
Ingredients
- 1 cup cooked rice
- 0.75 cup shredded cooked chicken
- 1 large egg
- 1 cup fresh greens (spinach or arugula)
- 0.25 cup fresh basil
- 0.25 cup fresh parsley
- 2 tablespoons fresh dill
- 3 tablespoons Greek yogurt
- 1 tablespoon lemon juice
- 1 clove garlic, minced
- 2 tablespoons olive oil
- Salt and pepper to taste
Instructions
- Blend fresh basil, parsley, dill, garlic, Greek yogurt, lemon juice, and 1 tablespoon olive oil until smooth; season with salt and pepper.
- Warm the rice in a small pot or microwave until steaming.
- Heat 1 tablespoon olive oil in a skillet over medium-high heat; add the egg and cook until the white is set and the edges are crispy, about 3–4 minutes.
- Toss the fresh greens with a splash of the green goddess sauce to wilt them slightly.
- Transfer rice to a bowl and top with wilted greens, shredded chicken, and the crispy egg.
- Drizzle generously with the remaining green goddess sauce and serve immediately.
The green goddess sauce can be made with any combination of fresh herbs you have on hand—mint, tarragon, and chives all work beautifully. If you don’t have Greek yogurt, use crème fraîche or a splash of olive oil to loosen the sauce. The key is tasting as you go and adjusting the lemon juice and salt to balance the herbs.
Storage note: Prepare the green goddess sauce up to 3 days ahead and store in an airtight container in the fridge. Shred the cooked chicken ahead too; assemble the bowl fresh each morning.
7. Beet and Goat Cheese Bowl with Crispy Chickpeas
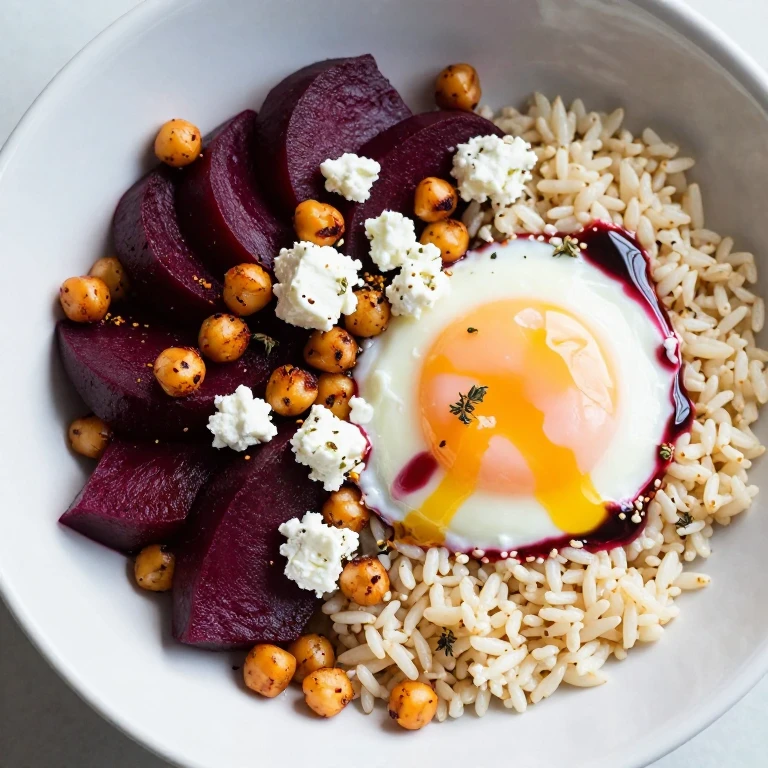
This bowl pushes into unexpected territory, and I love it for that reason. Roasted beets, tangy goat cheese, and crispy chickpeas create a breakfast that’s colorful, textural, and genuinely exciting. The whirl factor is the crispy chickpeas—they’re crunchy, protein-forward, and bring a textural contrast that makes the whole bowl feel intentional. A soft egg and a bright vinaigrette tie everything together.
Flavor profile: Earthy, tangy, slightly sweet, with crispy texture and rich egg yolk.
Occasion tag: Weekend breakfast, vegetarian-friendly.
Ingredients
- 1 cup cooked rice
- 0.75 cup cooked chickpeas, drained and patted dry
- 2 tablespoons olive oil
- 1 teaspoon smoked paprika
- 0.5 cup roasted beets, sliced or cubed
- 0.25 cup crumbled goat cheese
- 1 large egg
- 1 tablespoon red wine vinegar
- 1 teaspoon Dijon mustard
- 1 tablespoon fresh thyme
- Salt and pepper to taste
Instructions
- Toss dried chickpeas with 1 tablespoon olive oil and smoked paprika; spread on a small baking sheet and roast at 400°F for 15–18 minutes until crispy and golden.
- While the chickpeas roast, whisk together red wine vinegar, Dijon mustard, remaining olive oil, and fresh thyme to create a vinaigrette.
- Warm the rice and transfer to a bowl; layer with roasted beets and scatter the warm crispy chickpeas on top.
- In a skillet, cook the egg over medium heat until the white is set and the yolk is still soft, about 3–4 minutes.
- Top the bowl with the egg and crumbled goat cheese.
- Drizzle the thyme vinaigrette over everything and season with salt and pepper.
The key to crispy chickpeas is making sure they’re completely dry before roasting. I pat them with paper towels and let them air-dry for a few minutes. If they’re even slightly damp, they’ll steam instead of crisp. Also, shake the pan halfway through roasting to ensure even browning.
Make-ahead tip: Roast the chickpeas up to 3 days ahead and store in an airtight container. Prepare the vinaigrette up to 2 days ahead. Assemble the bowl fresh each morning with warm rice and a fresh egg.
8. Sriracha-Lime Shrimp and Coconut Rice Bowl
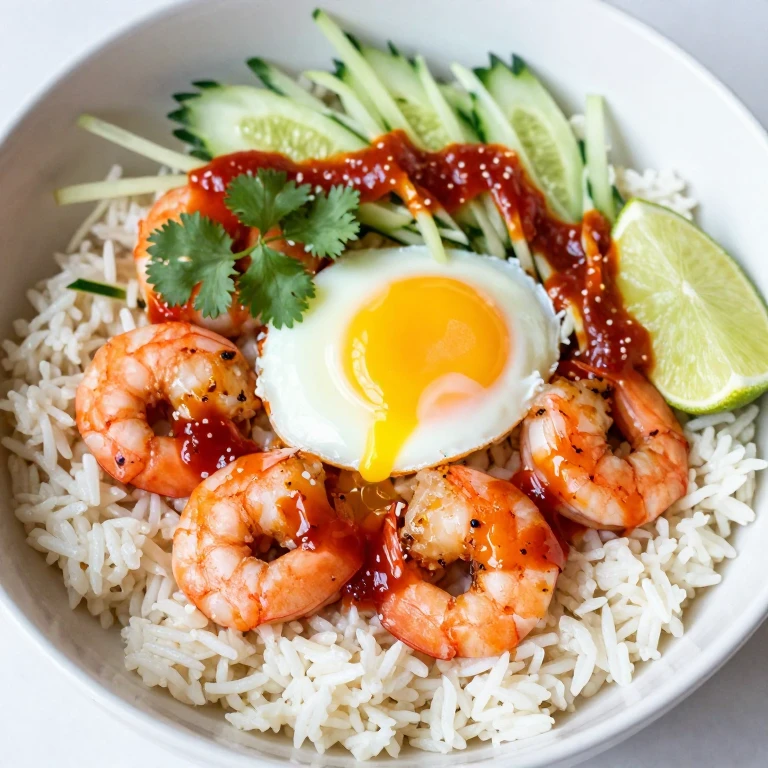
I developed this bowl when I wanted to bring bold, spicy flavors to breakfast without overwhelming the palate. Crispy shrimp, coconut rice, and a bright lime dressing create something that tastes like vacation in a bowl. The whirl factor is the sriracha-lime shrimp—it’s spicy, bright, and brings a textural contrast with crispy edges and tender centers. A soft egg and fresh cilantro finish the picture.
Flavor profile: Spicy, bright, tropical, with crispy shrimp and silky egg yolk.
Occasion tag: Special breakfast, seafood-forward.
Ingredients
- 1 cup cooked rice (prepared with 0.25 cup coconut milk mixed in)
- 6 oz shrimp, peeled and deveined
- 2 tablespoons neutral oil
- 2 tablespoons sriracha
- 1 tablespoon lime juice
- 1 clove garlic, minced
- 1 large egg
- 0.5 cup shredded cucumber
- Fresh cilantro and lime wedge for garnish
- Salt and pepper to taste
Instructions
- Toss shrimp with sriracha, lime juice, minced garlic, salt, and pepper; let sit for 5 minutes.
- Heat oil in a large skillet over medium-high heat; add the shrimp and cook until pink and cooked through, about 2–3 minutes per side.
- Transfer the shrimp to a plate and keep warm.
- In the same skillet, crack the egg and cook until the white is set and the yolk is still soft, about 3–4 minutes.
- Warm the coconut rice and transfer to a bowl; top with shredded cucumber, crispy shrimp, and the egg.
- Drizzle any remaining pan juices over the bowl and finish with fresh cilantro and a lime wedge.
Shrimp cook fast—overcooked shrimp become rubbery and tough. I watch for the moment they turn from translucent to opaque pink; that’s when they’re done. If you’re using frozen shrimp, make sure they’re fully thawed and patted dry before cooking, or they’ll release moisture and steam instead of sear.
Make-ahead tip: Prepare the sriracha-lime marinade up to 1 day ahead. Cook the shrimp fresh each morning for the best texture and flavor.
9. Mushroom and Herb Frittata Bowl
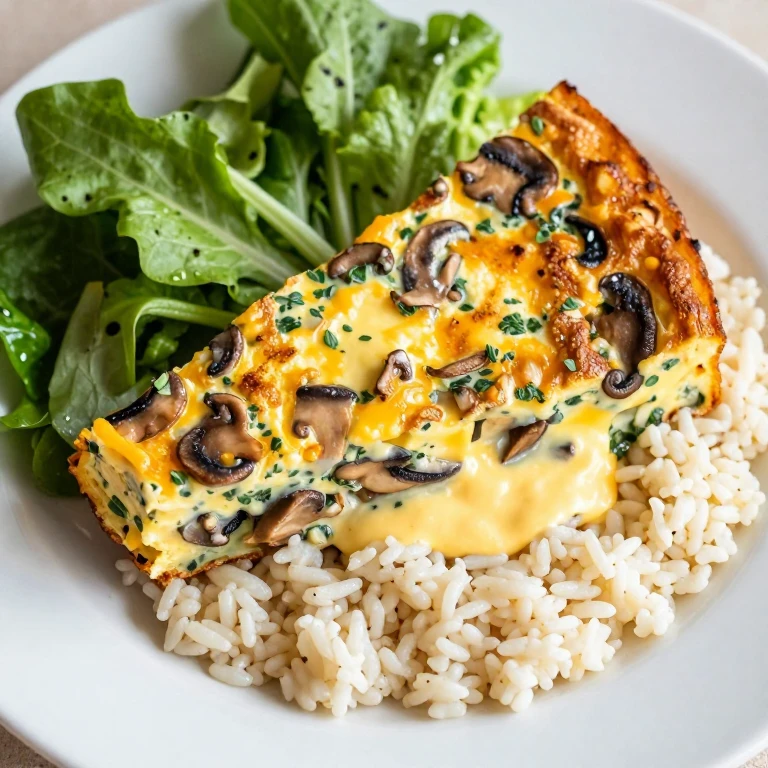
This bowl transforms a classic frittata into a breakfast that feels both elegant and approachable. Baked eggs with mushrooms, fresh herbs, and cheese create something that’s fluffy, rich, and deeply satisfying. The whirl factor is the herb-forward frittata—it’s textural, protein-forward, and brings a crispy bottom edge that contrasts with the fluffy interior. Served over rice with a bright salad, it becomes a complete breakfast.
Flavor profile: Herbaceous, earthy, cheesy, with crispy edges and fluffy interior.
Occasion tag: Make-ahead friendly, weekend breakfast.
Ingredients
- 1 cup cooked rice
- 4 large eggs
- 0.5 cup mushrooms, sliced
- 0.25 cup fresh herbs (parsley, chives, dill)
- 0.25 cup grated Gruyère or Cheddar cheese
- 2 tablespoons butter
- 1 clove garlic, minced
- 0.25 cup whole milk
- Salt and pepper to taste
- Fresh greens for serving
Instructions
- Preheat the oven to 375°F.
- Melt butter in a small oven-safe skillet over medium-high heat; add mushroom slices and cook until golden, about 5 minutes. Add minced garlic and cook for 1 minute more.
- Whisk together eggs, milk, fresh herbs, cheese, salt, and pepper in a bowl.
- Pour the egg mixture over the mushrooms in the skillet and cook on the stovetop for 2 minutes until the edges start to set.
- Transfer the skillet to the oven and bake for 8–10 minutes until the center is set but still slightly jiggly.
- Slice the frittata and serve over warm rice with fresh greens on the side.
The frittata is done when the edges are set and the center still has a slight jiggle—it continues cooking as it cools. If you overbake it, the eggs become rubbery. Also, use an oven-safe skillet; if your skillet has a plastic handle, wrap it in foil before putting it in the oven.
Storage note: Prepare the frittata up to 3 days ahead and store in an airtight container in the fridge. Reheat gently in a 325°F oven or enjoy cold with a drizzle of olive oil.
10. Black Garlic and Egg Yolk Bowl
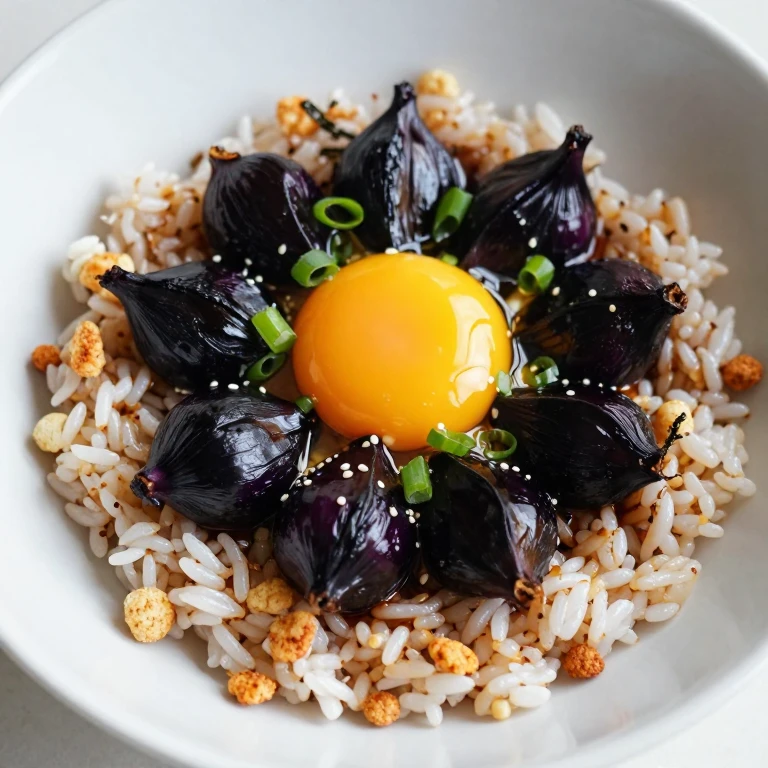
This is a bowl for when you want to celebrate simplicity and let premium ingredients shine. Black garlic, a silky egg yolk, and perfectly cooked rice create something that’s umami-forward and deeply satisfying without any fuss. The whirl factor is the black garlic—it’s sweet, savory, and brings a textural contrast with its chewy texture against creamy egg yolk. It’s the kind of bowl that proves you don’t need complexity to create something memorable.
Flavor profile: Umami-forward, sweet, savory, with chewy black garlic and silky egg yolk.
Occasion tag: Minimalist breakfast, ingredient-focused.
Ingredients
- 1 cup cooked rice
- 4–5 black garlic cloves, halved
- 1 large egg yolk
- 1 tablespoon butter
- 1 teaspoon soy sauce
- 0.5 teaspoon sesame oil
- Pinch of fleur de sel
- Scallion greens, sliced, for garnish
- Crispy rice crackers or toasted nori for texture
Instructions
- Warm the rice in a small pot or microwave until steaming.
- Melt butter in a small skillet over low heat; add the black garlic cloves and warm gently for 1 minute.
- Transfer the warm rice to a bowl and create a small well in the center.
- Carefully slide the raw egg yolk into the well (or poach it if you prefer a cooked yolk).
- Top with the warmed black garlic and drizzle with soy sauce and sesame oil.
- Finish with a pinch of fleur de sel, scallion greens, and crispy rice crackers or nori strips.
Black garlic is a fermented ingredient with a sweet, complex flavor—it’s nothing like raw garlic. You can find it at specialty grocery stores or online. The beauty of this bowl is its simplicity; the black garlic and egg yolk are the stars, so use the best quality you can find. If you can’t find black garlic, roasted garlic cloves work as a substitute, though the flavor profile shifts.
Make-ahead tip: This bowl is best assembled fresh, but you can prepare everything ahead and assemble in minutes. Black garlic keeps for months in an airtight container.
11. Charred Broccoli and Miso Butter Bowl
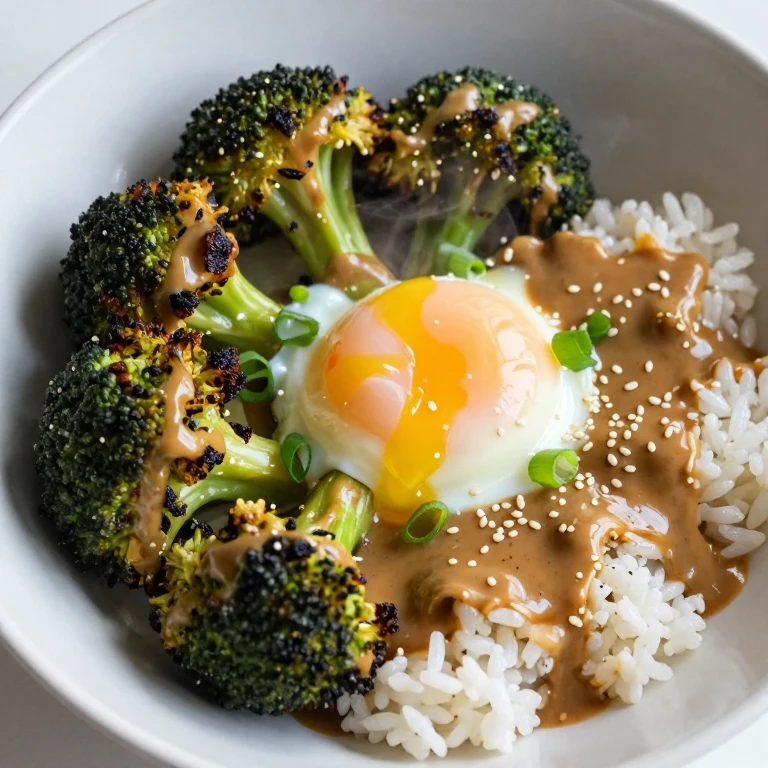
I created this bowl to prove that vegetables can be the star of breakfast, not just a supporting player. Charred broccoli, miso butter, and a soft egg create something that’s both comforting and bold. The whirl factor is the miso butter—it’s savory, slightly sweet, and brings a textural contrast with crispy broccoli edges and silky butter coating. It’s a bowl that tastes intentional and makes you feel like you’re eating something special.
Flavor profile: Savory, umami-forward, with charred edges and silky butter.
Occasion tag: Vegetable-forward, quick breakfast.
Ingredients
- 1 cup cooked rice
- 2 cups fresh broccoli florets
- 3 tablespoons unsalted butter
- 1 tablespoon white miso paste
- 1 large egg
- 1 clove garlic, minced
- 1 teaspoon soy sauce
- Sesame seeds and scallions for garnish
- Salt and pepper to taste
Instructions
- Heat a large skillet over medium-high heat; add broccoli florets (no oil) and cook undisturbed for 3–4 minutes until the bottoms char and turn dark brown.
- Stir the broccoli and cook another 2–3 minutes until tender and charred on multiple sides.
- Whisk miso paste with 1 tablespoon water; add it to the broccoli along with minced garlic and toss constantly for 1 minute.
- Add butter to the pan and let it melt into the broccoli, coating everything evenly.
- Push the broccoli to the side; crack the egg into the center and cook until the white is set and the yolk is soft, about 3–4 minutes.
- Transfer rice to a bowl and top with charred miso broccoli and the egg.
- Drizzle with soy sauce and finish with sesame seeds and sliced scallions.
Charring broccoli dry (without oil initially) creates a caramelized, crispy exterior that’s far superior to steamed broccoli. The high heat breaks down the natural sugars and creates depth. Don’t stir too early; let the broccoli sit in the hot pan so it develops that dark, crusty exterior.
Storage note: The charred broccoli can be prepared up to 2 days ahead and stored in an airtight container in the fridge. Reheat gently in a skillet and top with a fresh egg.
12. Crispy Tofu and Scallion Oil Bowl
This is my final bowl, and it’s built around textural contrast and bold finishing moves. Crispy tofu, a silky egg, and a punchy scallion oil create something that’s satisfying, simple, and endlessly customizable. The whirl factor is the scallion oil—it’s bright, aromatic, and brings a textural pop that elevates the entire bowl. It’s the kind of bowl you’ll find yourself making on repeat because it’s fast, forgiving, and genuinely delicious.
Flavor profile: Savory, aromatic, with crispy texture and silky richness.
Occasion tag: Weekday breakfast, customizable base.
Ingredients
- 1 cup cooked rice
- 6 oz extra-firm tofu, pressed and cubed
- 3 tablespoons neutral oil
- 1 large egg
- 4 scallions, white and light green parts sliced, dark green parts reserved
- 2 cloves garlic, thinly sliced
- 1 tablespoon soy sauce
- 1 teaspoon sesame oil
- Pinch of red pepper flakes
- Salt and pepper to taste
Instructions
- Press the tofu between paper towels for 10 minutes to remove excess moisture; cut into 0.75-inch cubes.
- Heat 2 tablespoons neutral oil in a large skillet over medium-high heat; add tofu cubes and cook until golden on all sides, about 8–10 minutes, stirring occasionally. Season with salt and pepper.
- Transfer the tofu to a plate; in the same skillet, heat 1 tablespoon neutral oil over medium-high heat and add sliced scallion whites and garlic. Cook for 1 minute until fragrant, then remove from heat and stir in sesame oil and red pepper flakes.
- In a clean spot in the skillet, crack the egg and cook until the white is set and the yolk is soft, about 3–4 minutes.
- Transfer rice to a bowl and top with crispy tofu and the egg.
- Drizzle with the scallion oil, scatter reserved scallion greens on top, and finish with a splash of soy sauce.
The scallion oil is best made fresh just before serving so the scallions stay bright and the oil is still warm. If you make it ahead, the scallions will darken and lose their fresh appeal. However, the crispy tofu can be made ahead and reheated. The contrast between warm scallion oil and crispy tofu is what makes this bowl special.
Make-ahead tip: Prepare the crispy tofu up to 2 days ahead and store in an airtight container in the fridge. Make the scallion oil fresh each morning for the best flavor and appearance.
How to Choose the Right One
Each of these bowls serves a different purpose, and I’ve designed them so you can build your perfect breakfast based on what you need that morning. If you’re looking for speed, reach for the Garlicky Greens and Jammy Egg, the Crispy Tofu and Scallion Oil, or the Black Garlic and Egg Yolk—all come together in under 15 minutes. For meal-prep friendly options that taste even better the next day, try the Kimchi Fried Rice, the Miso Mushroom and Soft Egg, or the Charred Broccoli and Miso Butter.
If you want to impress someone at brunch, go with the Smoked Salmon and Avocado, the Herb-Roasted Chicken and Green Goddess, or the Sriracha-Lime Shrimp and Coconut Rice. For vegetarian-forward options that don’t feel like an afterthought, the Beet and Goat Cheese Bowl with Crispy Chickpeas, the Peanut-Egg Tofu Bowl, and the Charred Broccoli and Miso Butter all deliver bold, satisfying flavors. If you’re new to breakfast rice bowls, start with the Garlicky Greens and Jammy Egg or the Miso Mushroom and Soft Egg—both teach you the core framework and give you confidence to improvise.
FAQ
Can I make these bowls ahead?
Absolutely. Most of these bowls are built around components you can prep ahead—cooked rice, sautéed vegetables, proteins, and sauces all store well in airtight containers for 2–3 days. The only thing I recommend cooking fresh is the egg, since the yolk is best warm and runny. In the morning, reheat your components, assemble, and top with a fresh egg. It’s a game-changer for busy weekdays.
What’s the best rice to use?
I use white, brown, or jasmine rice interchangeably depending on the flavor profile of the bowl. White rice is neutral and fast-cooking; brown rice adds nuttiness and texture; jasmine rice brings subtle floral sweetness. Day-old rice is actually ideal for fried rice bowls because it’s drier and crisps better. If you only have fresh rice, spread it on a plate to cool completely before using it.
Can I use a different protein?
Yes. These bowls are built around the framework of rice, protein, vegetables, and a bold finish—so you can swap proteins freely. Roasted chicken, ground turkey, canned tuna, chickpeas, beans, or tempeh all work beautifully. The key is making sure your protein is seasoned well and brings textural contrast. A crispy element (fried tofu, crispy chickpeas) or a rich element (egg yolk, creamy sauce) keeps the bowl interesting.
How do I make these bowls more filling?
Add more protein, add a grain (rice, farro, quinoa), or increase the amount of vegetables. I often double the egg, add a handful of nuts or seeds, or include a creamy element like avocado or goat cheese. You can also use brown rice instead of white rice for added fiber and staying power.
Are these bowls gluten-free?
Most of these bowls are naturally gluten-free if you use tamari instead of soy sauce and check your other ingredients for hidden gluten. The rice, eggs, vegetables, and most proteins are gluten-free. Just watch out for sauces, marinades, and any processed ingredients that might contain gluten.
What’s the best way to cook an egg for these bowls?
It depends on the bowl. I use soft-boiled, poached, fried, or scrambled eggs depending on the flavor profile and what I’m in the mood for. A soft-boiled or poached egg gives you that silky yolk that runs into the rice; a fried egg with crispy edges brings textural contrast; a scrambled egg is fastest if you’re in a hurry. All work beautifully—it’s about what texture you want that morning.
Can I make these bowls vegan?
Most of these can be adapted. Skip the egg or use a plant-based egg substitute; use tofu instead of animal protein; replace dairy with plant-based alternatives. The Peanut-Egg Tofu Bowl, the Kimchi Fried Rice, the Charred Broccoli and Miso Butter, and the Crispy Tofu and Scallion Oil are all easily veganized. The key is making sure your bowl still has textural contrast and bold flavor—don’t skip the finishing moves.