

Mornings don’t have to be chaotic. I’ve found that a solid week of egg-based meal prep transforms breakfast from rushed decision-making into a calm, grab-and-go routine. Eggs are the ultimate meal-prep protein—they’re affordable, versatile, and hold their texture and flavor through the week when stored properly. In this collection, I’m walking you through seven days of egg-forward breakfasts plus two bonus recipes that work as snacks, sides, or backup options. Each one builds on a core twist: bold flavor spins (pesto, salsa verde, chili crisp, curry), strategic texture contrast (crispy edges against creamy centers, crunchy toast against soft eggs), and finishing moves that make the difference between forgettable and crave-worthy.
Whether you’re prepping for a hectic work week, managing a household that eats at different times, or just tired of the same scrambled eggs, these recipes give you structure without monotony. I’ve included sheet-pan options, handheld wraps, baked casseroles, and flavor-kit components you can mix and match. The beauty of egg meal prep is flexibility—make the whole week on Sunday, or batch two or three recipes and rotate through them. Either way, you’ll walk into your kitchen each morning knowing exactly what’s waiting.
What You’ll Find in This List
This collection spans seven full days of grab-and-go egg breakfasts, plus two bonus recipes for snacking and flexibility. You’ll find sheet-pan egg squares with roasted vegetables, handheld wraps and toast kits built for speed, baked casseroles that feed a crowd or a week, and flavor-kit components (boiled eggs, egg salad) paired with sauce options you can rotate. The skill range is beginner-friendly—most recipes use straightforward baking, scrambling, or assembly methods. Flavor ranges from Mediterranean herbs and smoky spices to creamy avocado and tangy curry. Time investment is front-loaded: most recipes are made once and portioned across multiple days.
1. Sheet-Pan Veggie Egg Squares (Monday)

This is my go-to for Monday because it’s built for batch cooking and zero-fuss portioning. You’re roasting vegetables and eggs together on one pan, which means crispy, caramelized edges on the vegetables and set, custardy eggs in the center. The real twist here is the timing: roast the vegetables first, then pour the egg mixture over them. That way, the veg stays textured instead of turning mushy.
Roasted zucchini, bell pepper, and red onion meet a savory egg custard spiked with sharp cheddar and fresh thyme. The edges brown and crisp in the oven, while the center stays creamy enough to cut into clean squares.
Perfect for a structured Monday breakfast or a meal-prep anchor that holds through Wednesday.
Ingredients
- 2 medium zucchini, diced into 1/2-inch pieces
- 1 red bell pepper, diced
- 1 red onion, sliced into thin wedges
- 3 tablespoons olive oil, divided
- Kosher salt and black pepper to taste
- 8 large eggs
- 1/4 cup whole milk
- 1 cup shredded sharp cheddar cheese
- 2 tablespoons fresh thyme leaves (or 1 teaspoon dried)
- 1/4 teaspoon red pepper flakes
Instructions
- Preheat your oven to 400°F. Line a 9×13-inch baking sheet with parchment paper and drizzle with 2 tablespoons olive oil.
- Toss zucchini, bell pepper, and red onion with the remaining 1 tablespoon olive oil, salt, and pepper. Spread on the prepared sheet in a single layer and roast for 12-15 minutes, stirring halfway through, until the vegetables are tender and the edges begin to brown.
- While vegetables roast, whisk together eggs, milk, cheddar, thyme, red pepper flakes, salt, and pepper in a bowl until smooth.
- Pour the egg mixture over the roasted vegetables and gently stir to distribute evenly. Return to the oven and bake for 12-15 minutes, until the eggs are set but the center still jiggles slightly when you shake the pan.
- Remove from the oven and let cool for 5 minutes. The eggs will continue to set as they cool. Cut into 6 squares.
The observable cue here is the gentle jiggle in the center—that means the carryover heat will finish cooking them perfectly. Overbake and they’ll dry out by Wednesday; underbake and they’ll be runny when you reheat. Watch for that slight wobble and you’re golden.
Store in an airtight container in the refrigerator for up to 4 days. Reheat in a 350°F oven for 8 minutes, or microwave for 60-90 seconds. These freeze beautifully too—wrap individual squares in foil and freeze for up to 3 months.
2. Avocado Jammy Egg Toast Kit (Tuesday)
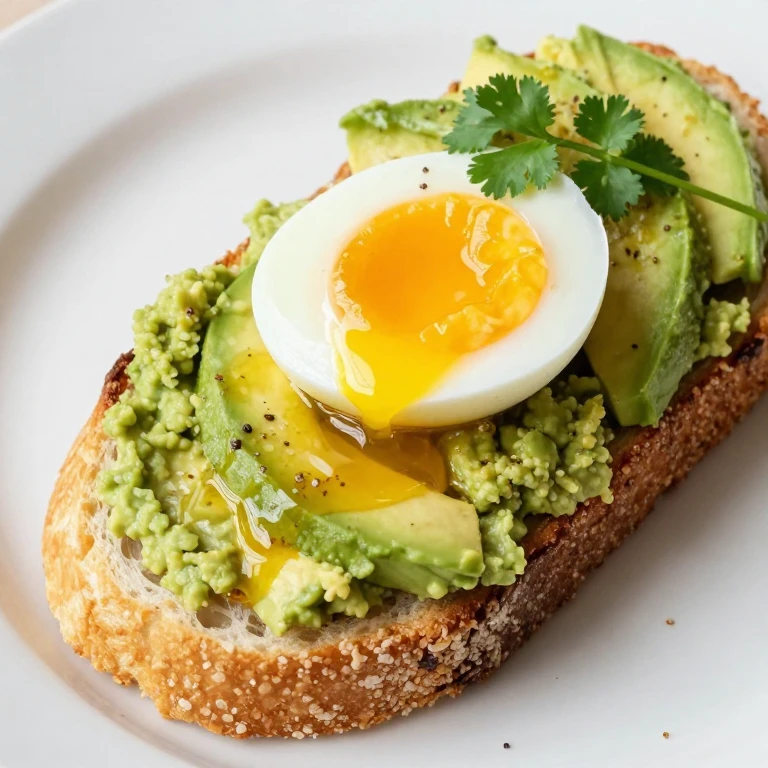
Tuesday is when I want something that feels special but takes five minutes to assemble. This is a component kit: you make jammy eggs once, toast bread once, and prep avocado slices once. Then each morning, you layer them fresh. The jammy egg is the star—that runny yolk is your sauce, your richness, your texture contrast all at once.
Soft, runny-yolked jammy eggs meet creamy avocado, crispy sourdough toast, and a hit of flaky sea salt and lemon zest. The yolk breaks into the avocado and runs across the toast. It’s indulgent without being heavy.
Ideal for a slower Tuesday or when you want to feel like you’re eating something restaurant-quality.
Ingredients
- 6 large eggs
- 2 ripe avocados
- 6 slices sourdough or whole-grain bread
- 2 tablespoons butter, softened
- 1 lemon, zested and halved
- Flaky sea salt (such as Maldon)
- Cracked black pepper
- 1/4 teaspoon red pepper flakes (optional)
- Fresh microgreens or arugula (optional)
Instructions
- Bring a pot of water to a rolling boil. Gently lower eggs into the water using a spoon. Set a timer for 6 minutes and 30 seconds.
- While eggs cook, slice avocados in half lengthwise, remove the pit, and scoop the flesh into a small bowl. Mash lightly with a fork, leaving some texture. Season with a pinch of salt and a squeeze of lemon juice.
- Toast bread until golden and crispy, about 3 minutes. Butter each slice lightly while still warm.
- When the timer goes off, transfer eggs to an ice bath using a slotted spoon. Let them cool for 1 minute, then gently peel under cool running water, starting from the wider end.
- To assemble: spread mashed avocado on each toast, top with a jammy egg, sprinkle with flaky salt, cracked pepper, lemon zest, and red pepper flakes if using. Serve immediately.
The timing on jammy eggs is everything. Six and a half minutes gives you a set white and a runny yolk. Go a minute longer and the yolk starts to set at the edges. Go shorter and the white is still translucent. Use that ice bath—it stops the cooking instantly and makes peeling easier.
Store jammy eggs in an airtight container in the refrigerator for up to 3 days. Keep avocado mashed and stored separately with plastic wrap pressed directly onto the surface to prevent browning. Toast bread fresh each morning, or store cooled toast in an airtight container for up to 2 days and re-crisp in a 350°F oven for 3 minutes.
3. Breakfast Burrito Freezer Wraps (Wednesday)

Wednesday is the midweek push, and these freezer wraps are your insurance policy. You assemble them once, wrap them tight, and freeze them. Then any morning, you grab one, microwave it for 90 seconds, and you’re out the door with a complete, balanced breakfast in your hand. The trick is not overstuffing—a tightly rolled burrito that’s manageable is better than a burrito that explodes when you unwrap it.
Scrambled eggs, crispy bacon, black beans, sharp cheddar, and roasted peppers wrapped in a flour tortilla with a thin layer of salsa. When you microwave it, the tortilla softens, the cheese melts, and everything stays intact.
Perfect for grab-and-go mornings or meal-prep freezer insurance.
Ingredients
- 8 large eggs
- 8 slices bacon, chopped
- 1 can (15 oz) black beans, drained and rinsed
- 1 red bell pepper, diced small
- 1 cup shredded sharp cheddar cheese
- 4 large flour tortillas (10-inch)
- 1/2 cup salsa (your choice)
- 2 tablespoons butter
- Kosher salt and black pepper to taste
- Optional: diced jalapeños, fresh cilantro
Instructions
- Cook bacon in a large skillet over medium-high heat until crispy, about 8 minutes. Transfer to a paper towel-lined plate and set aside.
- In the same skillet (don’t clean it), add diced bell pepper and cook for 3-4 minutes until softened. Push to the side of the pan.
- Add butter to the cleared side of the skillet. Once melted, add whisked eggs and scramble gently, stirring occasionally, until just set but still slightly creamy, about 3-4 minutes. Season with salt and pepper.
- Warm black beans in a small saucepan over low heat for 2 minutes, then drain any excess liquid.
- Lay a tortilla flat on a clean surface. Spread a thin layer of salsa down the center. Layer in order: scrambled eggs, cooked bacon, black beans, roasted pepper, and a small handful of cheddar.
- Fold in the sides of the tortilla first, then roll tightly away from you, keeping the sides tucked in as you roll. Wrap tightly in foil or parchment paper.
- Repeat with remaining tortillas and filling.
The observable cue for eggs is that they should still look slightly underdone when you pull them off the heat—they’ll firm up as they cool and again when you reheat them. Scrambling them past that point means they’ll be rubbery by Wednesday morning.
Freeze wrapped burritos for up to 3 months. To reheat, unwrap the foil, wrap the burrito in a damp paper towel, and microwave on high for 90 seconds. Let it cool for 30 seconds before eating—the filling will be very hot.
4. Greek Yogurt Bowl with Herby Jammy Eggs (Thursday)
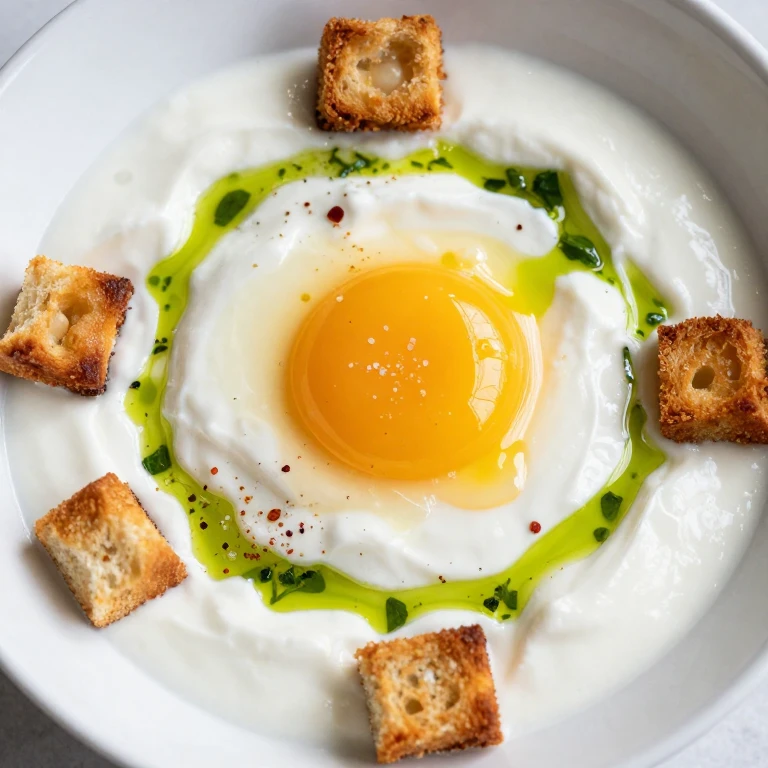
By Thursday, I want something that feels lighter but still substantial. This bowl is built around creamy Greek yogurt as the base, topped with jammy eggs, crispy croutons, and fresh herbs. It’s breakfast that tastes like a composed salad, which means you get vegetables, protein, and that textural contrast I’m always chasing.
Thick Greek yogurt spiked with lemon and dill meets a jammy egg, crispy herb-seasoned croutons, and shredded cucumber. The yolk breaks into the yogurt and becomes a sauce. It’s tangy, rich, and crisp all at once.
Ideal for a Thursday when you want something that feels intentional but doesn’t require cooking.
Ingredients
- 2 cups plain Greek yogurt (full-fat or 2%)
- 1 lemon, zested and juiced
- 2 tablespoons fresh dill, chopped (or 1 teaspoon dried)
- 1 tablespoon fresh parsley, chopped
- Kosher salt and black pepper to taste
- 4 jammy eggs (prepared as in Tuesday’s recipe)
- 1 cup cubed sourdough bread (1/2-inch cubes)
- 2 tablespoons olive oil
- 1 teaspoon garlic powder
- 1/2 teaspoon dried oregano
- 1 cucumber, shredded or thinly sliced
- 1/4 red onion, thinly sliced
- Flaky sea salt for finishing
Instructions
- Preheat your oven to 375°F. Toss bread cubes with olive oil, garlic powder, oregano, salt, and pepper. Spread on a small baking sheet and toast for 8-10 minutes, stirring halfway through, until golden and crispy.
- In a small bowl, whisk together Greek yogurt, lemon zest, lemon juice, dill, parsley, salt, and pepper. Taste and adjust seasoning.
- Prepare jammy eggs as directed in Tuesday’s recipe (6 minutes 30 seconds in boiling water, then ice bath).
- Divide the herbed yogurt between two bowls. Top each with shredded cucumber, sliced red onion, and half the crispy croutons.
- Gently peel a jammy egg and place it on top of each bowl. Sprinkle with flaky sea salt and cracked pepper.
The herbed yogurt is best made fresh the morning you eat it, but you can prepare it up to 1 day ahead—store in an airtight container and stir well before serving. The croutons stay crispy for 2-3 days in an airtight container, so you can make them on Sunday and use them throughout the week.
All components can be prepped ahead: yogurt mixture (1 day), croutons (3 days), jammy eggs (3 days), and vegetables (2 days). Assemble fresh each morning for the best texture contrast.
5. Tortilla Egg Fold with Beans and Greens (Friday)

Friday is when I want something warm, handheld, and satisfying enough to carry me through the afternoon. This is a crispy-edged tortilla folded around a savory egg scramble spiked with sautéed greens, beans, and a bold salsa verde. The edges of the tortilla get crispy in the pan, which gives you that textural contrast against the soft, creamy eggs inside.
Scrambled eggs folded with sautéed spinach, white beans, and a sharp salsa verde, all wrapped in a crispy-edged flour tortilla. The yolk is your sauce, the greens add a peppery note, and the salsa verde brings brightness and heat.
Perfect for a Friday when you want something filling that doesn’t feel heavy.
Ingredients
- 6 large eggs
- 3 cups fresh spinach (loosely packed)
- 1 can (15 oz) white beans, drained and rinsed
- 1/2 cup salsa verde
- 2 tablespoons butter
- 2 cloves garlic, minced
- 1/4 teaspoon cumin
- Kosher salt and black pepper to taste
- 2 large flour tortillas (10-inch)
- 1/2 cup shredded Oaxaca or mozzarella cheese
- Optional: diced jalapeño, fresh cilantro
Instructions
- Heat 1 tablespoon butter in a large skillet over medium-high heat. Add minced garlic and cook for 30 seconds until fragrant. Add spinach and cook, stirring, for 2-3 minutes until wilted. Season with salt and pepper, then transfer to a plate.
- In the same skillet, add the remaining 1 tablespoon butter. Whisk eggs in a bowl with cumin, salt, and pepper, then pour into the skillet. Scramble gently, stirring occasionally, for 3-4 minutes until just set but still slightly creamy.
- Fold the cooked spinach and white beans into the eggs. Stir in 1/4 cup of the salsa verde.
- Warm tortillas in a dry skillet for 30 seconds per side until pliable. Lay each tortilla flat and divide the egg mixture between them, placing it slightly off-center. Sprinkle with cheese.
- Fold the tortilla in half, then in half again to create a triangle or fold it into thirds. Place seam-side down in a hot skillet with a light coating of butter and cook for 2-3 minutes per side until the edges are golden and crispy.
- Serve with the remaining salsa verde on the side for dipping.
The observable cue for the eggs is the same as with the burritos—slightly underdone when you pull them off the heat. They’ll continue to cook as they sit in the tortilla and again when you pan-fry the fold. Overcooking them here means rubbery eggs by the time you eat them.
These are best eaten fresh, but you can prepare the egg-and-bean filling up to 1 day ahead and store it in an airtight container in the refrigerator. Assemble and pan-fry the tortilla folds fresh each morning for the crispiest edges.
6. Smoky Potato-and-Egg Skillet Box (Saturday)

Saturday is when I have a bit more time, so I’m making something with more layers of flavor and texture. This is a crispy-bottomed skillet hash with smoked paprika, roasted potatoes, and eggs cooked right in the pan. The real trick is getting the bottom layer crispy without burning it—medium-high heat, patience, and a non-stick skillet make all the difference.
Crispy roasted potatoes tossed with smoked paprika, caramelized onions, and sautéed kale, with eggs cracked directly into the pan and cooked until the whites set and the yolks stay runny. The bottom layer gets golden and crispy, the eggs are silky, and the kale adds a peppery edge.
Ideal for a leisurely Saturday breakfast or a meal-prep anchor that holds through Monday.
Ingredients
- 1 lb baby potatoes, quartered
- 3 tablespoons olive oil, divided
- 1 large yellow onion, sliced thin
- 4 cloves garlic, minced
- 1 bunch kale (about 4 cups), stemmed and chopped
- 2 teaspoons smoked paprika
- 1/2 teaspoon cumin
- Kosher salt and black pepper to taste
- 4 large eggs
- 1/2 cup shredded sharp cheddar or smoked gouda
- Fresh cilantro or parsley for garnish
- Flaky sea salt for finishing
Instructions
- Preheat your oven to 400°F. Toss quartered potatoes with 1 tablespoon olive oil, salt, and pepper. Spread on a baking sheet and roast for 15-18 minutes, stirring halfway through, until golden and crispy on the edges.
- While potatoes roast, heat a 10-inch non-stick or cast-iron skillet over medium heat. Add 1 tablespoon olive oil and sliced onion. Cook, stirring occasionally, for 10-12 minutes until the onion is deeply caramelized and golden. Season with salt and pepper.
- Push the caramelized onion to the side of the skillet. Add the remaining 1 tablespoon olive oil, then add minced garlic and cook for 30 seconds until fragrant. Add chopped kale and cook, stirring, for 3-4 minutes until wilted.
- Add the roasted potatoes to the skillet, along with smoked paprika and cumin. Stir gently to combine. Taste and adjust seasoning.
- Create four small wells in the hash. Crack an egg into each well. Reduce heat to medium-low and cover the skillet with a lid or foil. Cook for 5-7 minutes until the egg whites are set but the yolks still jiggle when you gently shake the pan.
- Sprinkle with shredded cheese, cover again, and cook for 1-2 minutes until the cheese melts. Garnish with fresh cilantro or parsley and flaky sea salt.
The observable cue for the eggs is that gentle jiggle in the yolk—that’s your signal to pull it off the heat. The residual heat in the skillet will continue to cook them slightly. If you cover the skillet and let it sit for a minute after you turn off the heat, the yolks will set a bit more, which is helpful if you prefer them less runny.
This skillet is best eaten fresh, but you can prepare the potato-kale-onion base up to 2 days ahead and store it in an airtight container. Reheat gently in a skillet over medium heat, then crack eggs into it and finish as directed. The texture of the potatoes will be softer when reheated, but the flavors will still be bold.
7. Baked Croissant Casserole Squares (Sunday)

Sunday is when I’m thinking about the week ahead and what will carry me through Monday and Tuesday. This is a make-ahead casserole built on buttery croissants, creamy custard, and a bold flavor spin: Dijon mustard and fresh thyme. It’s breakfast that feels indulgent but is actually straightforward to assemble. The croissants soak up the custard and bake into a golden, custardy mass that’s part bread pudding, part breakfast casserole.
Buttery croissants soaked in an egg custard spiked with Dijon mustard, sharp cheddar, and fresh thyme, then baked until golden. The edges get crispy, the center stays custardy, and the mustard adds a sophisticated tang that keeps it from feeling too rich.
Perfect for Sunday prep or a special-occasion breakfast that actually freezes beautifully.
Ingredients
- 4 large croissants, cut into 1-inch cubes (about 4 cups)
- 6 large eggs
- 1 1/2 cups whole milk
- 1/4 cup heavy cream
- 2 tablespoons Dijon mustard
- 1 cup shredded sharp cheddar cheese
- 2 tablespoons fresh thyme leaves (or 1 teaspoon dried)
- 1/2 teaspoon kosher salt
- 1/4 teaspoon black pepper
- 1/4 teaspoon red pepper flakes
- 2 tablespoons butter, for the pan
Instructions
- Butter a 9×9-inch baking dish. Spread croissant cubes evenly across the bottom.
- In a large bowl, whisk together eggs, milk, cream, Dijon mustard, cheddar, thyme, salt, pepper, and red pepper flakes until smooth and well combined.
- Pour the custard mixture over the croissant cubes, making sure to coat them evenly. Let the mixture sit for 10 minutes so the croissants can absorb some of the liquid. If the top layer of croissants is still dry, press them down gently into the custard.
- Cover the baking dish with foil and refrigerate for at least 2 hours, or up to overnight. This step is optional but recommended—it allows the flavors to meld and the croissants to fully absorb the custard.
- When ready to bake, preheat your oven to 350°F. Remove the casserole from the refrigerator and let it sit at room temperature for 15 minutes.
- Bake covered with foil for 20 minutes. Remove the foil and bake for an additional 15-20 minutes, until the top is golden and a knife inserted in the center comes out clean or with just a few moist crumbs.
- Let cool for 5 minutes before cutting into squares.
The observable cue here is the knife test—when a knife inserted in the center comes out clean or with just a few moist crumbs, you’re done. If it comes out with a lot of wet custard, give it another 5 minutes. The casserole will continue to set slightly as it cools.
This casserole is excellent for make-ahead: assemble it up to 1 day ahead, cover, and refrigerate. Bake fresh the morning you want to eat it, or bake it completely and store in an airtight container in the refrigerator for up to 3 days. Reheat individual squares in a 350°F oven for 8 minutes, or microwave for 60-90 seconds. The casserole also freezes beautifully—wrap baked squares individually in foil and freeze for up to 3 months. Thaw in the refrigerator overnight and reheat as directed.
8. Boiled Egg Snack Boxes (Bonus Recipe 1)
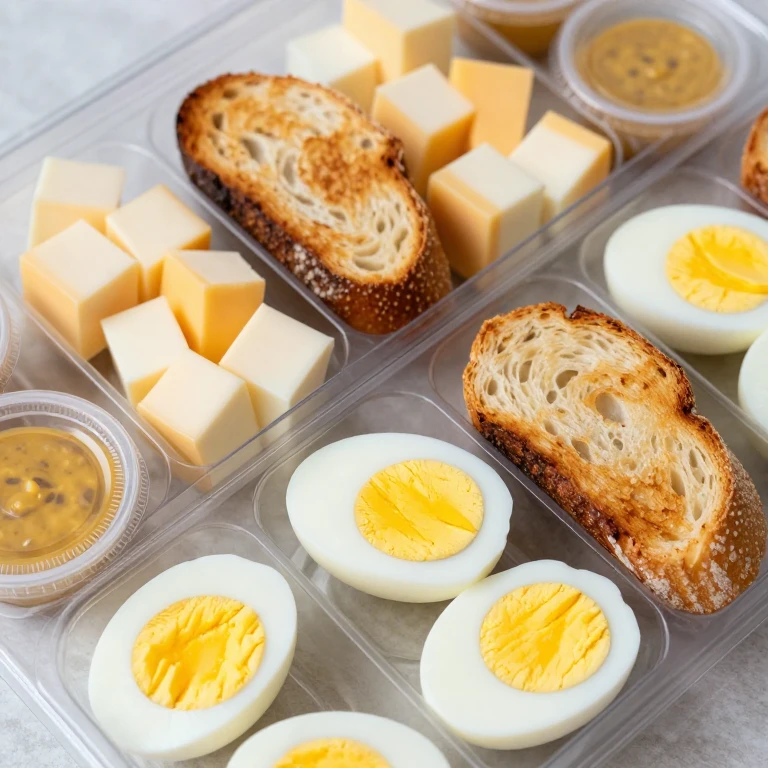
These aren’t just for breakfast—they’re your insurance policy for any time hunger strikes. I make a big batch of hard-boiled eggs on Sunday, peel them, and portion them into small boxes with crunchy components and a sauce. The twist is the sauce: instead of plain mayonnaise, I’m offering three bold options you can rotate through the week. The texture contrast here is soft, creamy egg against crispy toast points and crunchy vegetables.
Perfectly boiled eggs with crispy toast points, sliced vegetables (radish, cucumber, bell pepper), and a choice of three bold sauces: herb-forward green goddess, spicy sriracha mayo, or tangy lemon-dill. The eggs are the anchor, but the sauces and crunch keep each box feeling different.
Perfect for grab-and-go snacking, lunchbox additions, or a light breakfast when you’re short on time.
Ingredients
- 12 large eggs
- 4 slices whole-grain bread, cut into triangles and toasted
- 2 cups mixed vegetables (radish slices, cucumber rounds, bell pepper strips)
- Kosher salt and black pepper to taste
- For Green Goddess Sauce: 1/2 cup Greek yogurt, 1/4 cup fresh basil, 2 tablespoons fresh parsley, 1 clove garlic, 1 tablespoon lemon juice, salt and pepper
- For Sriracha Mayo: 1/2 cup mayonnaise, 2 tablespoons sriracha, 1 teaspoon honey, 1/2 teaspoon lime juice
- For Lemon-Dill Sauce: 1/2 cup Greek yogurt, 2 tablespoons fresh dill, 1 lemon (zested and juiced), 1 clove garlic (minced), salt and pepper
Instructions
- Bring a large pot of water to a rolling boil. Gently lower eggs into the water using a spoon. Set a timer for 13 minutes for hard-boiled eggs.
- While eggs cook, prepare your sauce of choice. For Green Goddess: blend Greek yogurt, basil, parsley, garlic, and lemon juice in a food processor until smooth. Season with salt and pepper. For Sriracha Mayo: whisk together mayonnaise, sriracha, honey, and lime juice. For Lemon-Dill: whisk together Greek yogurt, dill, lemon zest, lemon juice, minced garlic, salt, and pepper.
- Toast bread triangles at 375°F for 8-10 minutes until crispy and golden.
- When the timer goes off, transfer eggs to an ice bath using a slotted spoon. Let them cool completely, then gently peel under cool running water, starting from the wider end.
- Divide peeled eggs, toast points, and fresh vegetables among four small containers or boxes. Pack your sauce of choice in a small container or jar alongside. Season eggs with salt and pepper just before eating.
The observable cue for hard-boiled eggs is the 13-minute timer—that gives you a fully set yolk with no gray-green ring around it. If you go longer, that ring forms, which is harmless but indicates slight overcooking. The ice bath stops the cooking instantly and makes peeling easier.
Hard-boiled eggs keep in the refrigerator for up to 1 week, peeled or unpeeled. Sauces keep for up to 3 days. Assemble boxes up to 1 day ahead, keeping the sauce separate until you’re ready to eat. Toast points stay crispy for 2-3 days in an airtight container.
9. Curried Egg Salad Jars (Bonus Recipe 2)
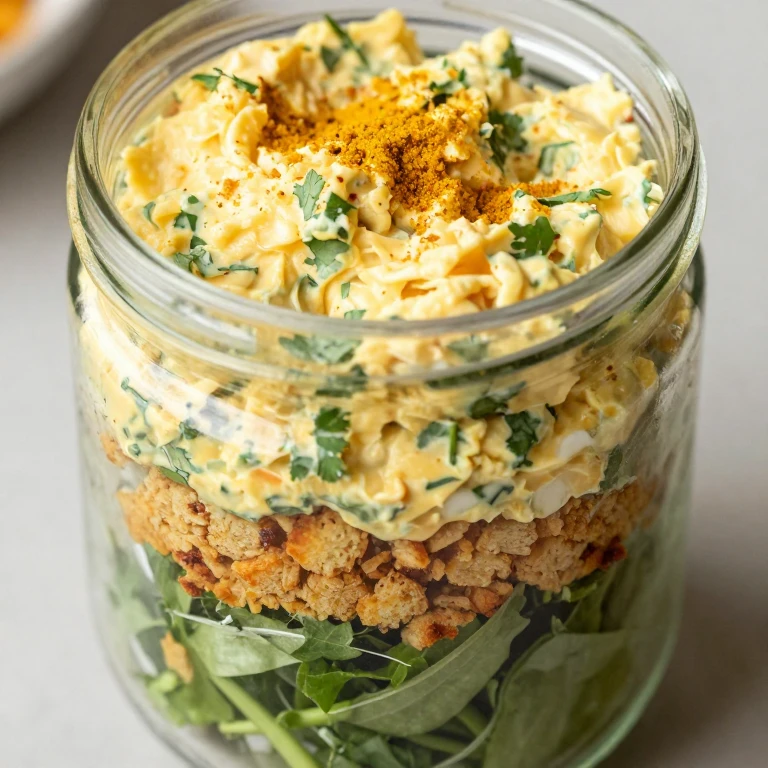
This is my secret weapon for when I want something that feels special but requires zero morning effort. Egg salad is often boring, but a bold curry spice blend and crispy components change everything. I’m building it as a jar: creamy egg salad on the bottom, crispy elements in the middle, greens on top. When you shake the jar and tip it into a bowl, everything combines into something that tastes intentional and bold.
Creamy egg salad spiked with curry powder, lime juice, and fresh cilantro, layered with crispy croutons and fresh greens. The curry adds warmth and complexity, the lime adds brightness, and the crispy croutons give you texture contrast against the creamy eggs.
Perfect for a light breakfast, a portable lunch, or meal-prep when you want something different from the standard egg preparation.
Ingredients
- 8 large hard-boiled eggs, peeled and chopped
- 1/4 cup mayonnaise
- 2 tablespoons Greek yogurt
- 1 1/2 teaspoons curry powder
- 1/2 teaspoon ground cumin
- 1 lime, zested and juiced
- 1/4 cup fresh cilantro, chopped
- 2 tablespoons diced red onion
- Kosher salt and black pepper to taste
- 1 cup crispy croutons (homemade or store-bought)
- 2 cups mixed greens (arugula, spinach, or mesclun)
- Optional: diced mango, sliced avocado, or crispy bacon
Instructions
- Prepare hard-boiled eggs by bringing a large pot of water to a rolling boil. Gently lower eggs into the water and set a timer for 13 minutes. Transfer to an ice bath, cool completely, then peel and chop.
- In a medium bowl, whisk together mayonnaise, Greek yogurt, curry powder, cumin, lime zest, and lime juice until smooth. Fold in chopped eggs, cilantro, and red onion. Season with salt and pepper. Taste and adjust seasoning—you want the curry to be noticeable but not overwhelming.
- Divide the egg salad among four mason jars (1-pint size), pressing it gently into the bottom of each jar.
- Layer crispy croutons on top of the egg salad, then top with mixed greens. If using optional ingredients like mango or avocado, add them on top of the greens.
- Seal the jars and refrigerate until ready to eat.
The observable cue for the curry seasoning is taste—start with 1 teaspoon and add more if you want it bolder. Curry powder varies in intensity depending on the brand, so it’s worth tasting as you go. The lime juice should brighten the whole thing and prevent it from tasting one-dimensional.
These jars keep in the refrigerator for up to 3 days, though the greens will soften slightly after day 2. To eat, shake the jar well to combine all the layers, then tip into a bowl or eat straight from the jar. The croutons will soften as they sit, so if you prefer them crispy, store them separately and add them just before eating.
10. Shakshuka-Spiced Egg Bake with Tomato Sauce (Bonus Recipe 3)

This is my show-off recipe, the one I make when I want to feel like I’m eating something from a restaurant kitchen. Shakshuka is North African—eggs poached in a spiced tomato sauce—and it’s built on bold flavor and beautiful presentation. The real twist here is making it in a cast-iron skillet so the bottom gets crispy while the sauce stays vibrant and the eggs stay creamy. It’s a complete meal in one pan.
Eggs poached in a deeply spiced tomato sauce with warm spices (cumin, coriander, cinnamon), fresh cilantro, and a hit of harissa. The sauce is rich and complex, the eggs are silky, and the crispy bottom of the pan gives you textural contrast. Serve with crusty bread for soaking up the sauce.
Perfect for a weekend breakfast or a special occasion when you want something that looks and tastes impressive.
Ingredients
- 2 tablespoons olive oil
- 1 medium onion, diced
- 4 cloves garlic, minced
- 1 can (28 oz) crushed tomatoes
- 2 tablespoons tomato paste
- 1 teaspoon ground cumin
- 1 teaspoon ground coriander
- 1/4 teaspoon ground cinnamon
- 1-2 teaspoons harissa paste (adjust to taste)
- Kosher salt and black pepper to taste
- 1/4 cup fresh cilantro, chopped
- 6 large eggs
- 1/4 cup crumbled feta cheese (optional)
- Crusty bread for serving
Instructions
- Heat olive oil in a 10-inch cast-iron skillet over medium heat. Add diced onion and cook, stirring occasionally, for 5-7 minutes until softened and beginning to brown.
- Add minced garlic and cook for 1 minute until fragrant. Stir in tomato paste and cook for 1-2 minutes, stirring constantly, until it darkens slightly.
- Add crushed tomatoes, cumin, coriander, cinnamon, harissa, salt, and pepper. Stir well to combine. Bring to a gentle simmer and cook uncovered for 8-10 minutes, stirring occasionally, until the sauce thickens slightly and the flavors meld. Taste and adjust seasoning—the harissa should add a subtle heat, not overpower.
- Reduce heat to medium-low. Create six small wells in the sauce by gently pushing the tomato sauce aside with the back of a spoon.
- Crack an egg into each well. Cover the skillet with a lid or foil and cook for 5-7 minutes until the egg whites are set but the yolks still jiggle gently when you shake the pan.
- Sprinkle with fresh cilantro and feta cheese if using. Serve directly from the skillet with crusty bread for soaking up the sauce.
The observable cue for the eggs is that gentle jiggle in the yolk—it means the eggs are cooked through but still creamy. The residual heat in the sauce will continue to cook them slightly after you pull the skillet off the heat. If you prefer your yolks fully set, cover the skillet and let it sit for 1-2 minutes after turning off the heat.
The tomato sauce can be made up to 2 days ahead and stored in an airtight container in the refrigerator. Reheat gently in the skillet over medium heat, then crack eggs into it and finish as directed. The shakshuka is best eaten fresh, but leftovers keep in an airtight container in the refrigerator for up to 1 day. Reheat gently over low heat to avoid overcooking the eggs.
How to Choose the Right One
Each recipe in this collection serves a different purpose and fits a different week or mood. If you’re looking for maximum meal-prep efficiency and want to make everything on Sunday, start with the Sheet-Pan Veggie Egg Squares (Monday) and the Baked Croissant Casserole (Sunday)—both make 4-6 servings in one pan and hold well through the week. If you prefer component kits where you assemble fresh each morning, the Avocado Jammy Egg Toast Kit (Tuesday) and Boiled Egg Snack Boxes (Bonus 1) are your best bets. For handheld, grab-and-go options that freeze beautifully, reach for the Breakfast Burrito Freezer Wraps (Wednesday) or the Tortilla Egg Fold (Friday). If you want something warm and comforting that feels special, the Smoky Potato-and-Egg Skillet (Saturday) and the Shakshuka-Spiced Egg Bake (Bonus 3) deliver restaurant-quality flavor. For lighter breakfasts or when you’re short on time, the Greek Yogurt Bowl with Herby Jammy Eggs (Thursday) and the Curried Egg Salad Jars (Bonus 2) are quick to assemble. Mix and match across the week: make three recipes on Sunday and rotate through them, or commit to one full week and start fresh the following week. The beauty of these recipes is flexibility—they’re designed to work with your schedule, not against it.
FAQ
Can I prep all seven days at once, or should I make them in batches?
Both work, depending on your kitchen space and energy. If you have a large oven and plenty of counter space, Sunday is a great day to make the Sheet-Pan Veggie Egg Squares, the Baked Croissant Casserole, the Smoky Potato-and-Egg Skillet, and hard-boiled eggs for the snack boxes all at once. If you’re tight on space, batch-prep two or three recipes on Sunday and make another batch on Wednesday. The component kits (jammy eggs, egg salad, sauce options) take minimal time and can be prepped in 15-20 minutes total, so you can make those fresh mid-week if you prefer.
How long do these recipes keep in the refrigerator?
Most egg-based breakfast recipes keep for 3-4 days in an airtight container. The Sheet-Pan Veggie Egg Squares, Baked Croissant Casserole, and Smoky Potato-and-Egg Skillet all hold well through day 4. Hard-boiled eggs keep for up to 1 week. The component kits (jammy eggs, egg salad) keep for 3 days, but fresh components like greens and avocado should be added the morning you eat them. Always store in airtight containers to prevent them from drying out or absorbing odors from other foods.
Can I freeze any of these recipes?
Yes. The Breakfast Burrito Freezer Wraps are designed to freeze and reheat beautifully—wrap individually and freeze for up to 3 months. The Baked Croissant Casserole also freezes well; wrap baked squares individually in foil and freeze for up to 3 months. The Sheet-Pan Veggie Egg Squares freeze for up to 3 months when wrapped individually. The other recipes are best eaten fresh or refrigerated, though leftover egg scrambles and bakes can be frozen in portions if you have space. Thaw frozen items in the refrigerator overnight and reheat gently in a 350°F oven or microwave to avoid overcooking the eggs.
What if I have dietary restrictions? Can I adapt these recipes?
Absolutely. For dairy-free: replace cheddar with a dairy-free alternative, use olive oil instead of butter, and swap Greek yogurt for a dairy-free yogurt in the sauce recipes. For gluten-free: use gluten-free bread for the toast kits and croutons, and gluten-free tortillas for the burritos and folds. For vegetarian: all recipes are already vegetarian; just omit bacon from the Breakfast Burrito if you prefer. For vegan: eggs are the centerpiece of this collection, so vegan adaptations would require significant changes. Consider substituting with tofu scrambles or chickpea flour-based dishes instead.
Which recipe is best for beginners?
The Boiled Egg Snack Boxes (Bonus 1) and the Avocado Jammy Egg Toast Kit (Tuesday) are the most beginner-friendly because they require minimal cooking skill—boiling water and timing are the main techniques. The Curried Egg Salad Jars (Bonus 2) is also simple: it’s just chopping, whisking, and layering. The Sheet-Pan Veggie Egg Squares (Monday) and Smoky Potato-and-Egg Skillet (Saturday) require a bit more technique (recognizing when vegetables are caramelized, managing heat to avoid overcooking eggs), but both come with clear observable cues to guide you.
How do I reheat these without drying out the eggs?
Low and slow is the key. For casseroles and skillet dishes, reheat in a 350°F oven for 8-10 minutes covered with foil to prevent drying. For individual portions, microwave for 60-90 seconds at 50% power (medium) instead of full power—this gentler heat keeps eggs creamy instead of turning them rubbery. For burritos and wraps, wrap in a damp paper towel and microwave for 90 seconds. For egg salad and component kits, eat cold or reheat gently if you prefer warm eggs, but these are designed to taste great at any temperature.