
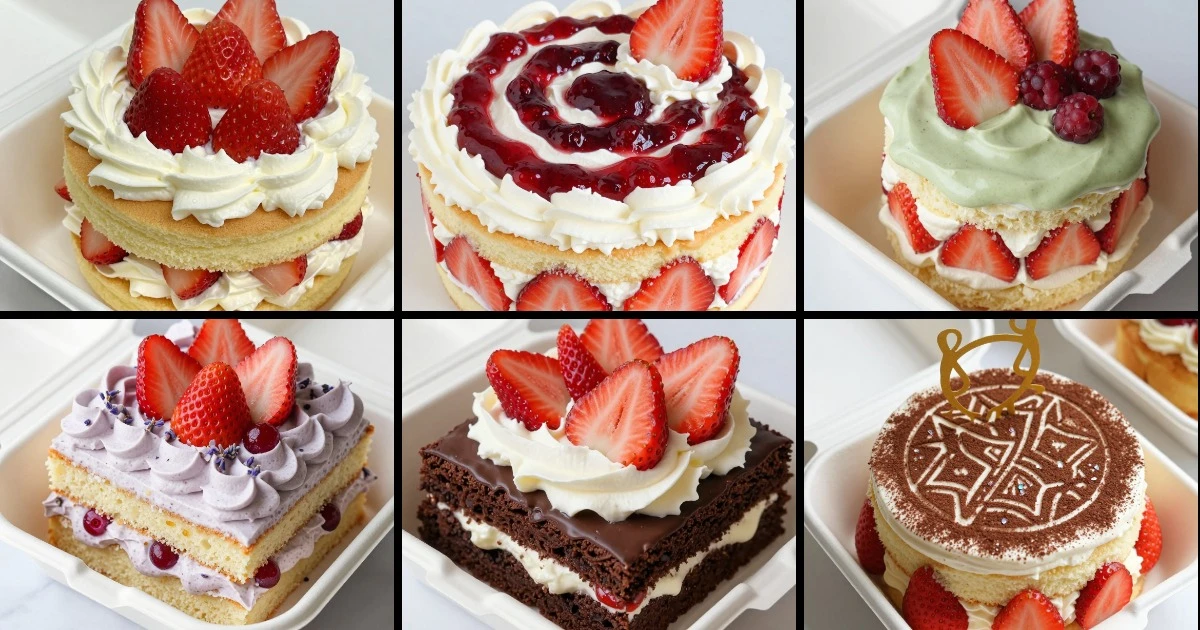
I’ve discovered that strawberry bento cakes hit the sweet spot between showstopping and giftable—they’re small enough to hand-deliver, bold enough to impress, and fun enough to make you want to bake a whole fleet of them. These 4-inch minis pack real technique: layered sheets, clean frosting lines, and toppings that survive travel. Whether you’re making them for friends, farmers market pop-ups, or just because, I’ve built 12 ideas that each bring a distinct flavor spin and texture contrast to the strawberry-and-cream formula.
What makes bento cakes different is the clean boxing—you’re not hiding imperfections under buttercream swirls. Every layer shows, every frosting edge matters, and that constraint is exactly what makes them fun to execute. I’ll walk you through mini-method versions of each cake, plus the finish moves that keep them travel-proof and picture-perfect.
What You’ll Find in This List
This collection spans flavor ranges from classic strawberries-and-cream to chocolate-dipped drama, ombré frosting effects, and character-stencil toppers. You’ll find 20-minute assembly options for when you’re gifting last-minute, plus weekend-project cakes that let you hand-paint details or build multi-layer architecture. Skill levels range from beginner-friendly (simple stacking, no piping) to intermediate (thin-sheet cutting, stencil work), and every entry includes storage tips so your minis stay fresh and travel-ready.
- Strawberry-cream layer formulas with observable baking cues
- Frosting techniques: clean edges, ombré effects, and drip finishes
- Topping strategies that stay secure in transit
- Make-ahead timelines and boxing tips for each style
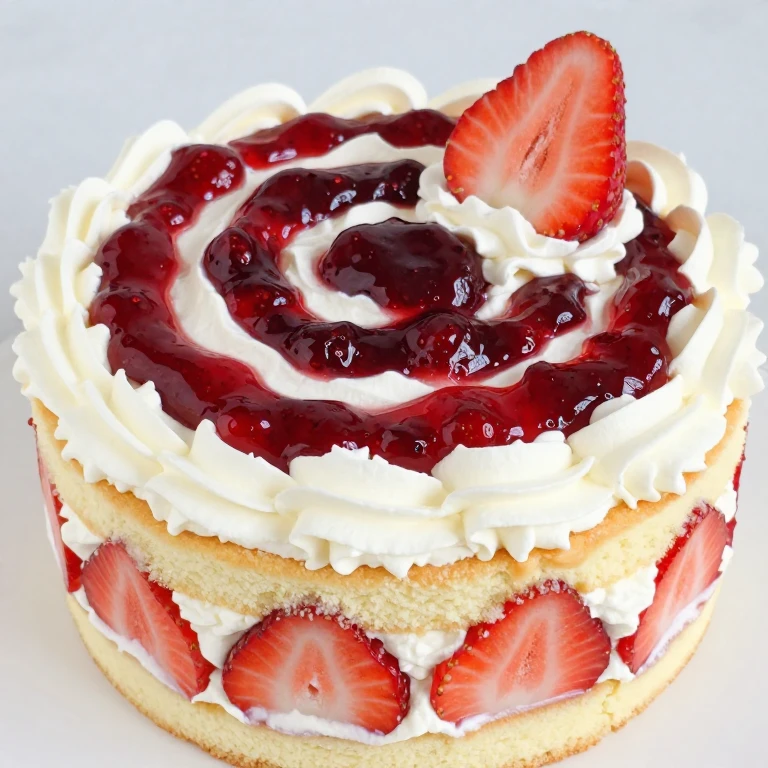
1. Classic Strawberry Shortcake Bento
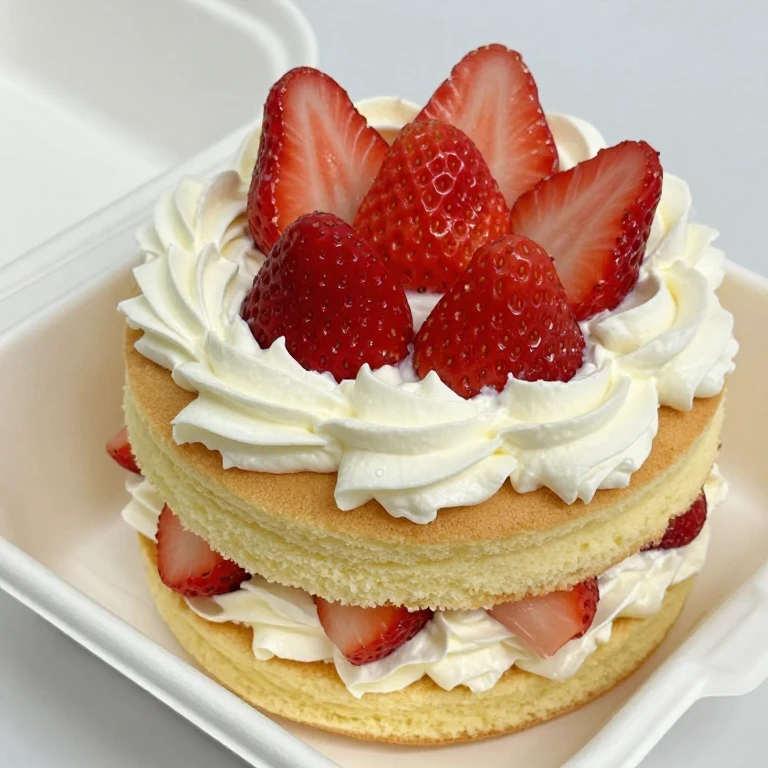
This one’s the foundation—fluffy vanilla cake, whipped cream, and fresh strawberry slices stacked in perfect horizontal lines. The appeal is pure: you see every layer, and the contrast between tender crumb and pillowy cream is immediate. It’s the gateway bento cake, and it teaches you the core stacking discipline you’ll use in every other idea on this list.
Flavor profile: Bright, clean, and uncomplicated—strawberry shines because there’s nothing fighting it.
Best for: First-time bento bakers, picnic gifts, anyone who loves the taste of summer in four bites.
Ingredients
- 2 cups all-purpose flour
- 1.5 tsp baking powder
- 0.5 tsp salt
- 6 tbsp butter, softened
- 0.75 cup sugar
- 2 large eggs
- 0.5 cup whole milk
- 1 tsp vanilla extract
- 1 cup heavy cream
- 2 tbsp powdered sugar
- 8 oz fresh strawberries, sliced
Instructions
- Preheat oven to 350°F. Line a 9-inch round cake pan with parchment, then grease lightly. Whisk flour, baking powder, and salt in a small bowl.
- Cream butter and sugar until pale and fluffy (about 2 minutes); you should see the mixture lighten noticeably and increase in volume.
- Add eggs one at a time, beating well after each. Alternate adding flour mixture and milk, starting and ending with flour. Stir in vanilla.
- Pour batter into prepared pan and smooth the top. Bake 22–26 minutes, until a toothpick inserted in the center comes out clean and the cake springs back when lightly pressed.
- Cool in pan 10 minutes, then turn out onto a wire rack to cool completely (about 1 hour).
- Whip heavy cream with powdered sugar until soft peaks form—you want it thick enough to hold shape but still cloud-like.
- Slice cooled cake into four thin rounds using a serrated knife and a cake leveler or by eye. Trim each round to fit your 4-inch cake ring or mold.
- Layer in your box or ring: cake, whipped cream (thin layer), strawberry slices, repeat until full. Chill at least 1 hour before serving.
The biggest failure mode here is overmixing the batter after you add the eggs—it can make the cake tough. Mix just until combined, and don’t overbeat the cream either; soft peaks mean it’ll hold its shape in the box without weeping. The observable cue is the pale, fluffy butter-sugar mixture and the springy cake top when it’s done baking.
Make-ahead: Bake the cake layers up to 2 days ahead and store wrapped at room temperature. Assemble the bento 4–6 hours before gifting, then refrigerate. It stays fresh in a sealed box for up to 24 hours.
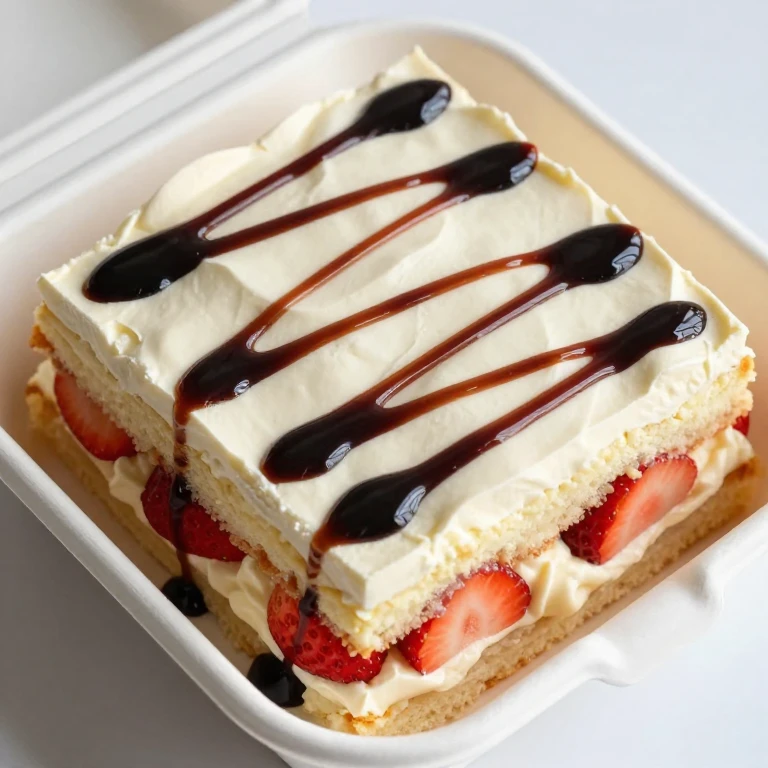
2. Chocolate-Dipped Strawberry Bento
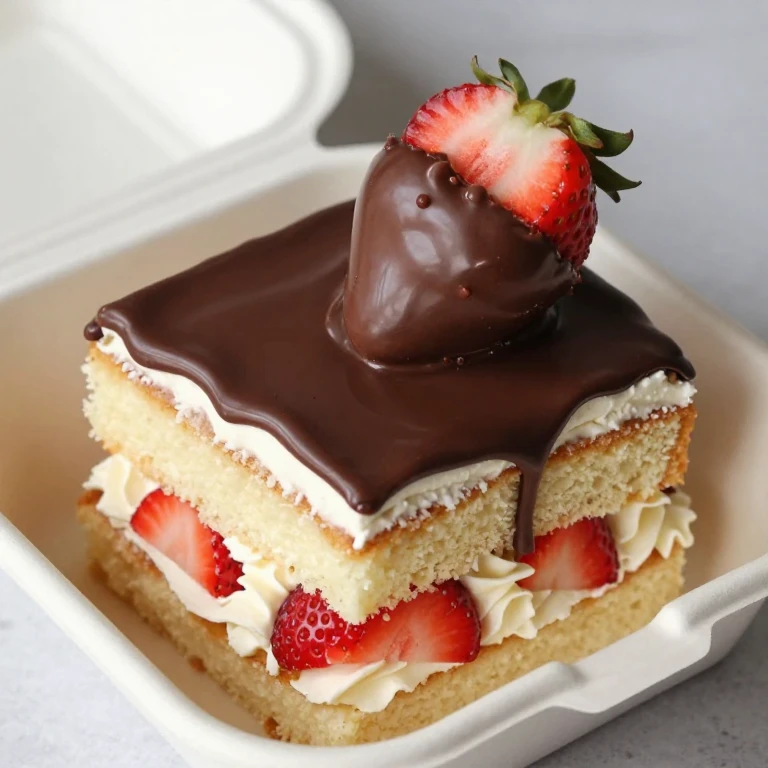
Take the classic shortcake formula and add a high-impact finish: dark chocolate coating the top strawberry slice and dripping down the side of the box. This is where bento cakes become Instagram-worthy—the chocolate drip is your signature move, and it’s easier than it looks.
Flavor profile: Strawberry and dark chocolate create a sophisticated contrast; the tartness of the fruit cuts through the richness.
Best for: Gifting to chocolate lovers, special occasions, anyone who wants their bento cake to photograph like a pro made it.
Ingredients
- 1 batch vanilla cake (see entry 1)
- 1 cup heavy cream
- 2 tbsp powdered sugar
- 8 oz fresh strawberries
- 4 oz dark chocolate (70% cacao), chopped
- 1 tbsp coconut oil
- Pinch of sea salt
Instructions
- Prepare and cool the vanilla cake as in entry 1, slicing into four thin rounds.
- Whip heavy cream with powdered sugar until soft peaks form.
- Layer cake, whipped cream, and strawberry slices as in entry 1. Chill for 1 hour.
- Melt dark chocolate and coconut oil together (microwave in 20-second bursts, stirring between each, or use a double boiler) until smooth. Stir in a tiny pinch of sea salt.
- Place a fresh strawberry slice on top of the assembled bento cake. Dip the tip into melted chocolate, then let it drip down one side of the cake box for visual drama.
- Drizzle a thin line of chocolate around the top edge if desired. Refrigerate for 15 minutes to set the chocolate before boxing.
The chocolate drip is all about temperature and timing: if the chocolate is too hot, it’ll run everywhere; too cool, and it won’t flow. Aim for chocolate that’s still warm to the touch but not steaming. Practice your drip on parchment first if you’re nervous—it takes one or two tries to get the angle right.
Make-ahead: Assemble the bento up to 6 hours ahead, then add the chocolate drip 30 minutes before serving. The chocolate sets quickly and keeps the cake looking fresh.
3. Ombré Pink Frosting Bento
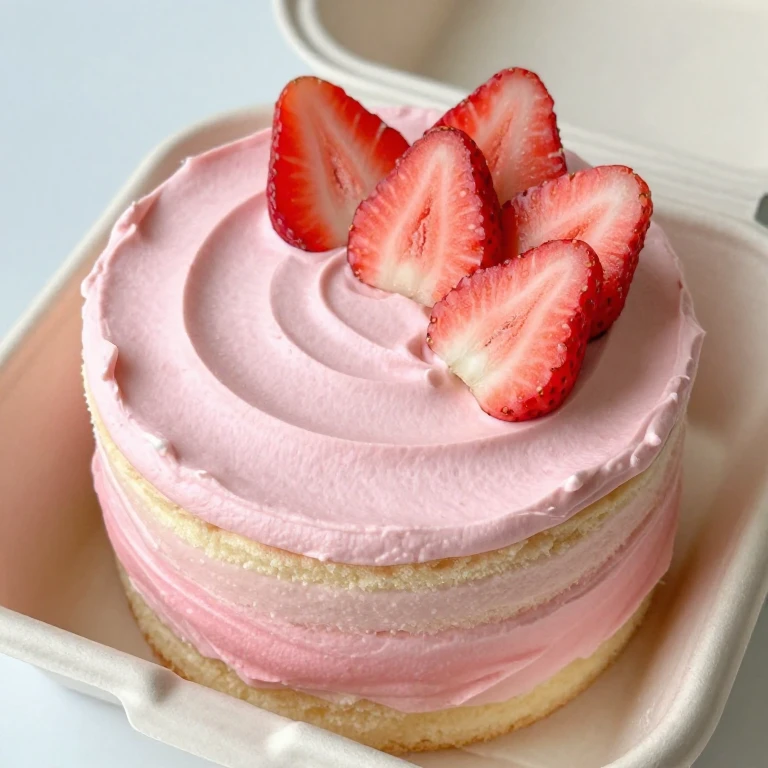
Instead of whipped cream layers, I’m building this one with a silky Swiss meringue buttercream that you tint in three shades of pink—deep rose at the bottom, pale blush at the top. The ombré effect makes the cake feel precious without extra technique; it’s just strategic color placement and clean frosting edges.
Flavor profile: Buttercream adds richness and slight tang; the strawberries stay bright against the creamy backdrop.
Best for: Bakers who love color work, gift boxes that need to look editorial, anyone making a whole batch and wanting visual variety.
Ingredients
- 1 batch vanilla cake (see entry 1)
- 4 oz egg whites (about 3 large)
- 0.5 cup sugar
- 8 oz butter, softened and cubed
- 0.5 tsp vanilla extract
- Red and pink gel food coloring
- 8 oz fresh strawberries, sliced
Instructions
- Prepare and cool the vanilla cake, slicing into four thin rounds.
- Make Swiss meringue buttercream: whisk egg whites and sugar in a heatproof bowl over simmering water, stirring constantly, until the mixture reaches 160°F (about 5 minutes) and feels hot to the touch.
- Transfer to a stand mixer and whip on high speed until stiff peaks form and the bowl feels cool to the touch (about 5 minutes). Gradually add softened butter, one cube at a time, beating between additions. Add vanilla.
- Divide buttercream into three bowls. Tint one deep rose, one medium pink, and leave one pale blush. You’ll see the color deepen as you stir in the gel coloring.
- Layer cake rounds with buttercream: start with deep rose on the bottom layer, medium pink on the second, and pale blush on top. Smooth each layer flat with an offset spatula.
- Top with fresh strawberry slices arranged in a pattern. Chill for at least 2 hours before boxing to set the frosting.
Swiss meringue buttercream is more stable than American buttercream and stays silky without looking greasy—it’s the pro move for clean edges. The key is not rushing the cooling step; if you add cold butter to warm buttercream, it’ll break and turn grainy. If it does, just warm it gently over a double boiler and re-whip.
Make-ahead: Make the buttercream up to 3 days ahead and refrigerate in an airtight container. Bring to room temperature and re-whip for 2 minutes before using. Assemble the bento 4–6 hours ahead and refrigerate until serving.
4. Strawberry Jam Swirl Bento
Here’s a texture twist: I’m layering thin ribbons of homemade strawberry jam between the cake and cream, creating pockets of intense fruit flavor and a jewel-toned visual. The jam adds acidity and jammy depth that fresh strawberries alone can’t deliver.
Flavor profile: Concentrated strawberry flavor with a subtle tartness; the jam reads as more sophisticated than fresh fruit alone.
Best for: Bakers with homemade jam on hand, anyone who wants a flavor punch, gift recipients who appreciate depth.
Ingredients
- 1 batch vanilla cake (see entry 1)
- 1 cup heavy cream
- 2 tbsp powdered sugar
- 0.5 cup strawberry jam (homemade or high-quality store-bought)
- 4 oz fresh strawberries, sliced
- 1 tbsp lemon juice
Instructions
- Prepare and cool the vanilla cake, slicing into four thin rounds.
- Whip heavy cream with powdered sugar until soft peaks form.
- Warm the strawberry jam slightly (about 20 seconds in the microwave) and stir in lemon juice to brighten the flavor.
- Layer in your bento box: cake, thin layer of whipped cream, small spoonful of jam (about 1 tbsp, spread thin), fresh strawberry slices, repeat.
- Finish the top with a strawberry slice and a tiny dollop of jam in the center. Chill for at least 1 hour.
The jam can overwhelm the cake if you use too much—think of it as an accent, not a filling. A thin layer (about the thickness of a dime) is all you need to add flavor without making the cake soggy. If your jam is very thick, thin it with a touch of water or lemon juice so it spreads easily.
Make-ahead: Assemble up to 8 hours ahead. The jam actually helps preserve the cake by adding moisture and acidity, so this one stays fresh longer than the classic version.
5. Cream Cheese Frosting Bento with Candied Lemon
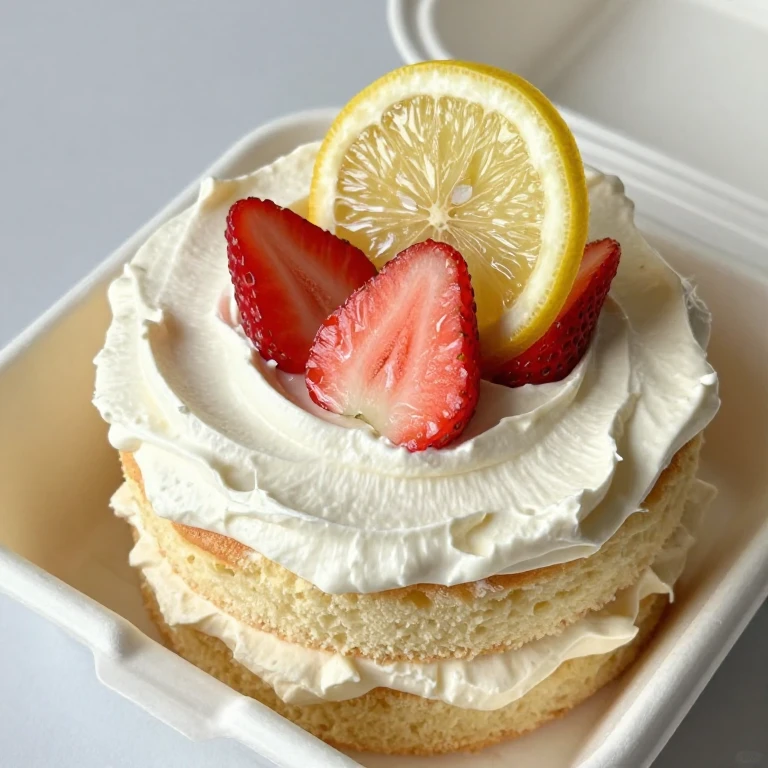
Swap the whipped cream for tangy cream cheese frosting, then top with candied lemon slices for a bright, sophisticated finish. This is the bento cake for people who find plain strawberry-cream a bit one-note; the lemon adds complexity without competing with the fruit.
Flavor profile: Tangy cream cheese, sweet-tart candied lemon, and fresh strawberry create a balanced, grown-up flavor story.
Best for: Bakers with a bit of patience (candying lemon takes 30 minutes), gifting to friends with adventurous palates, spring and summer occasions.
Ingredients
- 1 batch vanilla cake (see entry 1)
- 4 oz cream cheese, softened
- 2 oz butter, softened
- 1 cup powdered sugar
- 0.5 tsp vanilla extract
- 1 lemon, thinly sliced
- 0.5 cup sugar (for candying)
- 0.5 cup water
- 8 oz fresh strawberries, sliced
Instructions
- Prepare and cool the vanilla cake, slicing into four thin rounds.
- Make candied lemon: combine sugar and water in a small saucepan and bring to a simmer. Add lemon slices and simmer gently for 20–25 minutes until the rinds are translucent and the syrup thickens. Remove to parchment to cool and dry slightly (about 15 minutes).
- Beat cream cheese and butter together until smooth. Gradually add powdered sugar, beating until light and fluffy. Stir in vanilla. You should see the frosting lighten and increase in volume.
- Layer cake, cream cheese frosting, and strawberry slices. Top with a candied lemon slice.
- Chill for at least 2 hours before serving.
Cream cheese frosting is softer than buttercream, so keep everything cold and work quickly. If the frosting starts to get warm and slumpy, pop it back in the fridge for 10 minutes. The candied lemon slices are the showstopper here—they look like jewelry on top of the cake.
Make-ahead: Candied lemon slices keep in an airtight container for up to 1 week. Make the frosting 1 day ahead, refrigerate, and bring to room temperature before using. Assemble 4–6 hours ahead.
6. Matcha White Chocolate Bento
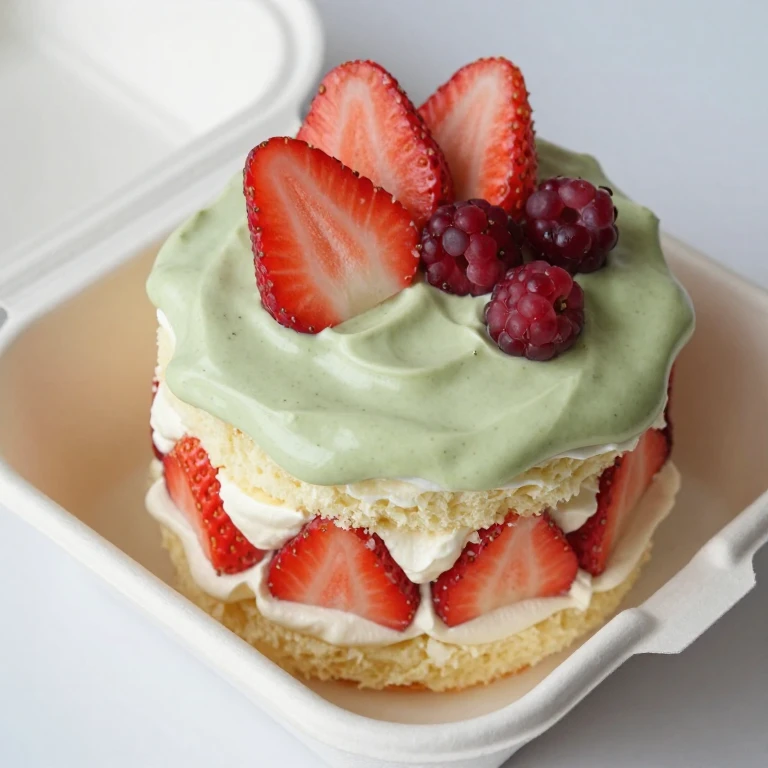
I’m introducing a flavor twist here: a thin layer of white chocolate ganache infused with matcha powder, creating an earthy-sweet contrast to the strawberry. The matcha adds visual drama (that signature green layer) and a subtle bitter note that makes the strawberry pop.
Flavor profile: Earthy matcha, creamy white chocolate, and bright strawberry—a modern, sophisticated combination.
Best for: Matcha lovers, anyone seeking a flavor surprise, bakers who want to differentiate their bento cakes.
Ingredients
- 1 batch vanilla cake (see entry 1)
- 1 cup heavy cream
- 2 tbsp powdered sugar
- 4 oz white chocolate, chopped
- 1 tbsp matcha powder
- 2 tbsp hot water
- 8 oz fresh strawberries, sliced
Instructions
- Prepare and cool the vanilla cake, slicing into four thin rounds.
- Whip heavy cream with powdered sugar until soft peaks form.
- Whisk matcha powder with hot water until smooth and lump-free. Heat cream (about 0.25 cup) until steaming, then pour over chopped white chocolate. Let sit 1 minute, then stir until smooth. Stir in the matcha mixture.
- Let the matcha-white chocolate ganache cool to room temperature (about 10 minutes) so it’s spreadable but not warm.
- Layer cake, whipped cream, thin layer of matcha ganache, strawberry slices, repeat. Finish with a strawberry slice on top.
- Chill for at least 2 hours to set the ganache.
The matcha powder must be whisked smooth with water first, or you’ll get gritty bits in your ganache. If the ganache seems too thick after cooling, warm it gently and let it cool again—you want it spreadable, not stiff. A thin layer is all you need; too much matcha can overpower the strawberry.
Make-ahead: Make the ganache up to 2 days ahead and store in an airtight container at room temperature. Assemble the bento 4–6 hours ahead and refrigerate.
7. Pistachio Cream Bento with Strawberry Drip
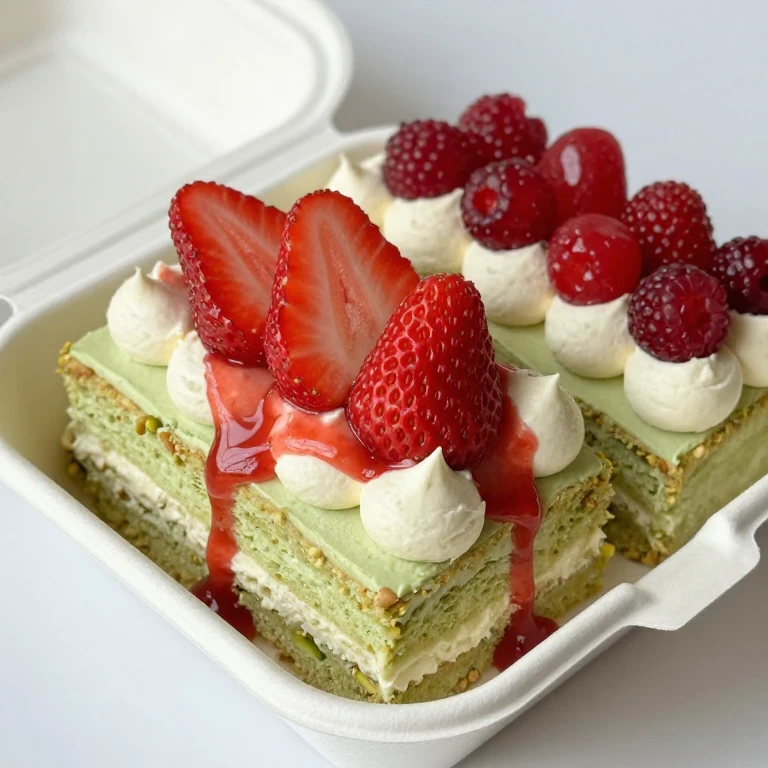
Switch out the vanilla cake for pistachio, then layer with a silky pistachio pastry cream and fresh strawberries. The pistachio adds a subtle nuttiness and pale green color that feels elegant without being loud.
Flavor profile: Delicate pistachio with a creamy, custard-like texture; strawberry adds brightness and tartness.
Best for: Bakers comfortable with pastry cream, anyone who loves nut flavors, gift recipients with refined taste.
Ingredients
- 1.5 cups all-purpose flour
- 0.5 cup finely ground pistachio flour
- 1.5 tsp baking powder
- 0.5 tsp salt
- 6 tbsp butter, softened
- 0.75 cup sugar
- 2 large eggs
- 0.5 cup whole milk
- 0.5 tsp pistachio extract (or vanilla)
- 1 cup whole milk (for pastry cream)
- 3 tbsp sugar
- 2 tbsp cornstarch
- 2 egg yolks
- 2 oz butter
- 0.5 tsp vanilla extract
- 8 oz fresh strawberries, sliced
Instructions
- Preheat oven to 350°F. Make pistachio cake: whisk flour, pistachio flour, baking powder, and salt together. Cream butter and sugar until pale and fluffy (about 2 minutes).
- Add eggs one at a time, beating well. Alternate adding flour mixture and milk, starting and ending with flour. Stir in pistachio extract.
- Bake in a greased 9-inch pan for 22–26 minutes until a toothpick comes out clean. Cool completely, then slice into four thin rounds.
- Make pastry cream: whisk egg yolks with sugar until pale (about 1 minute). Whisk in cornstarch. Heat milk until steaming, then slowly pour into egg mixture while whisking constantly to avoid scrambling the yolks.
- Return mixture to the saucepan and cook over medium heat, whisking constantly, until it thickens and comes to a boil (you’ll see it transform from pourable to custard-like, about 2 minutes). Remove from heat and stir in butter and vanilla. Cool to room temperature.
- Layer cake, pastry cream, and strawberry slices. Chill for at least 2 hours.
Pastry cream requires patience and constant whisking—don’t walk away from it. The observable cue is when it visibly thickens and reaches a boil; that’s when you know the cornstarch has cooked through and the eggs are set. If lumps form, push the cream through a fine-mesh sieve.
Make-ahead: Make the pistachio cake 2 days ahead. Prepare pastry cream up to 1 day ahead and store covered in the refrigerator. Assemble 4–6 hours before serving.
8. Honey Lavender Bento
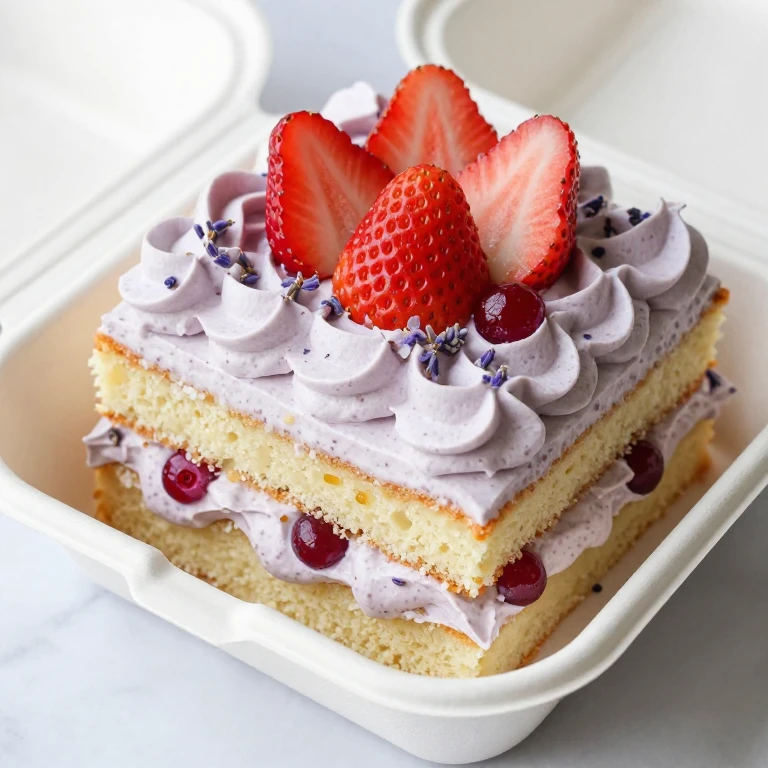
Infuse the whipped cream with a touch of lavender-honey syrup for a floral, delicate bento cake that feels like a special occasion in a box. The lavender is subtle—just enough to make people ask what that flavor is.
Flavor profile: Honey-sweet with a whisper of floral lavender; strawberry grounds the sweetness with tartness.
Best for: Spring gifting, anyone who loves subtle floral notes, bakers seeking a unique flavor profile.
Ingredients
- 1 batch vanilla cake (see entry 1)
- 1 cup heavy cream
- 2 tbsp powdered sugar
- 1 tbsp honey
- 1 tsp dried culinary lavender buds
- 2 tbsp water
- 8 oz fresh strawberries, sliced
Instructions
- Prepare and cool the vanilla cake, slicing into four thin rounds.
- Make lavender-honey syrup: combine water, honey, and lavender buds in a small saucepan. Bring to a simmer and cook for 2 minutes. Strain out the lavender buds and cool the syrup completely (about 15 minutes).
- Whip heavy cream with powdered sugar until soft peaks form. Gently fold in 1 tbsp of the cooled lavender-honey syrup, stirring just until combined—you want subtle flavor, not overpowering.
- Layer cake, lavender-honey cream, and strawberry slices. Chill for at least 1 hour.
Lavender is potent, so resist the urge to add more syrup than called for. If you do and the flavor becomes too strong, the fix is simple: fold in a bit of plain whipped cream to dilute it. The syrup keeps in the fridge for up to 1 week, so you can make it ahead and use it for multiple bento cakes.
Make-ahead: Make the lavender-honey syrup up to 1 week ahead. Prepare the lavender-honey cream and assemble the bento 4–6 hours before serving.
9. Brownie Base Bento with Strawberry Top
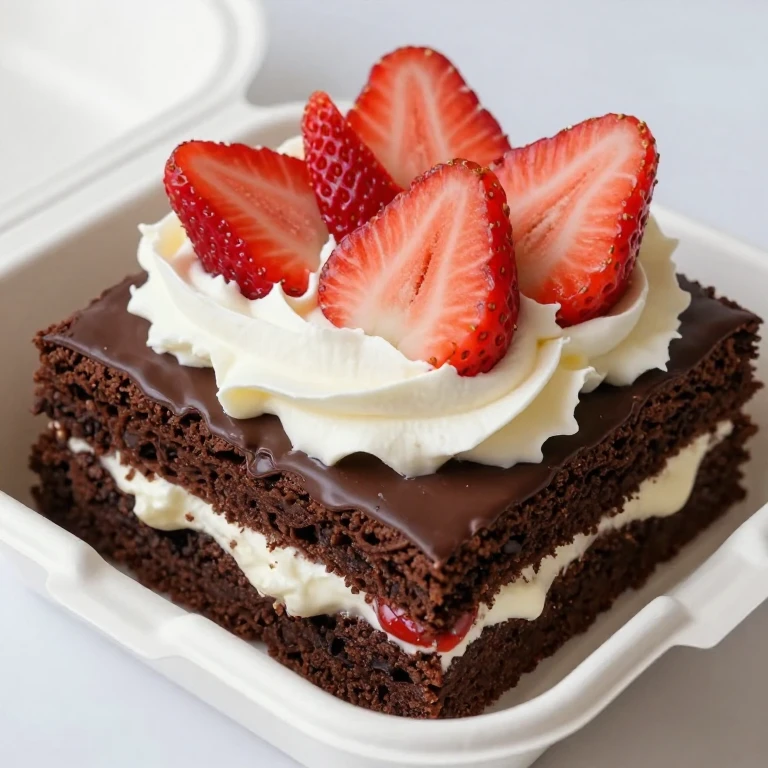
Replace the vanilla cake with a thin, fudgy brownie layer—it’s my whirl factor here, the texture contrast that makes this bento unexpected. The brownie stays just chewy enough (not dry) when you cut it thin, and the chocolate-strawberry pairing is timeless.
Flavor profile: Deep, fudgy chocolate with bright strawberry and creamy frosting; the tartness of the fruit cuts through the richness beautifully.
Best for: Chocolate lovers, anyone wanting a richer bento cake, gifting to people who think strawberry-vanilla is too simple.
Ingredients
- 4 oz dark chocolate, chopped
- 4 oz butter
- 0.75 cup sugar
- 2 large eggs
- 0.5 tsp vanilla extract
- 0.5 cup all-purpose flour
- 2 tbsp cocoa powder
- 0.25 tsp salt
- 1 cup heavy cream
- 2 tbsp powdered sugar
- 8 oz fresh strawberries, sliced
Instructions
- Preheat oven to 350°F. Melt chocolate and butter together (microwave in 20-second bursts or use a double boiler) until smooth.
- Whisk in sugar, then add eggs one at a time, whisking well after each. Stir in vanilla. Fold in flour, cocoa powder, and salt until just combined—don’t overmix.
- Pour into a greased 9-inch pan and bake for 14–16 minutes until a toothpick inserted in the center comes out with just a few moist crumbs. The brownie should still jiggle slightly in the center; it will set as it cools.
- Cool completely in the pan (about 1 hour), then slice into four thin rounds using a serrated knife.
- Whip heavy cream with powdered sugar until soft peaks form.
- Layer brownie, whipped cream, and strawberry slices. Chill for at least 1 hour before serving.
The brownie is the key here—you want it thin and just barely set, not fully baked and cake-like. The toothpick test is crucial: if it comes out clean, you’ve overbaked it and the brownie will be dry. A few moist crumbs mean it’s perfect and will stay fudgy as it cools. The observable cue is the slight jiggle in the center when you pull it from the oven.
Make-ahead: Bake the brownie up to 2 days ahead and store wrapped at room temperature. Assemble the bento 4–6 hours ahead and refrigerate.
10. Vanilla Cake with Character Stencil Topper
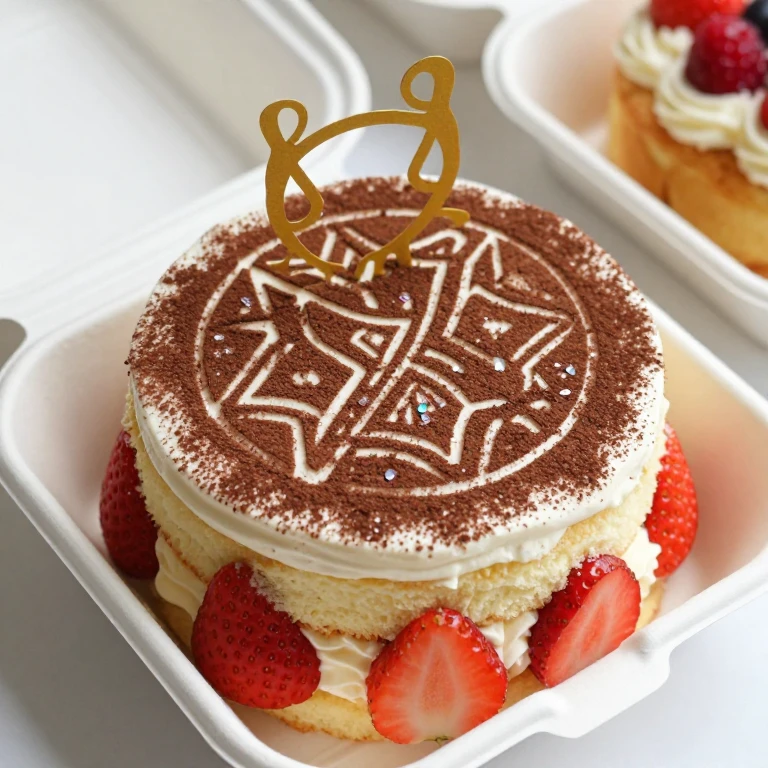
Take the classic shortcake formula and add a visual finish: a food-safe stencil (animal, flower, or geometric pattern) dusted with cocoa powder or edible glitter on top. This is pure theater—it looks hand-painted but takes 30 seconds.
Flavor profile: Classic strawberry-cream, elevated by a professional-looking finish.
Best for: Bakers who want their cakes to look editorial, gifting to kids (with fun animal stencils), anyone making a batch and wanting visual variety without flavor complexity.
Ingredients
- 1 batch vanilla cake (see entry 1)
- 1 cup heavy cream
- 2 tbsp powdered sugar
- 8 oz fresh strawberries, sliced
- 1 tbsp cocoa powder or edible glitter
- 1 food-safe stencil (animal, flower, or geometric)
Instructions
- Prepare and cool the vanilla cake, slicing into four thin rounds.
- Whip heavy cream with powdered sugar until soft peaks form.
- Layer cake, whipped cream, and strawberry slices. Chill for at least 1 hour.
- Place your stencil carefully on top of the assembled bento cake, pressing gently so it sits flush.
- Dust cocoa powder or edible glitter evenly across the stencil using a small sieve or fine-mesh strainer. Lift the stencil straight up to reveal the pattern.
- If using cocoa powder, do this step just before serving so the powder doesn’t absorb moisture and lose definition.
The stencil finish is all about precision and a steady hand. Practice on a plate first to get the angle and pressure right. If you’re using cocoa powder, wait to dust until just before boxing or serving—cocoa absorbs moisture from the cream and the pattern will blur if it sits too long. Edible glitter is more forgiving and won’t blur.
Make-ahead: Assemble the bento up to 6 hours ahead. Apply the stencil pattern 30 minutes before serving or gifting.
11. Strawberry Shortcake Bento with Whipped Mascarpone
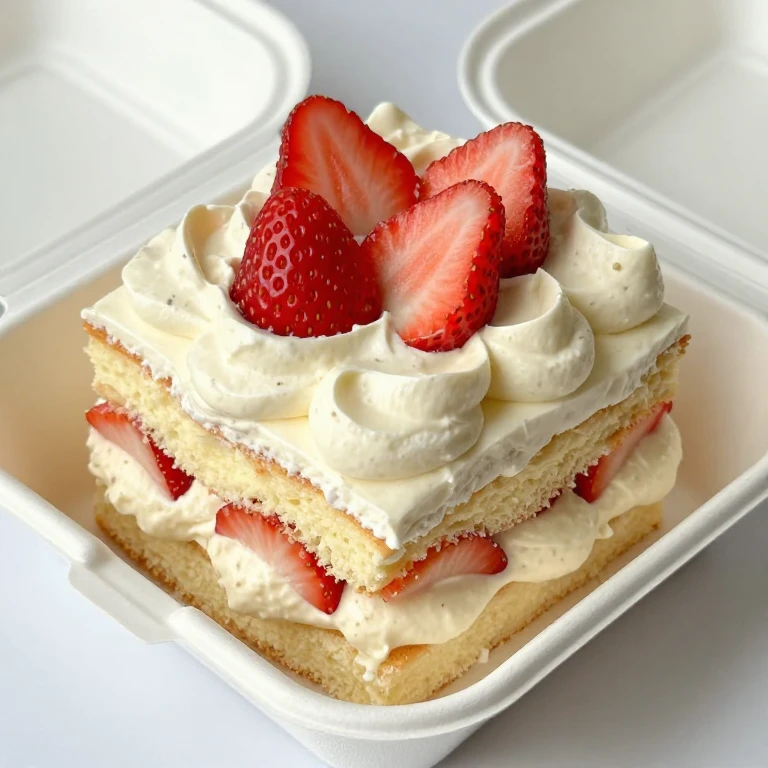
Blend mascarpone into the whipped cream for a richer, slightly tangy filling that feels more luxe than plain cream alone. The mascarpone adds body and a subtle sweetness that deepens the strawberry flavor.
Flavor profile: Creamy, slightly tangy mascarpone; fresh strawberry; tender cake—a more indulgent take on the classic.
Best for: Bakers who want a richer filling, gifting to people who love Italian desserts, anyone seeking a more sophisticated texture.
Ingredients
- 1 batch vanilla cake (see entry 1)
- 0.5 cup heavy cream
- 0.5 cup mascarpone, softened
- 2 tbsp powdered sugar
- 0.5 tsp vanilla extract
- 8 oz fresh strawberries, sliced
Instructions
- Prepare and cool the vanilla cake, slicing into four thin rounds.
- Whip heavy cream until soft peaks form. In a separate bowl, whisk mascarpone with powdered sugar and vanilla until smooth and slightly fluffy (about 1 minute).
- Gently fold the whipped cream into the mascarpone mixture until just combined—you want a light, mousse-like texture, not dense.
- Layer cake, whipped mascarpone cream, and strawberry slices. Chill for at least 1 hour.
The key is folding the cream in gently so you don’t deflate the whipped peaks. If the mascarpone is cold from the fridge, let it soften at room temperature for 15 minutes before whipping; cold mascarpone can clump and won’t fold smoothly. The observable cue is when the mixture is light, airy, and holds soft peaks.
Make-ahead: Assemble up to 6 hours ahead and refrigerate. The mascarpone cream is richer than plain whipped cream, so this bento cake stays fresh and doesn’t weep as quickly.
12. Strawberry Shortcake Bento with Balsamic Reduction
Finish the classic shortcake with a thin drizzle of aged balsamic reduction—it adds sweetness, complexity, and a sophisticated visual accent. This is the bento cake for people who love savory-sweet flavor combinations and want to impress.
Flavor profile: Sweet-tart strawberry with a deep, slightly tangy balsamic note that adds maturity and depth.
Best for: Adventurous bakers, gifting to food lovers, anyone seeking a conversation-starting flavor combination.
Ingredients
- 1 batch vanilla cake (see entry 1)
- 1 cup heavy cream
- 2 tbsp powdered sugar
- 8 oz fresh strawberries, sliced
- 0.5 cup aged balsamic vinegar
- 2 tbsp honey
Instructions
- Prepare and cool the vanilla cake, slicing into four thin rounds.
- Make balsamic reduction: combine balsamic vinegar and honey in a small saucepan. Bring to a simmer and cook, stirring occasionally, until the mixture reduces by about half and becomes syrupy (about 8–10 minutes). You’ll see it darken and thicken. Cool completely before using.
- Whip heavy cream with powdered sugar until soft peaks form.
- Layer cake, whipped cream, and strawberry slices. Chill for at least 1 hour.
- Just before serving, drizzle a thin line of balsamic reduction across the top of the assembled bento cake. A little goes a long way—the reduction is intense and sweet-tart.
The balsamic reduction is the showstopper here, so don’t skip it. The honey tempers the vinegar’s acidity and adds body to the syrup. If your reduction becomes too thick (like tar), add a few drops of water to loosen it. The observable cue is when the vinegar has reduced by half and coats the back of a spoon.
Make-ahead: Make the balsamic reduction up to 1 week ahead and store in an airtight container at room temperature. Assemble the bento 4–6 hours ahead, then drizzle the reduction just before serving.
How to Choose the Right One
If you’re short on time and want a foolproof gift, go with entry 1 (Classic Strawberry Shortcake) or entry 10 (Character Stencil Topper)—both are straightforward and look polished with minimal fuss.
If you want a flavor twist without extra technique, try entry 4 (Jam Swirl), entry 8 (Honey Lavender), or entry 12 (Balsamic Reduction). Each adds one flavor layer that transforms the base formula without requiring new skills.
If you’re comfortable with pastry techniques, go bold: entry 7 (Pistachio Cream) teaches you pastry cream, entry 6 (Matcha White Chocolate) introduces ganache, and entry 9 (Brownie Base) swaps the cake entirely for a richer base.
For gifting to chocolate lovers, entry 2 (Chocolate-Dipped Strawberry) and entry 9 (Brownie Base) are your moves. For anyone who loves visual drama, entry 3 (Ombré Pink Frosting) and entry 10 (Character Stencil) deliver editorial-looking finishes.
If you’re making a whole batch and want variety, pick three entries that use the same vanilla cake base (entries 1, 2, 4, 5, 8, 10, 11, 12) so you can bake once and assemble multiple flavor variations in one session.
FAQ
What’s the best way to cut thin cake layers for bento boxes?
I use a serrated knife and a cake leveler (or a ruler as a guide). Mark the height you want on the side of the cake with a toothpick, then use a gentle sawing motion, rotating the cake as you go, to cut horizontally. If you don’t have a leveler, chill the cake well and use a long serrated bread knife, letting the knife do the work without pressing down hard. The observable cue is when your knife glides through without resistance—that means the cake is cold enough and the blade is sharp.
How do I keep the frosting edges clean in a bento box?
The secret is working cold and using an offset spatula. Chill your assembled cake for at least 1 hour before boxing, so the frosting is firm. Use a small offset spatula to spread frosting in thin, even layers—think of it as sealing each layer rather than filling it generously. If frosting smudges, dip your spatula in hot water, wipe it dry, and smooth the edge. Work quickly before the frosting warms.
Can I make bento cakes ahead and freeze them?
Yes, but with caveats. Unfrosted cake layers freeze beautifully for up to 1 month wrapped tightly. Frosted and assembled bento cakes can freeze for up to 2 weeks, but the whipped cream or mascarpone filling can separate slightly as it thaws. For best results, assemble the bento, freeze it, then thaw it in the refrigerator overnight before serving. Buttercream and ganache fillings freeze more stably than whipped cream.
What’s the best way to transport a bento cake without damaging the topping?
Use a sturdy bakery box (4-inch square or round, depending on your cake size) and secure the cake inside with a non-slip mat or parchment paper so it doesn’t slide. If you’re adding a topping like chocolate drip, candied lemon, or a stencil pattern, do that step just before delivery so it doesn’t get jostled. Avoid stacking boxes, and keep the cake as level as possible during transport. If you’re shipping, use a cooler with an ice pack and overnight shipping to minimize thaw time.
Which entry is best for a beginner baker?
Start with entry 1 (Classic Strawberry Shortcake) or entry 11 (Whipped Mascarpone). Both use straightforward techniques: basic cake baking, whipping cream, and stacking. There’s no special equipment or advanced technique required. Once you’ve nailed the assembly and stacking discipline, you can move on to entries with flavor twists or frosting variations.
How long do bento cakes stay fresh?
Whipped cream and mascarpone fillings are best eaten within 24 hours of assembly. Buttercream and ganache fillings stay fresh for up to 2 days refrigerated. Always store bento cakes in an airtight box in the refrigerator. If you’re gifting, include a note to eat within 24 hours for the best texture and flavor. The cake itself stays moist longer than the filling, so the filling is your limiting factor.
Can I make these dairy-free or vegan?
Most entries can be adapted. Use a plant-based butter and coconut cream (the thick part from a can of coconut milk) instead of whipped cream for entries 1, 4, 8, 10, and 12. For entries with buttercream or mascarpone, use vegan butter and cashew cream (soaked cashews blended smooth). Egg-based entries (like entry 7 with pastry cream) are trickier but can use cornstarch slurry as a binder instead. The cake itself can use applesauce or aquafaba (chickpea liquid) as an egg replacer, though the crumb will be slightly different.