
A strawberry square cake should deliver clean lines and bold flavor in every bite. This version centers on a sharp-cornered structure with real strawberry puree baked into the crumb, then crowned with a glossy glaze that catches light. I’ve engineered this recipe around one core truth: proper pan prep and rotation technique give you those magazine-worthy edges, while strawberry reduction built into the batter ensures the flavor lands on the first taste, not just the frosting.
What sets this apart is the dual-layer approach. The cake itself gets strawberry puree mixed directly into the batter—no artificial extract, no watered-down flavor. Then you finish with your choice of glaze or buttercream, both designed to set clean and slice sharp. I’ve tested this through multiple bake cycles, and the difference between a sloppy square and a precise one comes down to three specific moves: parchment setup, mid-bake rotation, and a 15-minute chill before slicing.
If you’ve struggled with cake edges that crumble or a finish that looks homemade in the wrong way, this method fixes both problems. Let’s build a strawberry square cake that looks as intentional as it tastes.
Quick Snapshot
- Prep Time: 20 minutes
- Cook Time: 28-32 minutes
- Total Time: 50 minutes plus cooling
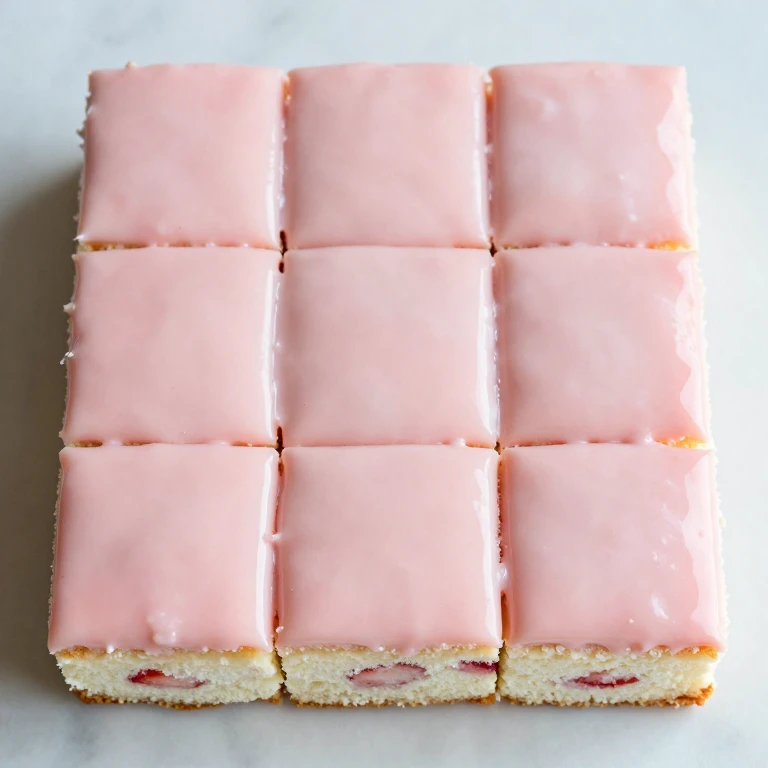
- Yield: 9 squares
- Texture: Tender crumb with glossy, set finish
- Flavor Profile: Bright strawberry, subtle vanilla, clean sweetness
- Skill Level: Intermediate
Why This Recipe Works
Strawberry flavor in cake fails when it relies on extract or when the puree waters down the batter. I solve this by reducing fresh strawberries to a thick paste before folding them in. That concentration means you taste strawberry on the first bite, not buried under butter and sugar. The ratio here is precise: 6 ounces of fresh berries down to about 3 tablespoons of puree, which adds moisture without compromising structure.
The square shape demands a specific pan and prep strategy. Using a 9-inch square cake pan lined with parchment on all four sides—sides extending above the rim—gives you a built-in guide for sharp edges. Mid-bake rotation at the 15-minute mark ensures even rise and prevents the edges from setting too fast while the center catches up. This single move eliminates doming and uneven browning.
The glaze finish is thin enough to set smooth but thick enough to hold a clean line where it meets the cake edge. I use a 2:1 ratio of powdered sugar to strawberry reduction, which gives you that glossy, professional look without the heaviness of traditional frosting. If you prefer buttercream, the same strawberry reduction method keeps the color natural and the flavor bold.
Ingredient Overview
- Strawberry Reduction:
- 8 ounces fresh strawberries, hulled and halved
- 2 tablespoons granulated sugar
- 1 tablespoon fresh lemon juice
- Cake:
- 1 3/4 cups all-purpose flour
- 1 1/2 teaspoons baking powder
- 1/4 teaspoon kosher salt
- 6 tablespoons unsalted butter, softened
- 3/4 cup granulated sugar
- 2 large eggs, room temperature
- 1/2 teaspoon vanilla extract
- 1/4 cup whole milk
- Glaze:
- 1 1/2 cups powdered sugar, sifted
- 3 tablespoons strawberry reduction (reserved from above)
- 1 tablespoon heavy cream
- Pinch of kosher salt
The strawberry reduction is your anchor flavor. I make this first by simmering berries with sugar and lemon juice for 8-10 minutes until the mixture thickens and the berries break down completely. You’ll use 3 tablespoons in the cake batter and another 3 tablespoons in the glaze. The lemon juice isn’t about tartness—it brightens the strawberry and keeps the puree from tasting flat or jammy.
For the cake itself, use unsalted butter and bring it to true room temperature (68-70°F). Cold butter won’t cream properly and you’ll lose the light, tender crumb this recipe depends on. The eggs matter too—room temperature eggs emulsify faster and incorporate more air into the batter. If your strawberry reduction is still warm when you fold it in, let it cool to room temperature first so it doesn’t deflate the batter.
The glaze ratio is forgiving but specific. If your reduction is thicker than expected, add another 1/2 tablespoon of cream. If it’s too thin, add another 2 tablespoons of powdered sugar. You’re looking for a consistency that pours slowly and sets to a matte finish within 2-3 minutes on a cool cake.
Whirl Hook
This strawberry square cake centers on one signature move: building strawberry flavor directly into the crumb with a fresh puree reduction, then finishing with a glossy glaze that sets clean and sharp. The texture contrast is tender cake against a smooth, set finish—no crumbs, no mess, pure precision.
Flavor Spin
The core twist here is using reduced strawberry puree instead of extract or jam. When you cook down fresh berries with sugar and lemon, you concentrate the flavor and eliminate water content. That means the strawberry flavor stays bold throughout the cake, and the glaze becomes an extension of that same flavor rather than a competing element. I chose vanilla as the supporting note—it amplifies the strawberry without fighting it. The lemon juice is the hidden player: it prevents the strawberry from tasting muted or one-dimensional.
Whirl Factor
Here’s what makes this cake work as a finished piece: the combination of tender, strawberry-studded crumb and a glossy, smooth glaze that sets with clean edges. The texture contrast is immediate—soft cake against a slight resistance from the glaze. The flavor lands in layers: initial strawberry brightness from the glaze, then the deeper, more complex strawberry flavor from the cake itself. This is a cake that looks intentional and tastes bold.
Step-by-Step Instructions
Make the Strawberry Reduction
- Hull and halve 8 ounces of fresh strawberries. Place them in a small saucepan with 2 tablespoons granulated sugar and 1 tablespoon fresh lemon juice.
- Bring to a simmer over medium heat, stirring occasionally. The berries will release liquid, then the mixture will begin to thicken. Cook for 8-10 minutes until the berries have broken down completely and the liquid has reduced by about half. The mixture should coat the back of a spoon. Let cool completely before using—this takes about 15 minutes.
- Measure out 3 tablespoons for the cake batter and set aside the remaining 3 tablespoons for the glaze.
Prepare the Pan and Preheat
- Preheat your oven to 350°F. Line a 9-inch square cake pan with parchment paper, letting the paper extend 1-2 inches above all four sides. This creates a guide for sharp edges and makes removal clean. Lightly spray the parchment with nonstick spray.
Mix Dry Ingredients
- In a medium bowl, whisk together 1 3/4 cups all-purpose flour, 1 1/2 teaspoons baking powder, and 1/4 teaspoon kosher salt. Set aside.
Cream Butter and Sugar
- In a large bowl, beat 6 tablespoons softened unsalted butter and 3/4 cup granulated sugar together on medium-high speed for 3-4 minutes. The mixture should be light, fluffy, and noticeably paler than when you started. This is where you build airiness into the cake—don’t rush this step.
Add Eggs and Vanilla
- Add 2 room-temperature eggs one at a time, beating on medium speed for about 45 seconds after each addition. The batter should stay smooth and emulsified—if it looks broken or grainy, you’re beating too fast or your eggs were too cold. Add 1/2 teaspoon vanilla extract and beat for 30 seconds.
Alternate Dry and Wet Ingredients
- Add one-third of the dry ingredients to the butter mixture and beat on low speed until just combined, about 20 seconds. Add half of the 1/4 cup milk and beat on low for another 20 seconds. Repeat: one-third dry, remaining milk, then final one-third dry. After the last addition, beat for just 10 seconds—overworking at this stage toughens the crumb.
- Fold in the 3 tablespoons of cooled strawberry reduction with a rubber spatula using about 12-15 gentle folds. You want to see streaks of strawberry throughout the batter, not a uniform pink color. A few streaks of white batter are fine.
Bake
- Pour the batter into the prepared pan, using an offset spatula to spread it into an even layer. Tap the pan gently on the counter three times to release any large air pockets.
- Bake for 15 minutes, then rotate the pan 180 degrees. This rotation prevents the edges from setting too fast while the center catches up. Continue baking for another 13-17 minutes. The cake is done when a toothpick inserted in the center comes out with just a few moist crumbs—not wet batter, but not completely clean either. The edges should pull slightly away from the sides of the pan.
- Let the cake cool in the pan for 10 minutes, then use the parchment overhang to lift it out onto a wire rack. Cool completely at room temperature—this takes about 1 hour. Do not attempt to glaze a warm cake; the glaze will melt and run.
Make and Apply the Glaze
- In a small bowl, whisk together 1 1/2 cups sifted powdered sugar, 3 tablespoons reserved strawberry reduction, 1 tablespoon heavy cream, and a pinch of kosher salt. Whisk until smooth and completely lump-free. The glaze should pour slowly and hold a line—if it’s too thick, add 1/2 tablespoon more cream; if too thin, add 2 tablespoons more powdered sugar.
- Pour the glaze over the cooled cake, letting it flow naturally to the edges. Use an offset spatula to spread it into an even, thin layer. The glaze should be about 1/8 inch thick and completely cover the top surface. Let it set at room temperature for 2-3 minutes before moving to the next step.
Chill and Slice
- Transfer the glazed cake to the refrigerator for 15 minutes. This allows the glaze to set completely and makes clean slicing possible. A warm glaze will smear; a set glaze will break cleanly.
- Using a long, sharp serrated knife dipped in hot water and wiped dry between each cut, slice the cake into 9 equal squares (3 rows by 3 columns). The hot knife glides through the glaze without dragging. If you notice the glaze cracking at the edges, your knife is too warm—let it cool for 10 seconds between cuts.
Pro Tips for Best Results
- Strawberry Reduction Timing: Make your reduction at least 30 minutes before you start the cake so it has time to cool completely. A warm reduction will break the emulsion in your batter and you’ll end up with a greasy, dense crumb. I always make this first thing, then move on to measuring and prepping everything else.
- Pan Prep is Non-Negotiable: The parchment overhang is what gives you sharp edges. If you skip it and just grease the pan, the edges will bake faster and you’ll get rounded corners. Spend the extra 30 seconds lining the pan properly—it’s the difference between a homemade cake and a finished one.
- Mid-Bake Rotation: This single move prevents doming and uneven browning. At 15 minutes, rotate the pan 180 degrees. If you forget this step, the edges will be darker than the center and the cake will dome slightly in the middle, which throws off your slicing geometry.
- Knife Temperature for Slicing: A hot knife is your secret weapon. Dip a long serrated knife in hot water, wipe it completely dry, and use one smooth downward motion per cut. Sawing back and forth drags the glaze and creates crumbs. One clean cut per side gives you sharp corners every time.
- Glaze Thickness Matters: A thin glaze (about 1/8 inch) sets smooth and clean. A thick glaze stays soft and smears when you slice. If your glaze is too thin, it’ll look patchy and unfinished. Aim for that middle ground where it pours easily but sets with a matte finish.
- Room Temperature Ingredients Are Real: Cold eggs and cold butter won’t emulsify properly, and you’ll end up with a dense, tight crumb. Pull your eggs and butter out 30 minutes before you start baking. This single step improves your texture more than any other adjustment.
Spin Options
Chocolate-Strawberry Square Cake
Replace 1/4 cup of the all-purpose flour with unsweetened cocoa powder and add 1/4 teaspoon instant espresso powder to the dry ingredients. The cocoa deepens the strawberry flavor and adds a slight bittersweet note. Use the same strawberry glaze on top, and the chocolate-strawberry combination is classic and bold. The texture stays the same—tender and clean—but the flavor becomes more complex.
Buttercream Finish Instead of Glaze
If you prefer a thicker, more substantial finish, make a strawberry buttercream: beat 4 tablespoons softened butter with 1 cup powdered sugar, then fold in 2 tablespoons of the strawberry reduction and a pinch of salt. Spread it thin over the cooled cake—about 1/4 inch—and chill for 20 minutes before slicing. The buttercream is richer and more forgiving than glaze, and it holds shape better if your kitchen is warm.
Vanilla Cake with Strawberry Glaze Only
If you want to keep the cake itself more neutral, skip the strawberry reduction in the batter and use the full amount in the glaze. Increase the vanilla extract to 1 teaspoon. This version lets the glaze be the star, and the cake becomes a clean, tender canvas. The flavor is still bold because the glaze is thick with strawberry, but the crumb is more versatile for pairing with other toppings.
Whirl Finish
Serve this cake cold or at room temperature—the glaze sets best when the cake has cooled completely. A slice with cold milk or hot coffee is the straightforward move. For something elevated, plate a square on a bed of fresh strawberries and a dollop of whipped cream, then drizzle a tiny amount of melted dark chocolate across the plate. The cake holds its shape, the glaze stays glossy, and every element stays distinct.
Store the finished cake in an airtight container in the refrigerator for up to 3 days. The glaze protects the crumb from drying out. If you want to freeze it, wrap the unglazed cake layers individually in plastic wrap and freeze for up to 2 weeks, then glaze after thawing. Do not freeze the glazed cake—the glaze will crack and the texture will suffer.
Serving Suggestions
The simplest serve is a cold slice with black coffee or cold milk. The strawberry flavor is bold enough to stand alone, and you don’t need competing flavors. If you want to expand the moment, plate the square on a small plate with a few fresh strawberries on the side and a small dollop of whipped cream. The fresh berries echo the cake flavor and add a textural contrast—soft cake against the slight resistance of fresh fruit.
For an elevated option, set the cake square on a thin pool of strawberry coulis (fresh strawberries blended smooth with a tablespoon of powdered sugar), add a quenelle of vanilla bean ice cream on top, and finish with a light dusting of freeze-dried strawberry powder. This turns a simple cake into a composed dessert that works for dinner parties or special occasions.
Storage & Reheating
Keep the finished cake in an airtight container at room temperature for up to 8 hours, though the glaze sets better and the cake stays fresher if you refrigerate it. In the refrigerator, it keeps for up to 3 days. The glaze acts as a barrier and prevents the crumb from drying out. The cake actually tastes better cold—the glaze has a slight snap and the crumb is tender without being fragile.
If you want to freeze the cake, do it before glazing. Wrap the cooled, unglazed cake in plastic wrap and then in foil, and freeze for up to 2 weeks. Thaw at room temperature for about 2 hours, then glaze and chill. Freezing a glazed cake causes the glaze to crack and the texture to suffer, so plan accordingly.
To reheat a slice (if you’re serving it warm, which I don’t recommend but understand the appeal), wrap it loosely in foil and warm it in a 300°F oven for about 8 minutes. The glaze will soften slightly and the crumb will be tender. It won’t be as clean to slice once warmed, so plan to eat it with a fork rather than picking it up.
FAQ
Can I use frozen strawberries for the reduction?
Yes, but thaw them completely and drain off excess liquid first. Frozen berries release more water than fresh ones, so you’ll need to simmer the reduction a bit longer—aim for 12-14 minutes instead of 8-10. The final texture should still be thick enough to coat the back of a spoon. The flavor is slightly less bright than fresh, but still bold enough to carry the cake.
What if my glaze is too thin and won’t set?
Add 2 tablespoons more powdered sugar and whisk until smooth. If it’s still too thin, add another tablespoon. The glaze should pour slowly—if you tilt the bowl, it should take 2-3 seconds to flow to the edge. Too thin and it runs off the cake; too thick and it won’t spread evenly. You’re looking for that middle consistency.
Can I make this cake a day ahead?
Yes. Bake the cake, cool it completely, then wrap it tightly in plastic wrap and store it at room temperature for up to 24 hours. Glaze it just before serving so the glaze is glossy and fresh-looking. If you glaze it ahead, cover it loosely with plastic wrap so the glaze doesn’t dry out completely, but it won’t have that fresh, shiny finish.
Why did my cake dome in the middle?
You likely skipped the mid-bake rotation or didn’t rotate it at the right time. The edges bake faster than the center, so if you don’t rotate the pan, the edges set while the center is still rising, which forces the center upward. Rotate at the 15-minute mark every time. If your cake domed, you can still slice it—just adjust your knife angle slightly to account for the dome.
Can I use a different size pan?
You can, but the baking time and yield will change. An 8-inch square pan will give you a thicker cake and longer bake time (35-40 minutes). A 10-inch square will give you a thinner cake and shorter bake time (22-26 minutes). The key is that the batter should be about 1 1/2 inches deep in the pan. Adjust the oven temperature or time as needed, and always use the toothpick test to confirm doneness.
What’s the difference between this glaze and a frosting?
Glaze is thin, pours easily, and sets to a smooth, glossy finish. Frosting is thick, spreads with a spatula, and holds peaks. This recipe uses glaze because it creates that clean, professional look and doesn’t add heaviness to the cake. If you prefer frosting, use the buttercream variation—it’s thicker, more substantial, and you can add decorative piping if you want.
Can I add fresh strawberry slices on top before glazing?
I don’t recommend it. Fresh strawberries release moisture that will soften the glaze and make it look patchy. If you want fresh berries on top, add them after the glaze has set completely, just before serving. Or use freeze-dried strawberry pieces, which add texture and flavor without releasing moisture.
Strawberry Square Cake With Sharp Corners and Glaze
Ingredients
Method
- Hull and halve 8 ounces of fresh strawberries. Place them in a small saucepan with 2 tablespoons granulated sugar and 1 tablespoon fresh lemon juice.
- Bring to a simmer over medium heat, stirring occasionally. The berries will release liquid, then the mixture will begin to thicken. Cook for 8-10 minutes until the berries have broken down completely and the liquid has reduced by about half. The mixture should coat the back of a spoon. Let cool completely before using—this takes about 15 minutes.
- Measure out 3 tablespoons for the cake batter and set aside the remaining 3 tablespoons for the glaze.
- Preheat your oven to 350°F. Line a 9-inch square cake pan with parchment paper, letting the paper extend 1-2 inches above all four sides. This creates a guide for sharp edges and makes removal clean. Lightly spray the parchment with nonstick spray.
- In a medium bowl, whisk together 1 3/4 cups all-purpose flour, 1 1/2 teaspoons baking powder, and 1/4 teaspoon kosher salt. Set aside.
- In a large bowl, beat 6 tablespoons softened unsalted butter and 3/4 cup granulated sugar together on medium-high speed for 3-4 minutes. The mixture should be light, fluffy, and noticeably paler than when you started. This is where you build airiness into the cake—don't rush this step.
- Add 2 room-temperature eggs one at a time, beating on medium speed for about 45 seconds after each addition. The batter should stay smooth and emulsified—if it looks broken or grainy, you're beating too fast or your eggs were too cold. Add 1/2 teaspoon vanilla extract and beat for 30 seconds.
- Add one-third of the dry ingredients to the butter mixture and beat on low speed until just combined, about 20 seconds. Add half of the 1/4 cup milk and beat on low for another 20 seconds. Repeat: one-third dry, remaining milk, then final one-third dry. After the last addition, beat for just 10 seconds—overworking at this stage toughens the crumb.
- Fold in the 3 tablespoons of cooled strawberry reduction with a rubber spatula using about 12-15 gentle folds. You want to see streaks of strawberry throughout the batter, not a uniform pink color. A few streaks of white batter are fine.
- Pour the batter into the prepared pan, using an offset spatula to spread it into an even layer. Tap the pan gently on the counter three times to release any large air pockets.
- Bake for 15 minutes, then rotate the pan 180 degrees. This rotation prevents the edges from setting too fast while the center catches up. Continue baking for another 13-17 minutes. The cake is done when a toothpick inserted in the center comes out with just a few moist crumbs—not wet batter, but not completely clean either. The edges should pull slightly away from the sides of the pan.
- Let the cake cool in the pan for 10 minutes, then use the parchment overhang to lift it out onto a wire rack. Cool completely at room temperature—this takes about 1 hour. Do not attempt to glaze a warm cake; the glaze will melt and run.
- In a small bowl, whisk together 1 1/2 cups sifted powdered sugar, 3 tablespoons reserved strawberry reduction, 1 tablespoon heavy cream, and a pinch of kosher salt. Whisk until smooth and completely lump-free. The glaze should pour slowly and hold a line—if it's too thick, add 1/2 tablespoon more cream; if too thin, add 2 tablespoons more powdered sugar.
- Pour the glaze over the cooled cake, letting it flow naturally to the edges. Use an offset spatula to spread it into an even, thin layer. The glaze should be about 1/8 inch thick and completely cover the top surface. Let it set at room temperature for 2-3 minutes before moving to the next step.
- Transfer the glazed cake to the refrigerator for 15 minutes. This allows the glaze to set completely and makes clean slicing possible. A warm glaze will smear; a set glaze will break cleanly.
- Using a long, sharp serrated knife dipped in hot water and wiped dry between each cut, slice the cake into 9 equal squares (3 rows by 3 columns). The hot knife glides through the glaze without dragging. If you notice the glaze cracking at the edges, your knife is too warm—let it cool for 10 seconds between cuts.