
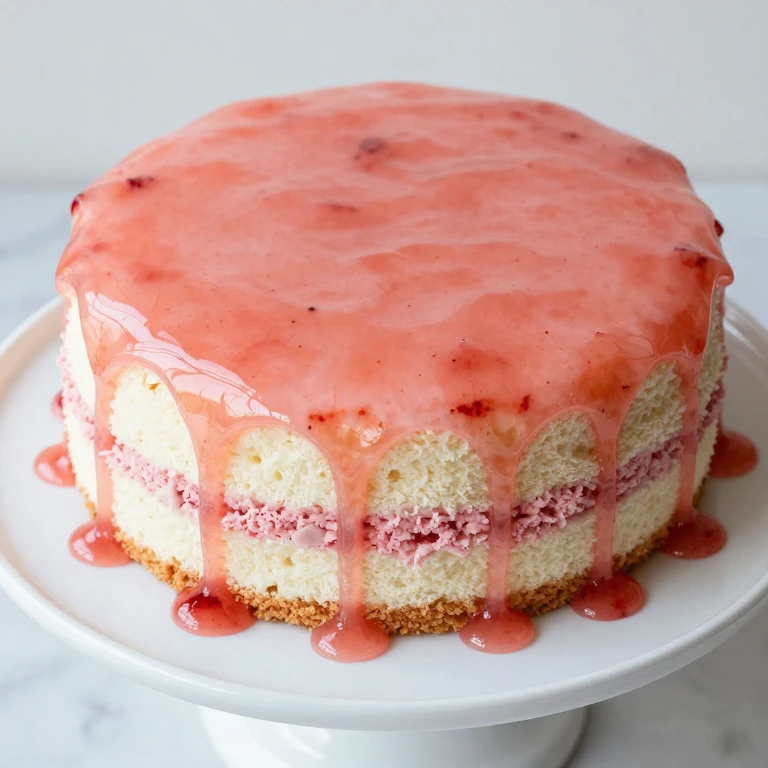
This strawberry glaze cake recipe delivers a glossy, naturally pink finish that looks professionally done but comes together in your home kitchen. I’ve built this around a tender vanilla-strawberry cake topped with a reduced strawberry puree glaze that sets to a mirror-like shine without any artificial coloring. You’ll hit specific temperatures to control thickness, prevent weeping, and achieve clean slices every time—plus I’m sharing a mirror glaze option if you want maximum visual impact and a simple powdered sugar variation for speed.
Why You’ll Love This
- Glossy finish with natural strawberry color—no food dye needed
- Temperature-controlled glaze that doesn’t slip or weep off the cake
- Clean slices every time when you chill to the right consistency
- Tender crumb with real strawberry flavor baked into the cake itself
- Done in under 2 hours from start to plated dessert
- Flexible finish: mirror glaze for showstopping shine or powdered sugar glaze for simplicity
Ingredient Breakdown
For the Cake
- 1 3/4 cups all-purpose flour
- 1 1/2 teaspoons baking powder
- 1/2 teaspoon salt
- 1/2 cup unsalted butter, softened
- 1 cup granulated sugar
- 2 large eggs
- 1 teaspoon vanilla extract
- 1/2 cup sour cream
- 1/2 cup fresh strawberry puree (about 8-10 medium berries, blended smooth)
For the Strawberry Glaze
- 1 1/2 cups fresh strawberry puree (about 12-14 medium berries)
- 2 tablespoons cornstarch
- 1/4 cup water
- 2 tablespoons granulated sugar
- 1 tablespoon lemon juice
- Pinch of salt
Optional: For Mirror Glaze Version
- 1 cup powdered sugar
- 2 tablespoons heavy cream
- 1/2 teaspoon vanilla extract
The strawberry puree is the star here—fresh berries blended smooth give you natural color and real flavor. If you’re using frozen strawberries, thaw and drain them well before blending to avoid excess water in your glaze.
Whirl Hook
The signature move: I reduce strawberry puree with cornstarch to lock in color and create a glaze that sets firm enough for clean slices but stays glossy on top. This is where temperature control matters—cook to 215-220°F and you get a glaze that clings to the cake without sliding or weeping. Skip that step and you’ll have a runny finish; overshoot it and the glaze turns dull and thick.
Flavor Spin
This cake is built on a vanilla-strawberry base where the berries go into the batter itself, not just the topping. That means every slice tastes like strawberry, not just the frosting. The glaze amplifies that flavor with concentrated, reduced puree that’s cooked down to intensify the taste without diluting it with extra liquid.
Whirl Factor
Flavor + Texture Contrast: Tender, moist crumb with a strawberry swirl running through it, topped with a glossy, firm-set glaze that cracks slightly when you cut into it. The glaze has a light jam-like texture that holds its shape but isn’t rubbery—that’s the texture payoff when you nail the temperature.
Step-by-Step
- Preheat your oven to 350°F and line a 9-inch round cake pan with parchment paper, then butter the sides.
- Whisk together flour, baking powder, and salt in a medium bowl; set aside.
- Beat softened butter and sugar together on medium speed for 2-3 minutes until light and fluffy, scraping the bowl halfway through.
- Add eggs one at a time, beating well after each addition, then mix in vanilla extract.
- Alternate adding the dry mixture and sour cream, starting and ending with dry ingredients—three additions of each, mixing on low speed until just combined after each addition.
- Fold in the strawberry puree by hand with a spatula using 8-10 gentle strokes until the color is even but not overmixed.
- Pour batter into your prepared pan and smooth the top with an offset spatula.
- Bake for 28-32 minutes until a toothpick inserted in the center comes out with a few moist crumbs (the cake will continue cooking slightly as it cools).
- Let the cake cool in the pan for 12-15 minutes, then turn it out onto a wire rack to cool completely—this takes about 45 minutes to 1 hour.
- While the cake cools, make your glaze: strain the strawberry puree through a fine-mesh sieve to remove seeds, pressing gently to extract all liquid.
- Whisk cornstarch and water together in a small bowl until smooth with no lumps.
- Pour the strained puree into a heavy-bottomed saucepan, add sugar, lemon juice, and salt, and bring to a boil over medium-high heat, stirring occasionally.
- Once boiling, reduce heat to medium and stir in the cornstarch mixture slowly, whisking constantly to avoid lumps.
- Cook for 3-4 minutes, stirring frequently, until the glaze thickens and turns translucent (you should see it coat the back of a spoon).
- Insert a candy thermometer and watch the temperature climb to 215-220°F—this is your target zone for a glaze that sets firm but stays glossy.
- Remove from heat and let the glaze cool to 90-100°F (about 15-20 minutes), stirring occasionally to release steam and prevent a skin from forming.
- Once the cake is completely cool and the glaze has reached the right temperature, place the cake on a serving plate or cake stand.
- Pour the glaze over the top of the cake, letting it pool slightly in the center and drip down the sides naturally, or use an offset spatula to spread it evenly.
- Chill the cake in the refrigerator for 20-30 minutes until the glaze is set and firm to the touch.
Visual Cooking Timeline
- 0:00 — Preheat oven to 350°F, prepare pan with parchment and butter
- 0:05 — Whisk dry ingredients together, set aside
- 0:08 — Cream butter and sugar until light and fluffy
- 0:15 — Add eggs and vanilla, then alternate dry and wet ingredients
- 0:20 — Fold in strawberry puree, pour into pan
- 0:22 — Cake into oven
- 0:50 — Cake out of oven, cooling begins on rack
- 1:35 — Cake fully cooled, glaze ready to pour
- 1:40 — Glaze poured and chilling
- 2:10 — Glaze set, cake ready to slice and serve
Spin Options
Mirror Glaze Version (High Shine)
If you want a professional mirror finish, skip the strawberry glaze and make a simple mirror coating: whisk 1 cup powdered sugar, 2 tablespoons heavy cream, and 1/2 teaspoon vanilla extract until smooth. Brush or pour this over the top of the cooled cake, letting it drip naturally down the sides. The strawberry puree glaze becomes a filling layer between the cake and the mirror coat—spread it thin on top of the cake, chill for 10 minutes, then apply the mirror glaze on top. This gives you the strawberry flavor baked in, a glossy strawberry layer, and a bright white mirror finish that catches the light.
Powdered Sugar Glaze Version (Speed Route)
For a faster finish with the same strawberry flavor, skip the cooked glaze entirely and make a simple powdered sugar glaze: whisk 1 1/2 cups powdered sugar, 2-3 tablespoons strawberry puree (fresh or frozen, thawed), and 1/2 teaspoon vanilla extract until smooth. Drizzle or spread over the cooled cake. This sets in about 10 minutes and gives you a sweet, strawberry-flavored finish without the temperature management. The texture won’t be as glossy, but the flavor is still there.
Cream Cheese Frosting Base
If you prefer a frosting cake, frost the cooled cake with a simple cream cheese frosting (8 oz cream cheese, 1/4 cup butter, 1 1/2 cups powdered sugar, 1/2 teaspoon vanilla), then top with the reduced strawberry glaze poured over the frosting. The glaze will sink slightly into the frosting and create a swirled, marbled effect.
Whirl Finish
Serving: Slice with a hot, wet knife (dip in hot water and wipe dry between cuts) to get clean slices without the glaze cracking. The glaze will have a slight give when you cut, then hold its shape on the plate. Serve at room temperature or chilled—both work, but chilled glaze has more snap to it.
Storage: Keep the cake covered at room temperature for up to 2 days, or refrigerate for up to 4 days. The glaze stays glossy and doesn’t weep if you’ve hit the right temperature. You can also freeze the unfrosted cake for up to 3 weeks, then glaze it fresh when you’re ready to serve.
Quick Tips
- Strain your strawberry puree through a fine-mesh sieve before cooking the glaze—seeds get in the way of a smooth finish and can affect how the glaze sets.
- Don’t skip the thermometer when cooking the glaze; 215-220°F is the sweet spot between runny and rubbery. Too low and it weeps, too high and it loses its glossy sheen.
- Cool the glaze to 90-100°F before pouring—hot glaze will slide right off the cake, cold glaze will be too thick to spread smoothly.
- If your glaze is too thick after cooling, warm it gently over low heat for 30-45 seconds and stir to loosen it, then let it cool again.
- Fresh strawberries give you the brightest natural color; frozen strawberries work too but may be slightly darker after cooking.
Substitution Ideas
- Raspberry puree → Strawberry puree — Use the same weight of raspberry puree for a deeper, tangier glaze. Cook time stays the same; taste at 215°F and adjust sweetness if needed.
- Sour cream → Greek yogurt — Use the same amount of plain Greek yogurt for a slightly tangier crumb. The texture stays tender; don’t overmix.
- Vanilla cake base → Almond cake base — Replace 1/2 teaspoon vanilla with 1/4 teaspoon almond extract for a subtle almond note that pairs beautifully with strawberry. No other changes needed.
- All-purpose flour → Cake flour — Use 2 cups cake flour for an even more tender crumb. Reduce baking powder to 1 teaspoon. Bake time may drop by 2-3 minutes.
- Strawberry glaze → Strawberry jam glaze — Warm 1 cup good-quality strawberry jam with 1 tablespoon water and 1/2 teaspoon lemon juice, strain through a sieve, and use as your glaze. No cooking required; chill until set.
Make-Ahead Options
Day Before: Bake the cake completely, cool, wrap tightly in plastic wrap, and store at room temperature. Make the strawberry glaze, cool it, transfer to an airtight container, and refrigerate. The glaze will thicken slightly when cold—gently warm it over low heat for 30-45 seconds before pouring if needed.
2 Hours Before: If the cake is already baked and cooled, make the glaze and let it cool to room temperature. Pour it over the cake 30 minutes before serving so it has time to set but stays fresh.
Morning Of: Prepare the strawberry puree (blend and strain) and store it in the fridge in an airtight container. Make the cake and glaze in the afternoon, giving yourself time for proper cooling between steps.
What NOT to Make Ahead: Don’t glaze the cake more than 4-6 hours before serving if you’re keeping it at room temperature—the glaze stays glossy but the cake can dry out. For longer storage, keep the glazed cake refrigerated and bring to room temperature 30 minutes before serving.
FAQ
Why is my glaze weeping or sliding off the cake?
Your glaze didn’t reach 215-220°F, so it’s still too thin. Cook it longer over medium heat, stirring constantly, and use a candy thermometer to hit the target. If it’s already cooled, reheat gently and cook to the right temperature.
Can I make this cake gluten-free?
Yes—use a 1:1 gluten-free flour blend in place of all-purpose flour. The crumb won’t be quite as tender, but it will still be moist. Reduce baking powder to 1 teaspoon to avoid a gummy texture.
How do I get clean slices without the glaze cracking?
Use a hot, wet knife—dip it in hot water, wipe it dry, then cut. The heat helps the glaze release cleanly. Wipe the knife between each cut. If the glaze has been refrigerated, let it come to room temperature first for easier slicing.
What if I don’t have fresh strawberries?
Frozen strawberries work perfectly—thaw them, drain any excess liquid, and blend smooth. The color may be slightly darker than fresh, but the flavor is just as strong. You’ll need about 1 1/2 cups thawed berries for the glaze.
Can I double this recipe?
Yes—double all cake ingredients and bake in two 9-inch pans for 28-32 minutes, or one 9×13-inch pan for 32-35 minutes. Double the glaze ingredients and cook to the same temperature. Assembly and chilling times stay the same.
How long does the glaze stay glossy?
When stored properly at room temperature with the cake covered, the glaze stays glossy for 2 days. Refrigerated, it holds for 4 days. The glaze doesn’t dry out or become dull if you’ve hit the right temperature during cooking.
Can I use this glaze on other cakes?
Absolutely—this glaze works on vanilla, almond, or even chocolate cakes. The strawberry flavor pairs especially well with white or vanilla cakes, but it’s flexible. Use the same temperature targets and cooling method.
Strawberry Glaze Cake With Glossy, Naturally Pink Finish
Ingredients
Method
- Preheat your oven to 350°F and line a 9-inch round cake pan with parchment paper, then butter the sides.
- Whisk together flour, baking powder, and salt in a medium bowl; set aside.
- Beat softened butter and sugar together on medium speed for 2-3 minutes until light and fluffy, scraping the bowl halfway through.
- Add eggs one at a time, beating well after each addition, then mix in vanilla extract.
- Alternate adding the dry mixture and sour cream, starting and ending with dry ingredients—three additions of each, mixing on low speed until just combined after each addition.
- Fold in the strawberry puree by hand with a spatula using 8-10 gentle strokes until the color is even but not overmixed.
- Pour batter into your prepared pan and smooth the top with an offset spatula.
- Bake for 28-32 minutes until a toothpick inserted in the center comes out with a few moist crumbs.
- Let the cake cool in the pan for 12-15 minutes, then turn it out onto a wire rack to cool completely, about 45 minutes to 1 hour.
- While the cake cools, strain the strawberry puree through a fine-mesh sieve to remove seeds, pressing gently to extract all liquid.
- Whisk cornstarch and water together in a small bowl until smooth with no lumps.
- Pour the strained puree into a heavy-bottomed saucepan, add sugar, lemon juice, and salt, and bring to a boil over medium-high heat, stirring occasionally.
- Once boiling, reduce heat to medium and stir in the cornstarch mixture slowly, whisking constantly to avoid lumps.
- Cook for 3-4 minutes, stirring frequently, until the glaze thickens and turns translucent.
- Insert a candy thermometer and cook until the temperature reaches 215-220°F, then remove from heat.
- Let the glaze cool to 90-100°F, about 15-20 minutes, stirring occasionally to release steam and prevent a skin from forming.
- Once the cake is completely cool and the glaze has reached the right temperature, place the cake on a serving plate or cake stand.
- Pour the glaze over the top of the cake, letting it pool slightly in the center and drip down the sides naturally.
- Chill the cake in the refrigerator for 20-30 minutes until the glaze is set and firm to the touch.