
I’ve found that breakfast doesn’t have to be complicated—especially when you’ve got eggs and a little prep time on your side. These 14 make-ahead egg breakfasts are built around the idea that a solid morning meal should be ready to grab, bold in flavor, and actually exciting to eat. From sheet-pan squares you can slice all week to freezer-friendly wraps that thaw while you’re getting ready, each recipe here has a signature twist that keeps breakfast from feeling like the same thing twice.
What makes these recipes bookmark-worthy is the range: some take 20 minutes, others are true weekend projects. Some are texture-driven (crispy, creamy, soft all in one bite), others lean into flavor spins that transform a basic egg into something you’ll actually want to eat at 7 a.m. I’ve built this collection so you can mix and match throughout the week, switching sauces, swapping vegetables, and never getting bored.
What You’ll Find in This List
This collection spans skill levels and occasions. You’ll find no-fuss boiled egg snacks perfect for beginners, sheet-pan bakes that feed a crowd or stock your freezer, and component-based preps where you cook eggs one way and dress them three different ways. Some recipes are ready in under 30 minutes; others benefit from overnight refrigeration. The flavor range runs from savory herb-forward to smoky and spiced, with a few unexpected twists (hello, pesto and smoked salmon) that prove eggs are far more versatile than they get credit for.
- Sheet-pan and muffin-tin bakes for freezer-friendly portions
- Boiled egg snack boxes and egg salad jars for grab-and-go mornings
- Breakfast sandwiches and burrito wraps you can make ahead and freeze
- Bowl and cup formats for when you want something warm and assembled
- Component-based preps so you can mix sauces and toppings all week
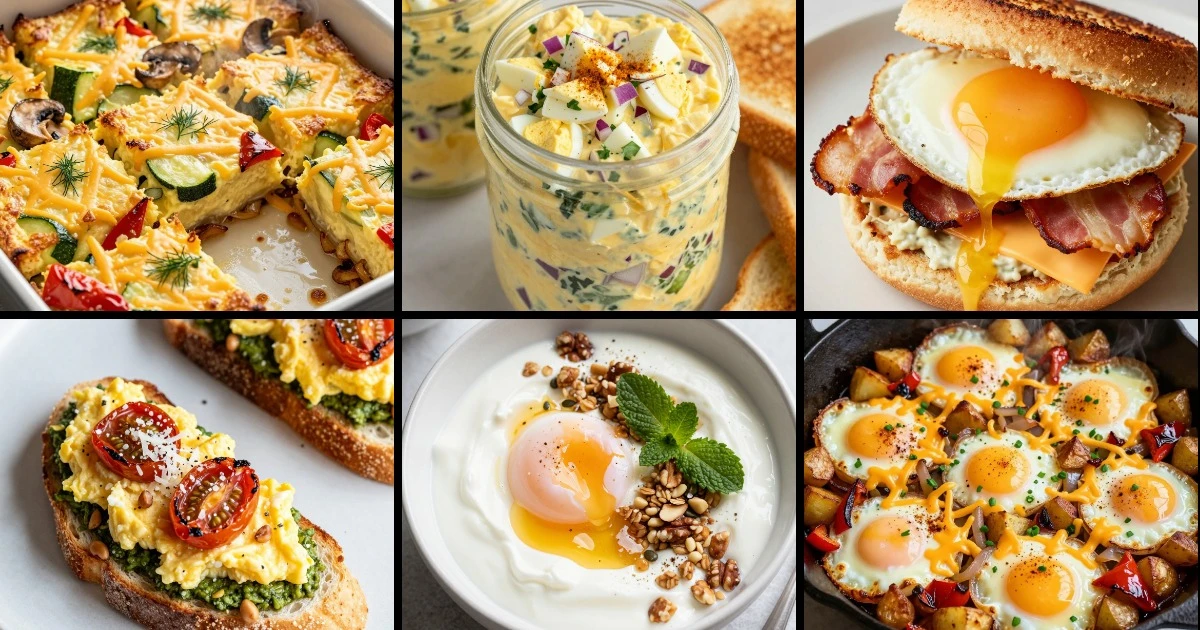
1. Sheet-Pan Veggie Egg Squares
This is the workhorse of make-ahead breakfasts. A single sheet pan holds a savory custard loaded with roasted vegetables, fresh herbs, and a sharp cheddar finish. The whirl factor here is the contrast between a set, custardy center and crispy, caramelized edges—you get both textures in every slice. I always make this on Sunday and cut it into 12 squares for grab-and-go breakfasts all week.
Roasted vegetables add sweetness and depth; the eggs bind everything into something that’s neither quiche nor scramble, but better than both.
Perfect for meal-prep mornings and freezer-friendly for up to three months.
Ingredients
- 12 large eggs
- 1 cup whole milk
- 2 cups roasted vegetables (bell peppers, zucchini, mushrooms), chopped
- 1.5 cups shredded cheddar cheese
- 1 medium onion, diced and caramelized
- 2 tablespoons fresh dill or parsley, chopped
- 2 tablespoons olive oil
- Salt and black pepper to taste
- 1 teaspoon garlic powder
Instructions
- Preheat oven to 375°F. Oil a 9×13-inch baking dish.
- Whisk eggs and milk together until pale and foamy, about 2 minutes. Season with salt, pepper, and garlic powder.
- Fold in roasted vegetables, caramelized onion, cheese, and fresh herbs until evenly distributed.
- Pour into prepared dish. Bake for 25–30 minutes until the center is just set but still slightly jiggly when you shake the pan gently—this keeps it custardy, not rubbery.
- Cool for 10 minutes, then cut into 12 squares.
The secret to keeping these moist is not overbaking. When you pull them from the oven, the very center should still jiggle slightly—carryover heat will finish the job. If you bake until completely firm, they’ll dry out by day three.
These freeze beautifully for up to three months. Reheat from frozen in a 350°F oven for 12–15 minutes, or microwave a single square for 90 seconds.
2. Muffin-Tin Omelette Cups

I love these because they’re portion-controlled, freezer-proof, and customizable in ways sheet pans aren’t. Each cup is a complete omelette—eggs, cheese, and fillings cooked in one vessel. The texture contrast comes from a set, slightly springy egg exterior and a custardy center, plus whatever crispy or tender fillings you choose. These are perfect for mornings when you want something that feels composed, not rushed.
The whirl factor is the built-in texture: soft-set eggs with a tender-crisp bottom from the muffin tin’s heat.
Great for batch cooking and freezer storage; reheat in 90 seconds.
Ingredients
- 10 large eggs
- 1/4 cup heavy cream
- 1 cup shredded gruyère cheese
- 1 cup diced cooked ham or crispy bacon
- 1/2 cup diced bell peppers (pre-roasted)
- 2 tablespoons fresh chives, chopped
- 2 tablespoons butter, for greasing
- Salt and white pepper to taste
Instructions
- Preheat oven to 350°F. Butter a 12-cup muffin tin generously.
- Whisk eggs and cream together until just combined—don’t overbeat or they’ll be tough. Season lightly with salt and white pepper.
- Divide cheese, ham, and peppers among muffin cups. Pour egg mixture to three-quarters full.
- Bake for 14–16 minutes until the edges are set but the center still has a slight wobble when you tap the tin.
- Cool for 5 minutes in the tin, then run a thin knife around each cup and pop them out.
The most common mistake is overbaking these. They continue to cook as they cool, so pull them when the center still jiggles slightly. Overcooked cups become rubbery and won’t reheat well.
Store in an airtight container in the fridge for up to five days, or freeze for up to three months. Reheat from frozen in a microwave (90 seconds) or toaster oven (5 minutes at 350°F).
3. Boiled Egg Snack Boxes

This might sound too simple, but there’s a reason boiled eggs dominate meal-prep culture: they’re done, they’re portable, and they’re endlessly customizable. My whirl factor here is pairing soft-boiled eggs (jammy yolk, set white) with a curated set of crispy and umami components—crusty bread, sharp cheddar, smoked salt, and a quick pickle. The contrast between soft yolk and crispy toast is where the magic lives.
Soft-boiled eggs with crispy soldiers (toasted bread strips), aged cheddar, and quick-pickled onions create a snack that’s textured and complete.
Prep-friendly and portable; no reheating required.
Ingredients
- 12 large eggs
- 4 slices crusty sourdough bread, cut into strips
- 8 ounces sharp aged cheddar, cut into chunks
- 1 red onion, thinly sliced
- 1/2 cup apple cider vinegar
- 2 tablespoons sugar
- 1 teaspoon salt
- 2 tablespoons olive oil for toasting bread
- Fleur de sel and cracked pepper
Instructions
- Bring a pot of water to a rolling boil. Gently lower eggs into the water and cook for 6.5 minutes for a jammy yolk. Transfer to an ice bath immediately to stop cooking.
- While eggs cook, warm vinegar, sugar, and salt in a small saucepan until sugar dissolves. Pour over sliced onion and let sit for at least 30 minutes.
- Toss bread strips with olive oil and toast at 375°F for 8–10 minutes until golden and crisp.
- Peel eggs gently under cool running water, starting from the wider end where the air pocket sits.
- Assemble boxes: one peeled egg per container, alongside bread soldiers, cheddar chunks, and a spoonful of pickled onion.
The key to a perfect jammy egg is timing and an ice bath. Six and a half minutes gives you a fully set white with a warm, runny yolk. If you go a minute longer, the yolk starts to set; a minute shorter and the white is still translucent. The ice bath stops cooking immediately, so you get consistency every time.
Boiled eggs keep refrigerated for up to seven days. Pickled onions last two weeks. Assemble boxes the morning you want to eat them, or keep components separate and assemble as you go.
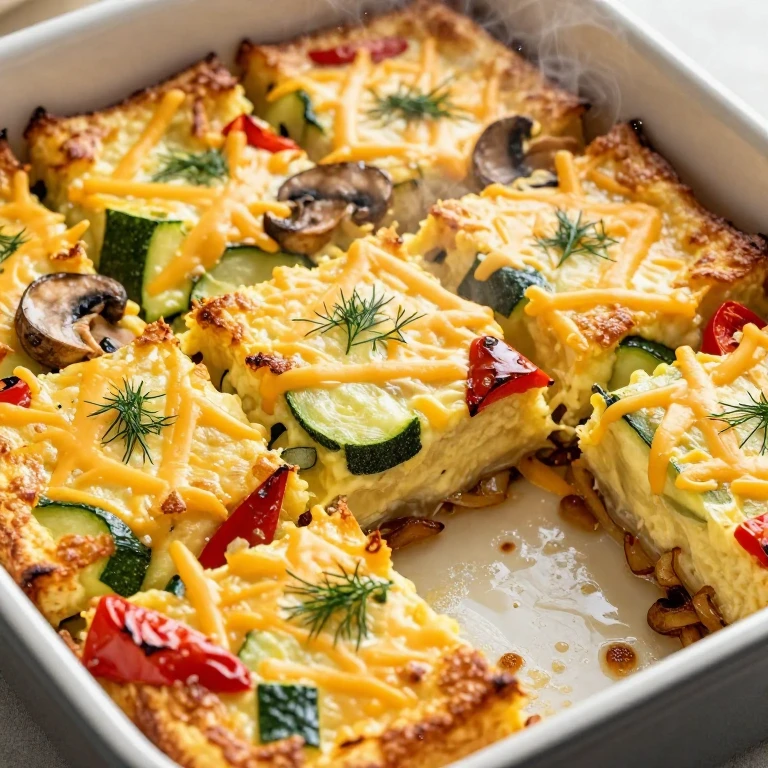
4. Curried Egg Salad Jars
When I want something that tastes intentional and bold, I reach for egg salad with a curry spin. Hard-boiled eggs get mixed with a creamy, spiced base—mayo spiked with curry powder, fresh lime, and a pinch of heat. The whirl factor is the contrast between creamy, rich egg salad and crisp vegetables and toasted bread for scooping. This is comfort food with an edge.
Curry powder and lime juice transform basic egg salad into something aromatic and unexpected; crispy toast soldiers provide the textural contrast.
Make-ahead friendly; best within four days of assembly.
Ingredients
- 10 large eggs, hard-boiled and chopped
- 1/2 cup mayonnaise
- 2 tablespoons Greek yogurt
- 1.5 teaspoons curry powder
- 1 tablespoon fresh lime juice
- 1/4 teaspoon cayenne pepper
- 1/4 cup diced red onion
- 1/4 cup fresh cilantro, chopped
- Salt and pepper to taste
- Toasted bread or crackers for serving
Instructions
- Hard-boil eggs: bring water to a boil, lower eggs in gently, and cook for 11 minutes. Transfer to an ice bath, then peel and chop.
- Whisk mayo, yogurt, curry powder, lime juice, and cayenne in a bowl until smooth. Taste and adjust spice level.
- Fold in chopped eggs, red onion, and cilantro. Season with salt and pepper.
- Divide into mason jars, pressing gently to pack. Top with a layer of plastic wrap pressed directly onto the surface to prevent browning.
The biggest failure point with egg salad is oxidation: the yolk turns gray-green if exposed to air too long. Keep the surface sealed with plastic wrap, and refresh the wrap daily. This keeps the salad looking fresh and tasting bright through day four.
Store in mason jars in the refrigerator for up to four days. Bring toasted bread or crackers separately to keep them crisp.
5. Breakfast Burrito Freezer Wraps

These are my secret weapon for mornings when I need something substantial and warming. A flour tortilla wraps scrambled eggs, crispy bacon, melted cheese, and roasted potatoes into a package that freezes beautifully and reheats in minutes. The whirl factor is the contrast between creamy scrambled eggs, crispy bacon, and tender potatoes—all wrapped in a tortilla that’s soft but sturdy enough to hold everything together.
Scrambled eggs mixed with crispy bacon, sharp cheddar, and roasted potatoes create a burrito that’s hearty and freezer-proof for up to three months.
Freezer-friendly and reheats in 90 seconds in the microwave.
Ingredients
- 12 large eggs
- 8 slices bacon, cooked and crumbled
- 2 medium russet potatoes, diced and roasted
- 1.5 cups shredded sharp cheddar cheese
- 4 large flour tortillas (10-inch)
- 1/2 cup diced bell peppers (optional)
- 2 tablespoons butter
- Salt and pepper to taste
- Salsa or hot sauce for serving
Instructions
- Roast diced potatoes at 400°F with a pinch of salt for 20–25 minutes until golden and tender.
- Cook bacon until crispy, then crumble. Reserve 1 tablespoon of bacon fat.
- Scramble eggs in the bacon fat over medium heat until just barely set—slightly underdone is ideal because they’ll cook more when you reheat. Fold in bacon, roasted potatoes, and cheese while eggs are still warm.
- Lay out tortillas. Divide egg mixture among them, leaving a 2-inch border on all sides. Fold in sides, then roll tightly from bottom to top.
- Wrap each burrito in parchment paper, then foil, and freeze.
The secret to a burrito that reheats well is not overcooking the eggs at the assembly stage. They should be creamy and slightly underdone when you roll them; the microwave will finish the job. Overcooked eggs turn rubbery and won’t improve with reheating.
Freeze for up to three months wrapped in parchment and foil. Reheat from frozen: remove foil, wrap in a damp paper towel, and microwave for 90 seconds to two minutes. Or unwrap and reheat in a skillet over medium heat for three minutes per side.
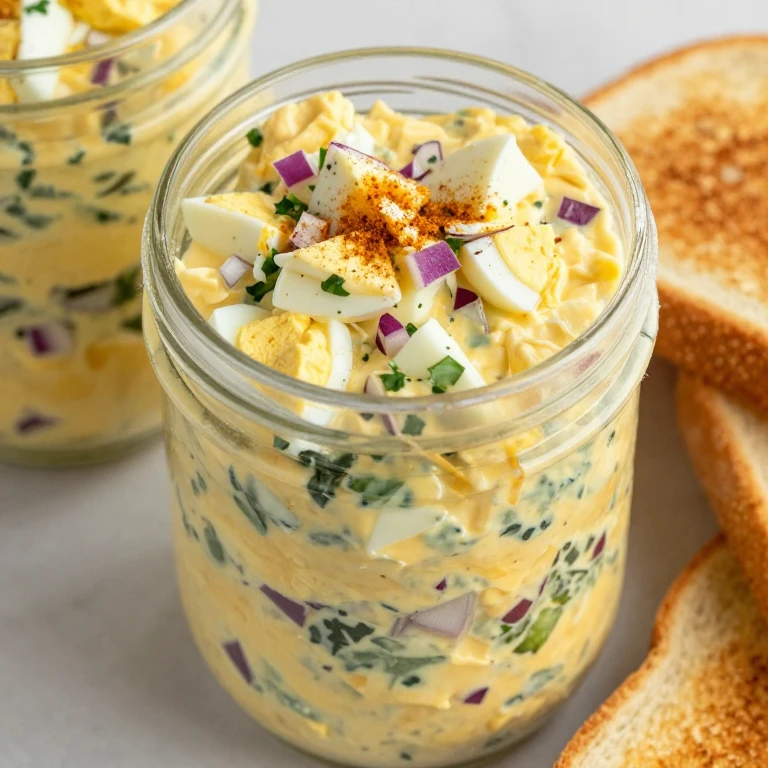
6. English Muffin Egg Sandwiches
I make these when I want something that feels like a proper breakfast sandwich but doesn’t require morning assembly. Fried eggs (cooked to order for jammy yolks) get layered with crispy bacon, sharp cheddar, and a quick aioli on toasted English muffins. The whirl factor is the contrast between soft, runny yolk and crispy muffin—the yolk becomes the sauce. These are best eaten fresh, but you can prep all the components ahead.
Jammy-yolk fried eggs with crispy bacon, aged cheddar, and lemon aioli on toasted English muffins create a sandwich where the yolk is the sauce.
Component-prepped; final assembly takes two minutes.
Ingredients
- 8 large eggs
- 8 slices thick-cut bacon
- 4 English muffins, split
- 8 slices sharp aged cheddar
- 1/2 cup mayonnaise
- 1 tablespoon fresh lemon juice
- 1 clove garlic, minced
- 2 tablespoons butter for cooking eggs
- Salt and pepper to taste
Instructions
- Whisk mayo, lemon juice, and minced garlic to make aioli. Season with salt and pepper. Set aside.
- Cook bacon in a skillet over medium heat until crispy, about 8 minutes. Drain on paper towels and break in half.
- Toast English muffins until golden and crisp.
- In the same skillet, melt butter over medium heat. Crack eggs into the pan and cook until whites are set but yolks are still jammy, about 3–4 minutes. Season with salt and pepper.
- Assemble: spread aioli on both muffin halves, layer with bacon, cheddar, and a fried egg. Top with the other muffin half.
The most critical step is cooking the egg to order—you want the white completely set but the yolk still runny so it acts as a sauce. If you cook it ahead, the yolk will set and the sandwich will be dry. That said, you can prep the aioli, cook the bacon, and toast the muffins hours in advance; just fry the eggs right before eating.
Store aioli and cooked bacon in the fridge for up to three days. Toast muffins fresh each morning. Fry eggs to order for the best result.
7. Smoked Salmon Egg Cups
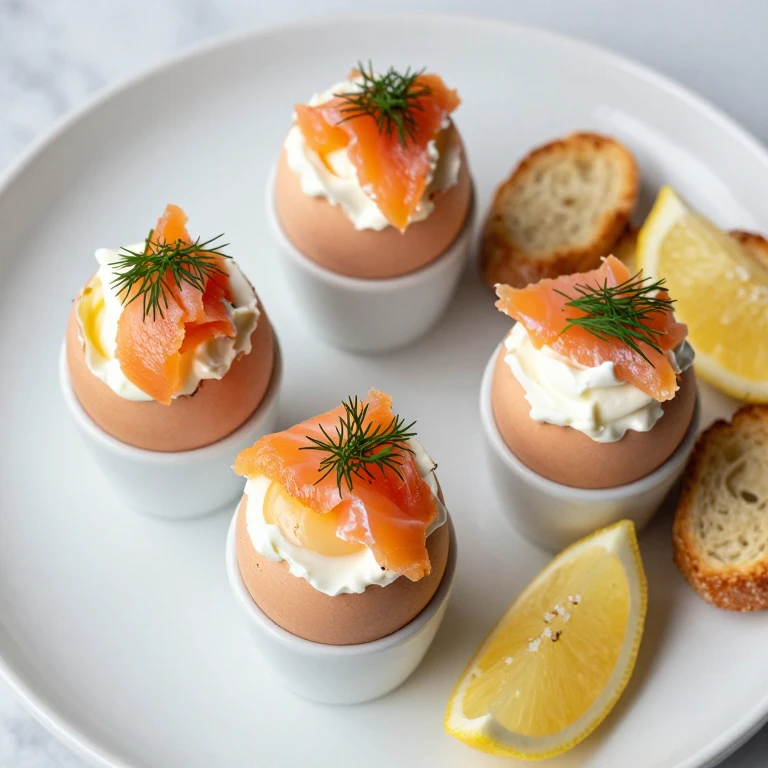
These feel fancy but come together in minutes. Soft-boiled eggs nestled in espresso cups, topped with ribbons of smoked salmon, fresh dill, and a dollop of crème fraîche. The whirl factor is the contrast between creamy, warm egg yolk and cool, briny salmon—plus the textural play of soft egg and crisp toast soldiers for dipping. This is a breakfast that feels like brunch.
Soft-boiled eggs with smoked salmon, fresh dill, and crème fraîche create a sophisticated breakfast with a contrast between warm yolk and cool, briny topping.
No-cook assembly; best served fresh.
Ingredients
- 8 large eggs
- 4 ounces smoked salmon, sliced into ribbons
- 1/4 cup crème fraîche
- 2 tablespoons fresh dill, chopped
- 1 lemon, cut into wedges
- 4 slices crusty bread, cut into strips
- 2 tablespoons olive oil
- Fleur de sel and cracked pepper
Instructions
- Bring water to a rolling boil. Lower eggs in gently and cook for 6.5 minutes. Transfer immediately to an ice bath.
- Toast bread strips at 375°F with a light brush of olive oil for 8–10 minutes until golden and crisp.
- Peel eggs carefully under cool running water. Place each egg in a small cup or espresso cup.
- Top each egg with a spoonful of crème fraîche, a ribbon of smoked salmon, a pinch of fresh dill, and fleur de sel.
- Serve with toast soldiers and lemon wedges for squeezing.
The timing on soft-boiled eggs is everything. Six and a half minutes gives you a set white with a warm, runny yolk. If you’re making these ahead, keep peeled eggs in a container of cool water in the fridge; they’ll hold for up to two days. Assemble just before serving so the crème fraîche stays cold and the salmon stays fresh.
Soft-boiled eggs keep refrigerated for up to two days. Assemble cups fresh each morning for the best flavor and texture contrast.
8. Pesto Tomato Egg Toasts (Component Prep)
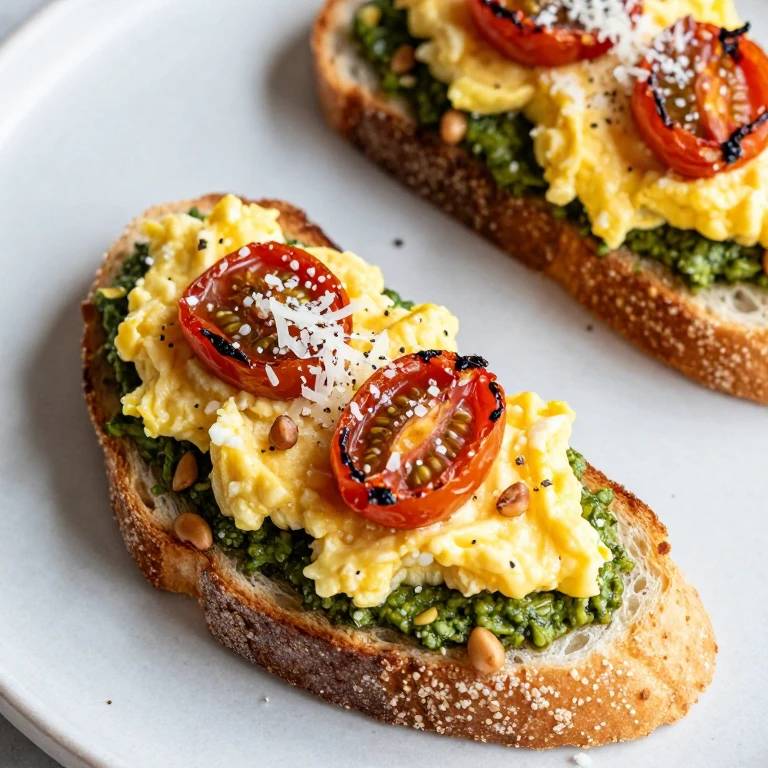
I love this approach because you cook eggs one way and dress them three different ways throughout the week. Start with soft-scrambled eggs (creamy, barely set), then build on them with different components. This version uses fresh basil pesto, roasted tomatoes, and crispy bread. The whirl factor is the contrast between creamy eggs and crispy, charred tomatoes—plus the herbaceous punch of pesto tying everything together.
Soft-scrambled eggs topped with fresh basil pesto, roasted cherry tomatoes, and crispy bread create a toast that’s rich, bright, and textured.
Component-based; eggs keep for three days, toast fresh each morning.
Ingredients
- 10 large eggs
- 1 cup fresh basil leaves
- 1/4 cup pine nuts, toasted
- 2 cloves garlic, minced
- 1/2 cup olive oil
- 1/2 cup grated Parmigiano-Reggiano
- 2 cups cherry tomatoes, halved
- 4 slices crusty bread
- Salt and pepper to taste
- Fleur de sel for finishing
Instructions
- Make pesto: pulse basil, pine nuts, garlic, and Parmigiano in a food processor until coarse. Drizzle in olive oil until the texture is creamy but still textured. Season with salt and pepper.
- Toss cherry tomatoes with 1 tablespoon olive oil, salt, and pepper. Roast at 425°F for 12–15 minutes until they blister and soften.
- Scramble eggs gently in a nonstick pan over medium-low heat with a tablespoon of butter. Pull them off heat when they’re still slightly creamy and underdone—they’ll firm up as they cool.
- Toast bread until golden and crisp. Spread a spoonful of pesto on each slice.
- Top toasts with soft-scrambled eggs, roasted tomatoes, and a pinch of fleur de sel.
The key to creamy scrambled eggs is low heat and patience. Stir gently and pull the pan off heat when the eggs still look slightly wet—they’ll continue to cook from residual heat. If you cook them until they look fully set, they’ll be rubbery by the time you eat them.
Store scrambled eggs in an airtight container in the fridge for up to three days. Make pesto up to five days ahead. Roast tomatoes up to two days ahead. Toast bread fresh each morning and assemble to order.
9. Greek Yogurt Jammy Egg Bowls
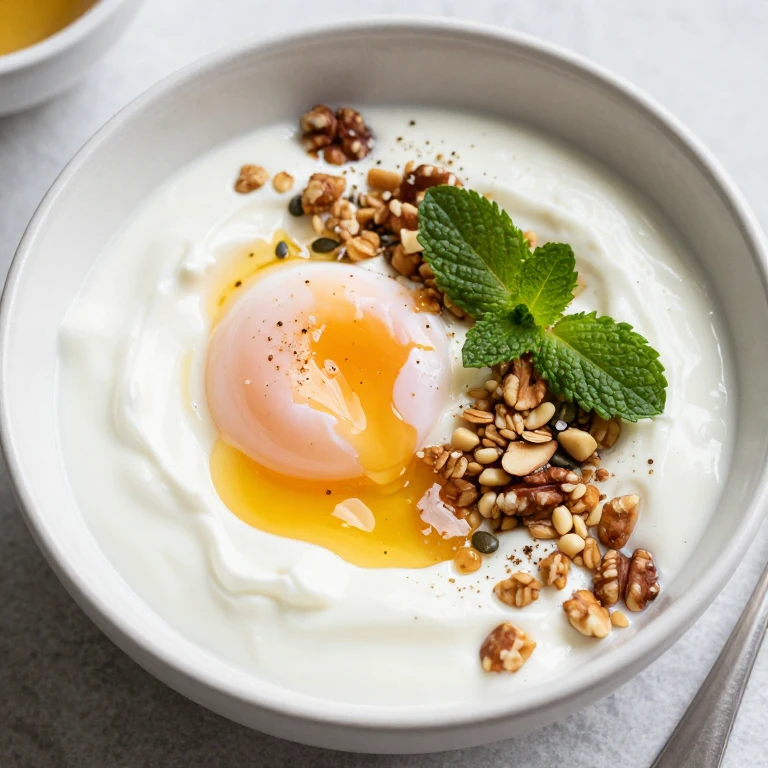
This is my go-to when I want something creamy, protein-packed, and ready in minutes. A base of thick Greek yogurt gets topped with a jammy soft-boiled egg, crispy granola, toasted nuts, and a drizzle of honey. The whirl factor is the contrast between cool, tangy yogurt and a warm, runny yolk—plus the textural play of creamy, crunchy, and soft all in one bowl. It straddles breakfast and dessert in the best way.
Thick Greek yogurt topped with a jammy egg, crispy granola, toasted nuts, and honey creates a bowl that’s creamy, crunchy, and surprisingly savory-sweet.
Assembly-based; components keep separately for up to a week.
Ingredients
- 8 large eggs
- 2 cups plain Greek yogurt (full-fat)
- 1 cup granola (preferably with nuts and seeds)
- 1/2 cup mixed toasted nuts (almonds, walnuts, pecans), chopped
- 1/4 cup raw honey
- 2 tablespoons fresh mint, chopped (optional)
- Fleur de sel and cracked pepper
Instructions
- Bring water to a rolling boil. Lower eggs in gently and cook for 6.5 minutes. Transfer to an ice bath immediately.
- Divide Greek yogurt among four bowls, creating a slight well in the center.
- Peel a soft-boiled egg and place gently on top of each bowl of yogurt.
- Scatter granola and toasted nuts around the egg. Drizzle with honey and finish with a pinch of fleur de sel and cracked pepper.
The contrast between cold yogurt and warm yolk is the whole point—so assemble this bowl just before eating. If you let it sit, the yolk cools down and loses its appeal. That said, you can prep and chill the yogurt, cook the eggs ahead (keep them in cool water), and toast the nuts days in advance. Just assemble fresh.
Soft-boiled eggs keep refrigerated for up to two days. Greek yogurt and granola keep for at least a week. Assemble bowls fresh each morning for the best temperature and texture contrast.
10. Potato-and-Egg Skillet Meal Prep Boxes
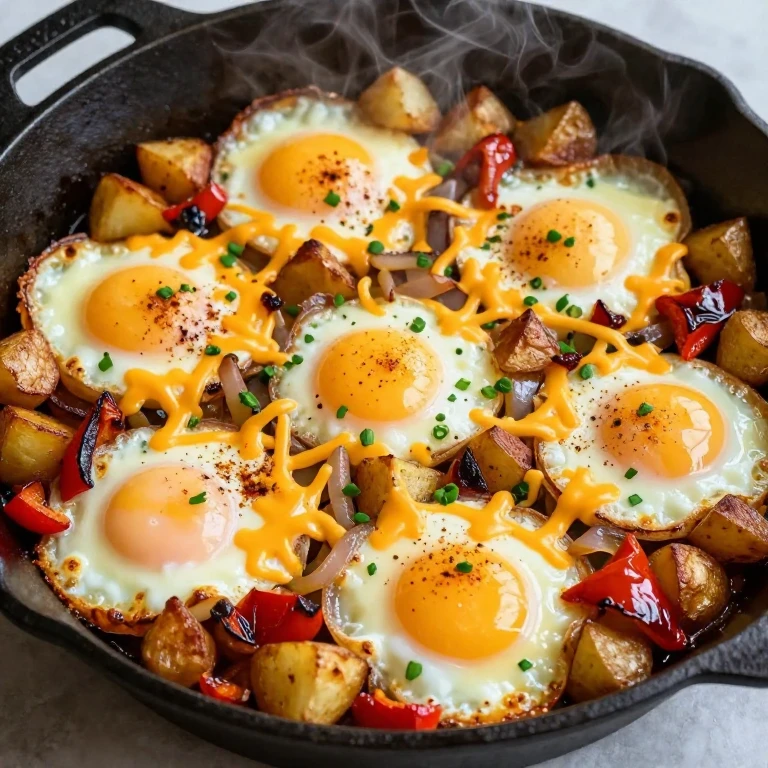
When I want something hearty and warming that reheats beautifully, this is my recipe. Crispy roasted potatoes, sautéed peppers and onions, and baked eggs all cooked in a single skillet. The whirl factor is the contrast between crispy, caramelized potatoes and creamy, set eggs—plus the savory depth of caramelized vegetables. This is the kind of breakfast that keeps you full until lunch.
Crispy roasted potatoes, caramelized peppers and onions, and baked eggs create a skillet that’s hearty, textured, and freezer-friendly.
Meal-prep friendly and reheats beautifully in the oven or microwave.
Ingredients
- 6 medium russet potatoes, diced
- 2 medium bell peppers, diced
- 1 large yellow onion, diced
- 8 large eggs
- 1.5 cups shredded sharp cheddar cheese
- 4 tablespoons olive oil
- 1 teaspoon smoked paprika
- 1 teaspoon garlic powder
- Salt and black pepper to taste
- 2 tablespoons fresh chives, chopped
Instructions
- Preheat oven to 400°F. Toss diced potatoes with 2 tablespoons olive oil, salt, pepper, and smoked paprika. Spread on a sheet pan and roast for 25–30 minutes until golden and crispy.
- In a large oven-safe skillet, heat 2 tablespoons olive oil over medium heat. Add diced peppers and onion, cooking until deeply caramelized, about 12–15 minutes. Season with garlic powder, salt, and pepper.
- Add roasted potatoes to the skillet and stir to combine. Create eight small wells in the mixture.
- Crack an egg into each well. Scatter cheese over the top. Transfer the skillet to a 375°F oven and bake for 12–15 minutes until the egg whites are set but yolks are still slightly jammy.
- Finish with fresh chives and serve.
The most important step is caramelizing the vegetables properly—don’t rush this. Deep caramelization builds sweetness and umami that makes the whole dish sing. If you skip this step, the vegetables taste raw and the skillet falls flat.
This reheats beautifully. Store in an airtight container in the fridge for up to four days, or freeze for up to two months. Reheat in a 350°F oven for 12–15 minutes, or microwave individual portions for 90 seconds to two minutes.
11. Grits-and-Egg Cups
Creamy, buttery grits topped with a soft-boiled egg and crispy bacon bits—this is Southern breakfast done right. The whirl factor is the contrast between creamy, luxurious grits and a warm, runny yolk that becomes the sauce. I add sharp cheddar to the grits for depth, and finish with crispy bacon and fresh chives. This is comfort food with an edge.
Creamy cheese grits topped with a soft-boiled egg and crispy bacon create a cup that’s rich, textured, and deeply satisfying.
Make-ahead friendly; reheat gently on the stovetop.
Ingredients
- 1 cup whole milk
- 2 cups chicken or vegetable broth
- 1/2 cup stone-ground cornmeal (grits)
- 4 tablespoons butter
- 1 cup shredded sharp cheddar cheese
- 8 large eggs
- 8 slices bacon, cooked and crumbled
- 2 tablespoons fresh chives, chopped
- Salt and white pepper to taste
Instructions
- Bring milk and broth to a simmer in a heavy-bottomed pot. Whisk in cornmeal slowly to avoid lumps, stirring constantly.
- Reduce heat to low and cook for 25–30 minutes, stirring frequently, until the grits are creamy and tender. The mixture should pull away from the sides of the pot slightly.
- Stir in butter and cheddar cheese until melted and smooth. Season with salt and white pepper. Divide among four cups or bowls.
- While grits cook, bring water to a rolling boil. Lower eggs in gently and cook for 6.5 minutes. Transfer to an ice bath.
- Peel eggs and place one on top of each cup of grits. Top with crispy bacon and fresh chives.
The most common mistake with grits is not stirring enough—they’ll scorch on the bottom if you leave them alone. Stir frequently and use low heat. If lumps form, press them against the side of the pot with your spoon to break them down.
Grits keep in the fridge for up to three days. Reheat gently on the stovetop over low heat, stirring in a splash of milk to loosen them. Soft-boiled eggs keep for up to two days. Assemble fresh each morning.
12. Quinoa-Egg Power Bowls
When I want something that feels nutritionally complete and tastes exciting, this is my move. Fluffy quinoa gets topped with a soft-boiled egg, roasted vegetables, fresh herbs, and a bright lemon vinaigrette. The whirl factor is the contrast between fluffy, slightly nutty quinoa and a warm, runny yolk—plus the textural play of soft egg, tender vegetables, and crisp herbs. This is meal-prep that doesn’t feel like a chore.
Fluffy quinoa topped with a soft-boiled egg, roasted vegetables, and a bright lemon vinaigrette creates a bowl that’s nutritionally complete and exciting to eat.
Fully make-ahead friendly; components keep separately for up to five days.
Ingredients
- 1 cup cooked quinoa
- 8 large eggs
- 2 cups roasted vegetables (broccoli, carrots, zucchini), chopped
- 1/4 cup fresh herbs (parsley, cilantro, mint), chopped
- 3 tablespoons olive oil
- 2 tablespoons fresh lemon juice
- 1 clove garlic, minced
- Salt and pepper to taste
Instructions
- Cook quinoa according to package directions. Fluff with a fork and let cool slightly.
- Roast vegetables at 400°F with a light coat of olive oil, salt, and pepper for 20–25 minutes until tender and caramelized.
- Make vinaigrette: whisk together 3 tablespoons olive oil, lemon juice, minced garlic, salt, and pepper.
- Bring water to a rolling boil. Lower eggs in gently and cook for 6.5 minutes. Transfer to an ice bath and peel.
- Assemble bowls: divide quinoa among four containers, top with roasted vegetables, fresh herbs, and a soft-boiled egg. Drizzle with vinaigrette.
The beauty of this bowl is that every component keeps separately. Cook quinoa up to five days ahead, roast vegetables up to three days ahead, and soft-boil eggs up to two days ahead. Assemble fresh each morning, or assemble the night before and dress with vinaigrette just before eating so the greens don’t wilt.
All components keep refrigerated for three to five days. Assemble and dress fresh each morning for the best texture and flavor.
13. Croissant Bake Squares

This is my secret weapon for weekend brunches and freezer stockpiling. Cubed croissants, eggs, cream, and sharp cheddar get layered in a baking dish and baked until golden. The whirl factor is the contrast between buttery, crispy croissant pieces and creamy, custardy egg—plus the sharpness of aged cheddar cutting through the richness. This is decadent breakfast that feels simple.
Buttery croissant cubes baked in an egg custard with sharp cheddar create a bake that’s crispy, creamy, and deeply rich.
Freezer-friendly for up to three months; reheat from frozen.
Ingredients
- 4 large croissants, cubed
- 10 large eggs
- 1.5 cups heavy cream
- 1 cup whole milk
- 2 cups shredded sharp cheddar cheese
- 2 tablespoons Dijon mustard
- 1 teaspoon salt
- 1/2 teaspoon white pepper
- 2 tablespoons butter, for the baking dish
- 2 tablespoons fresh thyme, chopped
Instructions
- Preheat oven to 350°F. Butter a 9×13-inch baking dish and spread croissant cubes evenly across the bottom.
- Whisk together eggs, cream, milk, Dijon mustard, salt, and white pepper until smooth. Pour over croissants.
- Scatter cheddar and fresh thyme over the top. Let sit for 15 minutes so the croissants absorb some of the custard.
- Bake for 35–40 minutes until the top is golden and the center is just set but still slightly jiggly when you shake the pan gently.
- Cool for 10 minutes, then cut into 12 squares.
The Dijon mustard might seem unusual, but it adds a subtle savory note that deepens the flavor without tasting spicy. It’s the secret ingredient that keeps this from tasting one-dimensional. Don’t skip it.
These freeze beautifully for up to three months. Wrap cooled squares individually in plastic wrap and foil, or layer them in a freezer container. Reheat from frozen at 350°F for 15–20 minutes covered with foil, then uncover and bake another five minutes to crisp the top.
14. Tortilla Egg Fold Kits

My last recipe is built for flexibility. Warm flour tortillas, scrambled eggs, and a curated set of toppings (cheese, salsa, avocado, fresh cilantro) that you assemble to taste. The whirl factor is the contrast between creamy scrambled eggs and fresh, crisp toppings—plus the textural play of soft tortilla and whatever you choose to pile on. This is breakfast that never gets boring because you’re building it fresh each time.
Soft scrambled eggs with warm tortillas and a customizable set of toppings create a breakfast kit where you control the flavor and texture every morning.
Component-based; eggs keep for three days, tortillas freeze for a month.
Ingredients
- 12 large eggs
- 8 large flour tortillas (10-inch)
- 1.5 cups shredded sharp cheddar cheese
- 1 cup salsa (fresh or cooked)
- 2 ripe avocados, sliced
- 1/4 cup fresh cilantro, chopped
- 2 limes, cut into wedges
- 2 tablespoons butter
- Salt and pepper to taste
Instructions
- Scramble eggs gently in a nonstick pan over medium-low heat with butter. Pull off heat when they’re still slightly creamy and underdone—they’ll firm up as they cool. Season with salt and pepper.
- Warm tortillas in a dry skillet over medium heat for about 30 seconds per side until pliable and warm.
- Assemble kits: lay a warm tortilla flat, add a spoonful of scrambled eggs in the center, then top with cheese, salsa, avocado, and fresh cilantro.
- Fold the tortilla in half or roll it into a tight cylinder, depending on your preference.
- Serve with lime wedges for squeezing.
The key to keeping these interesting throughout the week is rotating your toppings. Make one batch of scrambled eggs and one batch of tortillas, then switch between salsa and pico de gallo, add different cheeses, or swap cilantro for mint. The base stays the same, but the experience changes every day.
Scrambled eggs keep refrigerated for up to three days. Warm tortillas fresh each morning, or wrap them in foil and reheat in a 350°F oven for five minutes. Store tortillas in the freezer for up to a month and thaw overnight in the fridge before using.
How to Choose the Right One
I’ve built this collection so you can mix and match based on your week, your mood, and what you have on hand. If you want something you can make once and eat all week, reach for the Sheet-Pan Veggie Egg Squares (entry 1) or the Potato-and-Egg Skillet (entry 10)—both freeze beautifully and reheat in minutes. If you’re looking for something that feels special but requires almost no morning work, the Smoked Salmon Egg Cups (entry 7) and Greek Yogurt Jammy Egg Bowls (entry 9) come together in minutes once components are prepped. For freezer-friendly options that reheat from frozen, try the Breakfast Burrito Wraps (entry 5), Muffin-Tin Omelette Cups (entry 2), or the Croissant Bake Squares (entry 13). If you want maximum flexibility and control, the Tortilla Egg Fold Kits (entry 14) and Pesto Tomato Egg Toasts (entry 8) let you build something different every morning using the same base. And if you want something that bridges breakfast and brunch, the Grits-and-Egg Cups (entry 11) and English Muffin Egg Sandwiches (entry 6) hit that sweet spot between comfort and sophistication.
FAQ
Can I make all of these recipes ahead?
Most of them, yes—but with different timelines. Sheet-pan bakes, muffin-tin cups, and burrito wraps freeze beautifully for up to three months. Boiled eggs, egg salad, and soft-scrambled eggs keep in the fridge for three to five days. Component-based recipes (like the Tortilla Fold Kits and Pesto Toasts) are designed so you can prep elements separately and assemble fresh each morning. The key is understanding which recipes benefit from advance cooking and which ones are better assembled fresh.
Which recipe is best for beginners?
The Boiled Egg Snack Boxes (entry 3) and the Tortilla Egg Fold Kits (entry 14) are the most forgiving. Boiling eggs is hard to mess up—just time it right and use an ice bath. The Tortilla Kits are flexible; if your eggs aren’t perfect, you can cover them with toppings. The Sheet-Pan Veggie Egg Squares (entry 1) is also beginner-friendly if you follow the timing carefully and don’t overbake.
How do I reheat frozen egg dishes without them getting rubbery?
Low, gentle heat is your friend. For sheet-pan squares and muffin-tin cups, reheat in a 350°F oven wrapped loosely in foil for 12–15 minutes, then uncover and bake another two to three minutes. For burritos and wraps, microwave from frozen in a damp paper towel for 90 seconds to two minutes. The key is not blasting them with high heat; that dries them out. Gentle, slow reheating preserves moisture and texture.
Which recipes are best for a crowd?
The Sheet-Pan Veggie Egg Squares (entry 1), Potato-and-Egg Skillet (entry 10), and Croissant Bake Squares (entry 13) all feed a group easily and can be made a day or two ahead. The Muffin-Tin Omelette Cups (entry 2) are also great for feeding a crowd because you can make them in batches and guests can grab what they want. For something more interactive, set out Tortilla Fold Kit components and let people assemble their own.
Are there dairy-free or vegetarian options?
Most of these recipes are vegetarian already—you can skip the bacon and ham in recipes like the Breakfast Burritos (entry 5) and English Muffin Sandwiches (entry 6), or substitute with crispy roasted vegetables or plant-based bacon. For dairy-free versions, replace cheddar with nutritional yeast or a dairy-free cheese alternative, and swap cream and milk for oat or almond milk. The Boiled Egg Snack Boxes (entry 3) and Soft-Scrambled Eggs (entry 8) are easiest to adapt—just skip the cheese and use dairy-free toppings.
What’s the best way to store hard-boiled eggs?
Keep them in their shells in the coldest part of your fridge, ideally in a container of cool water. They’ll keep for up to seven days. Don’t peel them until you’re ready to eat them; peeled eggs oxidize and turn gray-green if exposed to air. If you’re making egg salad or other recipes that require peeled eggs, keep the surface sealed with plastic wrap pressed directly onto the food to prevent browning.
Can I prep eggs the night before and reheat them in the morning?
Yes, with caveats. Scrambled eggs, baked egg dishes, and omelette cups all reheat well the next day if stored properly in airtight containers. Soft-boiled eggs can be cooked ahead and kept in cool water for up to two days, then peeled fresh. The only recipes I wouldn’t recommend prepping more than a day ahead are fried eggs (entry 6) and soft-boiled eggs meant to be served warm—they’re best cooked to order.