
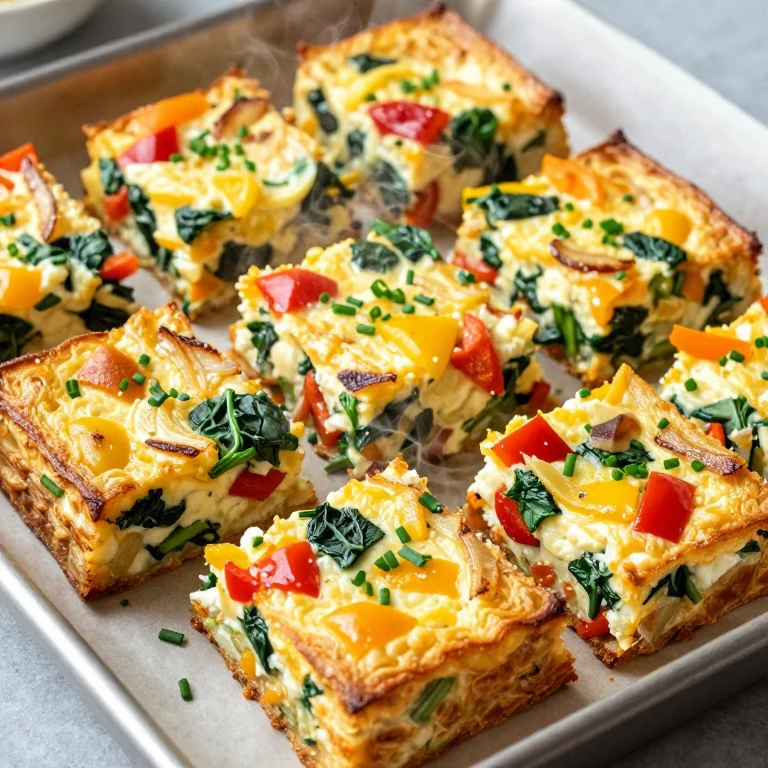
When I’m building my week, I need breakfast that doesn’t require thinking at 6 a.m. These sheet-pan veggie egg squares deliver exactly that—a tender, protein-packed base studded with roasted vegetables, sliced into grab-and-go squares, and ready to reheat in under two minutes. The secret isn’t complexity; it’s the cottage cheese stirred into the eggs, which keeps the texture impossibly creamy while adding serious staying power to your morning.
I’ve tested this recipe a dozen ways, and what sets this version apart is the ratio of egg to cottage cheese and the timing of when vegetables hit the pan. Too much dairy and the squares become dense. Add vegetables raw and they steam instead of caramelize. Get both right, and you’re looking at squares that taste intentional, not like breakfast prep.
This is the kind of recipe that fits into a busy week without demanding special equipment or technique. You roast your vegetables while your oven preheats, pour the egg mixture over them, and walk away for 22-25 minutes. Let me show you how I make this work every time.
Quick Snapshot
- Prep Time: 15 minutes
- Cook Time: 25 minutes
- Total Time: 40 minutes
- Yield: 9 squares
- Texture: Tender, creamy, never rubbery
- Flavor Profile: Savory, veggie-forward, bright with herbs
- Skill Level: Easy
Why This Recipe Works
The cottage cheese is the foundation here. When you blend it with eggs, you’re adding protein and creaminess without the density of cream cheese or heavy cream. I use a 6-egg-to-1-cup-cottage-cheese ratio, which gives you about 15 grams of protein per square without any graininess. The cottage cheese dissolves into the egg mixture during baking, creating that tender crumb.
I roast my vegetables for 12-15 minutes before pouring the egg mixture over them. This step matters. Raw vegetables release water as they bake, which can make the squares watery at the edges. Roasting drives off that moisture and concentrates flavor. The vegetables get a slight caramelization that carries through in every bite.
The baking temperature of 375°F is deliberate. Too hot and the edges set before the center cooks through, leaving you with a rubbery perimeter and a jiggly middle. At 375°F, the entire pan sets evenly, and you pull it out when the center still has the slightest jiggle—it continues cooking as it cools, landing at that perfect tender texture.
Ingredient Overview
- 6 large eggs
- 1 cup cottage cheese (full-fat or 2%)
- 1/2 cup whole milk
- 1 teaspoon salt
- 1/2 teaspoon black pepper
- 1/4 teaspoon garlic powder
- 1 red bell pepper, diced
- 1 medium yellow onion, diced
- 2 cups fresh spinach, roughly chopped
- 1 cup mushrooms, diced (cremini or button)
- 2 tablespoons olive oil
- 1/2 teaspoon dried oregano
- 1/4 cup fresh dill or parsley, chopped (optional but recommended)
The cottage cheese is non-negotiable here. Full-fat gives the best texture, but 2% works in a pinch. Avoid nonfat—it won’t blend as smoothly and the squares come out chalky. I use whole milk because it’s what I keep on hand, but 2% milk works equally well. Don’t substitute water; the dairy matters for richness.
For vegetables, I stick with what roasts well and releases minimal water: bell peppers, onions, spinach, and mushrooms are my baseline. These vegetables have distinct flavors and textures that hold up through reheating. The spinach wilts down significantly, so don’t be shy with it. Fresh herbs at the end brighten everything; dill is my go-to, but parsley, chives, or basil all work.
Whirl Hook
The twist here is the cottage cheese base—it’s what transforms standard scrambled eggs into something that stays creamy and protein-rich through the entire week. Pair that with vegetables that have actual caramelization (not steamed pallor), and you’ve got breakfast squares that taste like you spent time on them, even when you didn’t.
Step-by-Step Instructions
Prep Your Pan and Vegetables
Preheat your oven to 375°F. Line a 9×13-inch baking sheet with parchment paper or lightly oil it—this makes cleanup painless and prevents sticking. Dice your bell pepper into roughly 1/2-inch pieces, slice your onion into thin half-moons, and chop your mushrooms into quarters. Rough-chop the spinach so it distributes evenly; the pieces don’t need to be uniform because they’ll wilt down significantly.
Roast the Vegetables
Toss the diced peppers, onions, and mushrooms with 2 tablespoons of olive oil, the dried oregano, and a pinch of salt and pepper. Spread them in a single layer on your prepared baking sheet. Roast for 12-15 minutes, stirring once halfway through. You’re looking for the vegetables to soften and the edges of the peppers and onions to develop light browning—this is where the flavor deepens. The mushrooms should release their moisture and begin to caramelize slightly. Don’t skip this step; it’s the difference between bland and intentional.
Make the Egg Mixture
While the vegetables roast, combine your 6 eggs, 1 cup cottage cheese, and 1/2 cup milk in a blender. Add 1 teaspoon salt, 1/2 teaspoon black pepper, and 1/4 teaspoon garlic powder. Blend on high for 45-60 seconds until completely smooth with no cottage cheese lumps visible. This is crucial—lumpy mixture won’t set evenly. If you don’t have a blender, whisk the eggs and milk together in a bowl, then press the cottage cheese through a fine-mesh strainer into the mixture and whisk until smooth.
Combine and Bake
Remove the vegetables from the oven. Scatter the chopped spinach over the warm vegetables and give everything a gentle stir—the residual heat will begin wilting the spinach. Pour the egg mixture evenly over the vegetables, using a spatula to gently distribute it so every area gets covered. The mixture should come about halfway up the sides of your baking sheet.
Return to the oven and bake for 22-25 minutes. The squares are done when the edges are set and firm to the touch, but the very center still has a slight jiggle when you gently shake the pan. This is the critical moment—overbaking by even 3 minutes tips the texture toward rubbery. The residual heat will continue cooking the center as it cools, landing you at perfect tenderness.
Cool and Cut
Let the sheet pan cool on the counter for 10 minutes. This resting period allows the squares to set without becoming dense. Once cooled slightly, use a sharp knife to cut the entire pan into 9 squares (3 rows by 3 columns). A bench scraper helps here, but a thin-bladed knife works fine. Let the squares cool to room temperature before storing or eating.
Pro Tips for Best Results
- Don’t skip blending the cottage cheese. Lumps won’t smooth out during baking, and you’ll end up with a gritty texture. A quick blender run takes 60 seconds and transforms the entire outcome.
- Roast your vegetables separately first. This drives off moisture and concentrates flavor. If you pour the egg mixture over raw vegetables, they steam instead of caramelize, and the squares become watery at the edges.
- Pull the pan out when the center still jiggles slightly. This is the most common mistake I see. Overbaked squares are rubbery and won’t improve with reheating. A little carryover cooking is your friend here.
- Let the pan rest before cutting. Cutting into hot squares causes them to break apart. Ten minutes on the counter is the difference between clean squares and crumbly mess.
- Add fresh herbs after baking. If you stir them in before baking, they cook down to almost nothing. Scatter them on top after cooling for maximum brightness and texture contrast.
- Use full-fat cottage cheese if you can find it. The texture is noticeably creamier. If you only have nonfat, blend it extra-long and add an extra 2 tablespoons of whole milk to compensate.
Flavor Spin
The core twist here is the cottage cheese base combined with properly roasted vegetables. The cottage cheese keeps everything creamy while adding protein, and the roasting step concentrates vegetable flavor so the squares taste intentional. The texture contrast comes from the tender egg base against the slight chew of caramelized vegetables and the wilted spinach throughout.
Whirl Factor
What makes these squares stand out is the combination of creamy texture (from the cottage cheese blend) and concentrated vegetable flavor (from roasting first). The squares never dry out, even after several days in the fridge, and they reheat without becoming rubbery. This is breakfast that tastes like you spent time on it, but the actual hands-on work is maybe 15 minutes.
Spin Options
Zucchini and Sun-Dried Tomato Version
Dice 1 medium zucchini and 1/2 cup sun-dried tomatoes (oil-packed, drained). Roast the zucchini with 2 tablespoons olive oil, salt, and pepper for 12-15 minutes until the edges brown slightly. Stir in the sun-dried tomatoes along with 1 teaspoon Italian seasoning in the last 2 minutes of roasting. Proceed with the egg mixture as written. This version tastes Mediterranean and pairs beautifully with feta cheese crumbled on top after baking.
Caramelized Onion and Goat Cheese Version
Slice 2 large yellow onions into thin half-moons. Toss with 2 tablespoons olive oil and a pinch of salt. Roast for 15-18 minutes, stirring every 5 minutes, until the onions are deeply golden and caramelized. Add 1/2 cup crumbled goat cheese and 1 teaspoon fresh thyme to the egg mixture before pouring. The caramelized onions create a sweet, savory depth that elevates the entire dish.
Broccoli and Cheddar Version
Cut 1 small head of broccoli into small florets. Toss with 2 tablespoons olive oil, salt, and pepper. Roast for 12-15 minutes until the florets are tender and the edges crisp slightly. Stir 3/4 cup sharp cheddar cheese into the egg mixture before pouring over the broccoli. Bake as directed. This version is heartier and appeals to people who want something more substantial for breakfast.
Whirl Finish
These squares are designed for grab-and-go mornings. Slice them into individual squares, wrap in parchment paper, and stack in a container. They’re equally good cold straight from the fridge, reheated in the microwave for 45-60 seconds, or warmed in a skillet for 2-3 minutes for a slightly crisped edge. Top them with avocado, serve alongside toast, or layer into a breakfast sandwich. The texture holds through all of it.
Serving Suggestions
I eat these squares straight from the fridge with a cup of coffee and call it breakfast. If I have a few extra minutes, I toast a slice of whole-grain bread, spread it with cream cheese or avocado, and top it with a warm square and a pinch of flaky salt. The contrast between the crispy toast and creamy square is exactly what I want on a busy morning.
For a more elevated approach, serve a square on a bed of mixed greens dressed with lemon vinaigrette, add a dollop of Greek yogurt on the side, and scatter fresh herbs on top. This turns breakfast into a light lunch that feels intentional. The square provides the protein anchor, and the greens keep everything feeling fresh and bright.
I also use these squares as components in breakfast burritos. Warm a tortilla, add a square, top with salsa and avocado, and roll. It’s a completely different meal from eating them plain, and it’s an easy way to use up leftover squares mid-week.
Storage and Reheating
These squares keep for up to 4 days in an airtight container in the refrigerator. Store them in a single layer if possible, or separate layers with parchment paper so they don’t stick together. They’re perfectly fine eaten cold straight from the fridge, or you can reheat them.
To reheat, microwave a square on a microwave-safe plate for 45-60 seconds until warmed through. The texture stays tender and creamy. Alternatively, place the square in a skillet over medium heat for 2-3 minutes per side to warm through and add a slight crisp to the edges. This method is my preference when I have a few extra minutes.
For freezing, let the squares cool completely, wrap each one individually in plastic wrap, and place them in a freezer-safe container. They freeze for up to 2 months. Thaw overnight in the refrigerator, then reheat using either method above. Frozen-then-thawed squares have the same tender texture as fresh ones.
Frequently Asked Questions
Can I use egg whites instead of whole eggs?
You can, but the squares will be less creamy and more prone to drying out. If you go this route, use 8 egg whites instead of 6 whole eggs to maintain the protein level, and add an extra 2 tablespoons of whole milk to compensate for the lost yolk richness. The cottage cheese becomes even more important for texture.
What if I don’t have a blender?
Press the cottage cheese through a fine-mesh strainer into a bowl with the eggs and milk, then whisk vigorously for 2-3 minutes until completely smooth. It takes a bit longer than blending, but the result is identical. Make sure there are no lumps before pouring.
Can I make these ahead and freeze them?
Absolutely. Let them cool completely, wrap each square individually in plastic wrap, then place them in a freezer-safe container. They freeze for up to 2 months. Thaw overnight in the fridge and reheat using either the microwave or skillet method. The texture is unchanged.
What vegetables work best for this recipe?
Stick with vegetables that roast well and don’t release excessive water: bell peppers, onions, mushrooms, zucchini, broccoli, and asparagus are all excellent choices. Avoid watery vegetables like tomatoes or cucumbers unless you use them sparingly. Leafy greens like spinach work great because they wilt down to almost nothing.
How do I prevent the squares from being rubbery?
The key is pulling them out of the oven when the center still has a slight jiggle. Overbaking by even 3 minutes tips the texture toward rubbery, and there’s no fixing it. The residual heat continues cooking as the pan cools, so trust that slight jiggle.
Can I add cheese to the egg mixture?
Yes. Stir in 1/2 to 3/4 cup shredded cheese (cheddar, feta, or goat cheese all work) into the egg mixture before pouring. Don’t exceed 3/4 cup or the squares become dense. Add it to the blender with the other ingredients and blend until combined.
How many squares can I eat in one sitting?
One square provides roughly 12-15 grams of protein and keeps you satisfied for 3-4 hours. Most people eat one or two squares per breakfast depending on their appetite and what they pair it with. If you’re eating them with toast or fruit, one square is usually sufficient. If you’re eating them as a standalone breakfast, two squares is more filling.
Sheet-Pan Veggie Egg Squares for Easy Prep
Ingredients
Method
- Preheat oven to 425°F. Line a 9x13-inch sheet pan with parchment paper or lightly oil it.
- Dice bell peppers and onion into 1/2-inch pieces. Toss with 1 tablespoon olive oil, salt, and pepper.
- Spread peppers and onions in a single layer on the prepared sheet pan. Roast for 8-10 minutes, stirring halfway through, until edges caramelize and vegetables soften slightly.
- Remove pan from oven and scatter chopped spinach evenly over roasted vegetables. Reduce oven temperature to 375°F.
- In a large bowl, crack all 10 eggs and whisk until yolks and whites are fully combined. Add cottage cheese, salt, pepper, and garlic powder. Whisk vigorously for 30-45 seconds until cottage cheese is mostly broken down and the mixture is smooth with no large curds visible.
- Pour the egg mixture evenly over the vegetables on the sheet pan. Use a spatula to gently distribute it, ensuring it reaches all corners.
- Bake at 375°F for 22-25 minutes. The center should jiggle slightly when you gently shake the pan—it will continue cooking as it cools. The edges will be set and pull away slightly from the sides of the pan.
- Remove from oven and let cool for 5 minutes on the pan. This resting period firms up the structure without overcooking the center.
- Scatter fresh chives and flake sea salt over the top if desired. Cut into 8-10 squares using a sharp knife or bench scraper.