
I’ve tested this water bath canning pickled onions recipe dozens of times, and it’s become my go-to method for preserving onions that stay crisp, tangy, and shelf-stable for months. The secret isn’t complexity—it’s nailing the vinegar ratio (5 parts vinegar to 1 part water), prepping your jars correctly, and following the USDA processing time to the minute. You’ll end up with jars that look as good in your pantry as they taste on tacos, charcuterie boards, or straight from the jar at 3 p.m. when you need a quick, punchy bite.
Why You’ll Love This
- Shelf-stable for up to one year—no refrigerator space required after processing
- Crisp texture and bright tang that don’t fade over time, unlike quick-pickled versions
- One tested brine formula that works every time; scale it up for bulk canning sessions
- Ready to gift or meal-prep straight from the pantry—no last-minute prep needed
- Full control over salt, spice, and vinegar strength; customize to your taste before processing
- Tested against USDA and NCHFP safety guidelines—you know exactly what you’re canning
Ingredient Breakdown in Groups
For the Onions & Jars
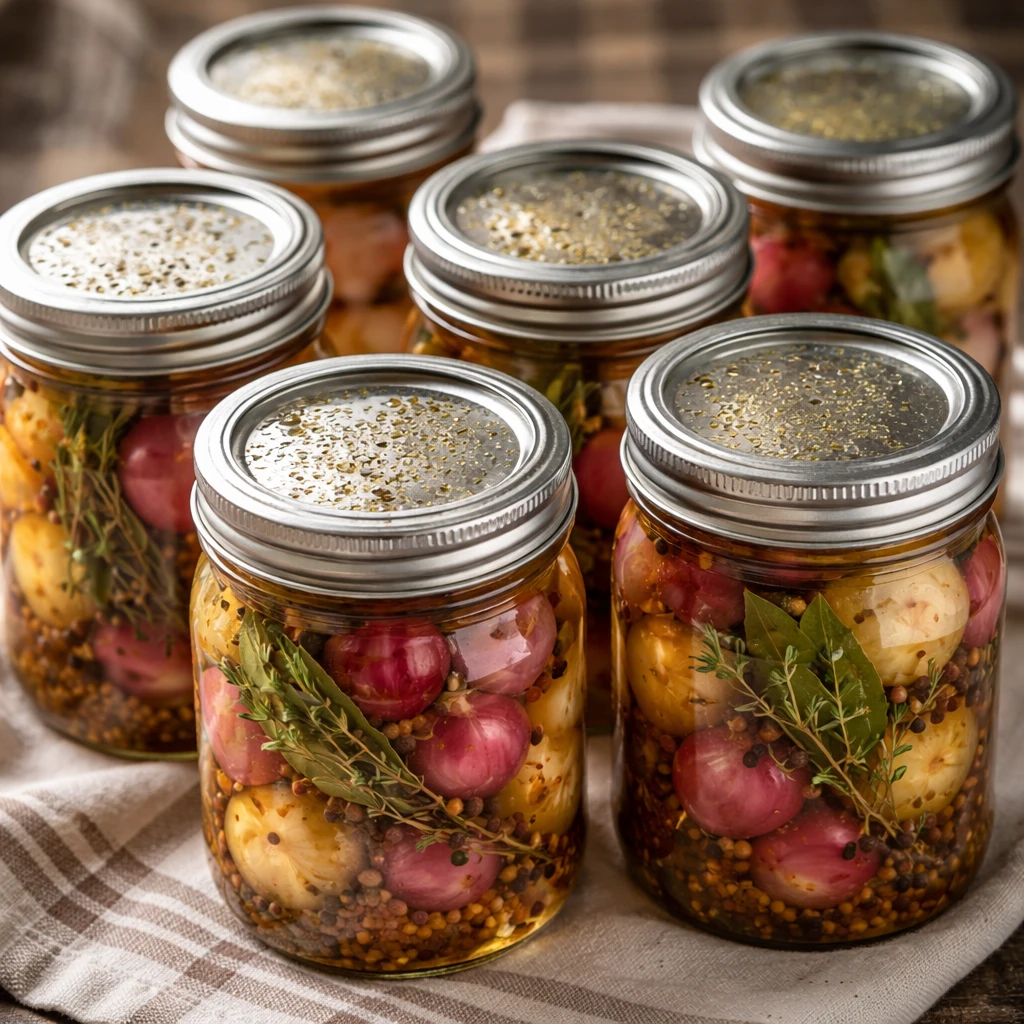
- 3 pounds small white or red onions (about 1 to 1.5 inches diameter), peeled and halved or quartered, or 4 pounds medium onions sliced into rings
- 6 to 8 pint-sized mason jars (or 3 to 4 quart-sized jars)
- New two-piece canning lids and bands
For the Brine
- 5 cups white vinegar (5% acidity) or apple cider vinegar
- 1 cup water
- 3 tablespoons pickling salt or kosher salt (not iodized)
- 2 tablespoons sugar
For Flavor & Spice (per jar)
- 2 to 3 bay leaves
- 1 teaspoon mustard seeds
- 1 teaspoon black peppercorns
- 1 small dried red chili (optional, for heat)
- 2 to 3 fresh thyme sprigs or 1/2 teaspoon dried thyme
- 1 small garlic clove, peeled and halved
Key note on vinegar: I always use 5% acidity vinegar—check the label. Lower acidity vinegar won’t preserve safely. White vinegar gives clean tang; apple cider vinegar adds subtle sweetness. Both work equally well in this recipe.
On salt: Pickling salt dissolves cleanly and won’t cloud your brine. Kosher salt works too; iodized table salt will make everything murky and bitter.
Whirl Hook
The twist here is the 5:1 vinegar-to-water ratio combined with proper jar processing—it locks in crispness and tang that stays bright for a full year. Most quick-pickle recipes rely on refrigeration and fade within weeks. This method gives you shelf-stable onions that taste better at month six than they do at week one, as flavors marry and mellow.
Flavor Spin
The core flavor play is vinegar-forward heat with warm spice undertones. I build this by layering mustard seed (peppery, slightly bitter), bay leaf (herbaceous calm), and peppercorns (sharp finish) directly into each jar before the brine hits. The onions themselves soften slightly during processing, which mellows their raw bite and lets them absorb the brine flavor completely. If you want more heat, add a dried chili per jar; if you prefer floral notes, swap thyme for a small rosemary sprig.
Step-by-Step
- Prepare your workspace and equipment. Fill your water bath canner with water and bring it to a rolling boil over high heat (this takes about 20-25 minutes). Place your jars, lids, and bands in a separate pot of simmering water to sterilize them—keep them hot until you fill them.
- Prep the onions. Peel your onions under cool running water, then halve or quarter them if they’re small (1 to 1.5 inches), or slice larger onions into thin rings. Pat them dry with a clean kitchen towel.
- Make the brine. In a medium saucepan, combine 5 cups vinegar, 1 cup water, 3 tablespoons salt, and 2 tablespoons sugar. Bring to a boil over medium-high heat, stirring occasionally until salt and sugar dissolve completely—this takes 3-5 minutes. Once boiling, reduce heat to medium-low and keep the brine hot until you’re ready to fill jars.
- Pack the spices into each jar. Working with one hot jar at a time, add 2 to 3 bay leaves, 1 teaspoon mustard seeds, 1 teaspoon black peppercorns, 1 small dried chili (if using), 2 to 3 thyme sprigs, and 1 halved garlic clove to the bottom of the jar.
- Fill jars with hot onions. Pack the prepped onions tightly into each jar, leaving 1/2 inch of headspace at the top. Work quickly so onions stay hot; cold onions in hot brine can crack jars.
- Pour hot brine over onions. Ladle the hot brine over the onions, maintaining that 1/2 inch headspace. Use a clean, damp cloth to wipe the rim of each jar—any brine residue will prevent a proper seal.
- Seal the jars. Place a hot lid on each jar, then screw a band on fingertip-tight (snug but not wrenched). Do not over-tighten; the lid needs room to move slightly during processing.
- Process in the water bath. Carefully lower filled jars into the boiling water bath using a jar lifter, keeping them upright. The water should cover the jars by 1 to 2 inches. Once all jars are in and the water returns to a rolling boil, process pint-sized jars for 10 minutes (or 15 minutes for quart-sized jars). Start timing once the water boils.
- Cool and rest. Turn off heat and let jars sit in the canner for 5 minutes before removing them. Use a jar lifter to carefully remove each jar and set it upright on a clean kitchen towel, leaving 2 inches of space between jars. Do not move them for at least 12 hours; they’ll seal as they cool.
- Check seals. After 12-24 hours, press the center of each lid. If it’s concave (slightly dented inward) and doesn’t pop back when you press it, the jar sealed successfully. If any lids popped back up, refrigerate those jars and use them within 3 weeks.
Visual Cooking Timeline
- 0:00 — Fill water bath canner with water, bring to rolling boil (20-25 minutes)
- 0:20 — Sterilize jars, lids, and bands in simmering water; start prepping onions
- 0:30 — Combine vinegar, water, salt, and sugar in saucepan; bring to boil (3-5 minutes to dissolve salt)
- 0:35 — Brine is hot and ready; begin packing jars with spices and onions
- 0:45 — All jars filled, sealed, and ready for water bath
- 0:55 — Processing complete (10 minutes for pints, 15 for quarts); remove jars to cool undisturbed
- 13:00 — Check seals after 12+ hours; label and store shelf-stable jars in a cool, dark place
Whirl Factor
Texture contrast: The onions start firm and raw, then soften slightly during processing while staying crisp enough to bite cleanly. They’re never mushy—that’s the payoff of the high vinegar ratio and proper heat timing. Flavor contrast: Tangy, salty brine plays against sweet undertones from the sugar and onion flesh. Warm spices (mustard, bay, peppercorn) add depth without overpowering the vinegar bite. The result is complex, balanced, and nothing like the flat tang of store-bought pickled onions.
Quick Tips
- Pack onions tightly—loose packing leads to floating pieces and uneven brine coverage. Aim for snug but not crushed.
- Don’t skip the headspace. Exactly 1/2 inch allows room for the brine to expand during processing without forcing out the seal.
- If you’re nervous about seal failure, process for an extra 2 minutes. The USDA times are tested minimums; a few extra minutes won’t hurt texture or flavor.
- Keep a kitchen timer visible during processing—don’t rely on memory. Set it the moment the water returns to a rolling boil.
- Label jars with the date and batch number. Properly canned pickled onions keep for one year, but they’re best in the first 6-8 months when flavor is brightest.
- If a jar fails to seal, don’t reprocess it. Refrigerate and use within 3 weeks, or open it and make a quick-pickle jar instead.
Spin Options
Garlic & Herb Variation
Double the garlic cloves to 2 per jar and add 1/4 teaspoon dried oregano and 1/4 teaspoon dried basil to the brine itself (dissolve them while heating). This version is bright, Mediterranean-leaning, and pairs beautifully with grilled meats and cheese boards.
Spicy & Sweet Variation
Add 1/4 teaspoon crushed red pepper flakes and 1 tablespoon honey to the brine (dissolve with salt and sugar). Use 2 small dried red chilies per jar instead of one. This version has heat that builds slowly and a subtle honey sweetness that rounds the vinegar.
Mustard & Dill Variation
Replace half the mustard seeds with yellow mustard powder (1/2 teaspoon per jar), and add 1/2 teaspoon fresh dill (or 1/4 teaspoon dried dill) per jar. This is sharper and more herbaceous—excellent with smoked fish and rye bread.
Make-Ahead Options
One week before: Peel and halve onions, store in a sealed container in the refrigerator. Prep your spices into small bowls so you can grab them quickly during packing. One day before: Sterilize all jars, lids, and bands; store them in a clean kitchen towel. Make the brine, cool it completely, and refrigerate in a covered container. Reheat gently before filling jars. Morning of canning: Set up your water bath canner and bring water to a boil. Have onions, spices, and brine ready within arm’s reach. Do not make ahead: Don’t pack jars the day before. Cold onions in hot brine can crack, and sealed jars sitting overnight before processing aren’t safe. Always fill and process on the same day.
Whirl Finish
Serving: Use pickled onions on tacos, nachos, grain bowls, charcuterie boards, or straight from the jar as a quick snack. They’re also stunning as a condiment alongside roasted meats, smoked fish, or even breakfast eggs. Storage: Sealed, unprocessed jars keep refrigerated for up to 3 weeks. Processed jars are shelf-stable in a cool, dark pantry for up to one year. Once opened, refrigerate and use within 2-3 weeks. If a jar ever shows signs of spoilage (cloudiness, off smell, bulging lid), discard it immediately—don’t taste it.
Substitution Ideas
White vinegar → Apple cider vinegar: Adds subtle sweetness and warmth; use the same ratio. White vinegar → Rice vinegar: Milder and slightly sweet; use 6 cups rice vinegar to 1 cup water to maintain acid strength. Pickling salt → Kosher salt: Works equally well; measure by weight if possible (3 tablespoons salt = about 50 grams). Small onions → Pearl onions: No peeling needed; blanch 2-3 minutes first to soften slightly. Small onions → Sliced red onions: Thinner slices pack more per jar; reduce processing time to 8 minutes for pints. Sugar → Honey: Use 1.5 tablespoons honey instead of 2 tablespoons sugar; dissolve it while heating the brine. Bay leaf → Dried tarragon: Use 1/4 teaspoon per jar for a more delicate, floral note.
FAQ
Can I use table salt instead of pickling salt?
I don’t recommend it. Iodized table salt contains anti-caking agents that cloud the brine and can taste bitter. Kosher salt or pickling salt are your best bets.
What if my jars don’t seal?
Don’t panic. Refrigerate unsealed jars immediately and use them within 3 weeks. They’re still safe—they just won’t be shelf-stable. You can also open them, reheat the brine, and reprocess with new lids, but only if you do this within 24 hours of the first processing.
Can I use larger onions?
Yes. Slice them into rings or wedges; they’ll pack more densely and may need slightly less processing time (8 minutes for pints instead of 10). Larger pieces also soften more during processing, so texture will be slightly less crisp.
How long do canned pickled onions keep?
Properly sealed and stored in a cool, dark place, they’re safe for one year. Flavor is brightest in the first 6-8 months; after that, they’re still safe but flavors mellow and onions soften slightly.
Can I add fresh garlic or herbs instead of dried?
Fresh herbs can introduce bacteria and aren’t safe for water bath canning. Stick with dried herbs, or use fresh herbs only in quick-pickled (refrigerated) jars that you’ll use within 3 weeks.
Do I need a pressure canner for this recipe?
No. The high vinegar ratio (5:1) makes this safe for water bath canning. Pressure canning is only needed for low-acid foods like plain vegetables or meats.
Can I double this recipe?
Absolutely. Scale up the onions and brine proportionally—the ratio stays the same. Just make sure your water bath canner is large enough to hold all jars with 1-2 inches of water covering them. Process in batches if needed.
Water Bath Canning Pickled Onions Recipe, Safe Method
Ingredients
Method
- Wash 4 pint jars, lids, and bands in hot soapy water; rinse thoroughly.
- Place jars in your canning pot and cover with hot water; bring to a gentle simmer and keep warm until you're ready to fill.
- Place lids in a small bowl, cover with hot (not boiling) water, and let sit until use.
- Peel onions and trim root and stem ends, leaving them whole if small (1 to 1.5 inches), or slice into thin rings if larger.
- Pat onions dry with a clean towel—this helps them pack firmly into jars.
- Combine white vinegar, apple cider vinegar (if using), water, kosher salt, and sugar in a large nonreactive pot (stainless steel or enamel).
- Bring to a rolling boil over medium-high heat, stirring occasionally until salt and sugar dissolve completely, 3-4 minutes.
- Add bay leaves, mustard seed, peppercorns, allspice berries, red pepper flakes, and fresh herbs; simmer for 1-2 minutes to infuse flavor.
- Remove a warm jar from the canning pot using a jar lifter; place it on a clean kitchen towel.
- Pack onions tightly into the jar, filling to about 1 inch from the top (headspace).
- Ladle hot brine over onions, leaving exactly 1/2 inch headspace at the top.
- Use a bubble remover tool to slide around the inside of the jar and release any air pockets.
- Wipe the jar rim with a clean, damp cloth to remove any brine drips.
- Place a hot lid on the jar and screw the band on firmly (not over-tight—just snug).
- Repeat with remaining onions and jars until all are filled and sealed.
- Place filled jars on the rack in your canning pot, ensuring they are covered by at least 1 inch of water.
- Bring the water to a rolling boil over high heat.
- Once boiling, process pint jars for 10 minutes (adjust for altitude if you're above 1,000 feet—add 1 minute per 1,000 feet).
- Turn off heat and let jars sit in the pot for 5 minutes before removing.
- Remove jars with a jar lifter and place them on a clean towel, spacing them 1 inch apart.
- Let cool undisturbed for 12-24 hours; you'll hear the satisfying pop as each lid seals.
- Check seals by pressing the center of each lid—it should not flex or pop back. Store sealed jars in a cool, dark place for up to 12 months.