
Whether you’re decorating a sheet cake for a weeknight dessert, impressing guests at a dinner party, prepping decorated cakes ahead for the week, or creating something the whole family can enjoy together, sheet cakes don’t have to look basic. I’ve found that the best designs are the ones that feel effortless—and that’s exactly what these 12 techniques deliver. Each one uses simple buttercream moves, minimal tools, and color palettes that work across vanilla, chocolate, cookies-and-cream, and lemon bases. You’ll master rustic swoops, confetti borders, drop flowers, shell patterns, controlled drips, and chocolate shards without needing a pastry degree or a kitchen full of piping tips.
What ties these designs together is the same principle I use in every recipe I develop: texture contrast and high-impact finishes that actually hold up to real baking schedules. These sheet cake designs are built to work whether you’re frosting 30 minutes before serving or prepping three days ahead. Let’s dig into the techniques.
Easy Sheet Cake Designs for Weeknight — Fast Finishes Under 30 Minutes
Weeknight sheet cakes need speed and reliability. These designs skip fussy piping and lean into bold strokes, scattered elements, and color-blocked sections that come together fast. Active time on frosting and decorating stays under 30 minutes once your cake is cooled and crumb-coated.
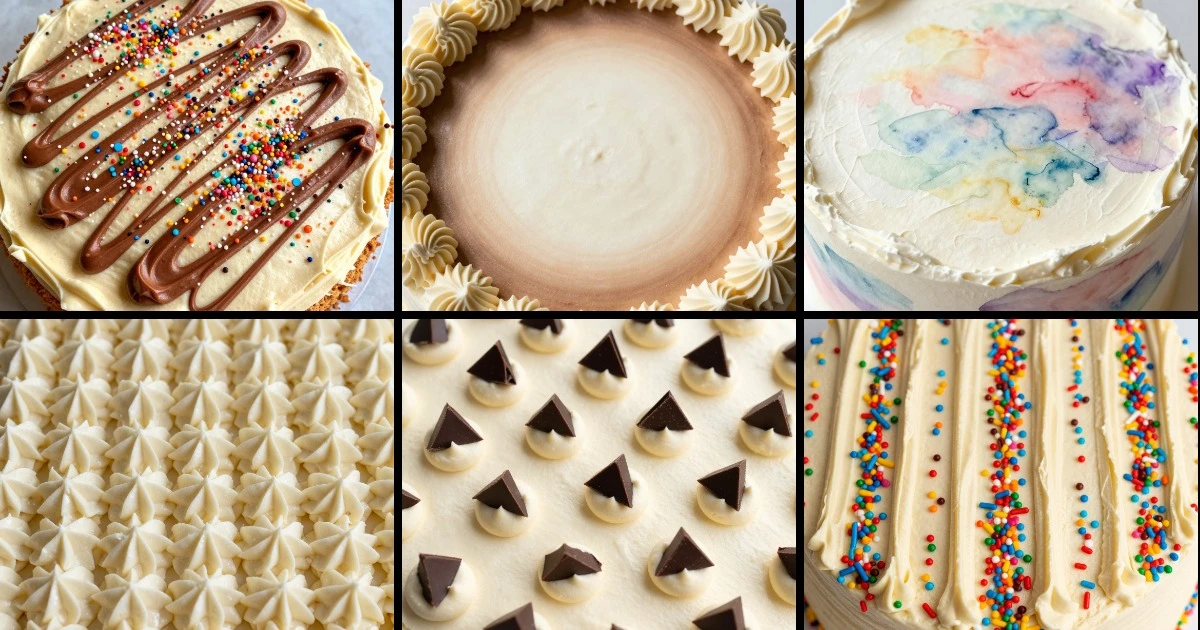
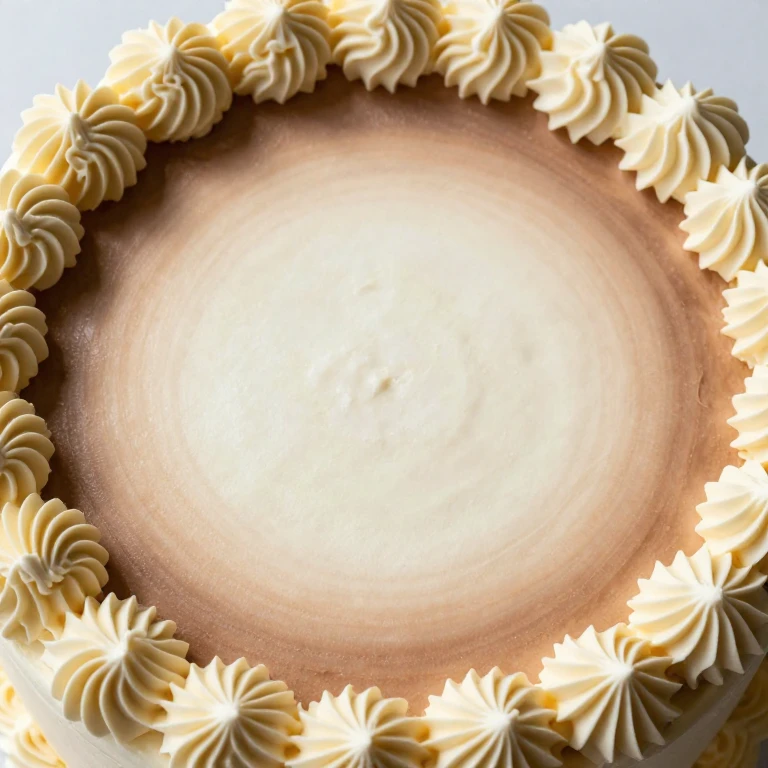
1. Rustic Swoosh and Sprinkle
This is my go-to when I want polished without perfectionist. Offset spatula swooshes in one direction, then a heavy sprinkle of nonpareils or pearl sugar across the top creates instant dimension. The beauty is in the imperfection—uneven swooshes actually look intentional and modern.
Ingredients
- 1 batch buttercream (your base recipe)
- 2–3 tablespoons heavy cream (to loosen frosting)
- Food coloring (1–2 colors)
- 1 cup nonpareils or pearl sugar
- Offset spatula
- Small bowl for color mixing
Instructions
- Crumb-coat your cooled sheet cake with a thin layer of buttercream; chill 15 minutes.
- Thin your main frosting color with heavy cream until it spreads smoothly but holds peaks.
- Using an offset spatula, make bold 3–4 inch swooshes across the cake surface, working in one direction.
- Immediately sprinkle nonpareils or pearl sugar across the wet frosting, pressing gently so they stick.
- Chill 10 minutes to set before serving.
Weeknight Win: Total decorating time is 12 minutes. The sprinkles hide any frosting imperfections.
Make-Ahead Note: Frost and decorate up to 4 hours ahead; store at room temperature in a cake box.
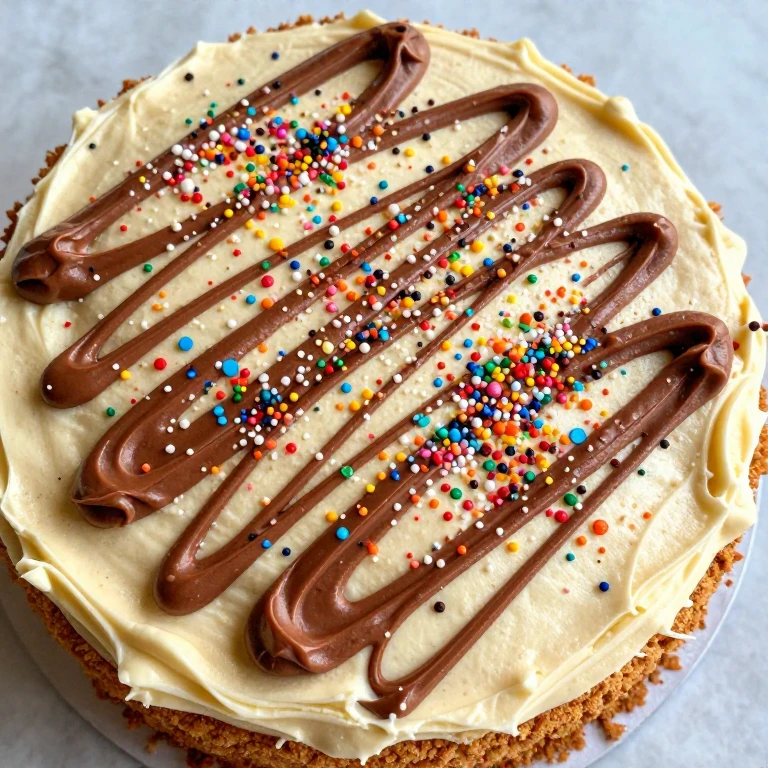
2. Color-Blocked Quarters
I divide the cake into four sections and frost each with a different pastel or jewel tone. It looks graphic and intentional, and there’s no blending required—just clean dividing lines. A thin piping line of white or contrasting buttercream between sections adds polish.
Ingredients
- 1 batch buttercream (divided into 4 portions)
- Food coloring (4 colors)
- Offset spatula
- Piping bag with round tip (optional)
- Toothpick (for dividing guide)
Instructions
- Crumb-coat the cake and chill 15 minutes.
- Lightly mark the cake into four equal sections using a toothpick (don’t press hard).
- Tint each buttercream portion with a different color.
- Frost each quarter with its assigned color using an offset spatula, working toward the center lines.
- Pipe a thin white or contrasting line along the dividing lines if desired; smooth with a damp spatula.
Weeknight Win: No piping skill needed; color contrast does the visual work.
Make-Ahead Note: Frost up to 6 hours ahead; store at room temperature.
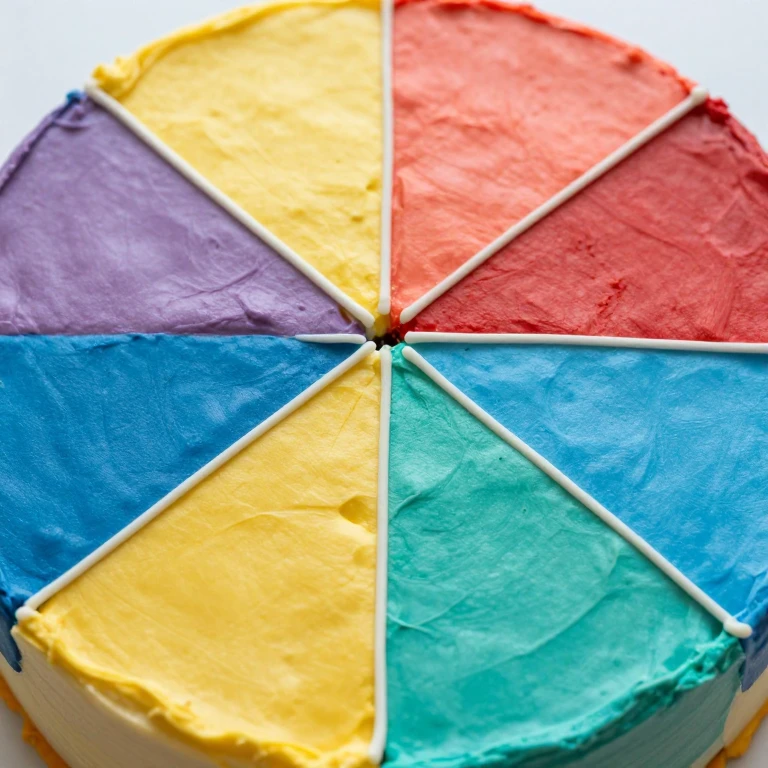
3. Scattered Fresh Flowers and Greenery
When I want something that reads elegant in seconds, I frost the cake with a neutral buttercream and scatter pesticide-free edible flowers and herb sprigs across the top. Roses, pansies, cornflowers, and mint leaves are my defaults. No pattern required—organic scatter is the point.
Ingredients
- 1 batch buttercream (neutral color: ivory or pale yellow)
- Pesticide-free edible flowers (roses, pansies, cornflowers)
- Fresh herb sprigs (mint, rosemary, thyme)
- Offset spatula
- Small plate for arranging flowers
Instructions
- Crumb-coat and chill 15 minutes.
- Frost the entire cake with a smooth or lightly textured layer of buttercream.
- Arrange flowers and herbs on a small plate, grouping by color or type.
- Scatter flowers and greenery across the frosted cake, pressing gently so they adhere.
- Chill 15 minutes to set before serving.
Weeknight Win: Flowers do all the decorating work; frosting can be imperfect underneath.
Make-Ahead Note: Add flowers no more than 2 hours before serving to keep them fresh; frost the cake base up to 8 hours ahead.
Easy Sheet Cake Designs for Dinner Party — Make-Ahead Techniques That Impress
Dinner party cakes need to feel special and reliable. These designs use make-ahead components—piped elements, ganache drips, chocolate shards—that you can prep the day before and assemble or touch up an hour before guests arrive. The Whirl Factor here is strategic prep: each design breaks into doable steps that spread across your timeline.
4. Piped Shell Border with Ombre Center
I pipe a classic shell border around the top edge in one color, then fill the center with a gradient of the same color family—darkest at the edges, fading to white or pale in the middle. It’s a technique that looks restaurant-quality but breaks down into two repeatable moves: shell piping and color blending.
Ingredients
- 1.5 batches buttercream
- Food coloring (1 color family, 3–4 shades)
- Piping bag with large shell tip (#16 or #18)
- Piping bag with small round tip (#3)
- Offset spatula
- Small bowls for color mixing
Instructions
- Crumb-coat the cake and chill 30 minutes.
- Frost the cake with a thin base layer of white or pale buttercream.
- Tint separate portions of buttercream in progressively darker shades of your chosen color.
- Pipe shells around the top perimeter using the shell tip, working in one consistent direction.
- Fill the center with concentric bands of color, starting with the darkest at the outer edge and blending toward the palest center using an offset spatula.
- Chill 20 minutes before serving.
Dinner Party Note: Pipe the shell border and prepare color portions the day before; assemble the ombre center 2 hours before guests arrive.
Make-Ahead Note: Piped shells hold perfectly for 24 hours in an airtight container; frost the cake base and chill overnight, then add the ombre center the day-of.
5. Dark Chocolate Ganache Drip with Gold Leaf
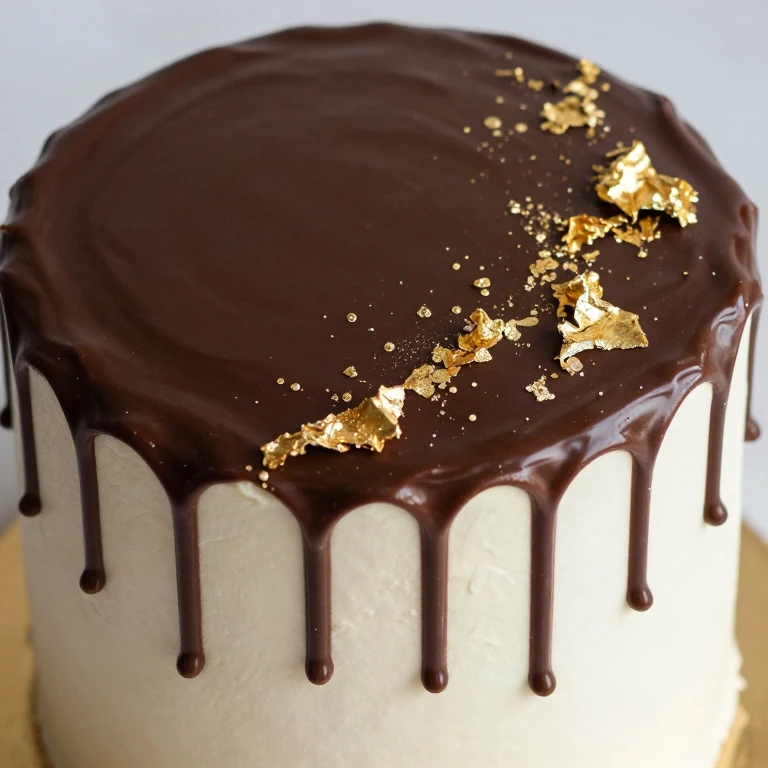
A poured ganache drip down the sides is my signature move for dinner parties because it looks luxe but requires zero piping skill. I pour warm ganache from a squeeze bottle, let it drip naturally, then finish with edible gold leaf pressed into the still-warm chocolate. The texture contrast between smooth ganache and creamy buttercream is the Whirl Factor here.
Ingredients
- 1 batch buttercream (pale or white)
- 6 oz dark chocolate, chopped
- 4 tablespoons heavy cream
- 1 tablespoon butter
- Edible gold leaf
- Squeeze bottle or piping bag
- Offset spatula
Instructions
- Crumb-coat the cake and chill 30 minutes. Frost the top and sides smoothly with buttercream.
- Heat cream and butter until steaming; pour over chopped chocolate and let sit 1 minute. Whisk until glossy and smooth.
- Let ganache cool to 90–95°F (warm to the touch but not hot).
- Pour ganache into a squeeze bottle. Working over one edge, squeeze a thin stream down the side, allowing it to drip naturally. Repeat around all edges.
- While ganache is still tacky, press small pieces of edible gold leaf onto the drips.
- Chill 30 minutes until ganache sets.
Dinner Party Note: Make ganache 2 hours ahead; pour and decorate 1 hour before guests arrive so ganache is fully set but still looks fresh.
Make-Ahead Note: Frost the cake and chill overnight; make and pour ganache the morning-of.
6. Hand-Painted Watercolor Buttercream
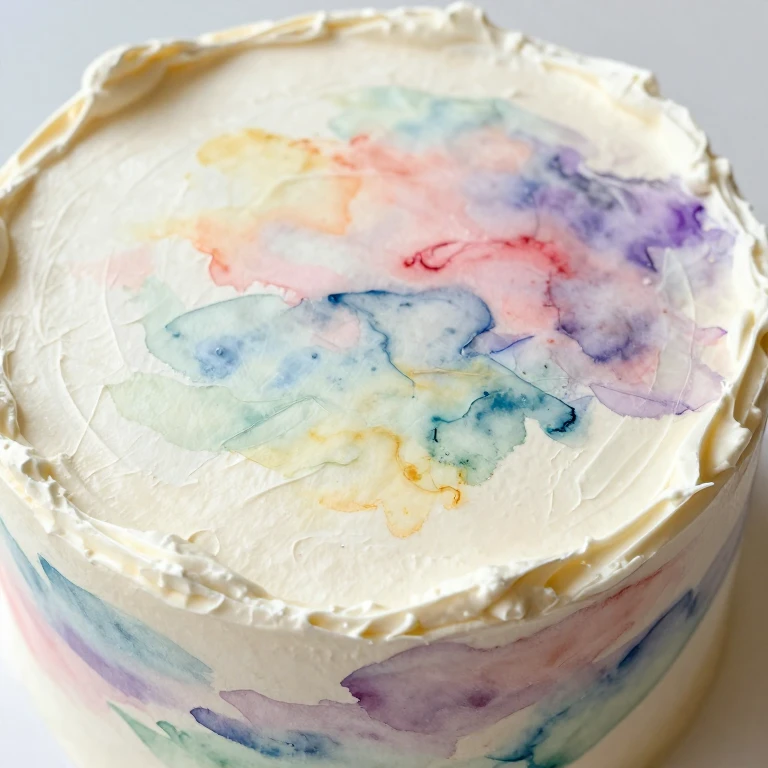
I thin buttercream with a touch of heavy cream and paint it directly onto the frosted cake using a small brush or offset spatula. Soft washes of color—blending two or three pastels or jewel tones—create a watercolor effect that feels artistic without requiring steady piping hands. This is where I lean into organic, imperfect marks because they read as intentional brushwork.
Ingredients
- 1 batch buttercream (divided and tinted)
- 2–3 tablespoons heavy cream (for thinning)
- Food coloring (2–3 colors)
- Offset spatula or small paintbrush
- Small bowls for color mixing
Instructions
- Crumb-coat the cake and chill 30 minutes. Apply a base layer of pale or white buttercream.
- Thin each color portion with a teaspoon of heavy cream until it’s the consistency of thick paint.
- Using an offset spatula or brush, paint broad strokes of one color across the cake surface.
- Rinse your tool and blend a second color into the first, creating soft transitions.
- Add a third color if desired, working while frosting is still wet for the best blending.
- Chill 20 minutes to set.
Dinner Party Note: This technique looks more polished when you embrace the organic quality—no two cakes will be identical, which is exactly the point.
Make-Ahead Note: Paint the cake 3–4 hours ahead; store at room temperature in a cake box.
7. Candied Citrus Wheels and Herb Clusters
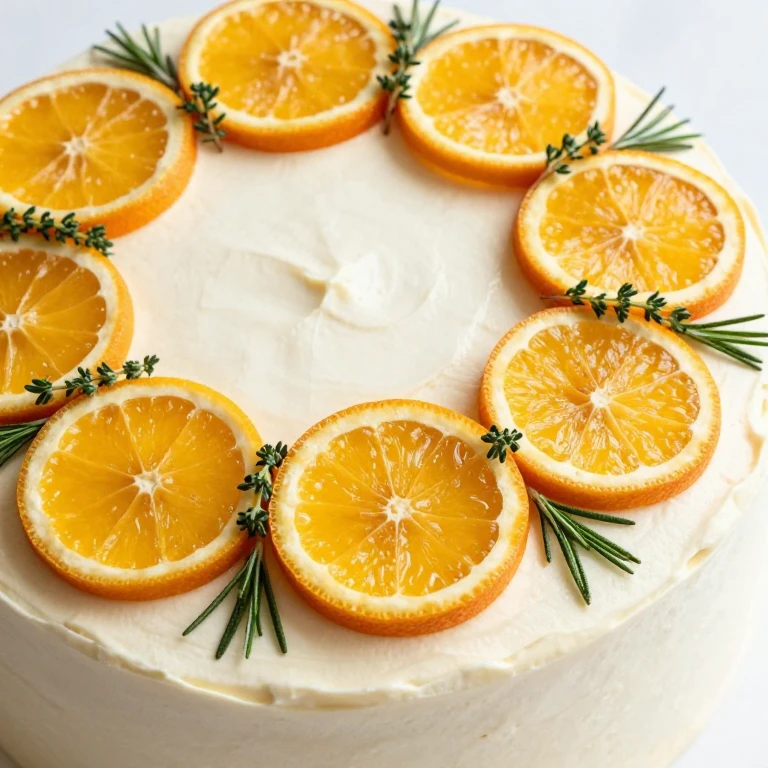
I candy thin lemon or orange slices ahead of time, then arrange them in a pattern across the frosted cake with clusters of fresh herbs tucked between. The candied wheels add shine and texture, and the combination reads as both modern and elegant. This works especially well on vanilla or lemon cakes where the citrus flavor echoes the design.
Ingredients
- 2 lemons or oranges, thinly sliced
- 1 cup sugar
- 1 cup water
- 1 batch buttercream
- Fresh herb sprigs (rosemary, thyme, mint)
- Offset spatula
Instructions
- Make candied citrus 1–2 days ahead: combine sugar and water in a saucepan, bring to a simmer. Add lemon or orange slices and simmer 45 minutes until translucent. Transfer to parchment and let dry completely.
- Crumb-coat the cake and chill 30 minutes. Frost smoothly with buttercream.
- Arrange candied citrus wheels in a pattern (scattered, circular, or linear) across the cake top.
- Tuck fresh herb sprigs between citrus wheels.
- Chill 15 minutes before serving.
Dinner Party Note: Candied citrus can be made 2 days ahead and stored in an airtight container. Assemble the cake 2 hours before guests arrive.
Make-Ahead Note: Frost the cake and chill overnight; add candied citrus and herbs the day-of, no more than 3 hours before serving.
Easy Sheet Cake Designs for Meal Prep — Freezer-Friendly Techniques and Reheating Guidance
Meal prep sheet cakes need to freeze well, hold their design through thawing, and look fresh when you serve them. These designs use stable elements—piped borders, chocolate components, and structured patterns—that don’t weep or shift when frozen and thawed. I focus on designs where each component is self-contained, so you can frost, decorate, freeze, and reheat without worrying about the finish falling apart.
8. Piped Rosette Field
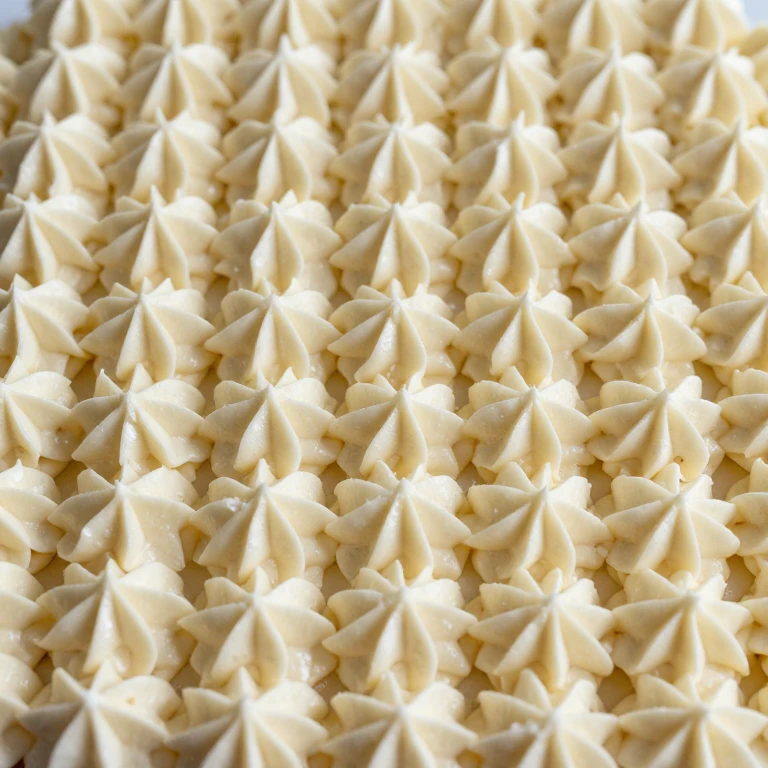
I pipe small rosettes in rows across the entire cake using a large star tip. It’s a repeatable motion that creates visual impact through repetition, and rosettes freeze and thaw without losing shape. Each rosette is its own unit, so even if the frosting softens slightly during thawing, the design stays intact. This is the Whirl Factor: structure through repetition.
Ingredients
- 1.5 batches buttercream (or Swiss meringue for stability)
- Food coloring (1–2 colors)
- Piping bag with large star tip (#32 or larger)
- Offset spatula
Instructions
- Crumb-coat the cake and chill 30 minutes. Frost with a thin base layer.
- Tint buttercream if desired.
- Pipe rosettes in tight rows, starting at one corner and working across in lines. Space them about 1 inch apart.
- Chill 30 minutes until rosettes are firm.
- Wrap tightly in plastic wrap and freeze up to 2 weeks.
Meal Prep Note: Freeze unwrapped for 2 hours until frosting is solid, then wrap tightly. Thaw at room temperature for 2–3 hours before serving.
Freezer Note: Rosettes hold perfectly through freeze-thaw cycles. Do not frost with American buttercream if you’re freezing longer than 1 week; use Swiss meringue or cream cheese frosting for better stability.
9. Chocolate Shard Toppers with Piped Dots
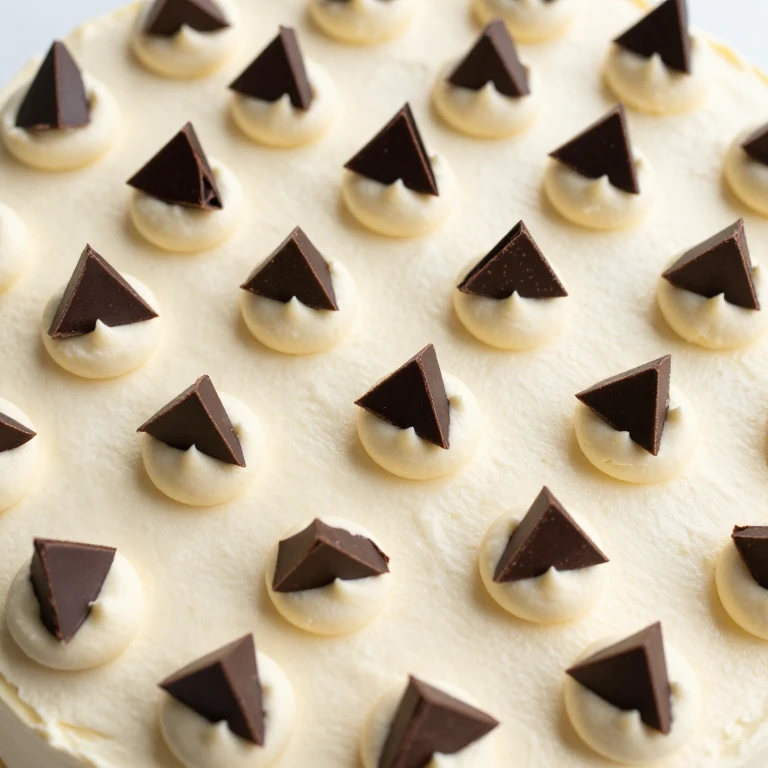
I pipe small dots of buttercream across the cake in a grid or scattered pattern, then press thin chocolate shards into each dot. The shards add height and texture, and they’re completely stable through freezing. The dots keep the shards in place even after thawing. This design is bold and modern, and it holds up to any handling.
Ingredients
- 1 batch buttercream
- 8 oz dark or milk chocolate
- Piping bag with small round tip (#3)
- Offset spatula
- Parchment paper
Instructions
- Make chocolate shards 1 day ahead: melt chocolate, spread thin on parchment, chill until brittle, then break into irregular shards. Store in an airtight container.
- Crumb-coat the cake and chill 30 minutes. Frost smoothly.
- Pipe small dots of buttercream in a grid or scattered pattern across the cake surface.
- Press a chocolate shard into each dot, angling slightly for visual interest.
- Chill 30 minutes until dots are firm, then wrap and freeze.
Meal Prep Note: Shards stay secure through freezing because they’re anchored in buttercream. Thaw at room temperature for 2–3 hours.
Freezer Note: Freeze up to 3 weeks. Shards do not absorb moisture, so they stay crisp even after thawing.
10. Confetti Sprinkle Stripes
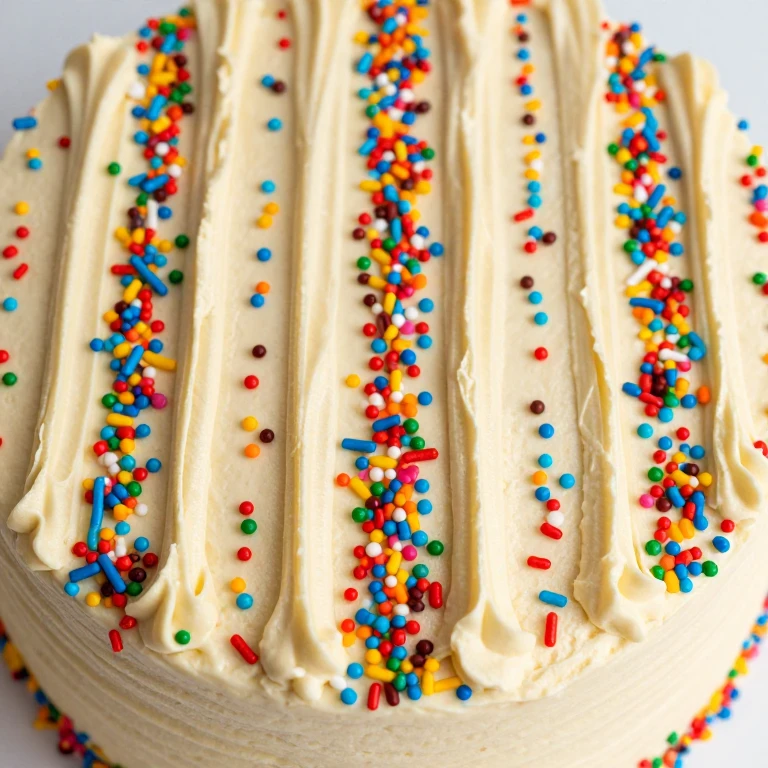
I frost the cake with a base color, then pipe thin vertical or horizontal lines of a contrasting buttercream color, and immediately press sprinkles into the wet frosting. The stripes create structure, and the sprinkles add texture. Everything is stable and freezer-friendly because sprinkles don’t soften or shift.
Ingredients
- 1.5 batches buttercream (divided for base and stripes)
- Food coloring (2 colors)
- Piping bag with small round tip (#3)
- 2–3 cups rainbow or themed sprinkles
- Offset spatula
Instructions
- Crumb-coat the cake and chill 30 minutes. Frost with your base color.
- Tint a second portion of buttercream a contrasting color.
- Pipe thin parallel lines (vertical or horizontal) across the cake, spacing them 1–2 inches apart.
- Immediately press sprinkles along each line, working quickly before frosting sets.
- Chill 30 minutes, then wrap and freeze.
Meal Prep Note: Sprinkles stay put through freeze-thaw cycles. Thaw at room temperature for 2–3 hours.
Freezer Note: Freeze up to 2 weeks. Do not thaw in the refrigerator, as condensation can soften sprinkles; use room temperature thawing only.
Easy Sheet Cake Designs for Family-Friendly — Kid-Approved and Flexible Techniques
Family sheet cakes need to be approachable, forgiving, and fun. These designs involve kids or adapt easily if you need to swap colors or ingredients. The Whirl Factor is flexibility: each design works with whatever sprinkles, colors, or toppings you have on hand. I focus on techniques that celebrate imperfection and invite participation.
11. DIY Sprinkle Bar Cake
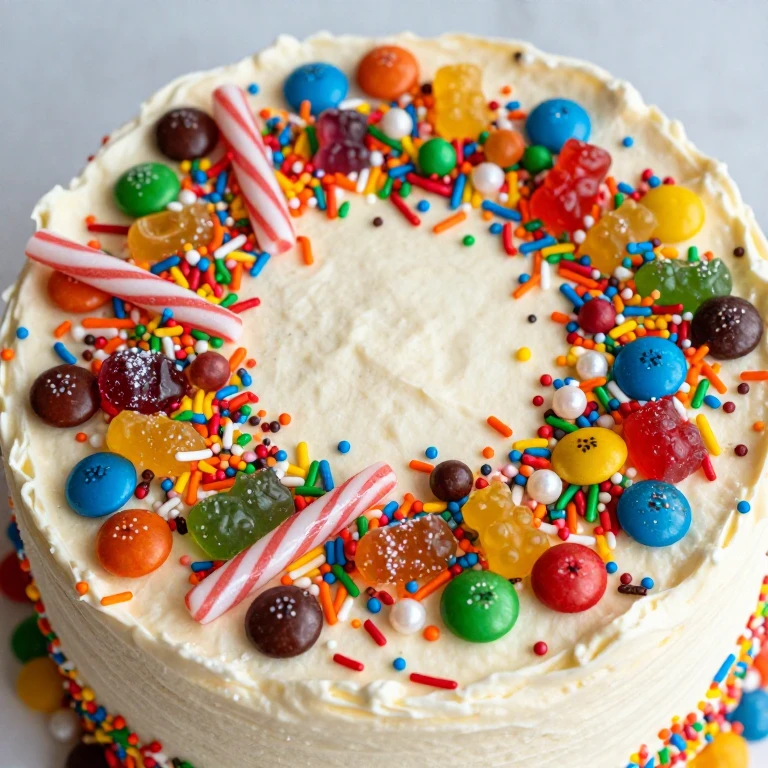
I frost the cake with a neutral buttercream and set out small bowls of different sprinkles, candies, and toppings. Kids (or the kid in you) scatter their own combinations across the cake. Everyone gets a personalized cake, and the randomness is part of the charm. This is pure texture contrast: smooth frosting, crunchy toppings.
Ingredients
- 1 batch buttercream (white or pale)
- Sprinkles (rainbow, pearl, nonpareils, jimmies)
- Candies (M&Ms, gummy bears, crushed candy canes)
- Edible glitter or pearl dust (optional)
- Offset spatula
- Small bowls and spoons
Instructions
- Crumb-coat the cake and chill 30 minutes. Frost smoothly with buttercream.
- Set out small bowls of sprinkles and candies, each with its own spoon.
- Let kids (or yourself) scatter toppings across the cake however they like.
- Chill 15 minutes to set before serving.
Family-Friendly Note: This design is mess-proof and judgment-free. Every cake looks unique and celebratory.
Make-Ahead Note: Frost up to 8 hours ahead; add toppings no more than 2 hours before serving so sprinkles stay crisp.
12. Crushed Candy Cane and Holly Leaf Design
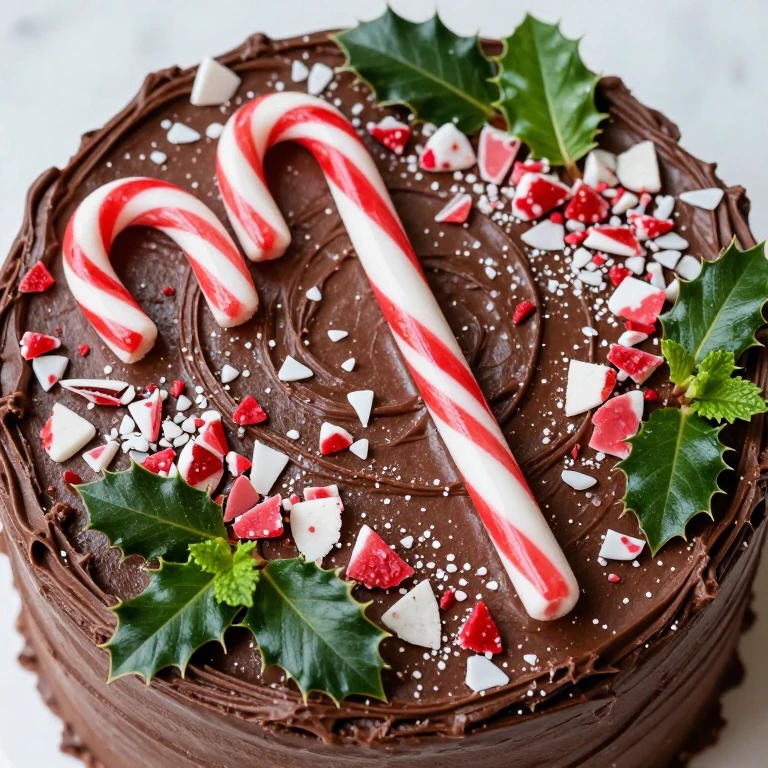
I frost the cake with chocolate buttercream, then create a simple pattern by pressing crushed candy canes into the frosting in lines or clusters, and tucking fresh holly leaves or mint sprigs between the candy pieces. It’s festive, easy, and works for any holiday season. The candy cane crunch against creamy frosting is the texture contrast that makes this feel special.
Ingredients
- 1 batch chocolate buttercream
- 6–8 candy canes, crushed into shards
- Fresh holly leaves or mint sprigs
- Offset spatula
- Small bowl for crushing candy
Instructions
- Crumb-coat the cake and chill 30 minutes. Frost with chocolate buttercream.
- Crush candy canes into irregular shards (not powder—you want visible texture).
- Press candy cane shards into the frosting in lines, clusters, or an all-over scatter.
- Tuck holly leaves or mint sprigs between candy pieces.
- Chill 15 minutes to set before serving.
Family-Friendly Note: Kids can help crush the candy and arrange the leaves. The result feels fancy but requires zero piping skill.
Make-Ahead Note: Add candy canes and leaves no more than 3 hours before serving; they stay crisp and fresh at room temperature.
FAQ
What’s the best buttercream consistency for decorating sheet cakes?
I use American buttercream (butter, powdered sugar, vanilla, heavy cream) for most sheet cake designs because it’s forgiving and holds piped shapes well. For designs that require painting or thin strokes, I thin it with 1–2 tablespoons of heavy cream per cup of frosting. For piped borders and rosettes, I keep it thicker—just spreadable but still holding peaks. If I’m making designs that will be frozen, I switch to Swiss meringue buttercream because it’s more stable through freeze-thaw cycles and doesn’t weep as easily.
How far ahead can I frost and decorate a sheet cake for a weeknight dinner?
I frost and decorate weeknight cakes up to 4–6 hours ahead, depending on the design. Designs with sprinkles, fresh flowers, or painted elements stay best when added closer to serving (within 2 hours) because they can absorb moisture from the frosting. Piped borders and ganache drips hold perfectly for 6 hours at room temperature. Always store decorated cakes in a cake box, not uncovered on a plate, to prevent drying and dust.
Can I make these designs ahead and freeze them?
Yes—most designs freeze beautifully for up to 2–3 weeks. Piped elements, chocolate shards, and sprinkles are all freezer-stable. Fresh flowers and herb garnishes should be added after thawing. I recommend freezing unwrapped for 2 hours until the frosting is solid, then wrapping tightly in plastic wrap. Thaw at room temperature for 2–3 hours before serving; never thaw in the refrigerator because condensation will soften the frosting and decorations.
What’s the easiest design if I have zero piping experience?
Start with Rustic Swoosh and Sprinkle or Color-Blocked Quarters. Both use an offset spatula instead of a piping bag, and imperfection is actually part of the design. If you want something that looks even more polished without piping, try Scattered Fresh Flowers and Greenery or Hand-Painted Watercolor Buttercream. These rely on color and texture rather than precise piping.
How do I keep buttercream from getting too soft while I’m decorating?
Keep your frosted cake chilled between decorating steps. After crumb-coating, chill for 15–30 minutes before adding the main frosting layer. If you’re working in a warm kitchen, chill again for 15 minutes after frosting the sides and top, before you start piping or adding decorative elements. Cold frosting holds its shape much better and gives you more time to work without smudging or sliding.
Can I substitute food coloring gels for liquid food coloring?
Absolutely—gel colors are actually my preference because they’re more concentrated, so you don’t need as much liquid in the frosting (which can throw off the consistency). Use about one-quarter the amount of gel compared to liquid coloring. Gel colors also produce more vibrant, true tones without diluting the buttercream, which is especially important if you’re making pale pastels or deep jewel tones.
What’s the best way to store a decorated sheet cake?
Store covered cakes at room temperature in a cake box for up to 2 days. If your kitchen is very warm or humid, refrigerate the cake, but bring it to room temperature 30 minutes before serving so the frosting softens and tastes creamy. Refrigeration can slightly dull colors and make buttercream taste less rich. For longer storage (up to 3 weeks), freeze the decorated cake wrapped tightly in plastic wrap, then thaw at room temperature.