
Scaling a cake for a crowd doesn’t mean sacrificing texture or taste. I’ve learned that a 12×18 sheet cake recipe demands precision—the right flour-to-liquid ratio, proper pan prep, and bake-time strategy. When you nail these fundamentals, you get a tender, level cake that slices cleanly and feeds 24-30 people with confidence. This isn’t a scaled-up box mix hack; it’s a real formula built for even rise and moist crumb across the entire pan.
What makes this version worth your time is the texture contrast I’ve built in. You get a delicate vanilla crumb that stays tender even when the cake sits for a day, paired with silky buttercream that pipes sharp edges and holds detail. The batter accounts for the shallow depth of a 12×18 pan, so the center bakes through without the edges drying out. I’ll show you how to prep the pan, scale the ingredients correctly, and read the doneness cues that matter.
Whether you’re baking for a birthday, office event, or family gathering, this sheet cake recipe removes the guesswork. Let’s break down the approach that keeps this cake level, moist, and ready to decorate.
Quick Snapshot
- Prep Time: 15 minutes
- Bake Time: 28-32 minutes
- Total Time: 1 hour 15 minutes (plus cooling)
- Yield: 24-30 servings
- Texture: Tender, level crumb with fine crease
- Flavor Profile: Classic vanilla with subtle butter depth
- Skill Level: Intermediate (scaling + pan management)
Why This Recipe Works
A 12×18 sheet cake isn’t just a bigger 9-inch round. The shallow depth and large surface area change how heat distributes through the batter. I’ve adjusted the liquid-to-flour ratio to account for faster evaporation at the edges while keeping the center moist. The batter is thick enough to rise evenly without doming, and the oven temperature is set low enough (325°F) to let the center bake through before the edges brown.
The buttermilk in this formula adds tang that brightens the vanilla without making it taste sour. I use cake flour instead of all-purpose because the lower protein content yields a more delicate crumb—essential when you’re cutting 24 slices from one pan. The butter ratio is generous enough to keep the cake tender for 2-3 days, but not so much that it feels greasy.
I’ve also built in a specific pan-prep method. A parchment-lined 12×18 pan with sides prevents sticking at the edges where the cake is thinnest. I use an oven thermometer to verify temperature accuracy, because a 12×18 pan’s size means one hot spot can ruin half the cake. The bake time range (28-32 minutes) accounts for oven variation; you’re watching for a specific doneness cue, not just a timer.
Ingredient Overview
- 2 1/4 cups cake flour (sifted before measuring)
- 1 3/4 teaspoons baking powder
- 1/2 teaspoon baking soda
- 1/2 teaspoon salt
- 1 cup (2 sticks) unsalted butter, softened to 68-70°F
- 1 3/4 cups granulated sugar
- 3 large eggs, room temperature
- 1 tablespoon vanilla extract (pure, not imitation)
- 3/4 cup buttermilk, room temperature
- 1/4 cup whole milk, room temperature
Cake flour is non-negotiable here. It has 7-8% protein compared to all-purpose’s 10-12%, which means less gluten development and a more tender crumb. I sift it before measuring to remove lumps and aerate it slightly; this helps the leavening distribute evenly across the batter. If you only have all-purpose flour, swap 2 tablespoons per cup with cornstarch to lower the protein content, but the texture won’t be quite as delicate.
Buttermilk and milk together create a custom liquid blend. Buttermilk adds tang and reacts with baking soda for lift, while the whole milk keeps the crumb tender and rich. Room-temperature eggs and butter emulsify faster and create a smoother batter, which means fewer lumps and more even rise. Cold eggs will break the emulsion and create a grainy texture.
Pure vanilla extract matters more in a large batch than a small one. Imitation vanilla gets lost in 24 servings; pure vanilla cuts through and adds depth. Unsalted butter lets you control salt levels and taste the butter flavor without overpowering the vanilla.
Whirl Hook
This sheet cake recipe scales the classic vanilla formula to feed a crowd without sacrificing the tender crumb and level rise that make slicing clean and decorating easy. The core twist is the liquid blend—buttermilk and whole milk together—that keeps the center moist while the edges bake through evenly. You get a cake that holds its shape under frosting, slices without crumbling, and tastes as good on day three as it does fresh from the oven.
Flavor Spin
Classic vanilla is the anchor here, but I’ve leaned into the butter and tang. The buttermilk adds a subtle sourness that makes the vanilla taste more complex and less one-note. The higher butter ratio (1 cup for a 12×18 pan) gives the crumb a tender, almost velvety mouthfeel. This isn’t a delicate angel food; it’s a sturdy, flavorful cake that holds up to heavy frosting and decoration.
Step-by-Step Instructions
Prep (5 minutes before mixing)
- Set your oven to 325°F and position a rack in the lower-middle slot. Place an oven thermometer on the rack and let it read for 15 minutes. Adjust your oven temperature if it’s off by more than 10 degrees. A 12×18 pan is large enough that uneven heat will create a domed or sunken center.
- Line a 12×18 sheet pan with parchment paper. Lay the parchment so it covers the bottom and comes up all four sides. Crease the corners sharply. Lightly spray the parchment with baking spray (or brush with softened butter). This prevents sticking at the thin edges where the cake is most delicate.
- Measure your dry ingredients into a medium bowl: sift the cake flour, then measure 2 1/4 cups. Add baking powder, baking soda, and salt. Whisk together until the color is uniform and no streaks of white baking soda remain. Set aside.
- Measure buttermilk and whole milk into a liquid measuring cup. Let both sit at room temperature for at least 20 minutes. Cold milk will cool the batter and slow emulsification.
Mixing (8 minutes)
- In a stand mixer fitted with the paddle attachment, cream the softened butter and sugar together for 3-4 minutes. The mixture should look pale, fluffy, and almost mousse-like. This incorporates air and creates a base for the eggs to emulsify into. Scrape the bowl halfway through.
- Add eggs one at a time, beating for 30 seconds after each addition. Pause after the second egg and scrape the bowl. The batter should look smooth and slightly thick, not curdled or grainy. If it looks broken (separated), the eggs were too cold. Keep beating; it will come together once you add the dry ingredients and milk.
- Add vanilla extract and beat for 15 seconds. Scrape the bowl.
- Add one-third of the dry ingredient mixture and beat on low speed for 20 seconds. The batter will look lumpy; this is correct. Overmixing at this stage develops gluten, which toughens the crumb.
- Add half of the milk mixture and beat on low for 15 seconds. Scrape the bowl.
- Add another third of the dry ingredients and beat for 15 seconds. Scrape the bowl again.
- Add the remaining milk mixture and beat for 15 seconds. Scrape the bowl.
- Add the final third of dry ingredients and beat on low for 20 seconds, until no white streaks remain. Stop here. Overmixing past this point toughens the cake. The batter should look smooth, thick, and pourable.
Baking (30-35 minutes)
- Pour the batter into the prepared 12×18 pan. Use an offset spatula to spread it evenly to the corners. Pay attention to the corners and edges; batter pools deeper there and will bake faster. Level the top gently.
- Place the pan in the preheated 325°F oven on the lower-middle rack. Set a timer for 25 minutes and close the oven door. Do not open it before 25 minutes.
- At 25 minutes, open the oven and look at the cake. The top should look set but still slightly soft. The edges should be pulling away from the pan by about 1/4 inch. If you see a dome forming in the center, the oven is too hot; check your thermometer.
- Insert a toothpick into the center of the cake (not near an edge, which bakes faster). It should come out with 2-3 moist crumbs clinging to it, not wet batter and not completely clean. This is the critical doneness cue. A completely clean toothpick means overbaking; wet batter means more time is needed.
- If the toothpick shows wet batter, bake for 2 more minutes and check again. If it shows the right amount of moist crumbs, remove the cake from the oven immediately. Total bake time is typically 28-32 minutes depending on your oven.
- Let the cake cool in the pan for 15 minutes. During this time, the carryover heat finishes baking the very center without overbaking the edges. The cake will pull away from the sides slightly.
- Turn the cake out onto a wire cooling rack. Peel away the parchment carefully. Let the cake cool completely at room temperature, about 1 hour. Do not frost a warm cake; the frosting will melt and slide off.
Pro Tips for Best Results
- Use an oven thermometer and verify temperature before baking. Most home ovens run 10-25°F off from the dial. A 12×18 pan is large enough that a 15-degree difference will create an uneven bake. I check my oven thermometer every time I bake a sheet cake, not just once.
- Room-temperature ingredients are non-negotiable. Cold eggs and butter won’t emulsify properly, and you’ll end up with a grainy batter. Take eggs and butter out of the fridge 30 minutes before you start. Cold buttermilk will cool the batter and slow the emulsification process. I’ve learned this the hard way—a grainy batter bakes into a dense, crumbly cake.
- Don’t skip the parchment paper and pan prep. The edges of a 12×18 cake are thinner and bake faster than the center. Parchment prevents them from sticking and browning too much. I always line the sides too, not just the bottom, to protect the thin edges.
- Mix on low speed when combining dry ingredients with wet. This is where most home bakers overmix. High speed develops gluten and toughens the crumb. I use the lowest speed on my mixer (speed 1) for this step and watch the batter carefully. Stop as soon as no white streaks remain.
- Don’t rotate the pan during baking. A 12×18 pan is too large to rotate safely without jostling the batter. If your oven has a hot spot, the parchment lining protects the edges. Trust the lower-middle rack position and the 325°F temperature.
- Chill the frosted cake for 30 minutes before slicing. Cold frosting is firm and won’t drag or tear. A warm cake with soft frosting will crumble as you cut. I always chill my decorated sheet cakes before serving, even if I’m in a hurry. The extra 30 minutes pays off in clean slices.
Whirl Factor
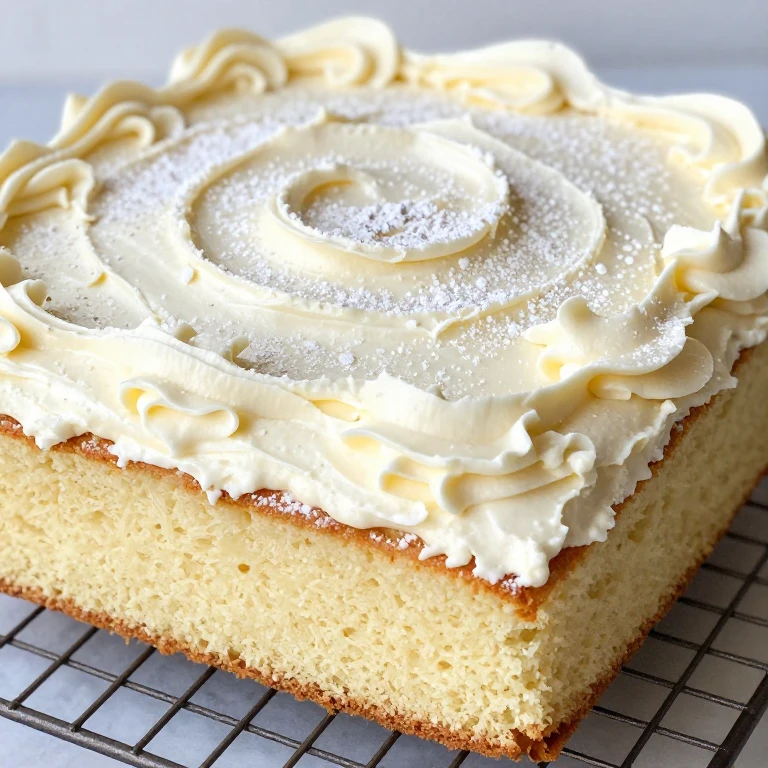
The texture contrast here is tender crumb against silky frosting. The cake is delicate enough to melt on your tongue, but structured enough to hold clean edges under a thick layer of buttercream. The buttermilk adds a subtle tang that prevents the vanilla from tasting flat, and the generous butter ratio keeps the cake moist for days. When you frost this cake and slice it, each piece shows the tender crumb and the sharp frosting edge—that’s the Whirl Factor.
Flavor Variations
Lemon Sheet Cake
Swap the vanilla extract for 1 tablespoon fresh lemon juice plus 1 teaspoon lemon zest. Add the zest to the butter-sugar mixture before adding eggs. Reduce the vanilla to 1 teaspoon. The lemon adds brightness without making the cake taste sour. Pair with a lemon buttercream (add 2 tablespoons fresh lemon juice to the frosting recipe). Bake time stays the same.
Almond Sheet Cake
Reduce cake flour to 2 cups and add 1/4 cup finely ground almond flour. Use 1 1/2 teaspoons vanilla extract and add 1/2 teaspoon almond extract. The almond flour adds a subtle nuttiness and keeps the crumb tender. Bake time may shorten by 1-2 minutes because almond flour absorbs less liquid. Check the center at 26 minutes instead of 25.
Chocolate Sheet Cake
Reduce cake flour to 2 cups and add 1/4 cup unsweetened cocoa powder (sifted). Increase sugar to 2 cups. Use 1 1/2 teaspoons vanilla extract. The cocoa adds depth without making the cake taste overly chocolate-forward. Pair with chocolate buttercream or a simple chocolate ganache. Bake time stays the same.
Vanilla Bean Sheet Cake
Use 1 tablespoon vanilla extract plus 1 vanilla bean, split and scraped. Add the vanilla bean seeds to the butter-sugar mixture. The visible specks and intense vanilla flavor make this version feel more elegant. Bake time and temperature stay the same.
Spin Options
I’ve tested three frosting approaches that work with this cake. A silky American buttercream (butter, powdered sugar, vanilla, milk) pipes sharp edges and holds detail for decorating. A Swiss meringue buttercream is less sweet and has a silkier mouthfeel if you’re frosting for adults. A simple chocolate ganache (chocolate and cream) is foolproof and looks polished. All three work with the bake time and texture of this recipe.
Serving Suggestions
Serve the sheet cake at room temperature with fresh berries on the side. The tender crumb and cool frosting contrast beautifully with the brightness of strawberries or raspberries. For an elevated option, dust the cake with edible flowers or gold leaf, and serve with whipped cream and a berry compote. If you’re serving at an event, cut the cake into 1 1/2-inch squares for easy handling. I always chill the frosted cake for 30 minutes before slicing to ensure clean cuts and no crumbling.
Whirl Finish
A decorated sheet cake is a statement piece. This recipe gives you the tender crumb and even rise that makes slicing clean and plating pretty. Frost it simply with a smooth finish, or go bold with piped borders, sprinkles, and a personalized message. The cake holds up to heavy decoration and stays moist for 2-3 days, so you can bake it the day before if you’re short on time.
Storage & Reheating
Store the unfrosted cake in an airtight container at room temperature for up to 2 days. The crumb stays tender and moist. If you’ve frosted the cake, cover it loosely with plastic wrap and refrigerate for up to 3 days. The cold frosting firms up and slices cleanly. Do not freeze a frosted sheet cake; the frosting separates from the crumb when thawed.
To freeze the unfrosted cake, let it cool completely, wrap it tightly in plastic wrap, then place it in a freezer bag. Label it with the date. Freeze for up to 3 months. Thaw at room temperature in the wrapper, about 2 hours. Once thawed, frost and serve the same day for the best texture.
To reheat a room-temperature slice, no reheating is necessary. The cake tastes best at room temperature or slightly chilled. If you’ve refrigerated the frosted cake and want to soften it slightly, let it sit at room temperature for 15-20 minutes before serving. Do not microwave; the frosting will melt and the crumb will dry out.
FAQ
Can I use all-purpose flour instead of cake flour?
You can, but the crumb will be slightly denser. Swap 2 tablespoons per cup of all-purpose flour with cornstarch to lower the protein content. Sift the mixture together before measuring. The result won’t be quite as delicate as true cake flour, but it’s a workable substitute if that’s what you have on hand.
What if my cake comes out domed or sunken in the middle?
A dome usually means your oven runs hot or the temperature is too high. Verify with an oven thermometer and bake at 325°F. A sunken center means the cake was underbaked. The toothpick test is your best guide; if it comes out wet, bake for 2 more minutes. A large pan means the center bakes slower than the edges, so the lower-middle rack position is critical.
Can I make this cake the day before?
Yes. Bake the cake, let it cool completely, and wrap it tightly in plastic wrap at room temperature. The next day, unwrap it, frost it, and serve. The crumb actually improves slightly after sitting for 24 hours; the moisture redistributes and the cake tastes more tender. Do not refrigerate an unfrosted cake; it dries out faster in the cold.
How do I get clean slices without the cake crumbling?
Chill the frosted cake for 30 minutes before slicing. Cold frosting is firm and won’t drag. Use a long serrated knife dipped in hot water and wiped dry between each slice. The heat helps the knife glide through the frosting. If the cake is still warm, the frosting will be soft and the crumb will crumble.
Can I double this recipe for two 12×18 pans?
Yes. Double all ingredients and divide the batter evenly between two prepared pans. Bake both pans on the lower-middle rack if your oven is large enough, or bake them one at a time. The bake time stays the same (28-32 minutes) because the depth of batter in each pan is the same. Use an oven thermometer to verify temperature accuracy when baking two large pans.
What’s the best way to level a domed cake?
Let the cake cool completely, then use a long serrated knife or cake leveler to slice off the dome. Make a horizontal cut about 1/4 inch deep, using a gentle sawing motion. Save the trimmed pieces for snacking or cake crumbs for frosting. A level cake is easier to frost and looks more polished when sliced.
Can I use buttermilk powder instead of liquid buttermilk?
Yes, but the results are slightly different. Mix 1/4 cup buttermilk powder with 3/4 cup water to make liquid buttermilk. Let it sit for 5 minutes before using. The texture will be nearly identical, though the tang may be slightly less pronounced. Use the same amount in the recipe.
12x18 Sheet Cake Recipe With Fluffy Vanilla Buttercream
Ingredients
Method
- Preheat oven to 325°F. Grease a 12x18 inch sheet pan with butter, dust lightly with flour, then line the bottom and two long sides with parchment paper. This prevents sticking at corners and gives you clean edges.
- In a medium bowl, whisk together flour, baking powder, baking soda, and salt. Set aside. This dry mix ensures even distribution of leaveners across the wide pan.
- In a large bowl, cream butter and sugar on medium-high speed for 3–4 minutes until pale and fluffy. Scrape the bowl halfway through. This step builds air pockets that create tender crumb.
- Add eggs one at a time, beating for 20–30 seconds after each addition. Scrape the bowl between eggs. Add vanilla extract with the last egg. Overbeating here creates dense spots; stop as soon as each egg is incorporated.
- Whisk milk and sour cream together in a small bowl. Add dry ingredients to the wet mixture in three additions, alternating with the milk mixture. Start and end with dry. Mix on low speed just until combined—overmixing toughens the crumb.
- Pour batter into prepared pan and spread level with an offset spatula. Tap the pan on the counter twice to release air bubbles. Batter should be roughly 1.5 inches deep.
- Bake for 28–32 minutes at 325°F. The center will jiggle slightly when you gently shake the pan at 28 minutes—that's correct. A toothpick inserted near the center should come out with a few moist crumbs, never wet batter.
- Cool in the pan for 15 minutes. Run a thin knife around all edges to loosen, then invert onto a wire rack. Peel away parchment and cool completely, about 1 hour. Do not frost a warm cake—frosting will melt and slide.
- For buttercream, cream 1.5 cups softened butter and 4 cups powdered sugar on medium speed for 3–4 minutes until light and fluffy. Add 3 tablespoons heavy cream, 1 teaspoon vanilla, and 0.25 teaspoon salt. Beat until smooth and spreadable.
- Frost the cooled cake with an offset spatula, working from the center outward. Chill for 30 minutes before slicing. A sharp knife dipped in hot water and wiped clean between cuts gives you clean slices.