
Strawberry cakes have dominated my kitchen for years, but what transforms a good cake into an Instagram-stopping showstopper is the aesthetic. I’ve learned that presentation isn’t an afterthought—it’s part of the flavor experience. When you plate a cake with intention, you’re setting expectations for taste, texture, and care. That’s why I’ve organized these 12 aesthetic approaches by design philosophy: minimalist line work, structured fruit arrangements, gloss finishes, and soft watercolor techniques. Each style pairs with a specific cake structure and frosting choice, so you’re not just decorating—you’re building a cohesive vision from crumb to crown.
Whether you’re baking for a dinner party, a styled photoshoot, or simply because you want your everyday dessert to feel special, these approaches work across skill levels. I’ve included the core twist for each aesthetic, the texture contrast that makes it crave-worthy, and the practical moves that keep your strawberries looking fresh-cut hours after plating. Let’s dive in.
Minimalist Line Art Strawberry Cake Designs
Clean lines and negative space define this group. These designs rely on precision piping, hand-drawn flourishes, and strategic fruit placement. They suit sponge cakes with Swiss meringue buttercream or cream cheese frosting—surfaces that hold sharp detail.
1. Single-Line Piped Strawberry Cake
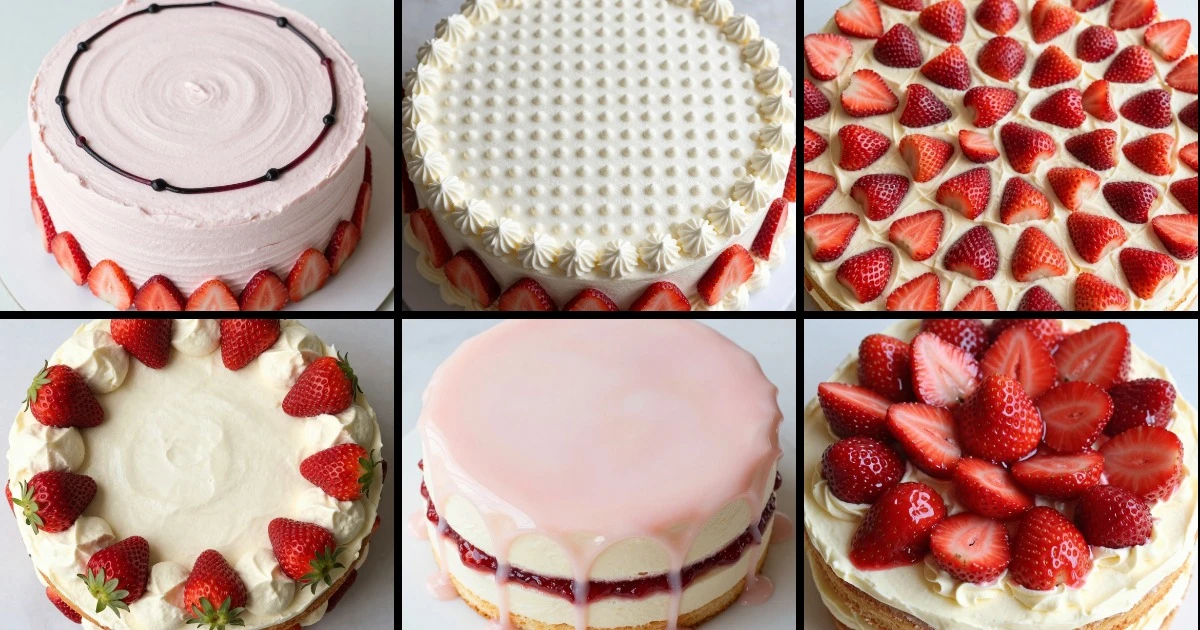
I love the confidence of one continuous line wrapping around a frosted tier. This aesthetic demands a steady hand and a fine piping tip, but the payoff is a cake that reads as gallery-quality in seconds. The Whirl Factor here is the contrast between the organic, hand-drawn quality of the line and the geometric perfection of the cake’s shape.
Ingredients
- Two 8-inch sponge cake layers
- 2 cups Swiss meringue buttercream, white or pale pink
- 1 lb fresh strawberries, hulled and halved lengthwise
- Black or deep burgundy food marker or edible pen
- 1 tbsp strawberry puree (for optional wash)
- Offset spatula
- Fine piping tip (0.5–1mm)
- Piping bag with coupler
- Parchment or acetate strip for practice
Instructions
- Level cake layers with a serrated knife and fill with buttercream and fresh strawberry slices between tiers.
- Crumb coat the cake with a thin layer of buttercream, chill 15 minutes, then apply final smooth coat using an offset spatula and bench scraper.
- Chill finished cake 30 minutes until frosting is firm but not hard.
- Using a fine piping tip and black or burgundy edible pen, draw one continuous flowing line around the cake’s perimeter—practice on acetate first if needed.
- Arrange fresh strawberry halves in a single row or scattered pattern along the base, cut-side facing out.
- Serve immediately or chill up to 4 hours before cutting.
Practical Tip: I always chill my piping hand under cold water for 30 seconds before drawing lines—a cool hand moves steadier and the frosting resists smudging.
Storage: This cake holds beautifully for 3–4 hours at room temperature if your kitchen stays below 70°F. For longer storage, refrigerate up to 2 days; bring to room temperature 20 minutes before serving so the frosting softens and the strawberries release their juices.
2. Hand-Drawn Botanical Sketch Cake
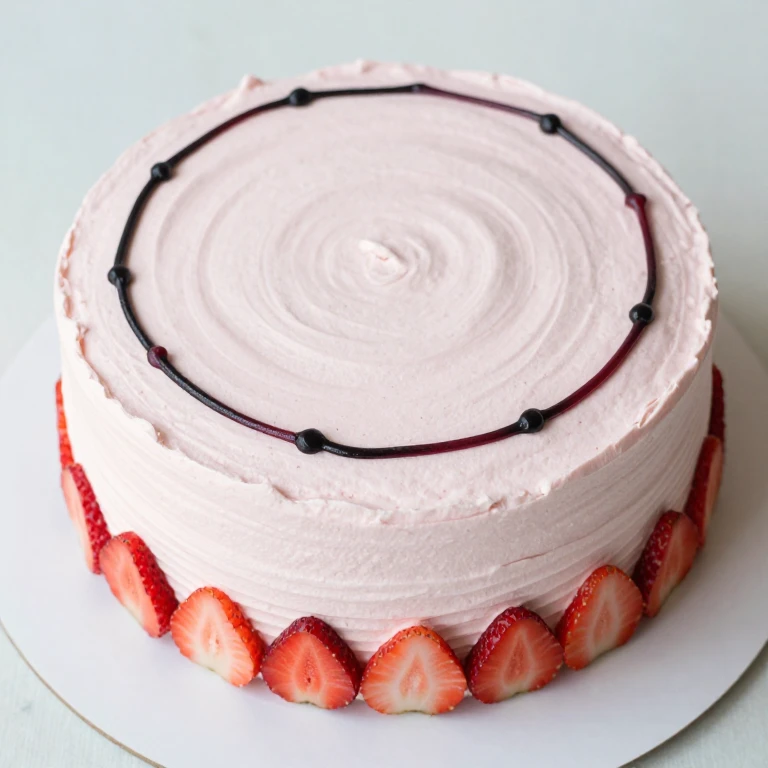
I sketch loose strawberry leaves and stems across the cake’s side, creating the impression of a botanical illustration come to life. The hand-drawn quality makes it forgiving—slight imperfections read as intentional artistry, not mistakes. The Whirl Factor is the tension between a structured cake form and organic, imprecise line work.
Ingredients
- Two 8-inch vanilla or almond sponge layers
- 2.5 cups cream cheese frosting
- 12–15 fresh strawberries with green hulls intact
- Edible black pen or food-safe marker
- 1 tbsp water mixed with 1 tsp gum arabic (optional, for wash)
- Offset spatula
- Bench scraper
- Small round piping tip (optional, for leaf details)
Instructions
- Bake, cool, and level your sponge layers; fill with cream cheese frosting and fresh strawberry slices.
- Crumb coat and chill, then apply final frosting coat until smooth.
- Chill the finished cake 20 minutes until the frosting is set but still slightly tacky.
- Using an edible pen, sketch loose leaf and stem shapes around the cake’s sides—aim for 3–4 botanical groupings spaced evenly.
- Arrange whole strawberries (with hulls) around the top and base, positioning them to anchor the sketched stems.
- Serve within 4 hours for best visual impact; refrigerate if holding longer.
Practical Tip: Sketch your design lightly first with a regular pencil on paper, then transfer the basic shapes to the cake using a toothpick as a guide before inking with the edible pen.
Storage: Keep refrigerated up to 2 days. The edible pen lines remain vibrant even after chilling, but the strawberry hulls may darken slightly—that’s natural and adds to the aged botanical look.
3. Negative Space Stripe Cake
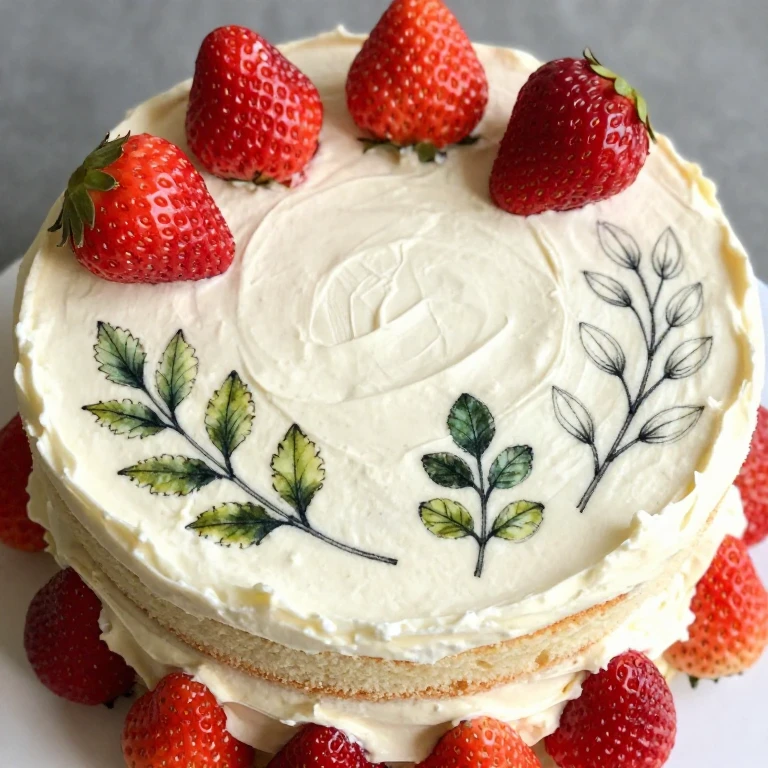
Instead of piping on frosting, I remove frosting in clean vertical stripes, exposing the cake beneath. This approach creates rhythm and lets the cake’s crumb structure become part of the design. The Whirl Factor is the visual surprise of seeing the cake’s interior texture—a texture contrast that feels modern and deliberate.
Ingredients
- Two 8-inch layered sponge cakes with strawberry jam or fresh filling
- 2.5 cups white or pale blush buttercream
- 8–10 fresh strawberries, sliced thin
- Offset spatula
- Bench scraper
- Ruler or straight-edge guide
- Comb scraper or offset spatula (for stripe removal)
- Parchment paper
Instructions
- Assemble and crumb coat your cake, then apply a full, even coat of buttercream.
- Chill 30 minutes until the frosting is firm.
- Using a ruler as a guide and a clean offset spatula or comb scraper, remove frosting in vertical stripes (about 1 inch wide, spaced 1 inch apart) to expose the cake layer beneath.
- Wipe your scraper clean between each stripe for sharp edges.
- Arrange thin strawberry slices in a single line down the center of the cake, or scatter them across the frosted sections only.
- Serve immediately or chill up to 3 hours before serving.
Practical Tip: Chill your cake scraper in the freezer for 10 minutes before scraping stripes—a cold tool glides through frosting without dragging or crumbling the cake.
Storage: This cake is best served the same day it’s decorated because the exposed cake edges can dry out. Refrigerate up to 24 hours, covered loosely with plastic wrap.
4. Geometric Dot Grid Cake
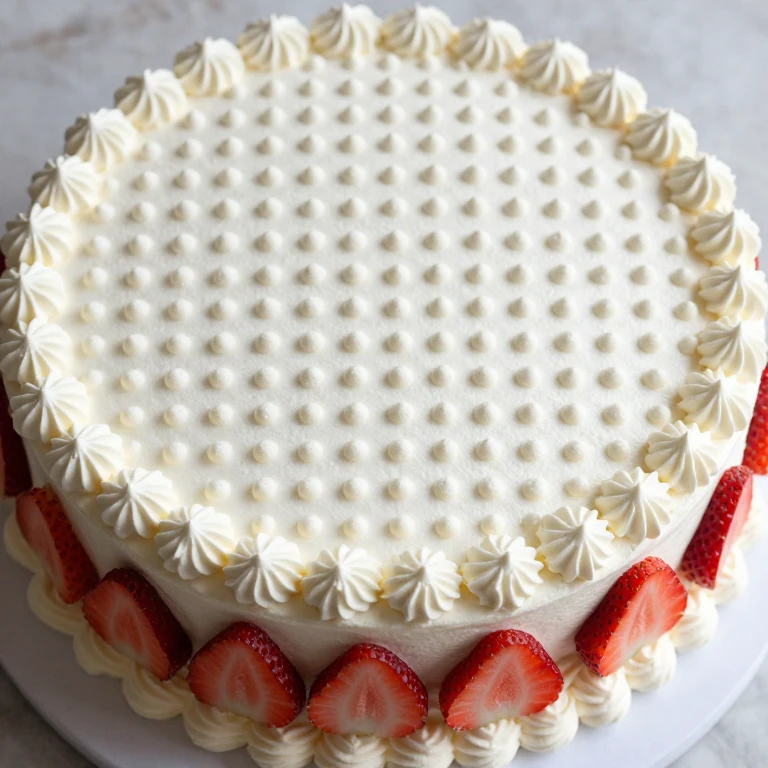
I pipe small, evenly spaced dots across the frosted surface using a fine round tip, creating a subtle grid pattern that reads as modern and controlled. The Whirl Factor is the interplay between the precise, mathematical dots and the organic placement of whole or halved strawberries within and around the grid.
Ingredients
- Two 8-inch sponge cake layers
- 2 cups Swiss meringue buttercream, white
- 12 fresh strawberries, hulled and halved
- Fine round piping tip (0.5–1mm)
- Piping bag with coupler
- Offset spatula
- Bench scraper
- Optional: small stencil or grid guide (parchment with marked dots)
Instructions
- Assemble, crumb coat, and apply final frosting coat to your chilled cake layers.
- Chill the frosted cake 30 minutes until firm.
- Using a fine round piping tip, pipe small dots (about 1/4 inch diameter) in evenly spaced rows across the top and sides—space them about 1/2 inch apart.
- Work in sections to maintain consistent pressure and dot size; if using a guide, remove it carefully after piping.
- Arrange strawberry halves in a loose circle or line around the base, or nestle them between dot clusters on top.
- Serve within 3–4 hours or refrigerate up to 2 days.
Practical Tip: Practice your dot pressure and spacing on a piece of parchment before piping on the cake—consistent dots are easier to achieve when your hand develops muscle memory.
Storage: Refrigerate up to 2 days, covered loosely. The piped dots remain crisp in the fridge and soften slightly at room temperature.
Structured Fruit Arrangement Strawberry Cake Aesthetics
These designs place strawberries as the primary visual element, arranged in grids, spirals, or geometric patterns. They demand fresh, uniform fruit and work best on cakes with a flat, stable frosting base like cream cheese or Swiss meringue buttercream.
5. Concentric Strawberry Ring Cake
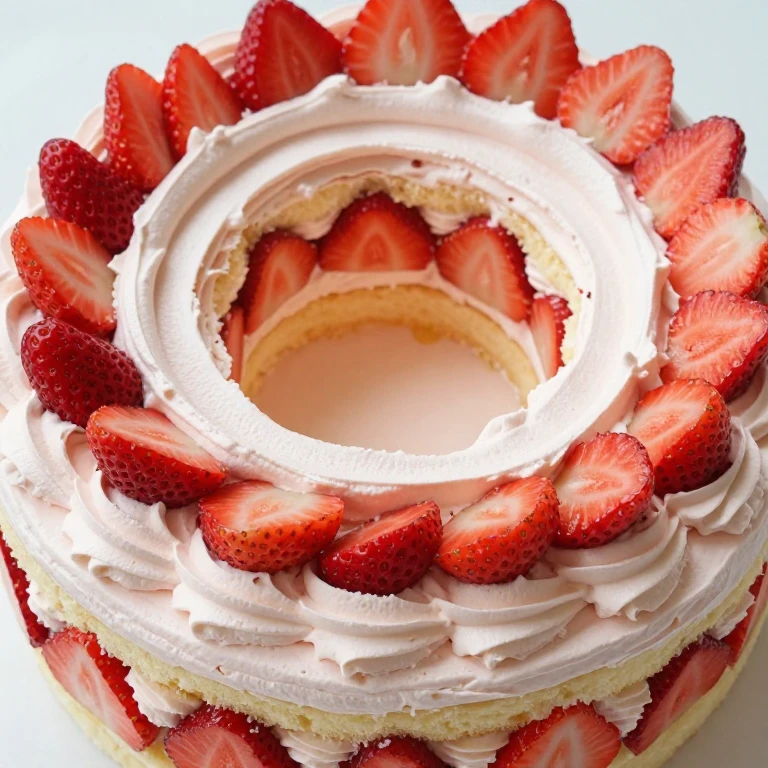
I arrange halved strawberries in concentric circles, starting from the cake’s center and spiraling outward. The effect is hypnotic and reads as intentional luxury. The Whirl Factor is the contrast between the soft, sweet frosting and the bright, tart snap of fresh strawberry flesh.
Ingredients
- Two 8-inch sponge or almond cake layers
- 2.5 cups Swiss meringue buttercream, pale pink or white
- 1.5 lbs fresh strawberries, hulled and halved lengthwise
- 1 tbsp neutral oil (for shine, optional)
- Offset spatula
- Bench scraper
- Parchment paper (for layout planning)
Instructions
- Assemble your cake layers with buttercream and fresh strawberry slices between tiers.
- Crumb coat and chill, then apply a final smooth coat of buttercream.
- Chill the finished cake 30 minutes until the frosting is set.
- Arrange strawberry halves in concentric circles, starting from the center top and working outward—place each half cut-side down, slightly overlapping the previous one.
- Fill any gaps with smaller strawberry pieces or a light dusting of freeze-dried strawberry powder.
- Optional: brush the strawberries lightly with neutral oil for added shine.
- Serve within 2–3 hours or refrigerate up to 4 hours; bring to room temperature 15 minutes before serving.
Practical Tip: Arrange your strawberries on parchment first to map out your spiral, then transfer them to the cake—this prevents repositioning and bruising.
Storage: Refrigerate up to 4 hours. The strawberries will release slight moisture, which softens the frosting—this is intentional and adds creaminess to each bite.
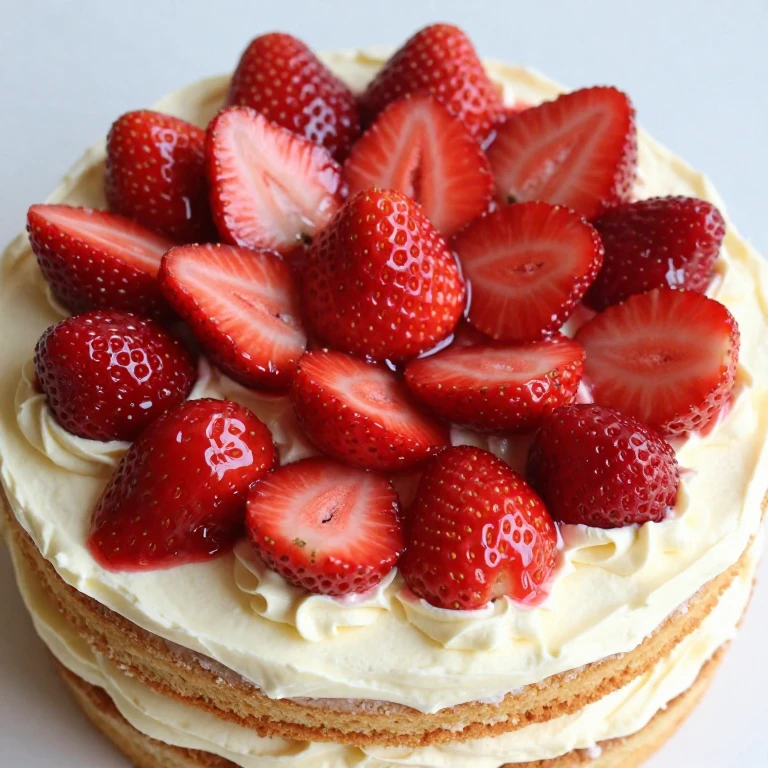
6. Strawberry Grid Cake

I arrange halved strawberries in a tight, geometric grid pattern across the cake’s top, creating a visual rhythm that feels both structured and abundant. The Whirl Factor is the balance between precision (the grid) and generosity (the density of fresh fruit).
Ingredients
- Two 8-inch sponge cake layers
- 2.5 cups cream cheese frosting
- 1.5–2 lbs fresh strawberries, hulled and halved
- 1 tbsp lemon juice (optional, to prevent browning)
- Offset spatula
- Bench scraper
- Optional: ruler or grid guide (drawn on parchment underneath cake board)
Instructions
- Assemble and frost your cake with a smooth, level coat of cream cheese frosting.
- Chill 30 minutes until the frosting is firm.
- Arrange strawberry halves in a tight grid pattern, cut-side down, starting from one corner and working in rows—aim for even spacing (about 1/2 inch between halves).
- Fill the entire top surface, working from the outside edge inward to avoid disturbing already-placed fruit.
- Optional: brush strawberries very lightly with a mixture of lemon juice and water to prevent oxidation.
- Serve within 3 hours or refrigerate up to 5 hours; the grid remains visually striking even after chilling.
Practical Tip: Cut all your strawberries at once and lay them on a paper towel to remove excess moisture—drier strawberries adhere better to the frosting and maintain their appearance longer.
Storage: Refrigerate up to 5 hours. The cream cheese frosting keeps the strawberries fresh-looking and prevents them from weeping onto the frosting.
7. Ombré Strawberry Fade Cake
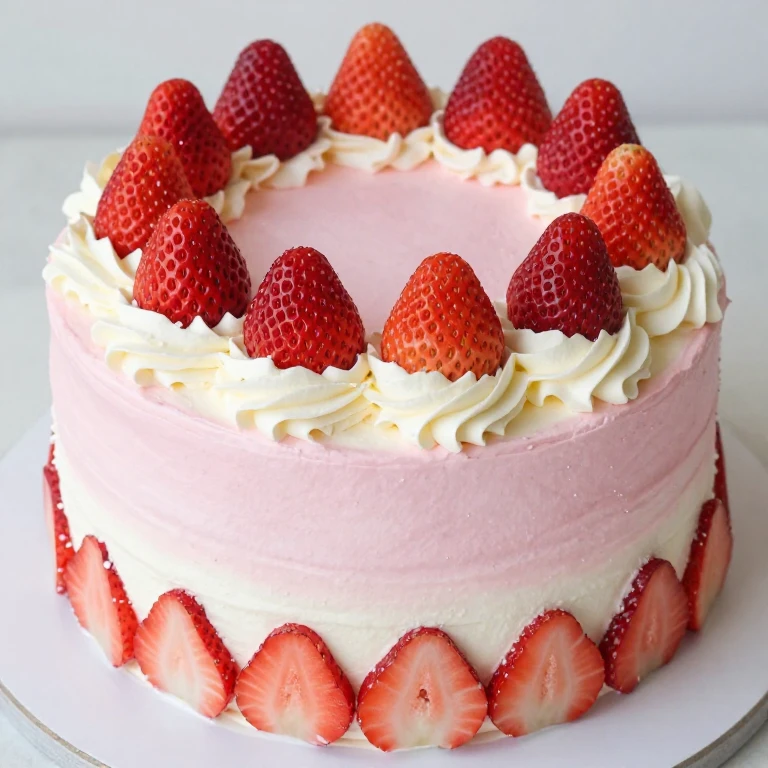
I arrange strawberries by size and color intensity, creating a gradient from pale pink or white frosting at the base to deep red fruit at the top. The effect mimics a watercolor wash and feels painterly. The Whirl Factor is the visual journey from subtle to bold, with texture contrast between soft frosting and firm fruit.
Ingredients
- Two 8-inch sponge cake layers
- 2.5 cups Swiss meringue buttercream, white or very pale pink
- 1.5 lbs fresh strawberries in varying ripeness (pale pink to deep red), hulled and halved
- Offset spatula
- Bench scraper
- Optional: edible pearl dust (for shimmer)
Instructions
- Assemble and frost your cake with a smooth, even coat of white or pale buttercream.
- Chill 30 minutes.
- Arrange strawberry halves in horizontal bands, starting with the palest berries at the cake’s base and progressing to the deepest red at the top.
- Work in rows, overlapping slightly, to create a seamless gradient effect.
- Optional: dust the finished cake lightly with edible pearl dust for added shimmer.
- Serve within 3–4 hours or refrigerate up to 6 hours.
Practical Tip: Sort your strawberries by color before you start arranging—this saves time and ensures a smooth gradient transition.
Storage: Refrigerate up to 6 hours. The gradient remains visually striking even after chilling, and the cold frosting helps preserve the strawberry color.
8. Scattered Whole Strawberry Cake
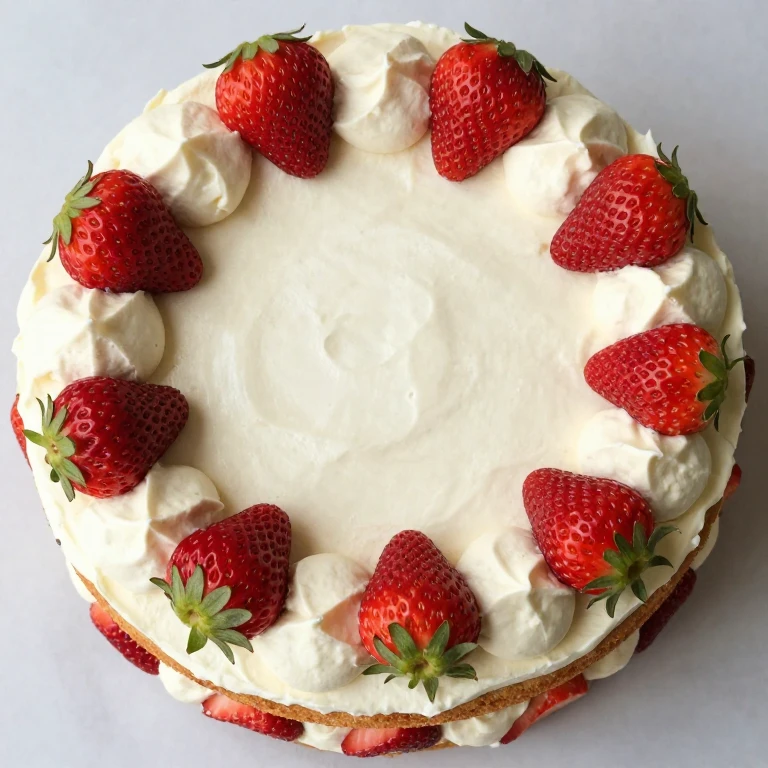
Instead of a pattern, I scatter whole strawberries (with hulls attached) across the frosted surface in an organic, garden-like arrangement. The Whirl Factor is the contrast between the structured cake form and the wild, natural placement of whole fruit—it reads as effortlessly elegant.
Ingredients
- Two 8-inch sponge cake layers
- 2 cups cream cheese frosting or Swiss meringue buttercream
- 12–16 whole fresh strawberries with hulls
- Optional: 2–3 fresh mint leaves
- Offset spatula
- Bench scraper
Instructions
- Assemble and frost your cake with a smooth, even coat.
- Chill 20 minutes until the frosting is set but still slightly tacky.
- Arrange whole strawberries (hulls up) across the top and sides in a loose, organic pattern—avoid a grid or pattern; let them feel naturally scattered.
- Tuck fresh mint leaves between berries if desired.
- Serve within 3–4 hours or refrigerate up to 6 hours.
Practical Tip: Choose strawberries of similar size and ripeness for visual balance, even though the arrangement is organic.
Storage: Refrigerate up to 6 hours. Whole strawberries with hulls stay fresh-looking longer than halved berries because the cut surface doesn’t oxidize.
Gloss and Mirror Finish Strawberry Cake Designs
These designs rely on glossy coatings—mirror glazes, fruit glazes, or gelatin washes—to create shine and depth. They demand precision and work best over firm, level cake bases. The payoff is a cake that looks almost jewel-like.
9. Mirror Glaze Strawberry Cake
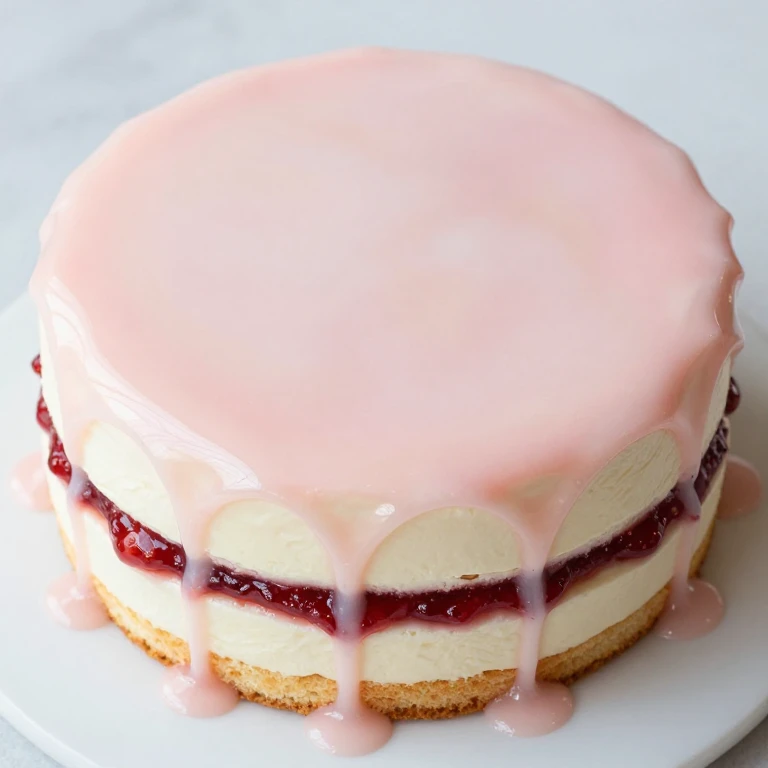
I pour a neutral or strawberry-tinted mirror glaze over a chilled cake, letting it cascade down the sides for a glossy, seamless finish. The Whirl Factor is the contrast between the slick, reflective glaze surface and the soft, yielding crumb beneath—plus the visual drama of the glaze cascade.
Ingredients
- Two 8-inch sponge cake layers
- 1 cup strawberry jam or curd (for filling)
- 2 cups Swiss meringue buttercream
- Mirror Glaze: 1 cup white chocolate, chopped; 1/2 cup heavy cream; 1/4 cup strawberry puree; 1 tbsp gelatin (bloomed); pinch of salt
- Fresh strawberries for garnish (optional)
- Offset spatula
- Wire rack over a baking sheet
- Thermometer (for glaze temp)
Instructions
- Assemble your cake layers with jam and buttercream filling; frost the exterior smoothly with buttercream.
- Chill the finished cake on a wire rack set over a baking sheet for at least 2 hours (or up to overnight) until very cold and firm.
- Prepare the mirror glaze: heat cream to 110°F, pour over chopped white chocolate and bloom gelatin, let sit 1 minute, then whisk until smooth. Stir in strawberry puree and salt. Cool to 85–90°F before pouring.
- Pour the glaze slowly over the chilled cake, working quickly but deliberately to allow it to flow down the sides evenly.
- Gently tap the cake board to settle the glaze and fill any gaps.
- Chill immediately for 30 minutes to set the glaze, then transfer to a serving plate.
- Garnish with fresh strawberries or freeze-dried fruit if desired.
- Serve within 4–6 hours; do not refrigerate after glazing, as condensation will dull the shine.
Practical Tip: The glaze temperature is critical—too hot and it will slide off; too cool and it will clump. Use a thermometer and pour in one smooth, continuous motion.
Storage: Serve the same day. If you must store, refrigerate uncovered for up to 24 hours, then bring to room temperature 30 minutes before serving (the shine will be slightly duller but the cake will taste just as good).
10. Fruit Glaze Shine Cake
I brush a light fruit glaze (apricot, strawberry, or neutral) across the frosted cake and arranged fruit, creating a subtle sheen and sealing in freshness. The Whirl Factor is the interplay between matte frosting and glossy fruit—visual interest through texture contrast.
Ingredients
- Two 8-inch sponge cake layers
- 2.5 cups cream cheese frosting
- 12–15 fresh strawberries, halved
- Fruit Glaze: 1/2 cup strawberry jam, 1 tbsp water, 1 tbsp lemon juice, strained through a fine sieve
- Offset spatula
- Pastry brush
- Small saucepan
Instructions
- Assemble and frost your cake with a smooth coat of cream cheese frosting.
- Arrange strawberry halves in your chosen pattern (grid, spiral, or scattered).
- Prepare the fruit glaze: heat jam with water and lemon juice over low heat, stirring until smooth. Strain through a fine sieve to remove pulp. Cool slightly.
- Brush the glaze gently over the strawberries and frosted surface using a pastry brush, working in light strokes to avoid disturbing the fruit.
- Chill immediately for 20 minutes to set the glaze.
- Serve within 3–4 hours or refrigerate up to 6 hours.
Practical Tip: Strain your glaze through a fine sieve to remove any pulp or seeds—a smooth glaze applies evenly and looks more polished.
Storage: Refrigerate up to 6 hours. The glaze seals the strawberries and prevents them from oxidizing or weeping, extending the cake’s visual appeal.
11. Watercolor Buttercream Drip Cake
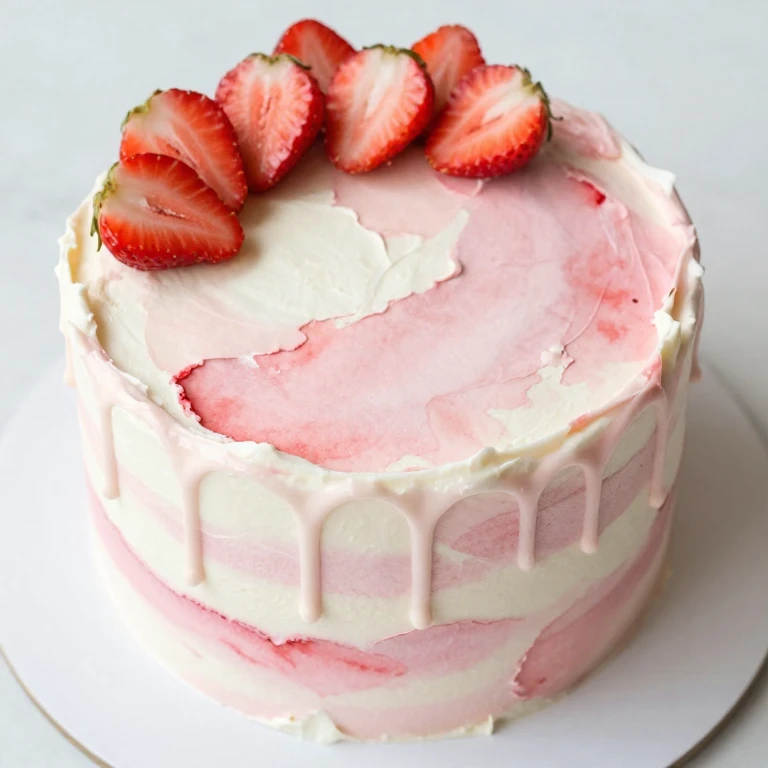
I apply buttercream in soft, blended color washes across the cake’s sides and top, creating a watercolor effect. The Whirl Factor is the soft, artistic quality of the blended colors paired with the precision of arranged strawberries—controlled chaos.
Ingredients
- Two 8-inch sponge cake layers
- 3 cups Swiss meringue buttercream, divided
- Gel food coloring in pale pink, deep red, and white
- 12 fresh strawberries, hulled and halved
- Offset spatula
- Bench scraper
- Palette knife or small offset spatula (for color blending)
Instructions
- Assemble your cake layers with buttercream filling.
- Divide buttercream into portions and tint with gel coloring: one pale pink, one deep red, one white.
- Crumb coat the cake, then apply patches of each buttercream color around the sides and top in no particular pattern.
- Using a bench scraper or palette knife, blend the colors where they meet, creating soft transitions and a watercolor effect—work gently to avoid overworking the frosting.
- Chill 30 minutes until the frosting is set.
- Arrange strawberry halves in a loose line or scattered pattern across the top.
- Serve within 3–4 hours or refrigerate up to 6 hours.
Practical Tip: Work quickly when blending colors—if the frosting gets too warm, it will become greasy and lose its shape. Keep your tools and cake chilled between steps.
Storage: Refrigerate up to 6 hours. The watercolor effect remains vibrant even after chilling, though the blended edges may soften slightly.
Soft and Semi-Naked Finish Strawberry Cake Aesthetics
These designs celebrate the cake’s crumb by leaving portions of it exposed, creating a rustic-modern look. They work beautifully with tender, moist cakes and showcase the bake’s structure and color.
12. Semi-Naked Cake with Strawberry Drip
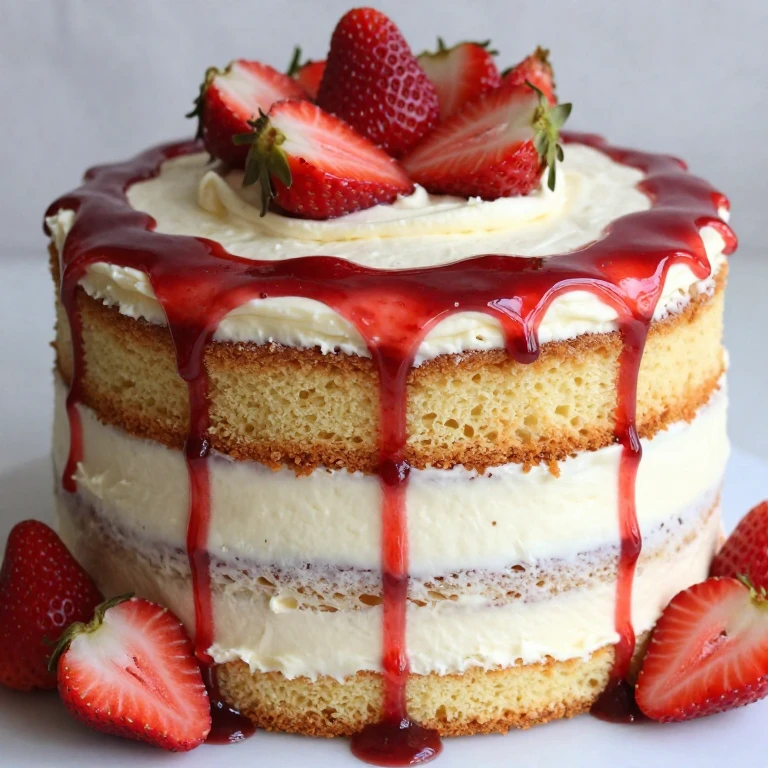
I frost the cake partially, leaving the sides partially exposed to show the cake’s crumb, then add a strawberry coulis drip down the sides. The Whirl Factor is the visual contrast between the naked crumb, smooth frosting, and glossy, flowing coulis—three textures in one design.
Ingredients
- Two 8-inch sponge or vanilla cake layers
- 1.5 cups cream cheese frosting
- Strawberry Coulis: 1 cup fresh strawberries (hulled), 2 tbsp powdered sugar, 1 tsp lemon juice
- Fresh strawberries for garnish
- Offset spatula
- Bench scraper
- Immersion blender or food processor
Instructions
- Assemble your cake layers with cream cheese frosting and fresh strawberry slices.
- Crumb coat the cake, then apply a partial frosting coat to the top and a thin, deliberate coat to the sides, leaving gaps of exposed cake visible (aim for 40–50% of the sides to show cake crumb).
- Chill 30 minutes until the frosting is set.
- Prepare strawberry coulis: blend fresh strawberries with powdered sugar and lemon juice until smooth. Strain through a fine sieve if you prefer a seedless sauce.
- Drizzle the coulis down the sides of the cake in thin streams, allowing it to pool slightly at the base.
- Arrange fresh strawberry halves on top and around the base.
- Serve within 2–3 hours or refrigerate up to 5 hours.
Practical Tip: Use a squeeze bottle or piping bag with a small round tip to drizzle the coulis—this gives you control over the thickness and placement of the drips.
Storage: Refrigerate up to 5 hours. The coulis will thicken as it cools, so if you’re making it ahead, thin it with 1 tsp water before drizzling.
When to Choose Each Style
- Minimalist Line Art: You want a gallery-quality cake that reads as intentional and modern. Choose this if you have steady hands and enjoy precision work, or if you’re styling for photography.
- Structured Fruit Arrangements: You have access to beautiful, uniform strawberries and want the fruit to be the hero. Pick this approach for celebrations where abundance and freshness matter most.
- Gloss and Mirror Finishes: You’re comfortable with glaze work and want maximum visual impact. These cakes photograph brilliantly and feel luxurious.
- Soft and Semi-Naked Finishes: You prefer a rustic-modern aesthetic and want to showcase your bake’s crumb structure. This style forgives minor frosting imperfections and celebrates the cake’s interior.
Frequently Asked Questions
How do I keep strawberries from browning or weeping after I cut them?
I always cut strawberries as close to serving time as possible—ideally within 1–2 hours. If you must cut them earlier, toss the halves gently with 1 tsp lemon juice per cup of berries; the acid slows oxidation. Pat them dry on paper towels before arranging on the cake. For maximum freshness, brush the cut surfaces very lightly with a mixture of equal parts lemon juice and water using a pastry brush. This creates a thin protective barrier.
Which frosting works best for each aesthetic?
Swiss meringue buttercream is my go-to for minimalist designs because it holds sharp piping detail and tolerates temperature changes. Cream cheese frosting is perfect for fruit arrangements because it’s slightly less rich and its tang complements strawberries. For glaze work, I use Swiss meringue buttercream as the base because it’s stable enough to support a heavy mirror glaze. For watercolor effects, I prefer Swiss meringue because the colors blend smoothly without the frosting becoming greasy.
Can I make these cakes ahead, and how far in advance?
I always bake my cake layers 1–2 days ahead and store them wrapped in plastic wrap at room temperature. I frost and decorate the day of serving for maximum visual impact, though most of these designs hold beautifully for 4–6 hours refrigerated. The exception is mirror-glazed cakes—serve those within 4 hours and don’t refrigerate after glazing, or condensation will dull the shine.
What’s the best way to transport a decorated strawberry cake?
I place the cake on a non-slip cake board, then set that board inside a sturdy cake box or on a flat surface in my car. For fruit-topped cakes, I keep them refrigerated until 30 minutes before serving to firm up the frosting. For glaze-finished cakes, I transport them at room temperature to preserve the shine. Avoid stacking anything on top of the cake box.
How do I know if my strawberries are fresh enough to use raw on a cake?
I look for berries that are bright red (or pale pink if they’re less ripe), firm to the touch, and smell sweet. Avoid any with soft spots, mold, or a dull appearance. The fresher your berries, the longer they’ll stay looking vibrant on the cake. I buy strawberries 1–2 days before I plan to decorate and store them unwashed in a breathable container in the fridge.
Can I use frozen strawberries for these designs?
Frozen strawberries won’t work for these aesthetics because they release moisture as they thaw and become mushy. I always use fresh, firm berries for visual appeal. However, frozen strawberries are perfect for making strawberry coulis or puree for glazes and fillings.
Conclusion
These 12 aesthetics are your toolkit for turning a good strawberry cake into a showstopper. Pick one that matches your style—whether you’re drawn to minimalist precision, abundant fruit, glossy drama, or rustic charm—and practice it until it feels natural. The best cake is the one you’ll actually make, so start with the aesthetic that excites you most and build from there.