
Christmas sheet cakes are the ultimate crowd-pleaser, and I’ve found that the design is just as important as the flavor. When I’m baking for the holidays, I want something that looks showstopping but doesn’t require pastry school credentials to pull off. That’s why I’ve organized these 10 designs by their core visual approach—from piped details to candy accents to snowy textures. Each one pairs a specific decorating technique with a flavor that amplifies the festive moment. Whether you’re baking ahead for a party or prepping a make-ahead dessert, these designs deliver impact without the stress.
I’ve grouped these by decorating style so you can pick based on your comfort level and time commitment. Some rely on simple piping, others on strategic candy placement, and a few on textured finishes that hide imperfections. Every design here travels well, chills beautifully, and tastes as good as it looks.
Piped & Buttercream Christmas Sheet Cake Designs
These designs lean on buttercream piping as the star. If you can pipe a line or a shell border, you can execute these looks. I always start with a crumb coat, chill it solid, then add the final frosting layer—that’s the secret to clean piping every time.
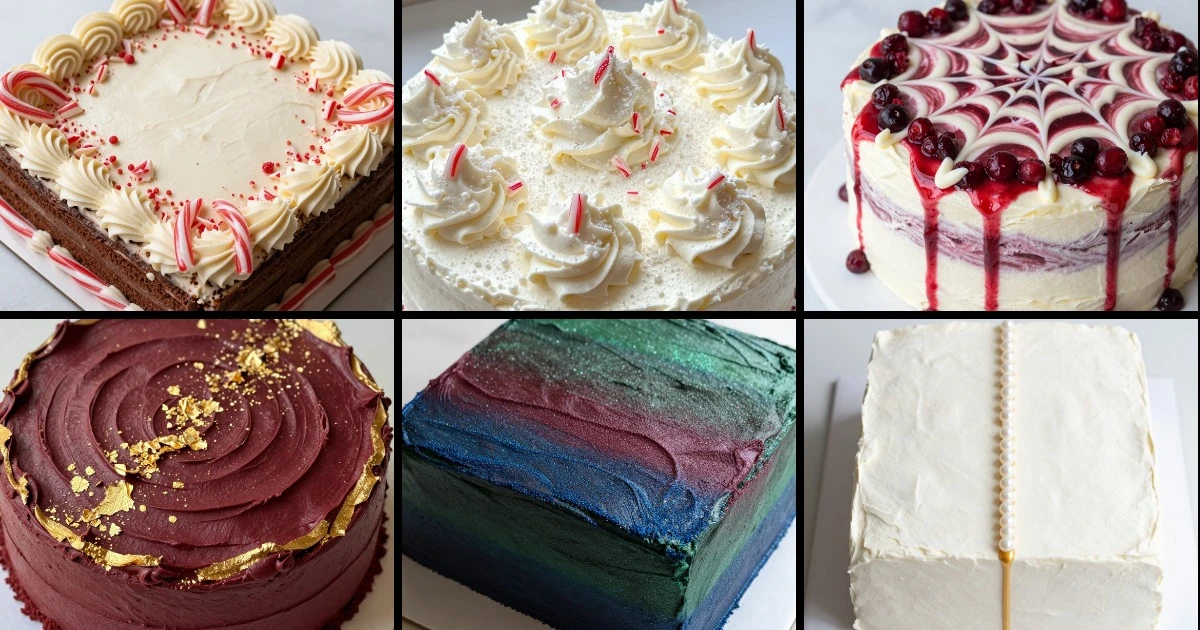
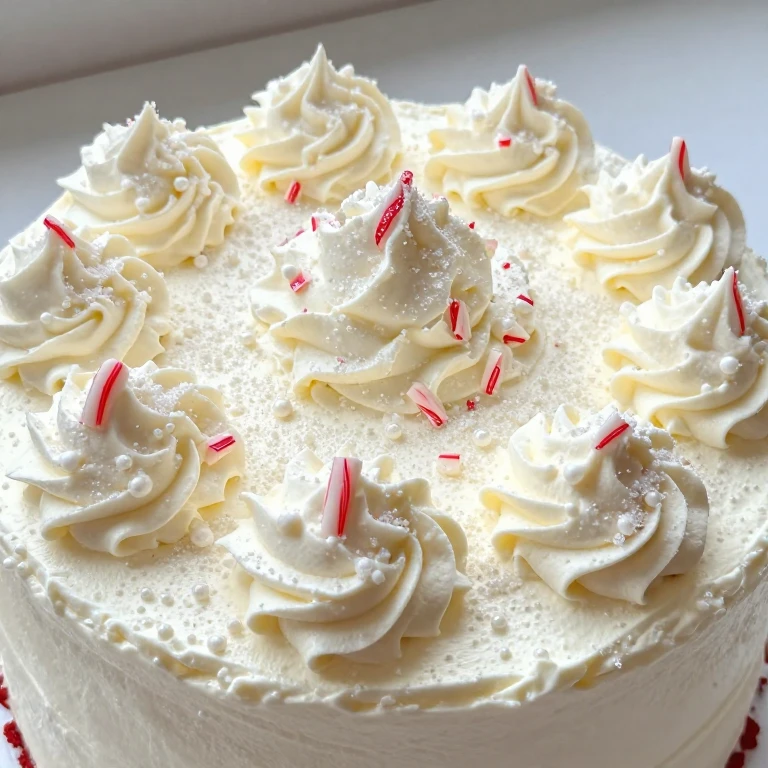
1. Candy Cane Swirl Border
This design wraps your sheet cake in a bold red-and-white swirl that reads Christmas instantly. The technique is a two-tone piping bag filled with both colors, so the stripes emerge as you pipe. I pair it with a peppermint mocha cake because the piping deserves a flavor that matches the visual punch.
Ingredients
- 1 box chocolate cake mix (or homemade vanilla)
- 1 cup heavy cream
- 6 oz cream cheese, softened
- 1 lb butter, softened
- 3 cups powdered sugar
- 1 tsp peppermint extract
- Red gel food coloring
- Crushed candy canes for garnish
- Espresso powder for mocha depth
Instructions
- Bake cake according to package directions in a 9×13 pan; cool completely.
- Whip cream cheese, butter, and powdered sugar until light; fold in peppermint extract and espresso powder.
- Divide frosting in half; tint one half red with gel color.
- Load a piping bag with both colors (red on one side, white on the other) and pipe a shell border around all edges.
- Fill center with plain white frosting and top with crushed candy canes.
- Chill at least 2 hours before serving so piping sets clean.
Whirl Factor: The two-tone piping creates visual drama, while peppermint-mocha flavors deliver bold taste contrast—creamy frosting against sharp peppermint and subtle coffee depth.
Make-Ahead Tip: Bake and crumb-coat the day before. Add final frosting and piping the morning of serving. This cake holds beautifully in the fridge for up to 3 days.
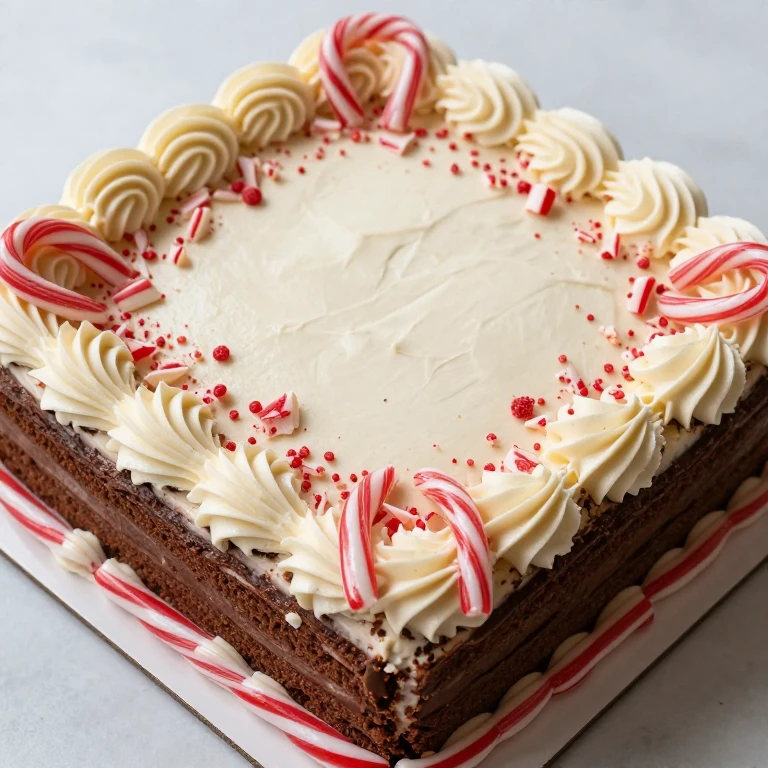
2. Piped Christmas Tree Forest
I pipe small evergreen trees across the top of the cake using a grass piping tip. Each tree gets a tiny star on top, and I scatter edible gold pearls around the base. It’s graphic, modern, and takes about 20 minutes if you work steadily.
Ingredients
- 1 box vanilla cake mix
- 1 lb butter, softened
- 4 cups powdered sugar
- 3 tbsp whole milk
- Green gel food coloring (forest shade)
- Yellow gel food coloring for stars
- Edible gold pearls
- Grass piping tip (Wilton #233)
- Small star piping tip
Instructions
- Bake vanilla cake in 9×13 pan; cool completely.
- Make buttercream: beat butter and powdered sugar, add milk and green coloring until deep forest green.
- Crumb coat, chill 30 minutes, then apply final frosting layer.
- Load grass tip into piping bag; pipe 8–10 trees in rows across the top, varying height.
- Switch to star tip, thin yellow frosting, and pipe a tiny star on each tree top.
- Scatter gold pearls around tree bases for snow effect.
Whirl Factor: Simple piping creates a modern, graphic look. Pair with eggnog cake for a cozy flavor contrast—light, creamy frosting against warm spice notes.
Storage Note: Keeps refrigerated for 4 days. Transport in a cake box with parchment between cake and lid to prevent frosting smudging.
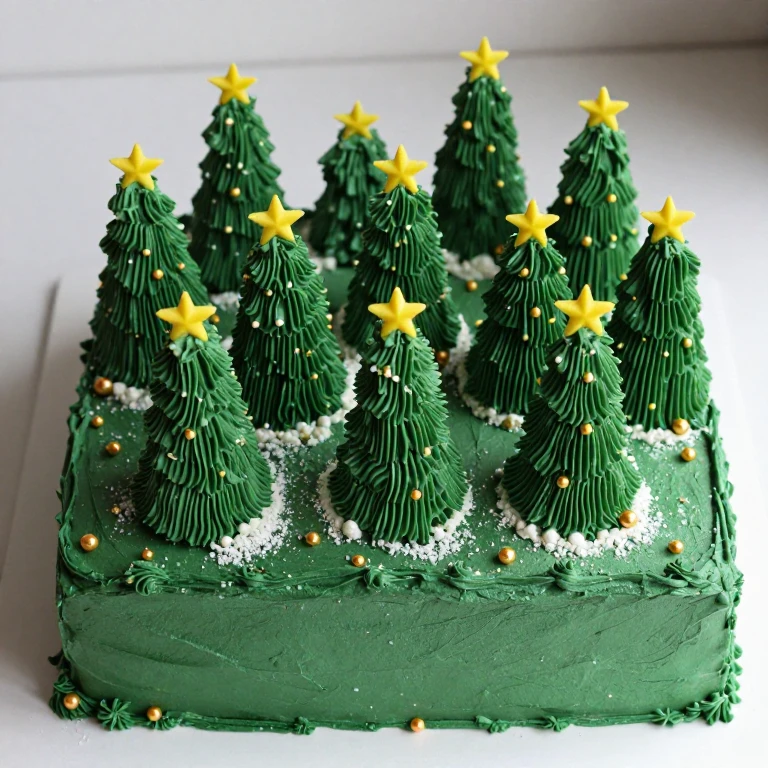
3. Holly & Berry Piped Garland
This design frames the top edge with a piped garland of holly leaves and berries. I use a leaf tip for the foliage and a round tip for the berries. It’s elegant without being fussy, and it pairs beautifully with a gingerbread-spiced cake.
Ingredients
- 1 box gingerbread cake mix (or spiced vanilla)
- 1 lb butter, softened
- 3.5 cups powdered sugar
- 2 tbsp heavy cream
- Green gel food coloring
- Red gel food coloring
- Leaf piping tip (#70 or similar)
- Round piping tip (#4)
- Edible pearl dust (optional)
Instructions
- Bake gingerbread cake in 9×13 pan; cool completely.
- Make buttercream: beat butter and powdered sugar, add cream and green coloring.
- Crumb coat and chill 30 minutes.
- Apply final frosting layer, then pipe a garland of leaves around the top perimeter using leaf tip.
- Switch to red frosting and round tip; pipe small berries between leaf clusters.
- Dust lightly with pearl dust if desired; chill 2 hours.
Whirl Factor: Piped botanicals create dimension and texture. Gingerbread cake delivers warm spice contrast against cool, creamy frosting.
Practical Tip: Practice your leaf piping on parchment first. Once you find your rhythm, the garland goes fast and looks impressive.
Candy & Textured Christmas Sheet Cake Designs
These designs rely on candy placement and textured finishes to create impact. No advanced piping skills needed—just intentional placement and a good eye for balance. I love these when I’m short on time but want serious visual payoff.
4. Snowy Peak Frosting with Candy Cane Shards
This is my go-to when I want rustic elegance. I frost the cake with peaks and valleys (no smoothing), then top with crushed candy cane pieces and edible snow. The texture hides any frosting imperfections, and the candy adds crunch.
Ingredients
- 1 box red velvet or vanilla cake mix
- 1 lb butter, softened
- 4 cups powdered sugar
- 3 tbsp heavy cream
- 1 tsp vanilla extract
- Crushed candy canes (about 1 cup)
- Edible white pearl dust or edible snow
- Red gel food coloring (optional, for tinted frosting)
Instructions
- Bake cake in 9×13 pan; cool completely.
- Make buttercream: beat butter, powdered sugar, cream, and vanilla until fluffy.
- Spread frosting across the top in thick, uneven peaks using an offset spatula.
- Immediately sprinkle crushed candy canes over the peaks.
- Dust with edible snow or pearl dust for a frosted effect.
- Chill 1 hour; the frosting will set around the candy, holding everything in place.
Whirl Factor: Textured frosting and candy create multiple layers of crunch and visual interest. Red velvet cake provides subtle tang against sweet, creamy frosting and sharp peppermint candy.
Make-Ahead Tip: Bake the day before. Frost and add candy the morning of serving. This design actually improves as it chills—the frosting firms up and holds the candy better.
5. Gingerbread Silhouette with Royal Icing
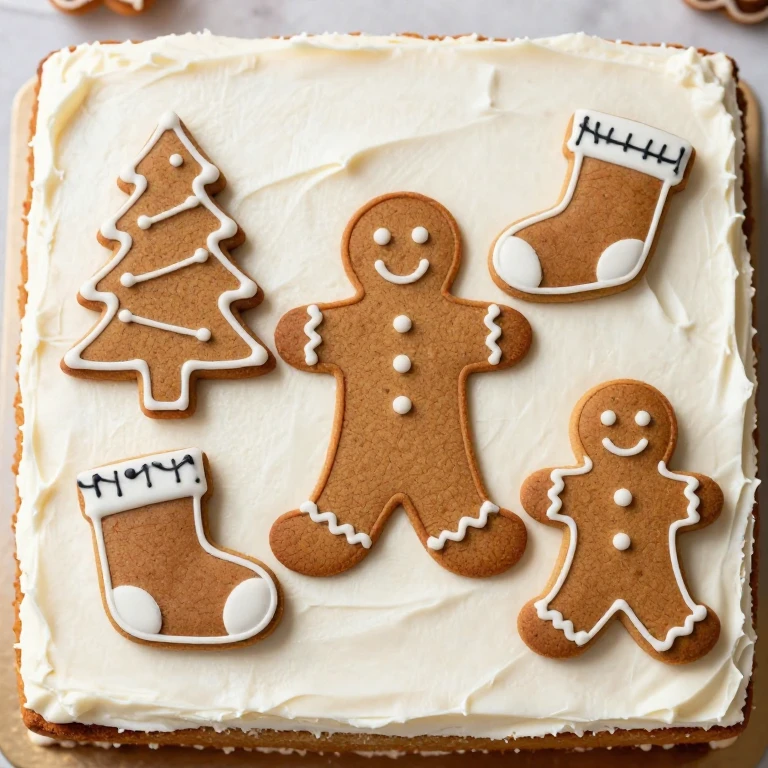
I bake thin gingerbread cookies in holiday shapes, then use them as toppers on a frosted sheet cake. The cookies stand upright, creating a 3D effect. It’s architectural and unexpected, and it tastes incredible because you get two textures in every bite.
Ingredients
- 1 box vanilla or eggnog cake mix
- 1 lb butter, softened
- 3.5 cups powdered sugar
- 2 tbsp heavy cream
- Gingerbread cookie dough (store-bought or homemade)
- Royal icing for cookie detail (2 egg whites, 3 cups powdered sugar, 1 tsp lemon juice)
- Edible markers or gel coloring
- Small cookie cutters (trees, stockings, gingerbread men)
Instructions
- Bake sheet cake in 9×13 pan; cool completely.
- Prepare gingerbread dough; roll thin, cut shapes, and bake at 350°F for 8–10 minutes. Cool on wire rack.
- Decorate cookies with royal icing details and let dry completely (at least 2 hours).
- Make buttercream: beat butter, powdered sugar, and cream until light.
- Frost the sheet cake smoothly with white or cream-colored frosting.
- Push decorated cookies upright into the frosting, spacing them for visual balance.
Whirl Factor: Crispy gingerbread cookies add structural contrast and deep spice notes against creamy vanilla or eggnog frosting. The 3D element is pure visual impact.
Storage Note: Assemble cookies on the cake no more than 2 hours before serving so they stay crisp. Store the finished cake in a cool room (not the fridge, which softens cookies).
6. Cranberry Swirl with White Chocolate Drizzle
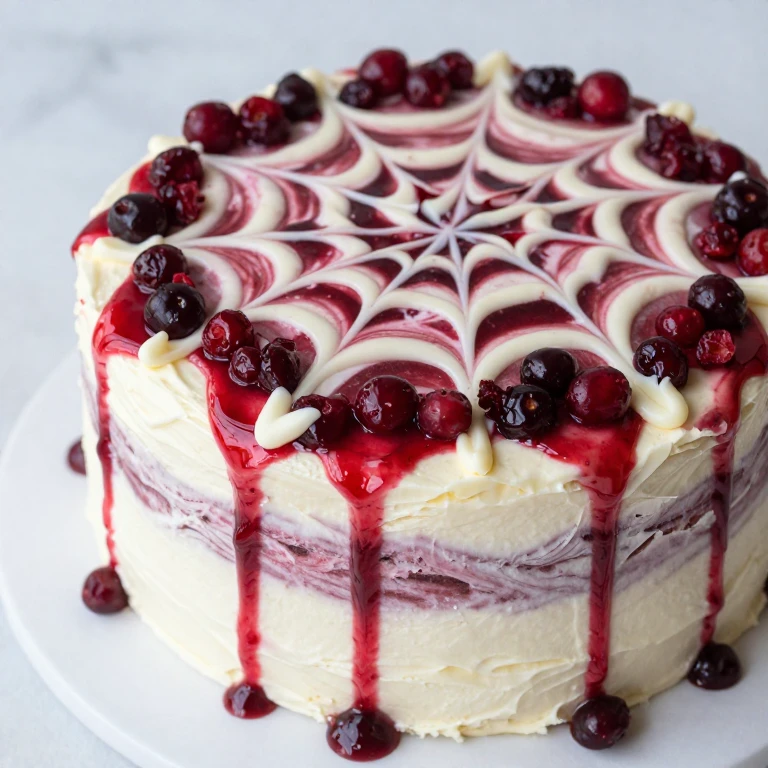
This design uses a tart cranberry compote swirled into white chocolate frosting, then drizzled with extra white chocolate. The color contrast is striking, and the flavor pairing is unexpected—tart cranberry against creamy white chocolate.
Ingredients
- 1 box vanilla cake mix
- 1 lb butter, softened
- 3 cups powdered sugar
- 4 oz white chocolate, melted and cooled
- 2 tbsp heavy cream
- 1 cup cranberry sauce (fresh or canned)
- 4 oz white chocolate for drizzle
- 2 tbsp coconut oil
- Dried cranberries for garnish
Instructions
- Bake vanilla cake in 9×13 pan; cool completely.
- Make white chocolate buttercream: beat butter and powdered sugar, add melted white chocolate and cream.
- Spread a thin base layer of frosting on the cake.
- Dollop cranberry sauce across the frosting, then swirl gently with a knife or offset spatula.
- Cover with remaining white chocolate frosting, leaving some cranberry swirls visible.
- Melt 4 oz white chocolate with coconut oil; drizzle over the top and scatter dried cranberries. Chill 2 hours.
Whirl Factor: Tart cranberry cuts through rich white chocolate, creating a flavor contrast that feels both festive and sophisticated. The swirl adds visual depth without requiring piping skill.
Practical Tip: Make the cranberry swirl the day before and chill it solid before adding the final frosting layer. This prevents the colors from muddying together.
Gold & Jewel-Tone Christmas Sheet Cake Designs
These designs lean into rich color palettes and metallic accents. I use gel food coloring for deep, saturated tones, and edible gold or pearl dust for luxury finishes. These feel elevated but come together quickly.
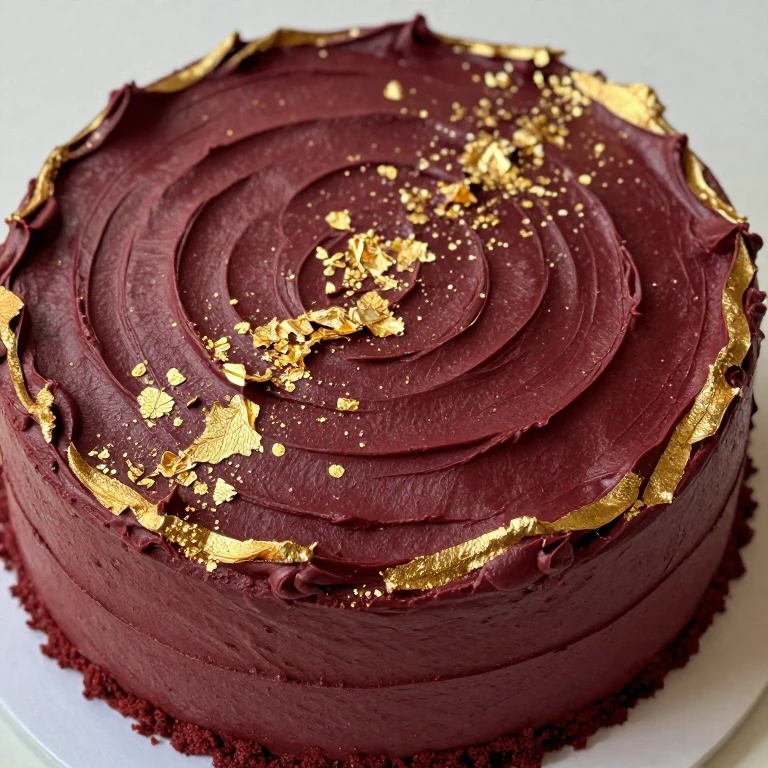
7. Deep Emerald with Gold Pearl Border
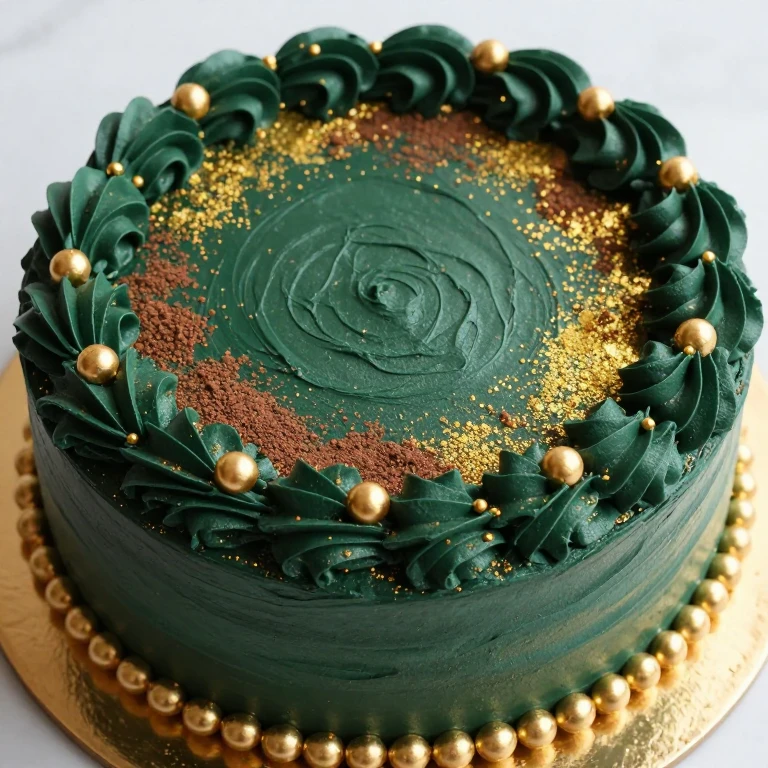
I frost this cake in a deep forest green, then pipe or place a border of edible gold pearls around all edges. The contrast between jewel-tone green and warm gold is pure holiday luxury. I pair it with a dark chocolate cake for serious depth.
Ingredients
- 1 box dark chocolate cake mix
- 1 lb butter, softened
- 4 cups powdered sugar
- 3 tbsp heavy cream
- Green gel food coloring (forest shade)
- Edible gold pearls
- Edible gold dust (optional)
- Cocoa powder for dusting
Instructions
- Bake chocolate cake in 9×13 pan; cool completely.
- Make buttercream: beat butter and powdered sugar until fluffy, add cream and deep green coloring.
- Crumb coat and chill 30 minutes.
- Apply final frosting layer smoothly with an offset spatula.
- Place edible gold pearls around the top and bottom edges, pressing gently into the frosting.
- Dust lightly with gold dust and cocoa powder for dimension. Chill 2 hours.
Whirl Factor: Jewel-tone green creates visual sophistication, while dark chocolate cake delivers rich, slightly bitter depth against creamy frosting. Gold pearls add luxury without fuss.
Make-Ahead Tip: Bake and crumb-coat the day before. Add final frosting and pearls the morning of serving. The cake holds beautifully for 3 days refrigerated.
8. Burgundy Velvet with Gold Leaf Accents
Deep burgundy frosting paired with delicate gold leaf creates an elegant, grown-up look. I use this for holiday parties where the dessert needs to feel special. The gold leaf catches the light and adds unexpected dimension.
Ingredients
- 1 box red velvet or vanilla cake mix
- 1 lb butter, softened
- 4 cups powdered sugar
- 3 tbsp heavy cream
- Red and blue gel food coloring (to create burgundy)
- Edible gold leaf sheets
- Edible gold dust
- Small paintbrush for application
Instructions
- Bake cake in 9×13 pan; cool completely.
- Make buttercream: beat butter and powdered sugar, add cream and burgundy coloring (mix red + touch of blue).
- Crumb coat and chill 30 minutes.
- Apply final frosting layer smoothly.
- Using a small paintbrush and tweezers, carefully place small pieces of gold leaf on the frosting in a scattered or geometric pattern.
- Dust edges lightly with gold dust. Chill 2 hours; handle gently to preserve leaf placement.
Whirl Factor: Burgundy creates a moody, elegant base, while gold leaf adds luxury and shimmer. Red velvet cake’s subtle cocoa and vanilla notes pair beautifully with this sophisticated presentation.
Storage Note: Chill until serving. Gold leaf is delicate—keep this cake in a cool room and avoid touching the decorated surface.
9. Ombre Jewel Tones with Pearl Dust
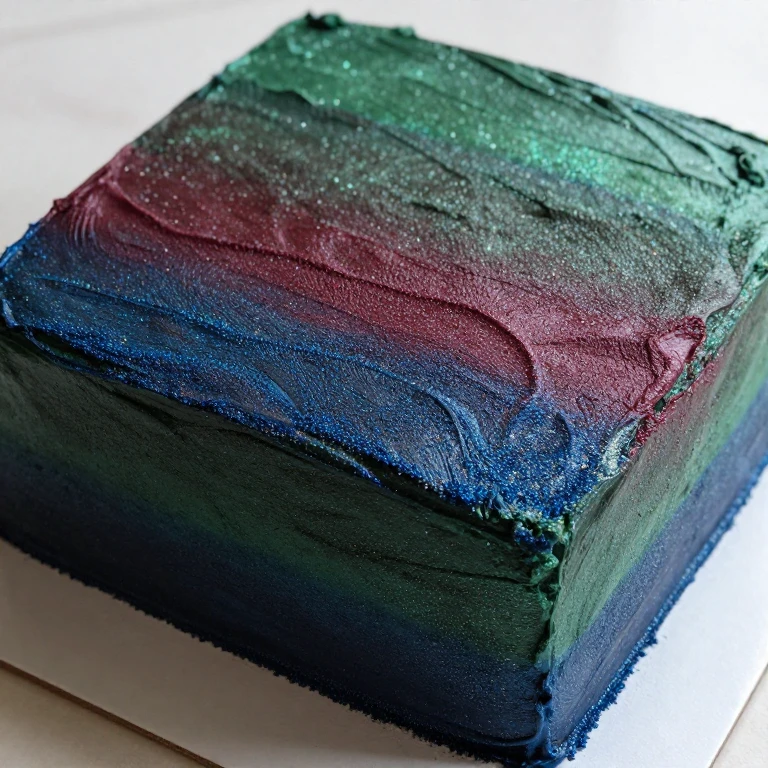
This design uses three shades of frosting—deep emerald, burgundy, and navy—in horizontal stripes across the cake. I dust the top with edible pearl powder for a frosted, dimensional effect. It’s modern and bold without being difficult to execute.
Ingredients
- 1 box vanilla cake mix
- 1.5 lbs butter, softened
- 6 cups powdered sugar
- 4 tbsp heavy cream
- Green gel food coloring
- Red and blue gel coloring (for burgundy)
- Blue gel food coloring
- Edible pearl dust (white or iridescent)
- Small offset spatula
Instructions
- Bake vanilla cake in 9×13 pan; cool completely.
- Divide buttercream into three bowls; tint one deep green, one burgundy, and one navy blue.
- Spread a thin layer of green frosting across the cake.
- Add a stripe of burgundy frosting next to it, then a stripe of navy, using an offset spatula to create clean lines.
- Dust the entire top generously with edible pearl dust.
- Chill 2 hours so frosting sets and pearl dust adheres.
Whirl Factor: Ombre jewel tones create visual drama and modern appeal. Vanilla cake provides a neutral base that lets the frosting colors and pearl shimmer take center stage.
Practical Tip: Chill your spatula between each frosting stripe so colors stay clean and don’t blend together.
Minimalist & Modern Christmas Sheet Cake Designs
These designs strip away excess and lean on simplicity, negative space, and a single bold element. I use these when I want impact without visual clutter. They photograph beautifully and feel current.
10. Minimalist White with Single Centerline Accent
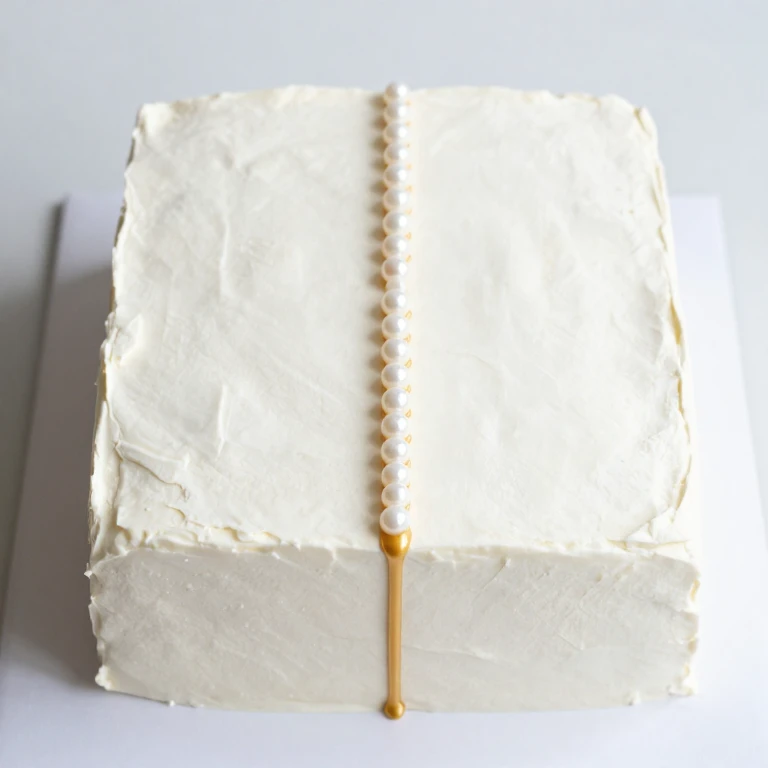
This design is all about restraint. I frost the cake in smooth white, then pipe a single elegant line down the center—it could be gold, deep green, or burgundy. Sometimes I add a single row of edible pearls along that line. It’s Scandinavian-modern and surprisingly striking.
Ingredients
- 1 box vanilla or almond cake mix
- 1 lb butter, softened
- 4 cups powdered sugar
- 3 tbsp heavy cream
- 1 tsp vanilla extract
- Gel food coloring for accent line (gold luster dust mixed with clear piping gel, or green/burgundy)
- Edible pearls or pearl dust
- Piping bag with fine round tip
Instructions
- Bake vanilla cake in 9×13 pan; cool completely.
- Make white buttercream: beat butter, powdered sugar, cream, and vanilla.
- Crumb coat and chill 30 minutes.
- Apply final frosting layer, smoothing it completely flat with an offset spatula.
- Load piping bag with gold luster gel or colored frosting; pipe a single clean line down the center from top to bottom.
- Add a row of edible pearls along the line if desired. Chill 1 hour.
Whirl Factor: Minimalist presentation creates modern elegance, while a single bold accent (gold or deep color) provides visual interest. Vanilla cake’s subtle sweetness lets the design and frosting texture shine.
Make-Ahead Tip: Bake the day before. Frost and add the accent line the morning of serving. This design travels beautifully—the smooth frosting and single line are easy to protect during transport.
When to Choose Each Design Style
- Piped designs (candy cane, tree forest, holly garland): Choose these when you have 30–45 minutes to decorate and want a design that feels handcrafted. They work best for intimate gatherings where guests will appreciate the detail.
- Candy & textured designs (snowy peaks, gingerbread silhouettes, cranberry swirl): Pick these when you’re short on piping confidence but want serious visual impact. They’re also ideal for make-ahead baking because you can assemble them hours in advance.
- Jewel-tone & gold designs (emerald with pearls, burgundy with leaf, ombre): Use these for formal holiday parties, dinner parties, or occasions where the cake needs to feel elevated and sophisticated. They photograph beautifully for social media.
- Minimalist designs (white with centerline): Choose this when you want modern elegance and easy transport. It’s perfect for potlucks, office parties, or when you want to let the flavor speak louder than the decoration.
FAQ
How far in advance can I bake a Christmas sheet cake?
I bake sheet cakes up to 3 days ahead and store them wrapped tightly in plastic wrap at room temperature. If you need to go longer, freeze the unfrosted cake for up to 2 weeks. Thaw at room temperature before frosting. The key is keeping the cake protected from air and moisture so it stays tender.
What’s the best way to transport a decorated sheet cake?
Place the cake in a sturdy cake box and fill any gaps with parchment paper or bubble wrap to prevent shifting. Keep the box level and avoid stacking anything on top. For piped designs, I chill the cake until the frosting is completely firm (at least 2 hours) before transporting. For candy-topped designs, place a piece of parchment loosely over the top so candy doesn’t shift but air can still circulate.
Can I make these designs with store-bought frosting?
Absolutely. Store-bought buttercream works for all of these designs. I recommend letting it come to room temperature and stirring it well before using. If it’s too stiff, add a tablespoon of milk at a time until it reaches a spreadable consistency. The flavor won’t match homemade, but the designs will look identical.
Which design works best for a beginner baker?
The snowy peak design and the minimalist white cake are the most forgiving. Both hide frosting imperfections and don’t require advanced piping skills. If you want to try piping, start with the candy cane swirl border—the two-tone effect is visually impressive but technically simple once you load the piping bag correctly.
How do I prevent my frosting from looking streaky or dull?
Make sure your frosting is the right consistency—it should be spreadable but hold its shape. If it’s too soft, chill it for 15 minutes. Use an offset spatula dipped in hot water and wiped clean between strokes. For a matte finish, use a bench scraper held at a 45-degree angle and work in one direction. For a textured finish (like the snowy peaks), embrace the unevenness—it’s intentional.
Can I use cream cheese frosting instead of buttercream?
Yes, but with a caveat. Cream cheese frosting is softer and tangier, which works beautifully for red velvet, gingerbread, and chocolate cakes. It’s harder to pipe with because it doesn’t hold structure as well, so I’d stick with cream cheese for the textured and candy designs rather than the piped ones. Keep it chilled until the moment you frost, and work quickly.
What’s the best way to get deep, saturated gel colors?
Use gel food coloring, not liquid. Gel is more concentrated, so a tiny amount goes a long way. Start with a toothpick dab and mix it in thoroughly. If you need a very deep shade (like forest green or burgundy), don’t be afraid to use more—the frosting can handle it. For gold effects, I use edible gold luster dust mixed with a tiny bit of clear piping gel or vodka to create a paintable consistency.
Conclusion
I’ve shared 10 designs that range from piped elegance to textured simplicity, and each one delivers the festive impact you’re after. Pick the design that matches your skill level and time commitment, bake the cake a day ahead if it helps, and frost it the morning of serving. Your guests will remember how beautiful it looked—and how good it tasted.