
There’s a moment in the kitchen when you realize that the simplest garnish can completely transform a plate. For me, it happened on a Tuesday night when I was making roasted chicken for the third time that week—same bird, same technique, same tired presentation. Then I remembered those pickled onions sitting in my fridge from Sunday prep, and everything shifted. A few spoonfuls of bright, tangy, crisp onions over that golden skin, and suddenly the whole dish felt intentional and fresh. That’s the Whirl Factor right here: one quick brine, endless applications.
This chicken with pickled onions garnish recipe is built around that exact principle. You’re making two things that work independently but sing together: juicy, properly brined chicken and a sharp, herbaceous pickled onion topping that adds color, texture, and acidity in one move. The lime-herb brine for the onions takes 10 minutes active time and delivers brightness that cuts through richness. Whether you’re serving this over bowls, salads, or straight from the cutting board, these pickled onions become your secret weapon for weeknight meals that taste considered without the fuss.
What Makes This Dish Special
The core twist here is texture contrast: silky, tender chicken meets crisp, snappy pickled onions. That crunch matters. It’s not just flavor—it’s the physical sensation that makes your palate wake up with each bite.
The second distinction is speed. Refrigerator pickled onions are ready in 15 minutes, not days. You’re not waiting for fermentation or deep preservation. The quick lime-vinegar brine softens the onion’s raw bite while keeping that structural snap intact. That’s the difference between a garnish that feels like an afterthought and one that feels intentional.
Third: versatility. This isn’t a one-dish recipe. Once you nail the brine method, you’re adding pickled onions to tacos, grain bowls, salads, pitas, and roasted vegetables. I always keep a batch in my fridge during warm months because it elevates everything it touches.
Flavor Profile Breakdown
The pickled onion brine works in layers. The base is lime juice and vinegar—acid that softens the onion’s natural sulfur bite while adding brightness. Salt balances that acidity and draws out the onion’s natural sweetness. A touch of honey or sugar rounds the edges, preventing the brine from tasting sharp or one-dimensional.
The herbs—dill, oregano, or peppercorns, depending on your mood—sit in the mid-palate, adding complexity without overwhelming the core lime-acid profile. The finish is clean and crisp, with the onion’s natural bite still present but refined. When you layer this over chicken, the acid cuts through the richness of the skin and meat, while the herbs echo whatever seasoning you’ve used on the bird itself.
Ingredient Highlights
Red onions are non-negotiable here. They hold their structure through pickling better than white or yellow onions, and their color matters—you want that visual pop on the plate. Slice them thin (about 1/4 inch) so they soften slightly while maintaining crunch.
Lime juice is your anchor. Fresh lime, not bottled, gives you brightness without the metallic undertone. If you’re in a pinch, white vinegar works as a substitute, though you’ll lose some of that citrus lift. I’d use 2 tablespoons vinegar to 1/4 cup lime juice if you’re blending them.
The herbs are flexible. Dill pairs beautifully with chicken and fish. Oregano leans Mediterranean and works with roasted or grilled birds. Peppercorns add subtle heat without dominating. Start with one herb, taste, and adjust. You’re building a flavor profile that complements your chicken preparation, not fighting it.
Whirl Hook
The signature move: a 10-minute lime-herb brine that transforms raw red onions into a crisp, tangy garnish that elevates any chicken dish. One batch, endless applications.
Flavor Spin
The core twist is the balance of acid, salt, and a whisper of sweetness. Lime juice softens the onion’s raw bite while adding brightness. A touch of honey prevents the brine from tasting sharp, and herbs (dill, oregano, or peppercorns) add complexity that echoes your chicken’s seasoning. The result: a garnish that tastes intentional, not like an afterthought.
Whirl Factor
Texture contrast is everything. Silky, tender chicken meets crisp, snappy pickled onions. That crunch wakes up your palate with each bite. The brine softens the onion’s raw sulfur edge while keeping structural snap intact—the difference between a garnish that feels rushed and one that feels considered. Speed matters too: these are ready in 15 minutes, not days.
Cooking Walkthrough
For the Pickled Onions:
- 2 medium red onions, thinly sliced (about 1/4 inch)
- 1/4 cup fresh lime juice
- 1 tablespoon white vinegar (or rice vinegar)
- 1 teaspoon kosher salt
- 1/2 teaspoon honey or sugar
- 1 teaspoon fresh dill (or 1/2 teaspoon dried oregano, or 5-6 peppercorns)
- 1/2 cup water
For the Chicken:
- 4 boneless, skinless chicken breasts (or 1 whole chicken, cut into pieces)
- 2 tablespoons olive oil
- 1 teaspoon kosher salt
- 1/2 teaspoon black pepper
- 1/2 teaspoon garlic powder
- Optional: fresh herbs (thyme, rosemary) for the chicken
Step 1: Prepare the Brine Combine lime juice, vinegar, salt, honey, and water in a small bowl. Stir until the salt and honey dissolve completely. This takes about 30 seconds of stirring. Taste it—you want bright acidity with a subtle sweetness underneath. If it’s too sharp, add another 1/4 teaspoon honey. If it’s too sweet, add another tablespoon of lime juice.
Step 2: Slice and Soak the Onions Slice red onions into thin rings, about 1/4 inch thick. Place them in a glass jar or bowl. Pour the brine over the onions until they’re fully submerged. Add your chosen herb (dill, oregano, or peppercorns) directly to the brine. Stir gently to distribute the herb and ensure even coverage. Let this sit at room temperature for 10-15 minutes. The onions will soften slightly but maintain their snap—that’s your target texture.
Step 3: Season and Cook the Chicken While the onions brine, pat your chicken dry with paper towels. This is crucial for browning. Combine salt, pepper, and garlic powder in a small bowl. Rub this mixture evenly over all surfaces of the chicken.
Step 4: Sear the Chicken Heat olive oil in a large skillet over medium-high heat. When the oil shimmers, carefully place the chicken in the pan. Don’t move it for 5-6 minutes—you’re building a golden crust. Flip and cook the second side for 4-5 minutes until golden brown. The internal temperature should reach 165°F when checked with an instant-read thermometer inserted into the thickest part.
Step 5: Rest and Plate Transfer the chicken to a cutting board and rest for 5 minutes. This allows the juices to redistribute, keeping the meat tender. Slice or serve whole, depending on your preference. Top generously with pickled onions and a spoonful of the brine. The liquid adds moisture and brightness to every bite.
Chef Notes
- I always slice my onions as thin as possible—a mandoline makes this effortless and ensures even pickling. If you’re using a knife, aim for 1/4 inch consistency.
- In my kitchen, I make a double batch of pickled onions on Sunday and keep them in the fridge for the entire week. They last about 5-7 days and actually improve as they sit, the flavors deepening.
- When I’m short on time, I use a whole chicken that’s already been roasted from the market. The pickled onions elevate it instantly, making it feel like a composed dish rather than a shortcut.
- I’ve found that tasting the brine before adding the onions is non-negotiable. Everyone’s lime and vinegar are slightly different—a 10-second taste check prevents a batch that’s too sharp or too dull.
- You’ll notice that the onions release liquid as they sit. Don’t drain this away—that brine is flavor gold for dressing bowls or drizzling over roasted vegetables.
Whirl Finish
Serve the chicken warm or at room temperature, topped with pickled onions and a spoonful of brine. Store leftover pickled onions in an airtight glass container in the refrigerator for up to 7 days. The flavor actually improves as they sit. Leftover cooked chicken keeps for 3-4 days refrigerated and reheats beautifully in a 325°F oven for 10 minutes.
Texture & Taste Expectations
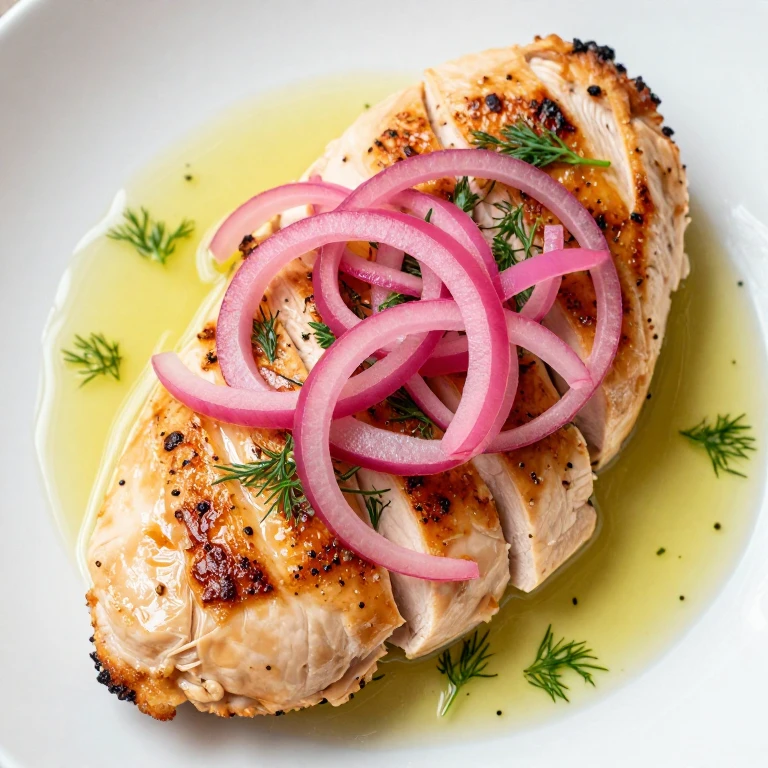
You’re looking at golden-brown chicken with a tender, juicy interior, topped with bright red onion rings that have a slight translucency from the brine. The first bite delivers richness from the chicken, immediately followed by a crisp, tangy snap from the onions. The lime and herbs come through clean and fresh, cutting through the richness without overwhelming it. The overall effect is a dish that tastes bright and intentional, not heavy or one-dimensional.
Customization Ideas
- Herb Variations: Swap dill for fresh cilantro if you’re serving over Mexican-inspired bowls. Use oregano for Mediterranean applications. Try tarragon for a more elegant, subtle herb note.
- Spice Level: Add 1-2 sliced jalapeños or a pinch of red pepper flakes to the brine for heat. This works especially well if you’re serving the chicken over rice or in tacos.
- Sweetness Adjustment: If you prefer a more assertive brine, reduce the honey to 1/4 teaspoon. For a sweeter profile, increase it to 1 teaspoon. Keep tasting as you adjust—small changes matter.
- Protein Swaps: This brine works beautifully over grilled fish, roasted pork, or even shrimp. The timing stays the same—10-15 minutes for perfect texture.
- Make It a Bowl: Serve the chicken over quinoa, rice, or greens. The pickled onions and their brine dress the entire bowl, adding brightness and moisture throughout.
Pairing Ideas
Serve this chicken with warm flatbread or pita to soak up the brine and chicken juices. A bright white wine—Sauvignon Blanc or Pinot Grigio—echoes the lime and herb notes without competing. For a composed meal, build a grain bowl with quinoa or rice as the base, roasted vegetables as the middle layer, sliced chicken, and pickled onions as the finish. The brine acts as dressing, tying everything together.
FAQ
Can I make the pickled onions ahead of time?
Absolutely. I make them up to 3 days in advance and store them in an airtight glass jar in the refrigerator. The flavor actually improves as they sit, becoming more integrated and complex. The onions will soften slightly more with time, but they maintain their essential crunch.
What if I don’t have fresh lime juice?
Use bottled lime juice in a pinch, though fresh is noticeably brighter. If you’re out of lime entirely, white vinegar works as a substitute—use 1/3 cup vinegar and reduce the water to 1/4 cup. The brine will be sharper and less citrusy, but still delicious.
How long do pickled onions last in the refrigerator?
They keep for 5-7 days in an airtight container. The brine prevents spoilage, and the flavor actually deepens over time. After a week, the onions start to soften noticeably, though they’re still edible.
Can I use this brine for other vegetables?
Yes. Red cabbage, jalapeños, cucumbers, and carrots all pickle beautifully in this lime-herb brine. Adjust the timing based on thickness—thin slices soften in 10 minutes, thicker pieces need 20-30 minutes.
What’s the best way to slice the onions thin?
A mandoline is fastest and most consistent, giving you uniform 1/4-inch slices. If you’re using a knife, slice from root to tip and aim for similar thickness throughout. Thinner slices soften more during pickling, so if you prefer more crunch, go slightly thicker.
Can I make this recipe with bone-in, skin-on chicken?
Completely. Bone-in thighs or breasts take slightly longer to cook—8-10 minutes per side depending on thickness. Check for 165°F internal temperature. The skin will be crispier, and the meat stays more tender, making the contrast with the pickled onions even more pronounced.
Is this recipe freezer-friendly?
The chicken freezes well for up to 3 months. The pickled onions don’t freeze well—the texture becomes mushy. Make a fresh batch after thawing the chicken, or keep pickled onions prepared in the refrigerator for up to a week.
Chicken With Pickled Onions Garnish, Lime & Herb Brine
Ingredients
Method
- Combine lime juice, vinegar, salt, honey, and water in a small bowl. Stir until the salt and honey dissolve completely. Taste the brine—you want bright acidity with a subtle sweetness underneath.
- Slice red onions into thin rings, about 1/4 inch thick. Place them in a glass jar or bowl. Pour the brine over the onions until fully submerged. Add your chosen herb directly to the brine and stir gently to distribute.
- Let the onions sit at room temperature for 10-15 minutes. They will soften slightly but maintain their snap.
- Pat chicken dry with paper towels. Combine salt, pepper, and garlic powder in a small bowl. Rub this mixture evenly over all surfaces of the chicken.
- Heat olive oil in a large skillet over medium-high heat. When the oil shimmers, carefully place the chicken in the pan. Don't move it for 5-6 minutes to build a golden crust.
- Flip the chicken and cook the second side for 4-5 minutes until golden brown. The internal temperature should reach 165°F when checked with an instant-read thermometer.
- Transfer the chicken to a cutting board and rest for 5 minutes. Slice or serve whole, depending on your preference. Top generously with pickled onions and a spoonful of the brine.