
Birthday sheet cakes don’t have to be complicated to be stunning. I’ve found that the secret isn’t fancy equipment or culinary school—it’s choosing a design that matches your skill level, mixing colors with confidence, and knowing exactly how to pipe clean lines. Whether you’re decorating for your first time or you’ve done dozens of parties, these ten sheet cake ideas give you the framework to create something your daughter will love. From soft pastel ombré to playful candy borders, each design builds on techniques you can master in one afternoon.
What makes these cakes bookmark-worthy is the balance: they look impressive enough for Instagram, but none of them require a pastry degree. I’ve tested every piping trick, color combo, and storage hack so you can focus on the fun part—watching your kid’s face light up when they see their cake.
What You’ll Find in This List
This collection spans flavor profiles from classic vanilla to strawberry milk, design complexity from simple sprinkle finishes to intricate piping, and occasions from small family gatherings to larger birthday bashes. You’ll find cakes that can be decorated the morning of the party, designs that benefit from make-ahead prep, and flavor combinations that pair beautifully with standard buttercream. Whether you’re drawn to soft pastels, bold primary colors, or trendy ombré effects, there’s a cake here that matches your vision—and your timeline.
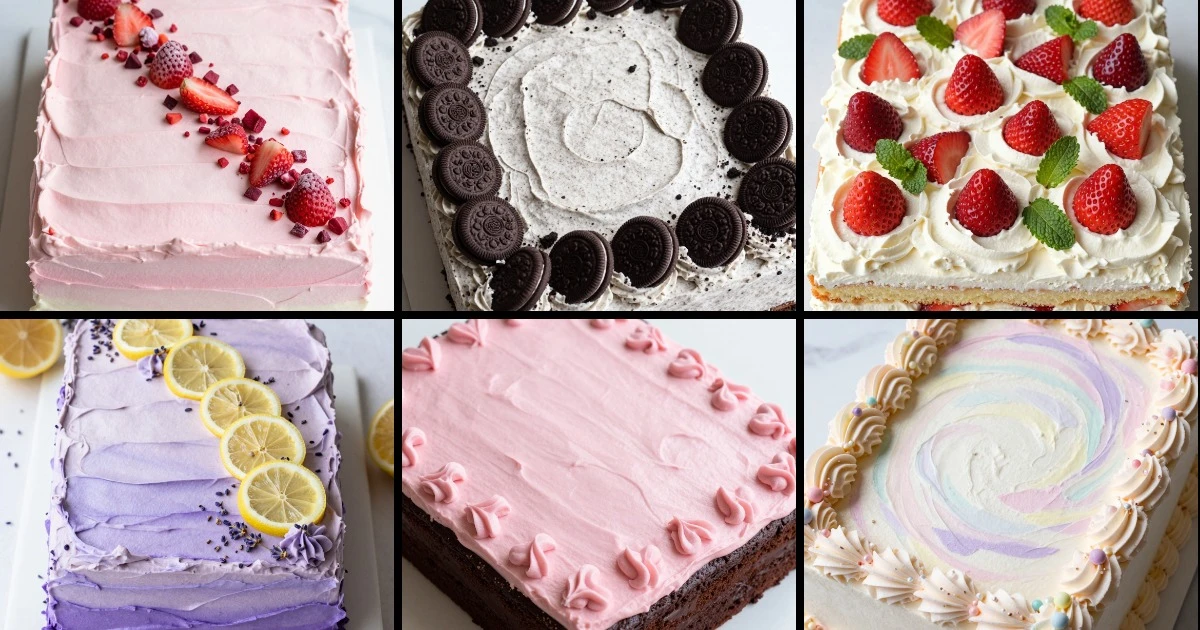
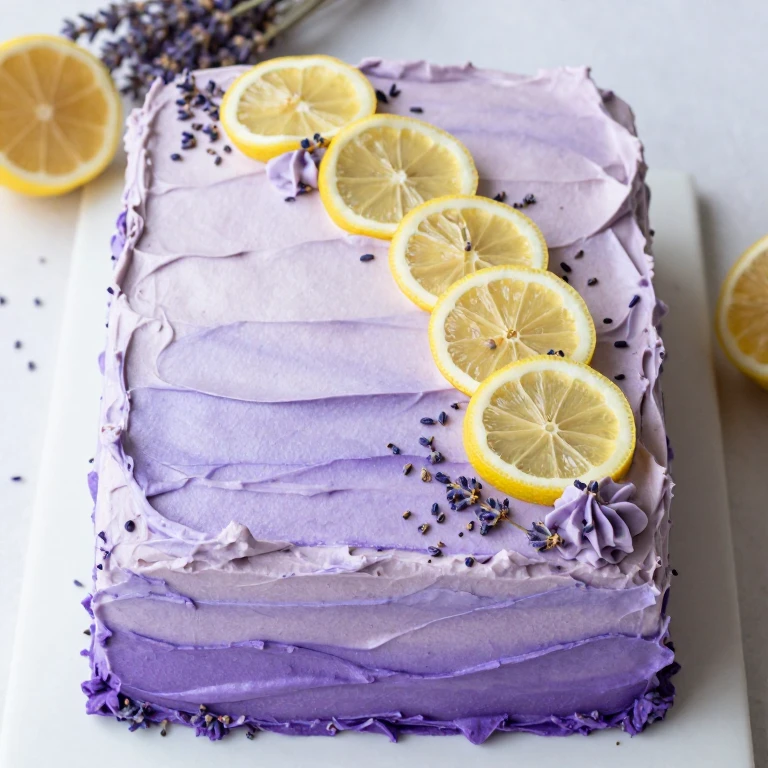
1. Pastel Ombré Dream Cake
This is the cake that looks like it belongs in a modern bakery window, but I promise you can execute it at home. The ombré effect—where color shifts gradually from light to deep—creates visual drama with minimal piping skill. Bake a classic vanilla sheet cake, then divide your buttercream into five bowls and tint each one a progressively deeper shade of pink, lavender, or peach. The real trick is using an offset spatula to blend the colors where they meet, creating that signature gradient.
Flavor Profile: Vanilla cake with Swiss meringue buttercream holds color beautifully and tastes less sweet than American buttercream.
Best for: Girls who love soft, sophisticated aesthetics; works for ages 5–16.
Ingredients
- 1 box vanilla cake mix (plus ingredients listed on box) or 2 cups all-purpose flour, 1½ tsp baking powder, ½ tsp salt, ½ cup unsalted butter softened, 1 cup granulated sugar, 2 large eggs, ½ cup whole milk, 1 tsp vanilla extract
- 1 lb unsalted butter softened
- 4 cups powdered sugar
- 3 tbsp whole milk or heavy cream
- 1 tsp vanilla extract
- Gel food coloring (pink, lavender, or peach)
- Sprinkles for border (optional)
Instructions
- Preheat oven to 350°F. Grease and flour a 9×13-inch sheet pan. If using cake mix, follow package directions. If baking from scratch, cream butter and sugar until pale, add eggs one at a time, alternate milk and dry ingredients, and pour into pan. Bake 28–32 minutes until a toothpick comes out clean and the top springs back when lightly touched.
- Cool completely in pan, then turn out onto a wire rack.
- Make buttercream: beat softened butter on medium-high for 3 minutes until creamy, then gradually add powdered sugar, milk, and vanilla. Beat until light and fluffy (2–3 minutes).
- Divide buttercream into five bowls. Leave one white, tint the others with gel coloring, each one slightly darker than the last.
- Using an offset spatula, spread the lightest shade across the top third of the cake. Blend the next shade into the first where they meet, then continue with each progressively darker shade, blending edges as you go.
- Add a sprinkle border around the edge if desired. Chill 15 minutes before serving so colors set.
Technique Insight: The key to seamless ombré is blending while the buttercream is still soft. Work in sections, and use a clean offset spatula dipped in warm water to smooth transitions. If you overmix, colors muddy—so blend gently with two or three strokes, then move on.
Make-Ahead Note: Bake the cake up to 2 days ahead and wrap it tightly. Decorate up to 8 hours before the party; store at room temperature or in a cool kitchen. Refrigerate only if your kitchen is very warm, as buttercream can sweat.
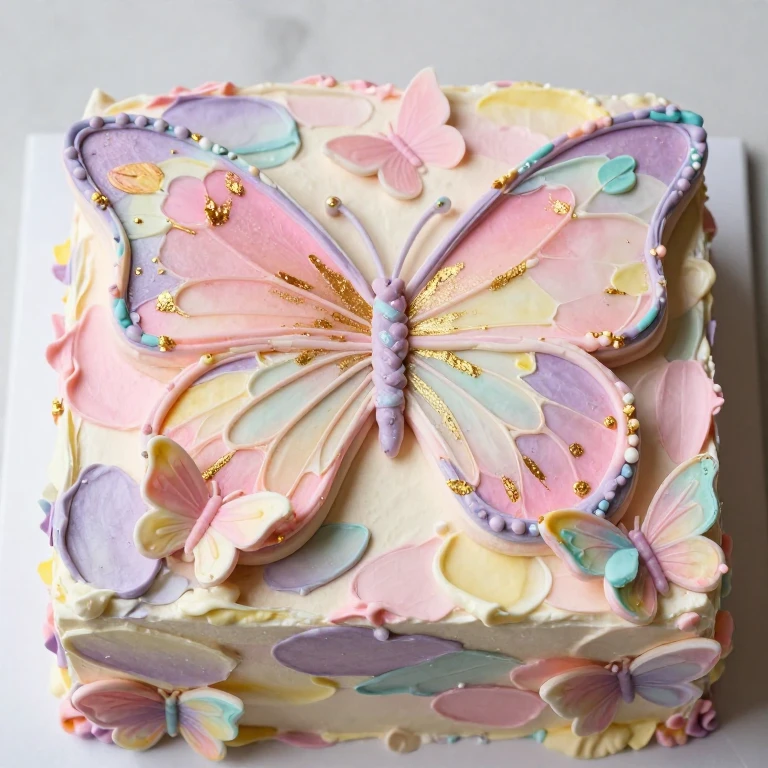
2. Butterfly Confetti Cake
Butterflies feel magical to kids, and this design lets you create them with zero piping skill. I use a simple technique: pipe small dots and lines with buttercream, then press edible butterfly toppers or candies into the frosting while it’s still soft. The confetti scattered across the top adds movement and hides any imperfect piping. It’s forgiving, festive, and takes about 20 minutes to decorate.
Flavor Profile: Vanilla or funfetti cake with bright pink or lavender buttercream; the candy toppers add playful color contrast.
Best for: Ages 4–10; nature-loving kids and first-time decorators.
Ingredients
- 1 box funfetti or vanilla cake mix (plus ingredients) or homemade vanilla cake (see recipe 1)
- 1 lb unsalted butter softened
- 3½ cups powdered sugar
- 2 tbsp heavy cream
- 1 tsp vanilla extract
- Gel food coloring (pink or lavender)
- Edible butterfly toppers or fondant butterflies
- Pastel sprinkles or pearl dust
- Piping bag with round tip
Instructions
- Bake cake according to package or recipe directions in a 9×13-inch pan. Cool completely.
- Make buttercream by beating softened butter until pale (2 minutes), then gradually add powdered sugar, cream, and vanilla. Beat until fluffy. Tint with gel coloring to your desired shade.
- Spread an even layer of buttercream across the entire cake with an offset spatula, smoothing the top as much as possible.
- Fill a piping bag with buttercream and a round tip. Pipe small dots (about ½ inch) randomly across the cake surface. These create anchor points for toppers and add texture.
- While buttercream is soft, gently press butterfly toppers into some of the piped dots, spacing them across the cake so they look like they’re landing.
- Scatter sprinkles or pearl dust around the butterflies. Chill 20 minutes so everything sets.
Practical Tip: If your edible toppers are delicate, press them in gently just before serving rather than hours ahead. The buttercream will hold them, but they’ll stay in better condition if added close to party time. Have tweezers handy for precise placement.
Storage Note: Decorate this cake up to 6 hours ahead; store at room temperature away from direct sunlight (toppers can fade). The buttercream and cake hold beautifully at room temp for a full party day.
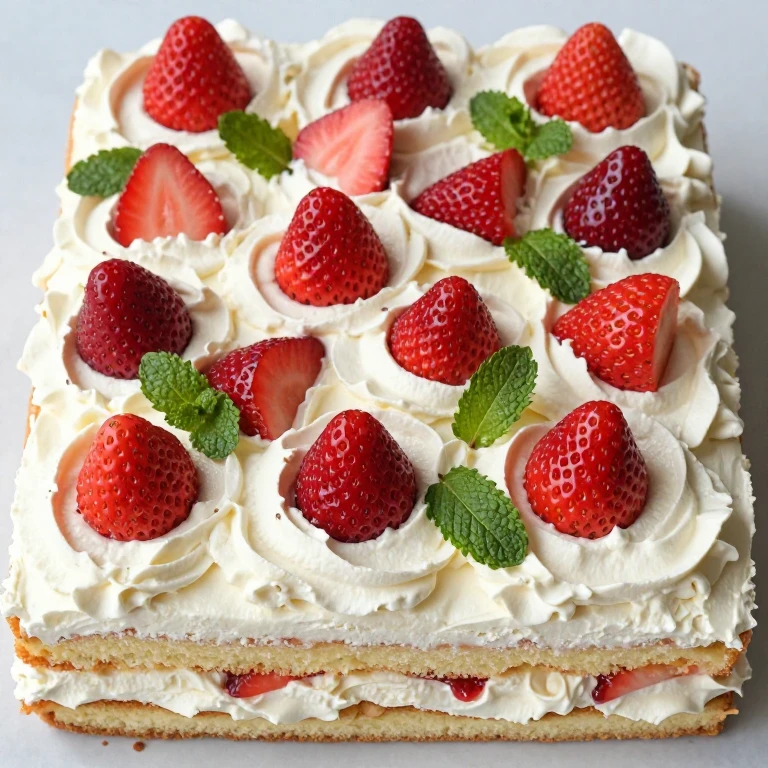
3. Strawberry Milk Dream Cake
This cake tastes exactly like the childhood favorite—strawberry milk—and the pale pink frosting with fresh strawberry slices creates a design that’s both elegant and playful. I layer the frosting with thin strawberry slices arranged in overlapping rows, which adds height and keeps the design simple. The strawberries do the heavy lifting visually, so you don’t need complex piping.
Flavor Profile: Vanilla or strawberry cake with strawberry-tinted buttercream and fresh strawberry garnish; tastes creamy and fruity.
Best for: Ages 5–14; kids who love fruit flavors and simple, fresh designs.
Ingredients
- 1 box strawberry or vanilla cake mix (plus ingredients) or homemade vanilla cake
- 12 oz fresh strawberries hulled and sliced
- 1 lb unsalted butter softened
- 3½ cups powdered sugar
- 2 tbsp heavy cream
- ½ tsp vanilla extract
- ½ tsp strawberry extract (optional but recommended)
- Gel food coloring (pink)
- 2 tbsp strawberry jam or preserves
- Whipped cream for serving (optional)
Instructions
- Bake cake in a 9×13-inch pan according to package or recipe directions. Cool completely.
- Make buttercream: beat softened butter until creamy, gradually add powdered sugar, cream, vanilla, and strawberry extract. Tint pale pink with gel coloring. Beat until fluffy.
- Spread a thin layer of buttercream across the entire cake. This is your base layer and prevents strawberry juice from soaking into the cake.
- Warm the strawberry jam slightly and brush a thin layer over the buttercream base.
- Arrange strawberry slices in overlapping rows across the cake, starting at one long edge and working toward the opposite edge. The slices should overlap like shingles.
- Spread or pipe remaining buttercream around the borders and between any gaps in the strawberry rows. Chill 30 minutes before serving.
Technique Insight: Fresh strawberries release juice as they sit. Blotting slices with a paper towel before arranging them minimizes weeping. The jam layer underneath acts as a moisture barrier, protecting the cake from getting soggy. If you prep this cake more than 4 hours ahead, the strawberries will soften—so slice and arrange them no more than 6 hours before serving.
Make-Ahead Note: Bake and frost the base (without strawberries) up to 1 day ahead. Add strawberry slices on the morning of the party, no more than 6 hours before serving. Store in a cool kitchen or refrigerate if necessary, but bring to room temperature 30 minutes before serving so flavors shine.
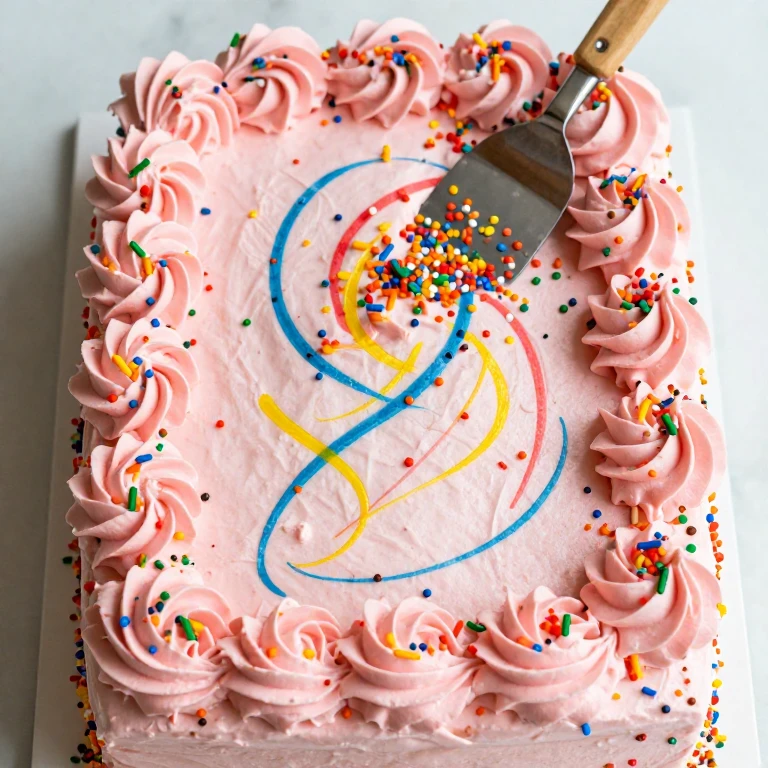
4. Rainbow Sprinkle Border Cake
Sometimes the best design is the simplest one. I frost this cake with white or pastel buttercream, then press rainbow sprinkles into the frosting around all four edges, creating a cheerful border that’s impossible to mess up. The sprinkles catch light and add texture without requiring any piping skill. It’s perfect for kids who love color and movement.
Flavor Profile: Funfetti or vanilla cake with vanilla buttercream; the sprinkles add visual pop and a hint of sweetness.
Best for: Ages 3–12; first-time decorators and kids who love rainbow aesthetics.
Ingredients
- 1 box funfetti or vanilla cake mix (plus ingredients) or homemade vanilla cake
- 1 lb unsalted butter softened
- 3½ cups powdered sugar
- 2 tbsp heavy cream
- 1 tsp vanilla extract
- Gel food coloring (optional; white or pale pastel)
- 2 cups rainbow sprinkles (jimmies or rod-shaped work best)
- Offset spatula
Instructions
- Bake cake in a 9×13-inch pan according to package or recipe directions. Cool completely.
- Make buttercream: beat softened butter until pale, gradually add powdered sugar, cream, and vanilla. If tinting, add gel coloring now. Beat until fluffy (2–3 minutes).
- Spread buttercream evenly across the entire cake with an offset spatula, creating a smooth, flat surface.
- Pour rainbow sprinkles into a shallow dish. Working one edge at a time, hold the cake at a slight angle and press the edge into the sprinkles, rolling gently so they adhere to the buttercream border. Repeat on all four sides.
- If desired, sprinkle a light handful of sprinkles across the top center of the cake for added color. Chill 15 minutes so sprinkles set.
Practical Tip: Use rod-shaped sprinkles (jimmies) rather than ball sprinkles—they press into buttercream more securely and don’t roll off as easily. If sprinkles aren’t sticking, your buttercream might be too soft. Chill the frosted cake for 10 minutes, then apply sprinkles. If they still slip, your butter wasn’t soft enough to begin with; next time, let it sit at room temperature for 30 minutes before beating.
Storage Note: Decorate this cake up to 8 hours ahead; store at room temperature away from heat or sunlight. Sprinkles can bleed color slightly if exposed to humidity or heat, so keep the cake in a cool spot. Avoid refrigerating unless your kitchen is very warm.
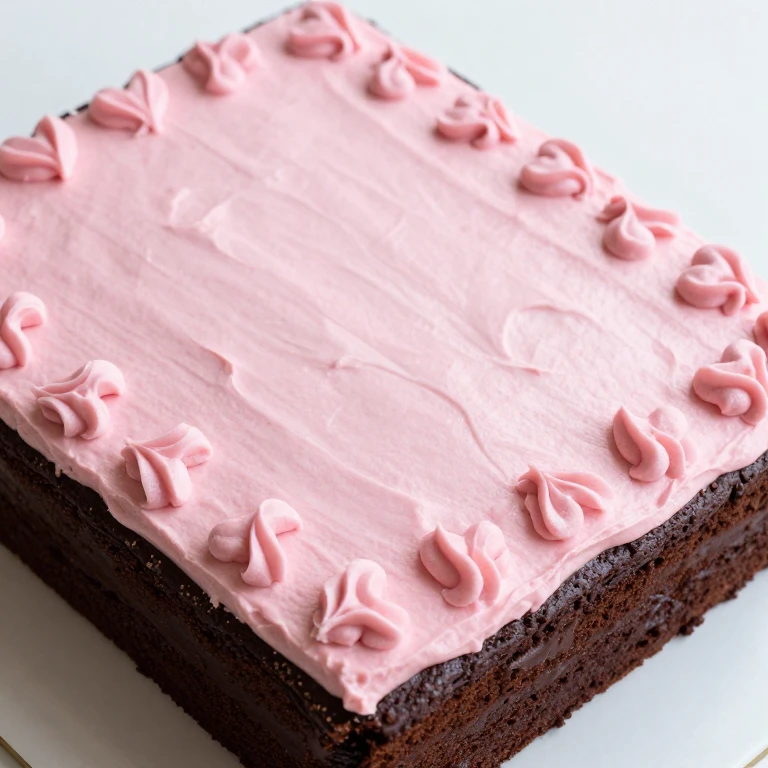
5. Heart Border Sweetheart Cake
This design speaks to the romantic spirit in every kid. I pipe small hearts around the border using a heart-shaped piping tip, creating a sweet frame that’s easier than it looks. If you don’t have a heart tip, you can pipe small dots and connect them to form hearts—it’s forgiving and charming. The center stays simple, letting the heart border be the star.
Flavor Profile: Vanilla or almond cake with rose-tinted buttercream; the heart detail adds romance without being overly mature.
Best for: Ages 6–16; kids who love delicate details and romantic aesthetics.
Ingredients
- 1 box vanilla cake mix (plus ingredients) or homemade vanilla cake
- 1 lb unsalted butter softened
- 3½ cups powdered sugar
- 2 tbsp heavy cream
- 1 tsp vanilla extract
- Gel food coloring (rose, pink, or red)
- Piping bag with heart-shaped tip (or round tip for freestyle hearts)
- Edible pearl dust or shimmer spray (optional)
Instructions
- Bake cake in a 9×13-inch pan according to package or recipe directions. Cool completely.
- Make buttercream: beat softened butter until creamy, gradually add powdered sugar, cream, and vanilla. Tint with gel coloring to a soft rose or pink. Beat until fluffy.
- Spread an even layer of buttercream across the entire cake with an offset spatula.
- Fill a piping bag with buttercream and a heart-shaped tip. Pipe hearts around the perimeter of the cake, spacing them about 1 inch apart. Pipe a second row of hearts around the inner edge if desired.
- Optional: dust the top center with edible pearl dust for subtle shimmer. Chill 20 minutes so piping sets.
Technique Insight: Heart tips vary by brand, so test yours on parchment first. Hold the piping bag at a 90-degree angle and squeeze gently; the tip will form the heart shape as you release pressure. If hearts look lopsided, your buttercream might be too warm. Chill it for 10 minutes and try again. Consistency is key—firm enough to hold shape, soft enough to pipe smoothly.
Make-Ahead Note: Bake and frost the base up to 1 day ahead. Pipe hearts up to 8 hours before the party; store at room temperature. If you refrigerate, the hearts may crack as they warm up, so avoid chilling unless absolutely necessary.
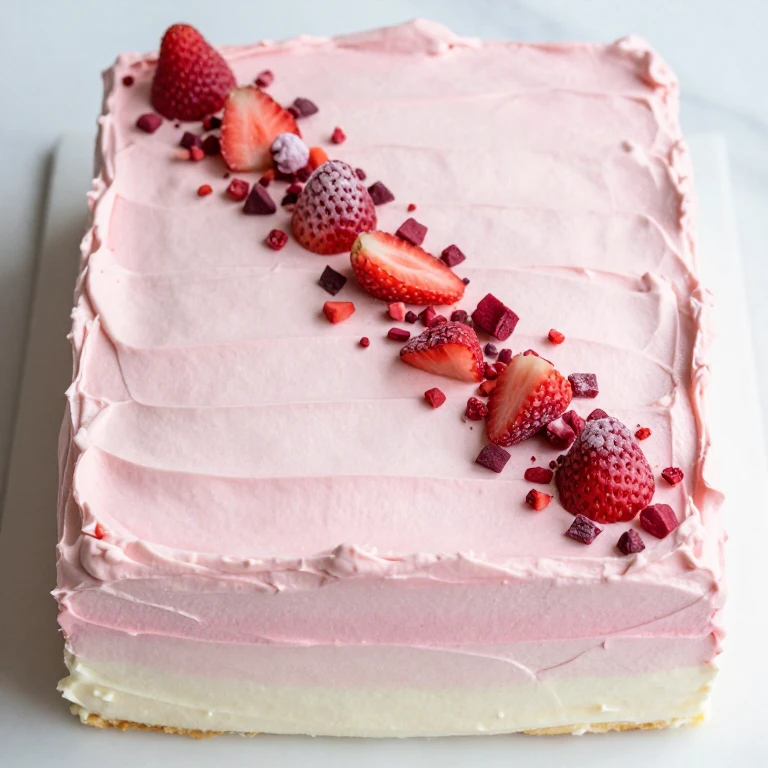
6. Candy Pearl Confetti Cake
Edible pearl candies are my secret weapon for instant sophistication. I spread white or pastel buttercream, then scatter pearl-shaped candies across the top in a loose, organic pattern. They catch light beautifully and add dimension without any piping required. It’s the cake equivalent of throwing on a statement necklace—minimal effort, maximum impact.
Flavor Profile: Vanilla cake with white or pale buttercream; the pearl candies add sweetness and subtle flavor depending on the variety.
Best for: Ages 5–16; kids who love sparkle and shimmer; works for sophisticated or playful themes.
Ingredients
- 1 box vanilla cake mix (plus ingredients) or homemade vanilla cake
- 1 lb unsalted butter softened
- 3½ cups powdered sugar
- 2 tbsp heavy cream
- 1 tsp vanilla extract
- Gel food coloring (optional; white, ivory, or pale pastel)
- 1½ cups edible pearl candies (various sizes if possible)
- Offset spatula
Instructions
- Bake cake in a 9×13-inch pan according to package or recipe directions. Cool completely.
- Make buttercream: beat softened butter until pale, gradually add powdered sugar, cream, and vanilla. Tint if desired. Beat until fluffy.
- Spread buttercream evenly across the entire cake with an offset spatula, creating a smooth surface.
- While buttercream is still soft, scatter pearl candies across the top in a loose, random pattern. Press them gently so they adhere but don’t sink completely into the frosting.
- If desired, place a few pearls around the edges and corners for a cohesive look. Chill 20 minutes so buttercream sets and pearls stay in place.
Practical Tip: Pearl candies come in many sizes and colors. Mix them for visual interest—combine white, pastel pink, and pale gold for an elegant look, or go bold with rainbow pearls. Press them in gently; too much pressure and they’ll sink and crack the buttercream. Let the frosting do the holding.
Storage Note: Decorate this cake up to 6 hours ahead; store at room temperature away from heat. If you refrigerate, the buttercream will firm up and candies won’t adhere as well when you remove it. Room temperature is ideal for this design.
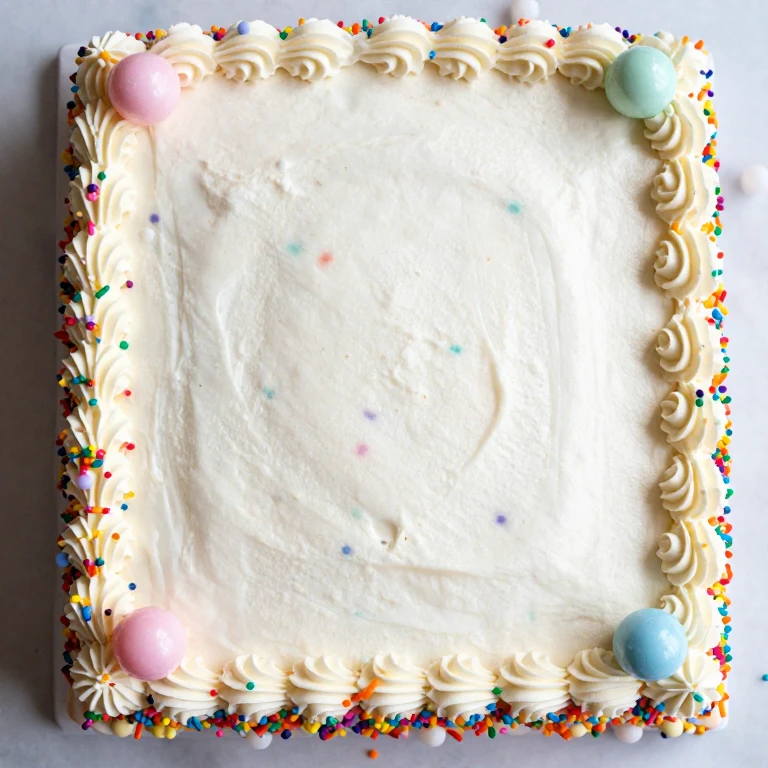
7. Lemon Raspberry Layer Cake
Bright, tart, and perfect for kids who love fruit flavors, this cake layers tangy lemon cake with fresh raspberries and a delicate lemon buttercream. The raspberries create a natural, beautiful design—just arrange them in rows or scatter them across the top. The flavor is sophisticated enough for older kids but fun enough for younger ones.
Flavor Profile: Bright lemon cake with tart raspberries and subtle lemon buttercream; refreshing and not overly sweet.
Best for: Ages 7–16; kids who love citrus and berry flavors; spring or summer birthdays.
Ingredients
- 1 box lemon cake mix (plus ingredients) or 2 cups all-purpose flour, 1½ tsp baking powder, ½ tsp salt, ½ cup unsalted butter softened, 1 cup granulated sugar, 2 large eggs, zest of 2 lemons, juice of 1 lemon, ½ cup whole milk
- 1 lb unsalted butter softened
- 3½ cups powdered sugar
- Juice and zest of 1 lemon
- 2 tbsp heavy cream
- 2 cups fresh raspberries
- 2 tbsp lemon curd (optional, for extra tang)
Instructions
- Preheat oven to 350°F. Grease and flour a 9×13-inch pan. If using cake mix, follow package directions. If baking from scratch, cream butter and sugar until pale, add eggs one at a time, then lemon zest and juice. Alternate milk and dry ingredients. Bake 28–32 minutes until a toothpick comes out clean.
- Cool completely in pan, then turn out onto a wire rack.
- Make buttercream: beat softened butter until creamy, gradually add powdered sugar, lemon juice, zest, and cream. Beat until fluffy and pale yellow.
- Spread a thin layer of buttercream across the cake. If using lemon curd, drizzle it lightly over the buttercream base.
- Arrange fresh raspberries in rows or scatter them across the cake. Spread remaining buttercream between and around the raspberries, filling gaps gently.
- Chill 30 minutes before serving so raspberries stay fresh and flavors meld.
Technique Insight: Raspberries are delicate and release juice quickly. Add them no more than 4 hours before serving. If you need to prepare earlier, keep them separate and add them 1 hour before the party. The buttercream base prevents the cake from absorbing too much juice.
Make-Ahead Note: Bake and frost the base (without raspberries) up to 1 day ahead. Add raspberries on the morning of the party, no more than 4 hours before serving. Store in a cool kitchen or refrigerate if your kitchen is warm; bring to room temperature 30 minutes before serving.
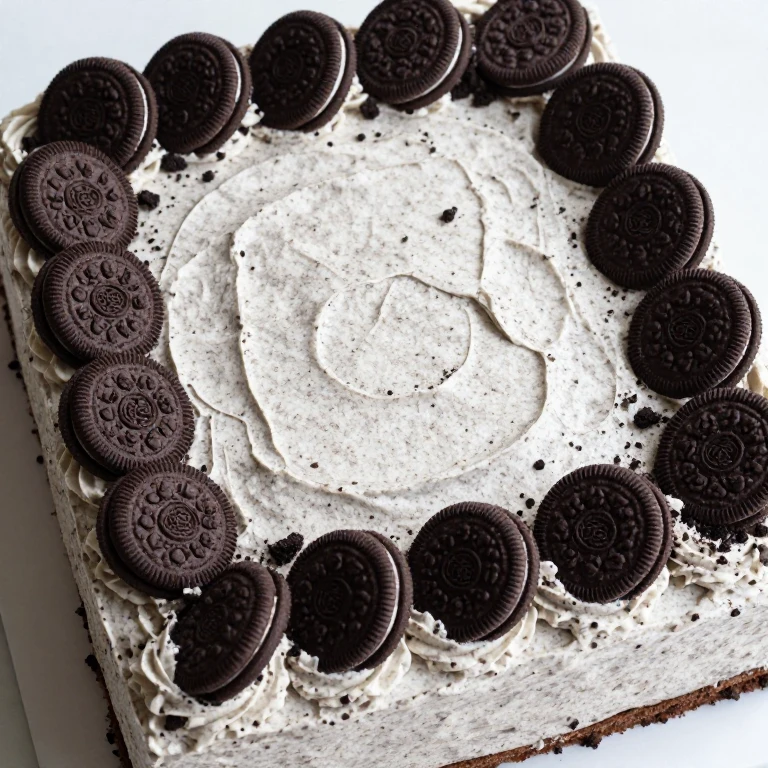
8. Cookies and Cream Dream Cake
This is the cake for kids who would choose cookies and cream ice cream every single time. I bake a vanilla cake, frost it with cookies-and-cream buttercream (made by crushing Oreos and folding them in), then top with crushed cookie pieces and whole cookie halves for a design that’s both simple and indulgent. No piping required—just press and scatter.
Flavor Profile: Vanilla cake with cookies-and-cream buttercream; tastes like the classic ice cream flavor but in cake form.
Best for: Ages 4–14; cookie-loving kids and those who prefer rich, familiar flavors.
Ingredients
- 1 box vanilla cake mix (plus ingredients) or homemade vanilla cake
- 1 lb unsalted butter softened
- 3 cups powdered sugar
- 2 tbsp heavy cream
- 1 tsp vanilla extract
- 15 Oreo cookies (or similar sandwich cookies), divided
- Piping bag with round tip (optional)
Instructions
- Bake cake in a 9×13-inch pan according to package or recipe directions. Cool completely.
- Make buttercream: beat softened butter until pale, gradually add powdered sugar, cream, and vanilla. Beat until fluffy.
- Crush 12 Oreos (including filling) into small pieces—some fine, some chunky. Fold into buttercream until evenly distributed. The buttercream should be speckled with cookie pieces.
- Spread cookies-and-cream buttercream evenly across the cake with an offset spatula.
- Crush remaining 3 Oreos into coarse pieces and scatter across the top of the cake. Press gently so they adhere.
- Optional: place whole Oreo halves or quarters around the border for a polished look. Chill 20 minutes so buttercream sets.
Practical Tip: The key to great cookies-and-cream buttercream is texture variety. Crush some cookies into fine crumbs and others into chunky pieces so you get pockets of flavor throughout. Don’t over-process or you’ll end up with a homogeneous gray frosting. Use a food processor for 3–4 pulses, then finish by hand.
Storage Note: Decorate this cake up to 8 hours ahead; store at room temperature away from direct sunlight or heat. The cookies will soften slightly as they sit, which is fine—it creates a chewy texture that most kids love. Avoid refrigerating unless absolutely necessary, as cold temps can make cookies hard.
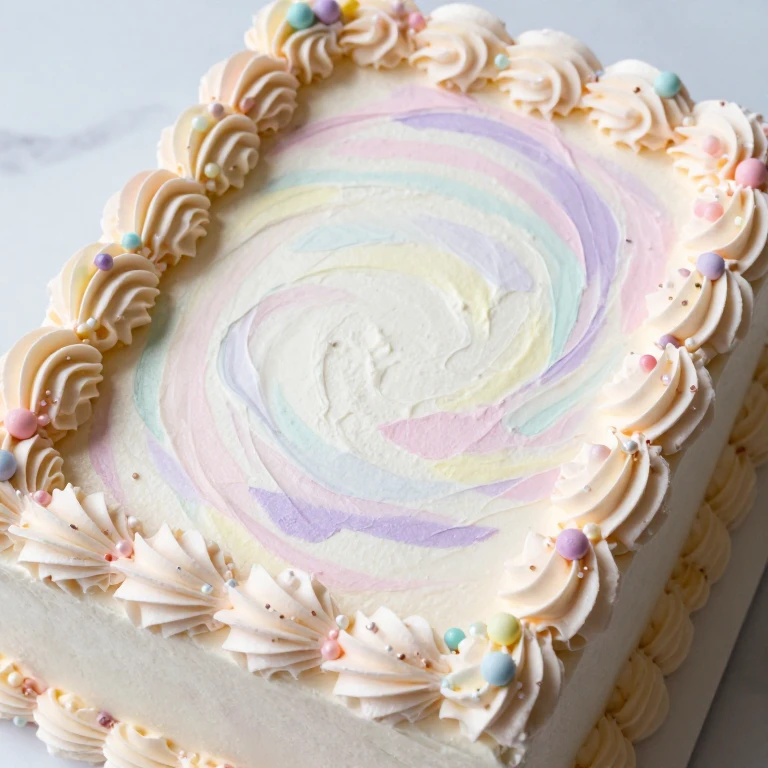
9. Vanilla Confetti Ombré Cake
This design combines two trends into one showstopper: confetti-speckled cake with an ombré frosting gradient. I bake a funfetti cake, then frost it with five shades of the same color, blending them from light to dark. The confetti inside the cake peeks through where you cut, and the ombré exterior is pure eye candy. It’s modern, fun, and totally achievable.
Flavor Profile: Vanilla funfetti cake with buttercream ombré in your color choice; the sprinkles add subtle sweetness and texture.
Best for: Ages 5–16; kids who love modern aesthetics and colorful designs; works for any theme.
Ingredients
- 1 box funfetti or vanilla cake mix with sprinkles (plus ingredients) or 2 cups all-purpose flour, 1½ tsp baking powder, ½ tsp salt, ½ cup unsalted butter softened, 1 cup granulated sugar, 2 large eggs, ½ cup whole milk, 1 tsp vanilla extract, ¼ cup rainbow sprinkles
- 1 lb unsalted butter softened
- 4 cups powdered sugar
- 3 tbsp heavy cream
- 1 tsp vanilla extract
- Gel food coloring (one color of your choice)
Instructions
- Preheat oven to 350°F. Grease and flour a 9×13-inch pan. If using cake mix, follow package directions. If baking from scratch, cream butter and sugar until pale, add eggs one at a time, alternate milk and dry ingredients, fold in sprinkles, and pour into pan. Bake 28–32 minutes until a toothpick comes out clean.
- Cool completely in pan, then turn out onto a wire rack.
- Make buttercream: beat softened butter until creamy, gradually add powdered sugar, cream, and vanilla. Beat until fluffy.
- Divide buttercream into five bowls. Leave one white, tint the others with gel coloring, each progressively darker (lightest to darkest).
- Spread the lightest shade across the top third of the cake. Blend the next shade into it, then continue with each darker shade, blending edges gently as you go.
- Chill 20 minutes so ombré sets and colors stay distinct.
Technique Insight: Funfetti cakes can be dense if you overmix. Fold sprinkles in by hand at the very end, and don’t stir the batter more than necessary after adding them. The confetti should stay suspended throughout the cake rather than sinking to the bottom.
Make-Ahead Note: Bake the cake up to 2 days ahead and wrap tightly. Decorate up to 8 hours before the party; store at room temperature. The confetti inside the cake won’t dry out if you wrap the unfrosted cake well, and the ombré frosting holds beautifully at room temp.
10. White Chocolate Berry Dream Cake
White chocolate and berries are a classic pairing, and this cake brings them together in a way kids absolutely love. I frost the cake with white chocolate buttercream, then arrange fresh berries (strawberries, blueberries, raspberries) in a scattered pattern across the top. It looks elegant but feels playful, and the flavor is rich without being heavy.
Flavor Profile: Vanilla or white chocolate cake with white chocolate buttercream and tart-sweet berries; creamy, fruity, and balanced.
Best for: Ages 6–16; kids who love white chocolate and fresh fruit; spring or summer celebrations.
Ingredients
- 1 box vanilla cake mix (plus ingredients) or homemade vanilla cake
- 8 oz white chocolate chopped
- 1 lb unsalted butter softened
- 2 cups powdered sugar
- 2 tbsp heavy cream
- 1 tsp vanilla extract
- 2 cups mixed fresh berries (strawberries, blueberries, raspberries)
- 2 tbsp white chocolate shavings or curls (optional garnish)
Instructions
- Bake cake in a 9×13-inch pan according to package or recipe directions. Cool completely.
- Melt white chocolate in a microwave-safe bowl in 20-second intervals, stirring between each, until smooth. Cool slightly (about 5 minutes).
- Make buttercream: beat softened butter until pale, gradually add powdered sugar and cream. Beat until fluffy. Add cooled white chocolate and vanilla, then beat until smooth and pale (1–2 minutes).
- Spread white chocolate buttercream evenly across the entire cake with an offset spatula.
- Arrange fresh berries across the top in a loose, organic pattern. Press gently so they adhere to the buttercream.
- Optional: scatter white chocolate shavings between berries for extra richness. Chill 30 minutes so buttercream sets and berries stay fresh.
Technique Insight: White chocolate can seize (become grainy) if it gets too hot or comes in contact with water. Melt it slowly in short intervals and make sure your bowl is completely dry. If it does seize, stir in a small amount of coconut oil (1 tsp at a time) to smooth it out. Avoid adding milk or cream directly to hot white chocolate; cool it first.
Storage Note: Bake and frost the base up to 1 day ahead. Add berries on the morning of the party, no more than 6 hours before serving. Store in a cool kitchen or refrigerate if necessary; bring to room temperature 30 minutes before serving so the white chocolate flavor comes through.
How to Choose the Right One
If you want a design that requires zero piping: Try Strawberry Milk Dream Cake (recipe 3), Rainbow Sprinkle Border (recipe 4), Candy Pearl Confetti (recipe 6), or White Chocolate Berry Dream (recipe 10). All rely on arranging toppings rather than piping.
If you want a cake you can decorate the morning of the party: Pastel Ombré Dream (recipe 1), Butterfly Confetti (recipe 2), Rainbow Sprinkle Border (recipe 4), and Cookies and Cream (recipe 8) all hold beautifully at room temperature and don’t require last-minute fresh toppings.
If you want to prep ahead and freeze: Bake any of these cakes up to 2 days ahead, wrap tightly, and store at room temperature. Frost and decorate the day of, or up to 8 hours ahead. Avoid freezing frosted cakes, as buttercream can separate when thawed.
If your daughter loves fruit flavors: Strawberry Milk Dream (recipe 3), Lemon Raspberry Layer (recipe 7), and White Chocolate Berry Dream (recipe 10) all highlight fresh, bright flavors.
If you’re decorating for the first time: Start with Rainbow Sprinkle Border (recipe 4), Butterfly Confetti (recipe 2), or Candy Pearl Confetti (recipe 6). None require piping skill, and they all look impressive.
FAQ
Can I make these cakes ahead and freeze them?
Yes, you can bake and cool any of these cakes up to 2 days ahead. Wrap the unfrosted cake tightly in plastic wrap and store at room temperature. Don’t freeze frosted cakes; buttercream separates when thawed and can weep. Instead, frost and decorate up to 8 hours before the party and store at room temperature.
What’s the best buttercream for piping details?
Swiss meringue buttercream (made with egg whites, sugar, and butter) holds color beautifully and tastes less sweet than American buttercream. For piping, it’s also more stable in warm kitchens. American buttercream (butter, powdered sugar, cream) is easier to make and works fine if you keep the cake cool. Both work; it depends on your comfort level and kitchen temperature.
How do I prevent buttercream from getting too soft while decorating?
Keep your frosted cake in a cool kitchen (below 70°F if possible) or pop it in the fridge for 10–15 minutes between decorating steps. Soft buttercream won’t hold piping details. If your kitchen is warm, chill the cake frequently. Cold buttercream pipes more cleanly and holds shapes longer.
Can I use store-bought frosting instead of homemade?
Absolutely. Store-bought buttercream works fine and saves time. Choose a quality brand and tint it with gel food coloring (which won’t thin the frosting like liquid coloring would). You may need to add a touch of cream to reach the right consistency for piping or spreading.
What’s the easiest design for a beginner?
Rainbow Sprinkle Border (recipe 4) or Candy Pearl Confetti (recipe 6). Both require spreading frosting and pressing toppings in—no piping at all. Butterfly Confetti (recipe 2) is also beginner-friendly because imperfect piping is hidden by confetti.
How long do these cakes stay fresh?
A frosted sheet cake stays fresh at room temperature for up to 2 days. If your kitchen is warm or humid, store it in a cool spot or refrigerate. Bring it to room temperature 30 minutes before serving so flavors shine. Cakes with fresh fruit (strawberries, raspberries, berries) are best served within 6 hours of decoration.
Can I make these cakes dairy-free or egg-free?
Yes, use a dairy-free cake mix or recipe and dairy-free butter (like Earth Balance) for the frosting. For egg-free, use an egg-free cake mix. The decorating techniques stay the same. Test your frosting consistency before decorating, as dairy-free butter sometimes behaves differently.