
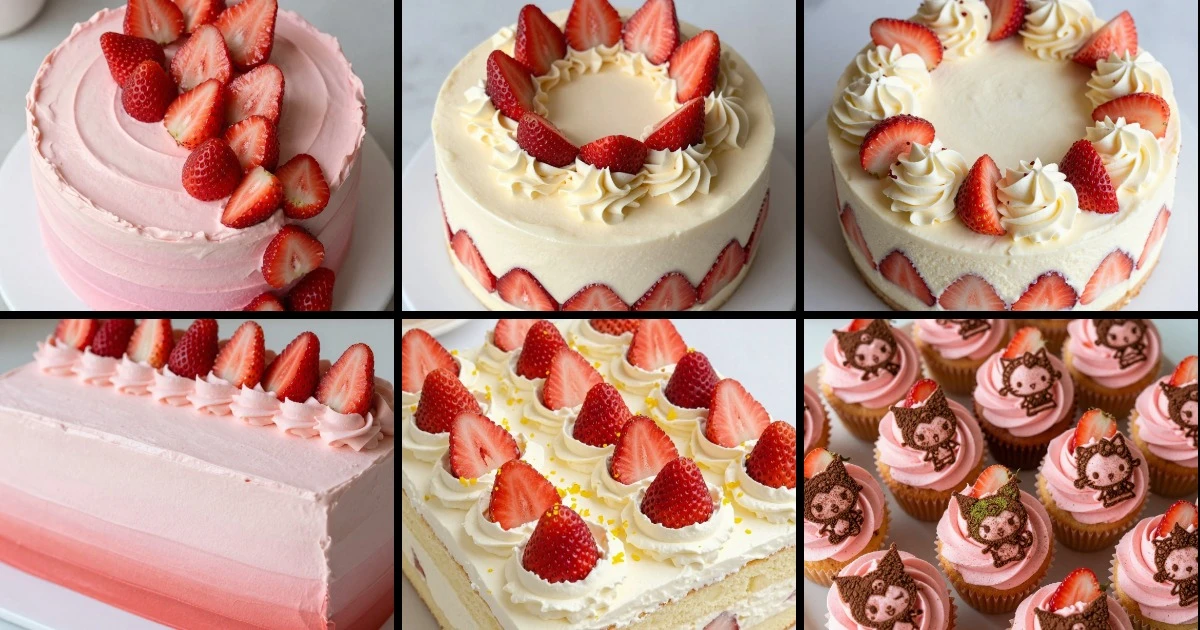
Strawberry birthday cakes have a way of stealing the spotlight at celebrations, and I’ve learned that the magic isn’t just in the fruit—it’s in how you build the layers, frost them, and finish them off. After sharing my first collection of strawberry birthday cake ideas, I realized there’s so much more territory to explore: ombré frosting techniques, surprise piñata centers, mini bento-style servings, and themed decorations that transform a simple cake into a statement piece. These twelve ideas push beyond the classic strawberry-on-top approach and give you real options for different party sizes, skill levels, and occasions.
I’ve organized these by visual style and execution method, so whether you’re decorating a sheet cake for a crowd, stacking layers for drama, or crafting individual portions for an intimate gathering, you’ll find a strategy that fits your timeline and kitchen confidence. Each recipe includes a make-ahead schedule, serving guide, and the core texture contrast that makes it memorable.
Classic Layered & Frosted Strawberry Cakes
This group covers the foundation cakes—the ones where frosting technique and strawberry placement become your main design tool. These are your go-to moves when you want impact without fussy assembly.
1. Ombré Pink Buttercream Strawberry Layer Cake
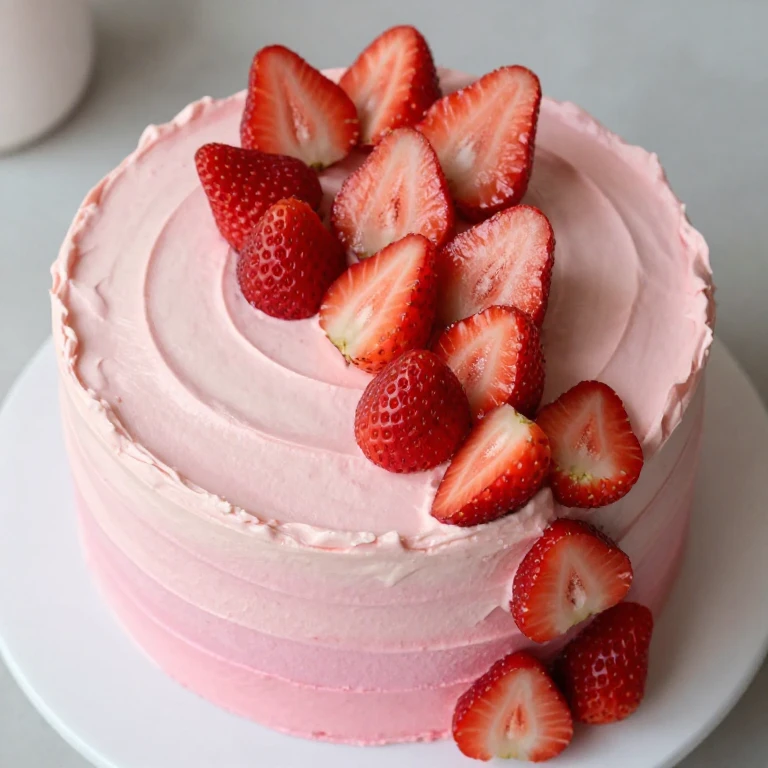
I love this approach because the frosting itself becomes the decoration. You’re building three or four layers of vanilla or almond cake, then creating a gradient from pale blush to deep rose using the same buttercream base, just with increasing drops of pink gel food coloring. Stack and crumb coat, then apply the ombré layers from bottom to top, letting each shade peek through slightly. Fresh strawberry halves nestle into the top and cascade down one side.
Ingredients
- 2 cups all-purpose flour
- 1½ teaspoons baking powder
- ½ teaspoon salt
- ½ cup unsalted butter, softened
- 1 cup granulated sugar
- 3 large eggs
- ½ cup whole milk
- 1 teaspoon vanilla extract
- 2 lbs fresh strawberries, hulled and halved
- 3 cups unsalted butter, softened (for frosting)
- 6 cups powdered sugar
- Pink gel food coloring
Instructions
- Preheat oven to 350°F. Grease and flour three 8-inch round cake pans. Whisk together flour, baking powder, and salt.
- Cream softened butter and granulated sugar until light and fluffy, about 3 minutes. Add eggs one at a time, beating well after each. Alternate adding flour mixture and milk in three additions, starting and ending with flour. Stir in vanilla.
- Divide batter evenly among pans and bake 22–26 minutes, until a toothpick comes out clean. Cool in pans 10 minutes, then turn out onto wire racks to cool completely.
- Make buttercream by beating softened butter until pale, then gradually add powdered sugar. Divide into four bowls and tint each with increasing pink coloring for ombré effect.
- Level cake layers. Place first layer on cake board, spread with frosting, and layer strawberry halves. Repeat with remaining layers. Crumb coat with palest pink, chill 15 minutes, then apply ombré frosting layers from bottom to top.
- Arrange fresh strawberry halves on top and down one side. Chill until serving time.
Whirl Factor: The ombré frosting technique transforms a simple cake into a modern showstopper—the gradient catches light and gives you a professional finish without piping complexity.
Make-Ahead Tip: Bake layers up to 2 days ahead, wrap tightly, and freeze. Frosting keeps 3 days refrigerated. Assemble and decorate up to 6 hours before serving; keep chilled.
2. Rainbow Sprinkle Confetti Layer Cake with Strawberry Filling
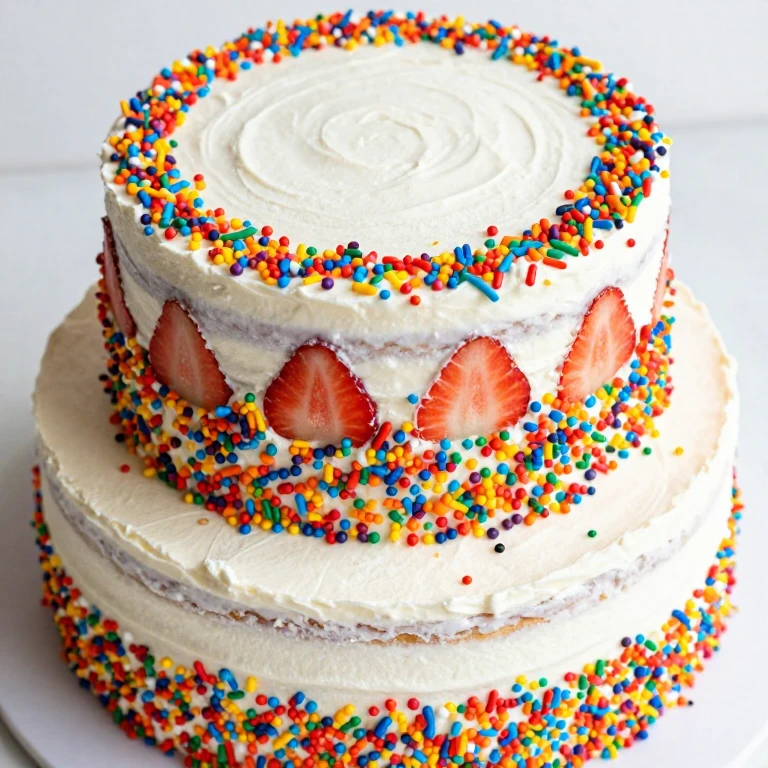
This one leans into celebration mode. The twist here is mixing rainbow sprinkles directly into the cake batter—not just on top—so every slice reveals color. I use a classic vanilla base, fold in sprinkles gently at the end, then sandwich layers with strawberry jam and fresh strawberry slices before finishing with white or vanilla frosting and a sprinkle border.
Ingredients
- 2¼ cups all-purpose flour
- 2¼ teaspoons baking powder
- ½ teaspoon salt
- ¾ cup unsalted butter, softened
- 1½ cups granulated sugar
- 3 large eggs
- ¾ cup whole milk
- 2 teaspoons vanilla extract
- ¾ cup rainbow sprinkles (plus more for border)
- 1 cup strawberry jam
- 1 lb fresh strawberries, sliced
- 3 cups unsalted butter, softened (for frosting)
- 5 cups powdered sugar
Instructions
- Preheat oven to 350°F. Grease and flour three 8-inch round pans. Whisk flour, baking powder, and salt together.
- Cream butter and sugar until fluffy, about 3 minutes. Add eggs one at a time. Alternate milk and flour mixture in three additions, starting and ending with flour. Stir in vanilla, then gently fold in rainbow sprinkles.
- Divide batter among pans and bake 24–28 minutes until a toothpick comes out clean. Cool in pans 10 minutes, then turn out to cool completely.
- Level cake layers. Spread first layer with jam, add strawberry slices, and top with next layer. Repeat. Crumb coat with frosting and chill 15 minutes.
- Apply final frosting layer smoothly. Press rainbow sprinkles around the bottom edge and top perimeter for a confetti border.
- Chill until serving time; slice carefully to reveal the sprinkle-studded interior.
Whirl Factor: Sprinkles baked into the cake create a surprise element—you’re not just decorating the outside, you’re building color into the structure itself.
Storage Note: This cake stays moist for 3 days covered at room temperature. Freeze unfrosted layers up to 1 month; thaw before frosting and assembly.
3. White Chocolate Strawberry Mousse Layer Cake
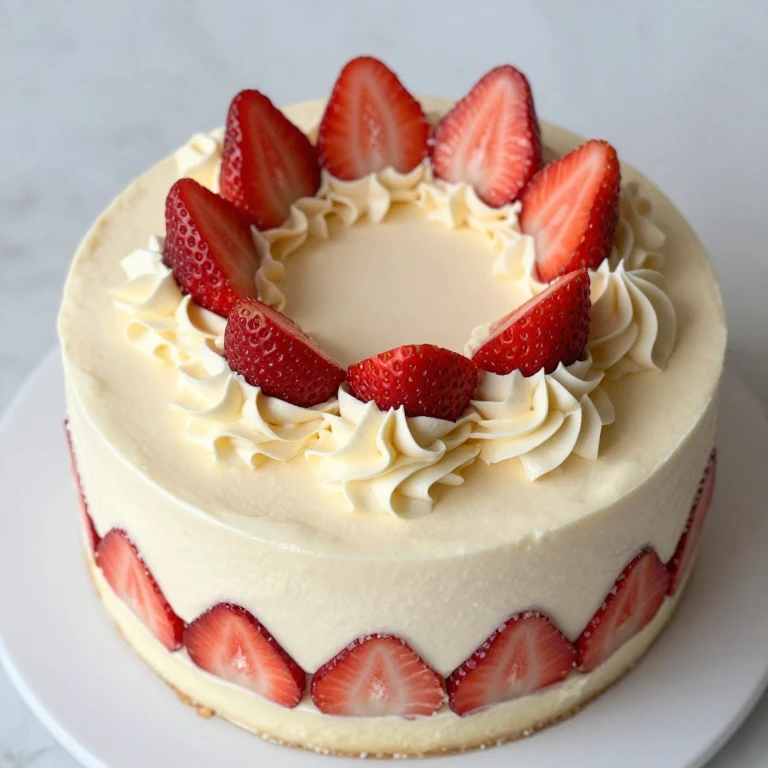
Here’s where texture contrast shines. I’m building alternating layers of light vanilla sponge and silky white chocolate mousse, with fresh strawberry pieces distributed throughout. The mousse sets slightly as it chills, creating an airy, almost cloud-like layer between cake slices. Top with whipped cream and a crown of fresh strawberries.
Ingredients
- 1¾ cups all-purpose flour
- 1¾ teaspoons baking powder
- ¼ teaspoon salt
- ½ cup unsalted butter, softened
- ¾ cup granulated sugar
- 3 large eggs, separated
- ⅓ cup whole milk
- 1 teaspoon vanilla extract
- 8 oz white chocolate, chopped
- 1 cup heavy cream, cold
- 1 lb fresh strawberries, hulled and halved
- 2 cups heavy cream (for whipped topping)
- 2 tablespoons powdered sugar
Instructions
- Preheat oven to 350°F. Grease and flour two 8-inch round pans. Whisk flour, baking powder, and salt.
- Cream butter and granulated sugar until fluffy. Add egg yolks one at a time. Alternate milk and flour mixture in three additions. Stir in vanilla. In a separate bowl, whip egg whites to stiff peaks and fold into batter gently.
- Divide between pans and bake 22–26 minutes. Cool completely. For mousse: melt white chocolate gently over low heat or in a double boiler. Cool slightly, then fold in 1 cup cold heavy cream in two additions until mousse forms.
- Level cake layers. Place first layer on a cake board, spread with mousse, scatter strawberry halves, and top with second layer. Spread remaining mousse on top and sides.
- Whip 2 cups heavy cream with powdered sugar to stiff peaks. Pipe or spread over mousse layer. Arrange fresh strawberry halves on top in a crown pattern.
- Chill at least 4 hours (or up to overnight) before serving to let mousse set.
Whirl Factor: The mousse layer gives you an ultra-light, almost weightless texture between cake layers—it’s indulgent but not heavy, and strawberries suspended in it add bursts of fresh fruit flavor.
Make-Ahead Schedule: Bake layers 1 day ahead. Assemble mousse cake up to 8 hours before serving; keep refrigerated. Whipped cream topping should be added within 2 hours of serving.
Surprise-Center & Piñata Strawberry Cakes
These designs hide something special in the middle—candy, fruit, or a flavor contrast that guests discover on the first bite. They’re dramatic, memorable, and easier to execute than they look.
4. Strawberry Piñata Cake with Candy Center
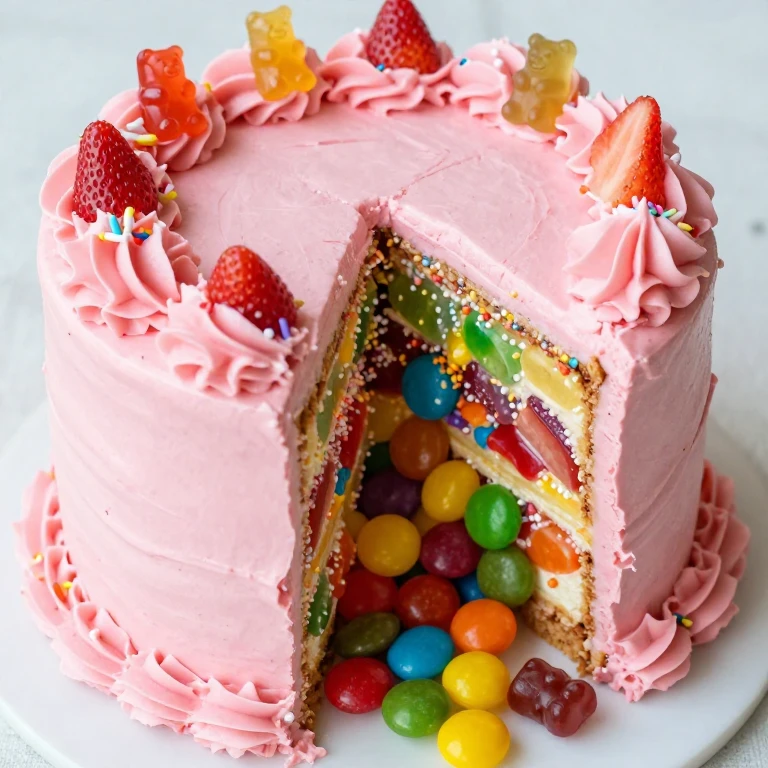
I’ve become obsessed with piñata cakes because they deliver that moment of delight. You’re baking a standard two-layer strawberry cake, but before assembly, you’re carving a shallow bowl into the top of the bottom layer, filling it with your choice of small candies, crushed cookies, or even freeze-dried strawberries, then topping it with the second layer. When cut, the filling tumbles out dramatically.
Ingredients
- 2¼ cups all-purpose flour
- 2¼ teaspoons baking powder
- ½ teaspoon salt
- ¾ cup unsalted butter, softened
- 1½ cups granulated sugar
- 3 large eggs
- ¾ cup whole milk
- 2 teaspoons vanilla extract
- 1 cup fresh strawberries, pureed
- Pink gel food coloring (optional)
- 2 cups strawberry jam or frosting
- 1½ cups small candies (gummy bears, sprinkles, crushed freeze-dried strawberries, or chocolate chips)
- 3 cups unsalted butter, softened (for frosting)
- 5 cups powdered sugar
Instructions
- Preheat oven to 350°F. Grease and flour two 8-inch round pans. Whisk flour, baking powder, and salt.
- Cream butter and sugar until fluffy. Add eggs one at a time. Alternate milk and flour mixture in three additions. Stir in vanilla and strawberry puree; add food coloring if desired for deeper pink.
- Divide between pans and bake 26–30 minutes. Cool completely. Make buttercream by beating softened butter until pale, then gradually add powdered sugar.
- Level both layers. Using a small round cutter or spoon, carve a shallow bowl (about 1 inch deep) into the top of the bottom layer, leaving a ½-inch border around edges.
- Spread jam or frosting around the carved area, fill the bowl with your chosen candies, then carefully place the top layer on top, pressing gently.
- Crumb coat with frosting, chill 15 minutes, then apply final frosting layer. Chill until serving time.
Whirl Factor: The surprise center creates texture and flavor contrast in every slice—you get cake, frosting, and a burst of candy or fruit all at once, making this cake feel interactive and fun.
Storage Note: Keep this cake refrigerated if using fresh fruit filling, or at room temperature if using candies. Best served within 2 days of assembly.
5. Strawberry Jam Ribbon Swirl Cake
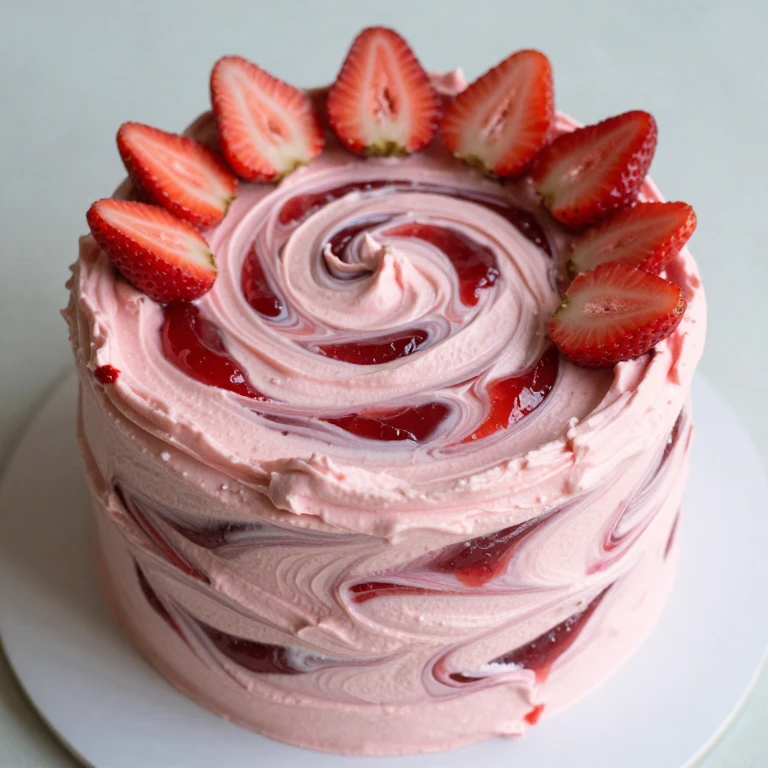
Instead of a single surprise center, I’m running a ribbon of strawberry jam through the middle of the cake by piping it in a spiral pattern before baking. You fill a piping bag with jam, pipe concentric circles on the batter, then swirl a knife through to create ribbons. When baked and sliced, you see beautiful jam veins running through each piece.
Ingredients
- 2¼ cups all-purpose flour
- 2¼ teaspoons baking powder
- ½ teaspoon salt
- ¾ cup unsalted butter, softened
- 1½ cups granulated sugar
- 3 large eggs
- ¾ cup whole milk
- 1½ teaspoons vanilla extract
- ¾ cup strawberry jam (divided: ½ cup for swirl, ¼ cup for frosting)
- Pink gel food coloring (optional)
- 3 cups unsalted butter, softened (for frosting)
- 5 cups powdered sugar
- Fresh strawberries for topping
Instructions
- Preheat oven to 350°F. Grease and flour two 8-inch round pans. Whisk flour, baking powder, and salt.
- Cream butter and sugar until fluffy. Add eggs one at a time. Alternate milk and flour mixture in three additions. Stir in vanilla and food coloring if desired.
- Pour half the batter into each pan. Transfer ½ cup jam to a piping bag fitted with a medium round tip. Pipe concentric circles of jam on top of batter in each pan.
- Using a thin knife or skewer, drag lines from the center outward (or inward) to create a web or swirl pattern. Bake 26–30 minutes until a toothpick comes out clean (avoiding jam pockets). Cool completely.
- Make buttercream, then blend in ¼ cup strawberry jam for a swirled frosting. Level and stack layers with frosting between them.
- Crumb coat, chill 15 minutes, then apply final frosting. Top with fresh strawberry halves and chill until serving.
Whirl Factor: The jam ribbon creates visual intrigue and flavor pockets throughout the cake without requiring complex assembly—it’s all built in during baking.
Make-Ahead Tip: Bake layers up to 2 days ahead, wrap tightly, and freeze. Frosting keeps 3 days refrigerated. Assemble up to 8 hours before serving.
6. Strawberry Cheesecake Swirl Layer Cake

This combines two beloved flavors by creating a cheesecake mousse layer sandwiched between strawberry cake layers. I whip cream cheese with a little powdered sugar and fold in whipped cream to make a light cheesecake mousse, then layer it with fresh strawberries and cake. It’s indulgent but not as heavy as a traditional cheesecake.
Ingredients
- 2¼ cups all-purpose flour
- 2¼ teaspoons baking powder
- ½ teaspoon salt
- ¾ cup unsalted butter, softened
- 1½ cups granulated sugar
- 3 large eggs
- ¾ cup whole milk
- 1 teaspoon vanilla extract
- ½ cup fresh strawberries, pureed
- 8 oz cream cheese, softened
- ½ cup powdered sugar
- 1 cup heavy cream, cold
- 1 lb fresh strawberries, sliced
- 2 cups heavy cream (for whipped topping)
- 2 tablespoons powdered sugar (for topping)
Instructions
- Preheat oven to 350°F. Grease and flour two 8-inch round pans. Whisk flour, baking powder, and salt.
- Cream butter and granulated sugar until fluffy. Add eggs one at a time. Alternate milk and flour mixture in three additions. Stir in vanilla and strawberry puree.
- Divide between pans and bake 26–30 minutes. Cool completely. For cheesecake mousse: beat softened cream cheese and ½ cup powdered sugar until smooth. Fold in 1 cup cold heavy cream in two additions until mousse forms.
- Level cake layers. Place first layer on a cake board, spread with cheesecake mousse, scatter fresh strawberry slices, and top with second layer.
- Spread remaining mousse over top and sides. Whip 2 cups heavy cream with 2 tablespoons powdered sugar to stiff peaks and pipe decoratively on top.
- Arrange fresh strawberry slices on top. Chill at least 4 hours before serving.
Whirl Factor: Cream cheese mousse adds a tangy richness that contrasts with the light strawberry cake and fresh fruit—it’s a flavor and texture play that feels sophisticated and craveable.
Storage Note: Keep refrigerated and serve within 2 days. This cake doesn’t freeze well due to the mousse layer.
Sheet Cake & Crowd-Pleaser Strawberry Cakes
When you’re feeding a crowd or want minimal fuss, sheet cakes are your answer. These designs work for 12–20 servings and use straightforward decorating techniques that scale easily.
7. Sports-Field Sheet Cake with Strawberry Stripes
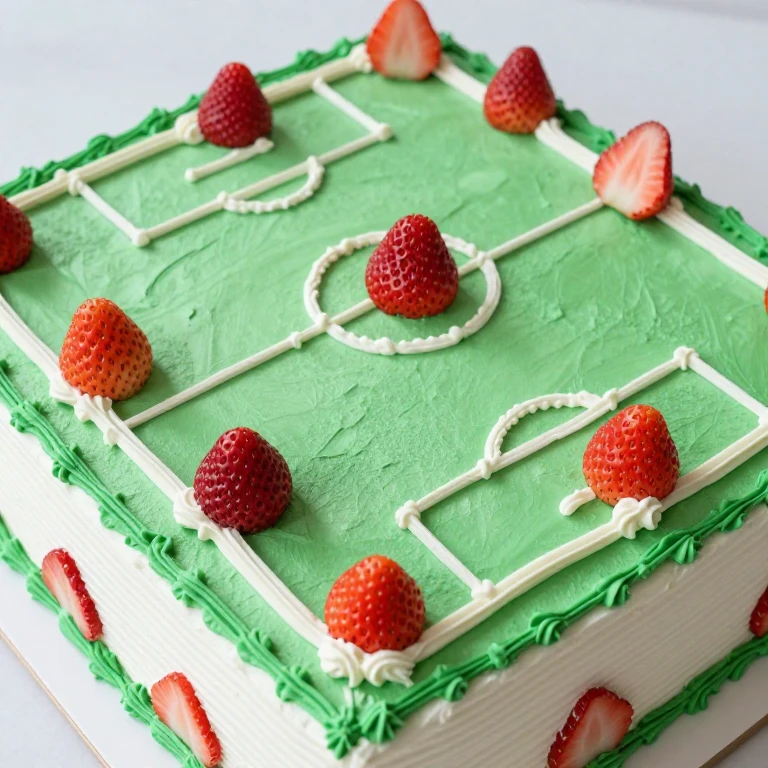
I love this for kids’ birthday parties because it’s customizable to any sport. You’re baking a full sheet cake, frosting it with a sports-field design (think soccer field lines, baseball diamond, basketball court), then using fresh strawberry halves to mark the field or create team colors. The strawberries add a fresh contrast to the buttercream.
Ingredients
- 3 cups all-purpose flour
- 3 teaspoons baking powder
- ¾ teaspoon salt
- 1 cup unsalted butter, softened
- 2 cups granulated sugar
- 4 large eggs
- 1 cup whole milk
- 2 teaspoons vanilla extract
- Green gel food coloring
- 5 cups unsalted butter, softened (for frosting)
- 8 cups powdered sugar
- 2 lbs fresh strawberries, halved
- Piping bags and tips for field lines
Instructions
- Preheat oven to 350°F. Grease a 13×9-inch sheet pan. Whisk flour, baking powder, and salt.
- Cream butter and sugar until fluffy. Add eggs one at a time. Alternate milk and flour mixture in three additions, starting and ending with flour. Stir in vanilla.
- Pour into prepared pan and bake 28–32 minutes until a toothpick comes out clean. Cool completely in pan.
- Make buttercream by beating softened butter until pale, then gradually add powdered sugar. Tint half with green food coloring for the field base.
- Spread green frosting evenly over cooled cake. Using white frosting and a piping bag fitted with a thin round tip, pipe field lines (soccer, baseball, or basketball design based on your sport choice).
- Arrange strawberry halves to mark field positions, create team colors, or highlight key spots. Chill until serving.
Whirl Factor: Fresh strawberries become functional design elements on a sheet cake—they’re not just decoration, they’re part of the visual strategy and add a fresh bite to every piece.
Make-Ahead Schedule: Bake and cool the sheet cake 1 day ahead. Frosting keeps 3 days refrigerated. Decorate with field lines up to 6 hours before serving, add strawberries within 2 hours of serving time.
8. Ombré Strawberry Buttercream Sheet Cake
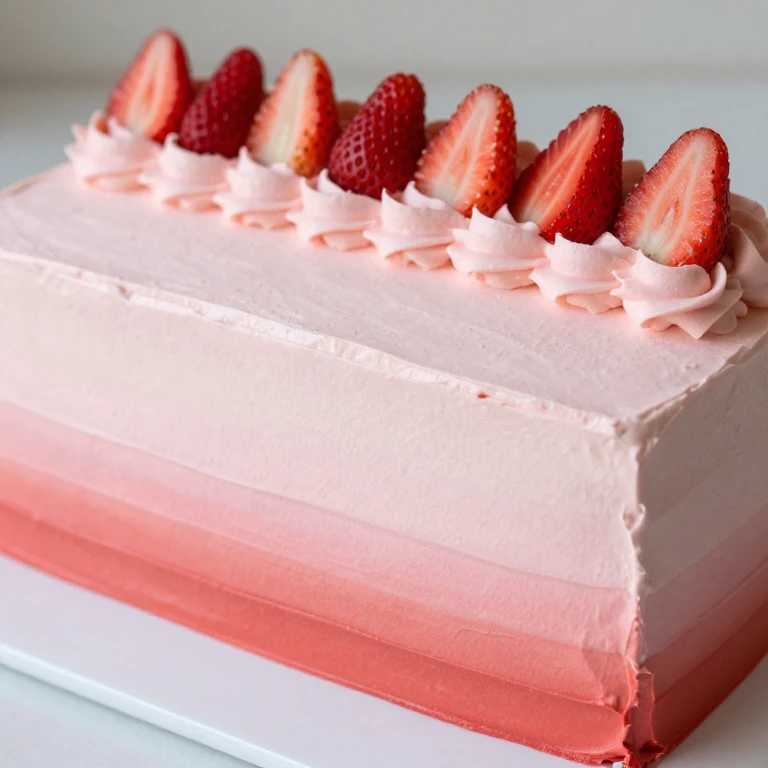
This is my go-to for larger gatherings where I want impact without complicated techniques. I’m baking a single thick sheet cake, then frosting it with horizontal stripes of ombré pink buttercream, creating a gradient from pale blush at the top to deep rose at the bottom. Fresh strawberries line the top edge.
Ingredients
- 3 cups all-purpose flour
- 3 teaspoons baking powder
- ¾ teaspoon salt
- 1 cup unsalted butter, softened
- 2 cups granulated sugar
- 4 large eggs
- 1 cup whole milk
- 2 teaspoons vanilla extract
- 5 cups unsalted butter, softened (for frosting)
- 8 cups powdered sugar
- Pink gel food coloring
- 1½ lbs fresh strawberries, halved
Instructions
- Preheat oven to 350°F. Grease a 13×9-inch sheet pan. Whisk flour, baking powder, and salt.
- Cream butter and sugar until fluffy. Add eggs one at a time. Alternate milk and flour mixture in three additions. Stir in vanilla.
- Pour into prepared pan and bake 28–32 minutes. Cool completely in pan.
- Make buttercream by beating softened butter until pale, then gradually add powdered sugar. Divide into four bowls and tint each with increasing amounts of pink gel coloring for an ombré effect.
- Spread palest pink as a crumb coat over the cooled cake. Chill 15 minutes. Apply horizontal stripes of frosting from top to bottom, using increasingly darker shades of pink.
- Arrange fresh strawberry halves along the top edge in a single line. Chill until serving time.
Whirl Factor: The ombré frosting technique transforms a simple sheet cake into a modern, gallery-worthy design—the gradient catches light and makes this cake feel intentional and polished.
Storage Note: Keep covered at room temperature for up to 3 days. Freeze unfrosted cake layers up to 1 month; thaw before frosting.
9. Strawberry Lemonade Sheet Cake with Whipped Cream Frosting
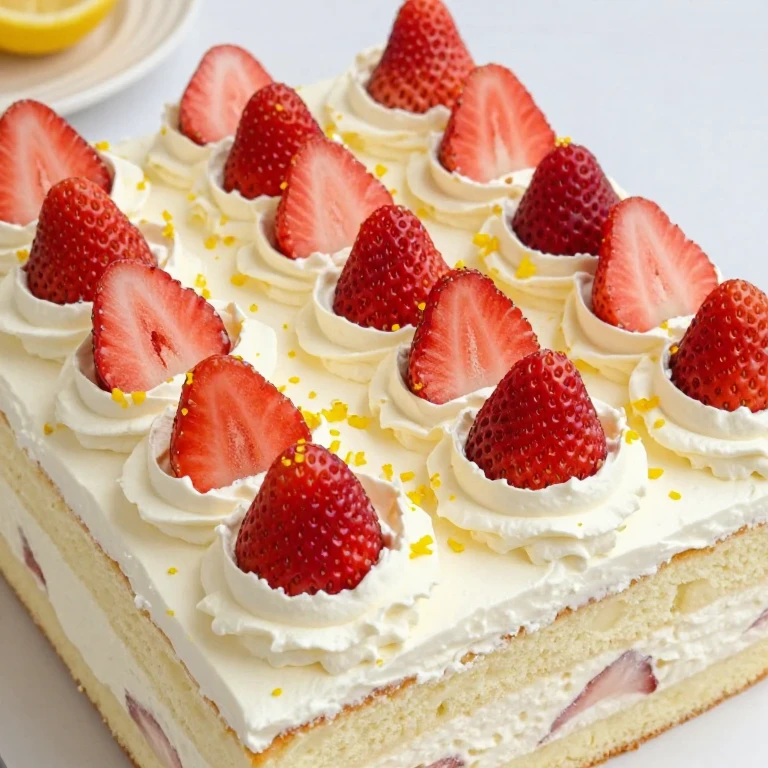
Here’s where I add a flavor twist to the crowd-pleaser format. The cake itself is infused with fresh lemon juice and zest, giving it brightness that complements strawberries perfectly. I frost it with a light whipped cream frosting (stabilized so it holds up) and top with fresh strawberries and a light dusting of lemon zest.
Ingredients
- 3 cups all-purpose flour
- 3 teaspoons baking powder
- ¾ teaspoon salt
- 1 cup unsalted butter, softened
- 2 cups granulated sugar
- 4 large eggs
- ¾ cup whole milk
- ¼ cup fresh lemon juice
- 2 teaspoons lemon zest
- 2 teaspoons vanilla extract
- 3 cups heavy cream, cold
- ¼ cup powdered sugar
- 2 tablespoons cornstarch (to stabilize whipped cream)
- 1½ lbs fresh strawberries, halved
- Extra lemon zest for garnish
Instructions
- Preheat oven to 350°F. Grease a 13×9-inch sheet pan. Whisk flour, baking powder, and salt.
- Cream butter and sugar until fluffy. Add eggs one at a time. Combine milk and lemon juice (it will curdle slightly; this is normal). Alternate milk mixture and flour mixture in three additions. Stir in lemon zest and vanilla.
- Pour into prepared pan and bake 28–32 minutes. Cool completely in pan.
- For stabilized whipped cream frosting: whisk cornstarch and powdered sugar together, then whip cold heavy cream until soft peaks form. Add cornstarch mixture and continue whipping to stiff peaks.
- Spread whipped cream frosting evenly over cooled cake. Arrange fresh strawberry halves in rows across the top.
- Dust lightly with additional lemon zest just before serving. Keep chilled until serving time.
Whirl Factor: Lemon juice and zest brighten the strawberry flavor while whipped cream frosting keeps the cake feeling light—it’s a flavor and texture combination that feels fresh and summery.
Make-Ahead Tip: Bake the sheet cake 1 day ahead. Make stabilized whipped cream frosting up to 4 hours before serving. Assemble and decorate within 2 hours of serving to keep frosting fresh.
Individual & Mini Strawberry Cakes
When you want to serve smaller portions, create elegant individual presentations, or prep ahead for a party, mini cakes and cupcakes give you flexibility. These designs work for intimate gatherings or as part of a larger dessert spread.
10. Character Stencil Strawberry Cupcakes
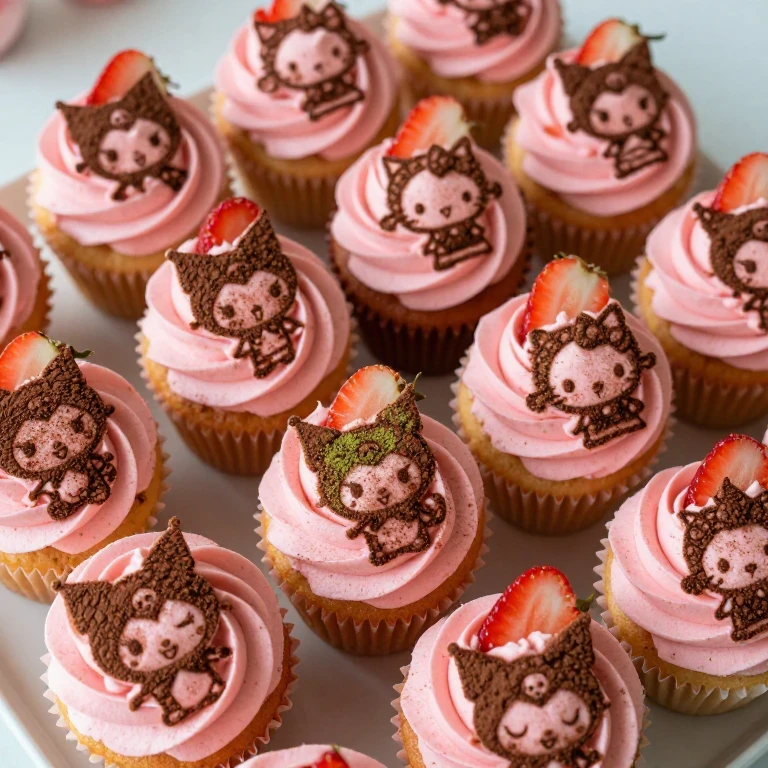
I’ve had so much fun with this technique: bake standard strawberry cupcakes, frost them with white or pink buttercream, then use character stencils (available online or at craft stores) to dust cocoa powder, matcha powder, or edible glitter on top to create themed designs. Kids love recognizing their favorite characters, and the stencil technique is foolproof.
Ingredients
- 1¾ cups all-purpose flour
- 1¾ teaspoons baking powder
- ¼ teaspoon salt
- ½ cup unsalted butter, softened
- ¾ cup granulated sugar
- 2 large eggs
- ⅓ cup whole milk
- ½ teaspoon vanilla extract
- ¼ cup fresh strawberries, pureed
- 2 cups unsalted butter, softened (for frosting)
- 3½ cups powdered sugar
- Pink gel food coloring (optional)
- Cocoa powder, matcha powder, or edible glitter for stenciling
- Character stencils
- Fresh strawberry pieces for topping
Instructions
- Preheat oven to 350°F. Line a 12-cup muffin tin with cupcake liners. Whisk flour, baking powder, and salt.
- Cream butter and sugar until fluffy. Add eggs one at a time. Alternate milk and flour mixture in three additions. Stir in vanilla and strawberry puree.
- Divide batter evenly among liners and bake 18–22 minutes until a toothpick comes out clean. Cool in tin 10 minutes, then transfer to a wire rack to cool completely.
- Make buttercream by beating softened butter until pale, then gradually add powdered sugar. Tint with pink food coloring if desired.
- Frost each cooled cupcake with a thick layer of buttercream, smoothing the top. Place a character stencil on top of the frosting and dust with cocoa powder or matcha powder using a small sifter.
- Carefully lift the stencil straight up. Top each cupcake with a fresh strawberry piece if desired. Arrange on a platter.
Whirl Factor: Stenciled designs create a personalized, character-driven visual that feels thoughtful and playful—the technique is simple but the result looks professionally decorated.
Storage Note: Frost cupcakes up to 8 hours ahead and keep covered at room temperature. Apply stencil designs within 2 hours of serving to keep the powder crisp.
11. Mini Bento-Box Strawberry Cakes
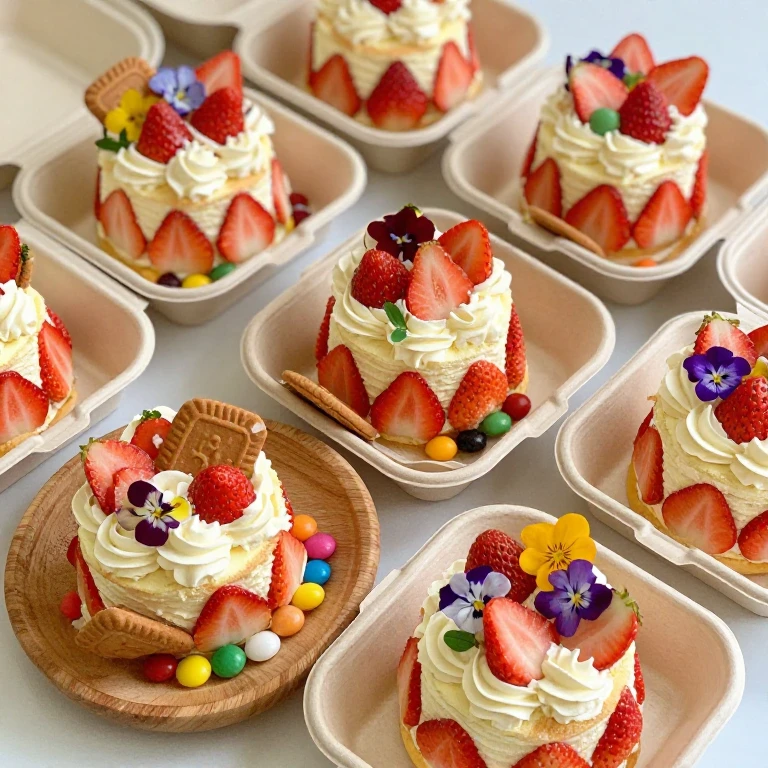
This concept is perfect for intimate gatherings or when you want individual servings that feel special. I bake small round cakes (using a muffin tin or small cake pans), then arrange them on individual small boards or plates with coordinating elements: a small dollop of whipped cream, fresh strawberries, a few cookies or candies, and edible flowers. Each person gets their own curated dessert experience.
Ingredients
- 1¾ cups all-purpose flour
- 1¾ teaspoons baking powder
- ¼ teaspoon salt
- ½ cup unsalted butter, softened
- ¾ cup granulated sugar
- 2 large eggs
- ⅓ cup whole milk
- ½ teaspoon vanilla extract
- ¼ cup fresh strawberries, pureed
- 1 cup heavy cream, cold
- 2 tablespoons powdered sugar
- 1 lb fresh strawberries, halved
- Optional: shortbread cookies, candies, edible flowers, mint leaves
Instructions
- Preheat oven to 350°F. Grease a 6-cup muffin tin or two 4-inch round cake pans. Whisk flour, baking powder, and salt.
- Cream butter and sugar until fluffy. Add eggs one at a time. Alternate milk and flour mixture in three additions. Stir in vanilla and strawberry puree.
- Divide batter among muffin cups or pans and bake 16–20 minutes (muffins) or 20–24 minutes (small cakes) until a toothpick comes out clean. Cool completely.
- Whip cold heavy cream with powdered sugar to stiff peaks.
- To assemble: place one cooled cake on a small board or plate. Add a dollop of whipped cream to one side. Arrange fresh strawberry halves, cookies, candies, and edible flowers around the cake in a bento-style layout.
- Repeat for each serving. Arrange boards on a table for guests to choose their preferred presentation, or pre-assemble all boxes and chill until serving time.
Whirl Factor: The bento-box concept transforms individual cakes into curated tasting experiences—guests get cake, cream, fresh fruit, and coordinating elements all at once, creating a multi-textured bite.
Make-Ahead Schedule: Bake small cakes up to 2 days ahead. Assemble bento boxes up to 4 hours before serving and keep chilled. Add whipped cream within 2 hours of serving for best texture.
12. Strawberry Shortcake Trifle Cups
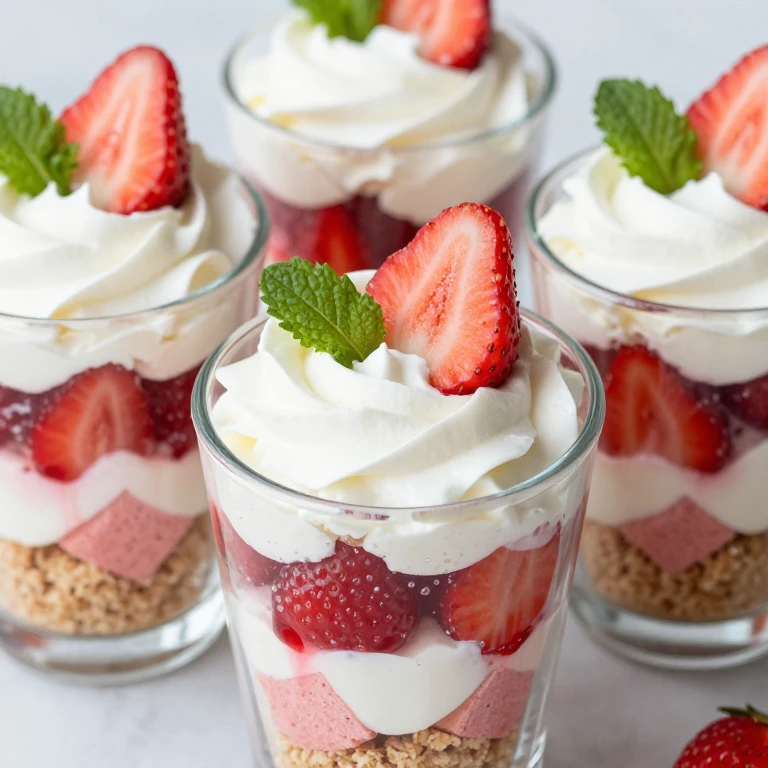
This is my favorite make-ahead option for parties. I’m layering cubed strawberry sponge cake, fresh strawberries macerated in a touch of sugar, whipped cream, and crushed shortbread cookies in individual glasses or jars. It’s essentially a deconstructed strawberry shortcake that you can prep hours ahead and guests can eat with a spoon right from the cup.
Ingredients
- 1¾ cups all-purpose flour
- 1¾ teaspoons baking powder
- ¼ teaspoon salt
- ½ cup unsalted butter, softened
- ¾ cup granulated sugar
- 2 large eggs
- ⅓ cup whole milk
- 1 teaspoon vanilla extract
- 1½ lbs fresh strawberries, hulled and sliced
- 3 tablespoons granulated sugar (for maceration)
- 2 cups heavy cream, cold
- 3 tablespoons powdered sugar
- 1 cup shortbread cookies, crushed
- Fresh mint leaves for garnish (optional)
Instructions
- Preheat oven to 350°F. Grease an 8-inch square cake pan. Whisk flour, baking powder, and salt.
- Cream butter and granulated sugar until fluffy. Add eggs one at a time. Alternate milk and flour mixture in three additions. Stir in vanilla.
- Pour into prepared pan and bake 22–26 minutes. Cool completely, then cut into small cubes.
- Toss sliced strawberries with 3 tablespoons granulated sugar and let sit 15 minutes to macerate and release juice.
- Whip cold heavy cream with powdered sugar to stiff peaks.
- In individual glasses or jars, layer in this order: crushed shortbread, cake cubes, macerated strawberries with juice, whipped cream. Repeat layers, ending with whipped cream and a strawberry slice on top. Garnish with mint if desired.
- Cover and refrigerate until serving time.
Whirl Factor: Layering in glasses creates visual appeal and flavor complexity in every spoonful—you get cake, fresh fruit, cream, and cookie crunch all together, and the components stay distinct because they’re not mixed.
Make-Ahead Tip: Assemble trifle cups up to 8 hours ahead and refrigerate covered. The cake absorbs strawberry juice slightly, making the layers even more flavorful as they sit.
When to Choose Each Style
Choosing the right strawberry cake design depends on your party size, timeline, and the vibe you’re creating. Here’s how I match cake style to situation:
- Ombré Pink Buttercream Layered Cake: Choose this when you want a single, dramatic centerpiece cake for 8–12 people and have time for a multi-layer assembly. It’s your go-to for dinner parties or milestone celebrations where the cake is the main dessert.
- Rainbow Sprinkle Confetti Layer Cake: Go here for kids’ parties or celebrations that lean into fun and color. The sprinkles-in-the-batter trick makes this feel special without requiring advanced decorating skills.
- Strawberry Piñata Cake: Pick this when you want a wow moment—the surprise center makes this feel interactive and memorable. It works for any age group and any party size up to 12 people.
- Sports-Field Sheet Cake: Choose this for larger crowds (12–20 people) and themed parties. It’s straightforward to decorate, scales easily, and the customizable field design makes it feel personalized.
- Mini Bento-Box Cakes: Go here for intimate gatherings (4–8 people) where you want each guest to feel specially treated. This style works beautifully for bridal showers, small family celebrations, or as part of a larger dessert spread.
- Strawberry Shortcake Trifle Cups: Choose this for maximum make-ahead flexibility and when you’re serving 6–12 people. You can assemble cups the morning of your party, and guests can eat directly from the glass with a spoon.
FAQ
Can I make any of these cakes gluten-free?
Yes, absolutely. For any of the cake layers, substitute all-purpose flour with a 1:1 gluten-free baking blend (King Arthur or Bob’s Red Mill both work well). You may need to add ½ teaspoon of xanthan gum per cup of flour if your blend doesn’t already contain it. The structure and moisture will be slightly different, but these cakes hold up beautifully with the right blend. Frostings, mousses, and whipped cream toppings are naturally gluten-free, so those layers require no adjustment.
How far in advance can I bake the cake layers?
Cake layers freeze beautifully for up to 1 month when wrapped tightly in plastic wrap and stored in airtight containers. Thaw at room temperature for about 2 hours before frosting. If you’re not freezing, layers stay fresh at room temperature for 1 day or refrigerated for 2 days. Frostings and mousses have different timelines: buttercream keeps 3 days refrigerated, whipped cream frosting is best used within 4 hours, and mousse layers should be assembled no more than 8 hours before serving.
What’s the best way to level cake layers?
I use a serrated knife or a cake leveler (a tool with adjustable wires that slides across the cake). The leveler is more consistent if you’re baking multiple layers, but a sharp serrated knife works fine if you take your time. Place the cake on a turntable, mark the height you want to cut with a toothpick around the perimeter, then slowly rotate the cake while carefully sawing horizontally. You want to remove just enough to create a flat surface without losing too much cake. Save the scraps—they’re perfect for cake crumbs to mix into frosting or for trifle layers.
How do I prevent strawberries from sliding off the cake?
Fresh strawberries slide when there’s nothing for them to grip. I use a small dab of frosting or jam on the back of each strawberry to anchor it to the cake. For piped or stacked arrangements, you can also insert a toothpick or small wooden skewer through the strawberry and into the cake, then remove it just before serving. If you’re using whipped cream frosting, the frosting itself is sticky enough to hold strawberries in place as long as you don’t move the cake around too much.
Can I use frozen strawberries instead of fresh?
For purees and jams (like the strawberry jam ribbon or the puree in the cake batter), frozen strawberries work great—they’re often more flavorful because they’re frozen at peak ripeness. Thaw them completely and drain excess liquid before using. For fresh strawberry garnishes and toppings, I always recommend fresh berries because they hold their shape and provide that textural contrast. Frozen strawberries become soft and weepy as they thaw, so they’re not ideal for decorative placement.
What’s the difference between a piñata cake and a surprise-center cake?
A piñata cake has a carved-out bowl in the cake itself that you fill with candies or toppings before stacking the layers. A surprise-center cake might have jam ribbons baked into the cake, a mousse layer sandwiched between cake layers, or a filling that’s revealed when you cut into it. The piñata is more about the dramatic reveal of loose items, while surprise-center cakes are about flavor and texture contrasts built into the structure.
How do I store leftover cake?
Storage depends on the frosting and filling. Buttercream-frosted cakes keep at room temperature for 3 days covered with a cake dome or plastic wrap. Mousse and whipped cream cakes must be refrigerated and are best within 2 days. Cheesecake mousse cakes don’t freeze well, but buttercream cakes freeze beautifully for up to 1 month if wrapped tightly. Trifle cups keep refrigerated for up to 2 days—the cake will absorb some strawberry juice, which actually improves the flavor as it sits.
Conclusion
These twelve strawberry birthday cake ideas give you options for every party size, skill level, and timeline. Whether you’re building an ombré masterpiece, hiding a surprise center, feeding a crowd with a sheet cake, or crafting individual bento-style servings, you’ve got a strategy that fits your celebration. Pick one, set your make-ahead schedule, and let the cake be the star of your party.